# SUPRA - Full Documentation > Supra is a full-stack, high-performance Layer 1 blockchain ecosystem with native oracles, verifiable randomness, automation, and cross-chain bridging. Supports both MoveVM and EVM smart contracts. Source: https://docs.supra.com --- ## Supra Layer 1 ### Source: https://docs.supra.com/overview # Overview One chain. Full developer stack. Supra is more than a Layer 1. It’s a full-stack, high-performance blockchain ecosystem built to support the next generation of decentralized applications. Whether you’re building DeFi, GameFi, AI/ML protocols, or cross-chain solutions, Supra provides the tools to move faster and scale with confidence. With ultra-fast finality, low-latency oracles, secure automation, and seamless bridging, Supra brings everything together in one vertically integrated platform. ### Native Oracles: Real-Time, Reliable, and Customizable Supra’s native oracle network brings unmatched speed and precision to on-chain data delivery. - **Data Feeds** – Pull and push-based price feeds with fast refresh rates and multi-source aggregation. - **dVRF (Distributed Verifiable Random Function)** – A next-gen dVRF system that delivers secure, provably fair randomness optimized for performance-critical applications like gaming, NFTs, lotteries, and more. --- ### Native Automation: Set-and-Forget Smart Contract Execution Supra's 0-block delay automation framework lets you schedule and trigger smart contract functions with zero upkeep. Built directly into the execution layer. - **Use Cases** – Automated liquidations, recurring payments, rebalancing strategies, yield harvesting, and more. - **Developer Friendly** – No external keepers or centralized intermediaries required. --- ### Native SupraNova Bridge: Fast, Secure, Modular Interoperability SupraNova is our flagship bridge — a secure, modular, and composable interoperability protocol that allows fast asset and message transfers between Supra and other ecosystems. Supporting two different bridging technologies based on use cases - **[HyperNova:](https://supra.com/documents/Supra-HyperNova-Whitepaper.pdf)** A trustless bridge protocol that uses the source chain’s consensus layer for event verification using validator signatures. - **[Hyperloop:](https://supra.com/documents/Supra-Hyperloop-Whitepaper.pdf)** A fast, multi-signature-based game-theoretically secure bridge designed for source chains for which HyperNova-style trustless bridging is not applicable or feasible or results in high latency (Layer 2 chains). ### Source: https://docs.supra.com/network-information # Network Information Relative network, faucet, and API details. ---- | ------------------------------- | -------- | | Mainnet | `https://rpc-mainnet.supra.com` | 8 | | Testnet | `https://rpc-testnet.supra.com` | 6 | ### Testnet Faucet ``` https://rpc-testnet.supra.com/rpc/v1/wallet/faucet/
``` --- ## Supra EVM | Network | Rest API | Chain ID | | ------------- | -------- | -------- | | RPC Info Soon | TBA | TBA | ### Faucet Coming soon... ### Source: https://docs.supra.com/useful-links # Useful Links Quick access to official resources, developer tools, and community channels. | Core Resources | Links | | ------------------------------------ | ---------------------------------------------------------------------------------------- | | **Official Website:** | [https://supra.com/](https://supra.com/) | | **Documentation (Network Details):** | [https://supra-documentation.com/network-information](/network/network-information) | | **Block Explorer:** | [https://suprascan.io/](https://suprascan.io/) | | **Faucet:** | [https://supra.com/faucet/](https://supra.com/faucet/) | | **StarKey Wallet** | [https://starkey.app/](https://starkey.app/) | | Developer Resources | Links | | ----------------------------- | ------------------------------------------------------------------------------ | | **Official GitHub:** | [https://github.com/Entropy-Foundation](https://github.com/Entropy-Foundation) | | **Dev Newsletter (DevWire):** | [https://hub.supra.com/devwire](https://hub.supra.com/devwire) | | **Developer Forum:** | [https://forum.supra.com/](https://forum.supra.com/) | | **Discord:** | [https://discord.com/invite/supralabs](https://discord.com/invite/supralabs) | | Social & Community | Links | | ------------------ | ------------------------------------------------------------------------------------------------ | | **X (Twitter):** | [https://x.com/SUPRA_Labs](https://x.com/SUPRA_Labs) | | **YouTube:** | [https://www.youtube.com/@SupraOfficial](https://www.youtube.com/@SupraOfficial) | | **LinkedIn:** | [https://www.linkedin.com/company/supraoracles/](https://www.linkedin.com/company/supraoracles/) | | **Reddit:** | [https://www.reddit.com/r/SupraLabs/](https://www.reddit.com/r/SupraLabs/) | | **Instagram:** | [https://www.instagram.com/supra.labs/](https://www.instagram.com/supra.labs/) | | **TikTok:** | [https://www.tiktok.com/@supra_labs](https://www.tiktok.com/@supra_labs) | | Company | Links | | ----------- | -------------------------------------------------------- | | **Careers** | [https://supra.com/careers/](https://supra.com/careers/) | | AI & LLM Resources | Links | | ------------------------------- | ------------------------------------------------------------------ | | **Documentation index (llms.txt):** | [https://docs.supra.com/llms.txt](https://docs.supra.com/llms.txt) | | **Full docs for LLMs (llms-full.txt):** | [https://docs.supra.com/llms-full.txt](https://docs.supra.com/llms-full.txt) | ### Source: https://docs.supra.com/moonshot # Moonshot Consensus Algorithm Moonshot is a family of high-performance Byzantine Fault Tolerant (BFT) consensus protocols designed for blockchain systems. ### Overview The Moonshot protocols aim to optimize chain-based rotating leader BFT consensus by achieving both low latency and high throughput. ### Key Features 1. Low Latency: Moonshot protocols achieve a minimum view change block period (ω) of δ and a minimum commit latency (λ) of 3δ, where δ is the network transmission latency. 2. Optimistic Responsiveness: Moonshot protocols make progress in time proportional to the actual network delay, independent of any known upper bound. 3. Reorg Resilience: Moonshot ensures that when an honest leader proposes after Global Stabilization Time (GST), one of its proposals becomes certified and is extended by every subsequently certified proposal. 4. Short View Length: Pipelined Moonshot and Commit Moonshot achieve a view length (τ) of 3Δ, where Δ is the known upper bound on network delay. 5. Pipelining: Some Moonshot variants implement pipelining to improve efficiency in certain network conditions. ### Variants 1. **Simple Moonshot:** The basic version with ω = δ, λ = 3δ, and reorg resilience. 2. **Pipelined Moonshot:** Improves upon Simple Moonshot with full optimistic responsiveness and τ = 3Δ. 3. **Commit Moonshot**: Further optimizes for scenarios where block proposals take longer to disseminate than votes. ![Moonshot Consensus diagram](/images/network/image-1-1.png)
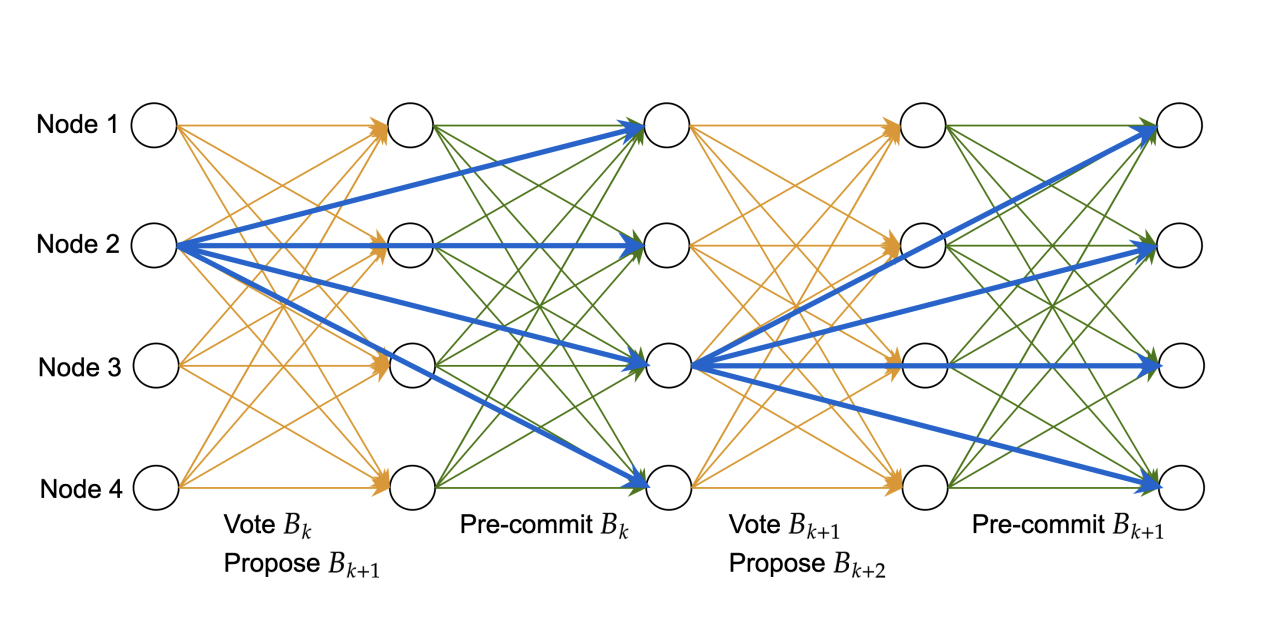
Explicit commit votes (pictured in green) enable Commit Moonshot to commit blocks sooner than its pipelined counterparts when block proposals (pictured in blue) take sufficiently longer to disseminate than votes.
1.**Direct Pre-commit:** When a node receives Cv(Bk) in any view v' where v' ≤ v: - If timeout_view < v, send out ⟨commit, H(Bk), v⟩ 2.**Indirect Pre-commit**: When a node receives Cv(Bk) in any view: - If it has already sent a commit vote for any descendant of Bk - And timeout_view < v - And it hasn't yet sent ⟨commit, H(Bk), v⟩ Then send out ⟨commit, H(Bk), v⟩ 3.**Alternative Direct Commit**: When a node receives commit messages from a quorum: - If the messages are ⟨commit, H(Bk), v⟩ from different nodes - In any view Then commit Bk ### Performance Moonshot protocols have been shown to outperform existing state-of-the-art protocols like Jolteon in both failure-free scenarios and the presence of failures. They achieve higher throughput and lower latency in wide-area networks of up to 200 nodes. ### Implementation Considerations While Moonshot protocols offer superior performance in many scenarios, they have higher communication complexity (O(n²)) compared to some linear protocols. Developers should consider the trade-offs between communication complexity and performance metrics like latency and throughput when choosing a consensus protocol for their specific use case. For detailed implementation guidelines and API references, please refer to the subsequent sections of this documentation. --- ## Supra MoveVM ### Source: https://docs.supra.com/network/move/overview # Overview Welcome to the Supra Move Layer 1 network documentation. Supra's MoveVM is a high-performance blockchain designed to support secure and scalable decentralized applications. As part of Supra's vertically integrated L1 ecosystem, MoveVM offers developers a robust platform to build and deploy applications using the Move programming language, renowned for its safety and efficiency. Incorporating native services such as oracles, verifiable randomness, automation, and cross-chain communication, Supra's MoveVM enables the creation of "Super dApps" that are both composable and performant. This documentation provides comprehensive resources to help you get started, from setting up the Supra CLI to deploying your first Move smart contract and dApp. Whether you're new to Move or an experienced developer, this guide will support you in harnessing the full potential of Supra's MoveVM. --- ### Source: https://docs.supra.com/network/move/getting-started # Getting Started Want to build on the Supra Move blockchain? You've come to the right place! We’ll take you through all you need to deploy your first Supra Move contract from scratch, all in four broad stages: 1. First, we will install docker and the Supra CLI. 2. Then we’ll complete the initial setup. 3. Then we’ll use the testnet faucet. 4. Finally, we’ll deploy your first Move contract on Supra. The Supra CLI includes easy commands for the Supra Move network that make it beginner friendly and easy to use. If you get stuck anywhere or face any issues, please reach out to us on [Discord](https://www.discord.gg/supralabs). For the latest RPC URL, please refer to the [Supra Network Information](/network/network-information) page. --- ### Source: https://docs.supra.com/network/move/getting-started/docker # Introduction to Docker Before installing the Supra CLI, you will need to install Docker. It’s helpful to understand what Docker is, how it works, and why we use it for this setup. This page includes some information that you will find useful once you move on to setting up the Supra CLI. *** ## Prerequisites * [ ] Install [Docker Desktop](https://www.docker.com/) ([Windows](https://docs.docker.com/desktop/setup/install/windows-install/), [Mac](https://docs.docker.com/desktop/setup/install/mac-install/), [Linux](https://docs.docker.com/desktop/setup/install/linux/)) *** ## What Is Docker? **Docker** is a platform that packages applications into lightweight, portable **containers**. These containers include everything an app needs to run: code, runtime, libraries, and environment variables. Think of containers as lightweight, isolated virtual machines — but more efficient and faster to start. *** ## Why Use Docker with the Supra CLI? Docker provides a consistent, repeatable environment that eliminates: * OS differences (Linux, Mac, Windows) * Dependency/version mismatches * “It works on my machine” issues With Docker, developers can run the **Supra CLI** in a pre-configured environment without needing to install the CLI or dependencies locally. *** ## What Is Docker Compose? **Docker Compose** is a tool used to define and run multi-container Docker applications using a YAML file (`compose.yaml` or `docker-compose.yml`). YAML is a human-readable data serialization language. It is commonly used for configuration files. In our case, the Compose file: * Defines the container configuration for the Supra CLI * Specifies the image to use * Sets up **bind mounts** to share files between your machine and the container *** ## Bind Mounts A **bind mount** is a way to share directories between your host machine and the container. In the Supra CLI setup: * The `supra/configs` folder on your host is bind-mounted to the `configs/` folder inside the container. * The `supra/move_workspace` folder on your host is bind-mounted to the `move_workspace/` folder inside the container. * This means anything you create/do inside these folders within the container will appear on your host — and vice versa. Example: `~/Documents/supra/configs ↔ /supra/configs` *** ## Entering the Shell of a Container Once you proceed with the CLI setup, you'll create a docker container containing the CLI binary. To interact with the CLI, you'll need to enter into the shell of the container. When a docker container is running, you can open a terminal session _inside_ of it using: ```bash docker exec -it supra_cli /bin/bash ``` * `exec` tells Docker to run a command inside an existing container. * `-it` allows interactive terminal input/output. * `supra_cli` is the name of the container. * `/bin/bash` starts a shell session. This is useful when you want to: * Run the Supra CLI directly (`supra move tool ...`) * Explore the file system * Debug issues inside the container Make sure the container is running first:\ Use `docker start supra_cli` if needed. *** ## Common Docker Commands Some of these commands may come in handy later. | Command | Description | | --------------------------------------- | ------------------------------------------ | | `docker ps --all` | Lists all containers (running and stopped) | | `docker start ` | Starts an existing container | | `docker stop ` | Stops a running container | | `docker exec -it /bin/bash` | Enters the shell of a container | | `docker logs ` | Prints logs from a container | | `docker rm ` | Removes a container | | `docker images` | Lists downloaded Docker images | | `docker volume ls` | Lists Docker volumes (persistent storage) | *** ## Common Docker Compose Commands Some of these commands may come in handy later. | Command | Description | | ------------------------ | ----------------------------------------------------- | | `docker compose up -d` | Starts containers in detached (background) mode | | `docker compose down` | Stops and removes containers, networks, and volumes | | `docker compose ps` | Lists containers defined in your Compose file | | `docker compose logs` | Shows logs from all Compose services | | `docker compose restart` | Restarts all services defined in the Compose file | | `docker compose pull` | Pulls the latest versions of images from the registry | | `docker compose build` | Builds or rebuilds services defined in the file | You can also use `docker compose -f ` to specify a compose file, including remote files via `curl ... | docker compose -f - up`. *** ## Summary Docker simplifies the Supra CLI experience by: * Eliminating setup headaches * Ensuring all developers use the same runtime * Providing isolated environments with shared config folders If you're new to Docker, this may feel like a lot — but once set up, you’ll rarely need to modify it again. *** ## Want to Learn More? * [Docker Overview (Official Docs)](https://docs.docker.com/get-started/overview/) * [Docker Compose Overview](https://docs.docker.com/compose/) * [Docker Bind Mounts](https://docs.docker.com/storage/bind-mounts/) ### Source: https://docs.supra.com/network/move/getting-started/supra-cli-with-docker # Setup Supra CLI Installation of the Supra CLI using Docker. On May 2nd, 2025 a new version of the CLI was released. To update your CLI to the latest version, please repeat the steps below. ## Prerequisites - [ ] Install [Docker Desktop](https://www.docker.com/) ([Windows](https://docs.docker.com/desktop/setup/install/windows-install/), [Mac](https://docs.docker.com/desktop/setup/install/mac-install/), [Linux](https://docs.docker.com/desktop/setup/install/linux/)) - [ ] If you are new to Docker, review the [Introduction to Docker](docker) page The installation process of Docker is straight forward and requires no additional configuration. The only requirement to proceed is to ensure the [Docker Daemon](https://docs.docker.com/engine/daemon/start/) is running. If you installed Docker Engine, opening the program will start the daemon. ## Install and Setup the CLI ### Start the container with Docker Compose Open your terminal and `cd` to the directory on your machine where you wish to setup the CLI. For convenience, we recommend placing it within the `Documents` directory. However, this is entirely arbitrary and there will be no repercussions for choosing differently. execute me!
```bash cd Documents ```
The following command will use the latest compose file (which you can [view here](https://github.com/Supra-Labs/supra-dev-hub/blob/main/Scripts/cli/compose.yaml)) and pipe it into the [Docker Compose command](docker.md#what-is-docker-compose). This will pull the latest image, create, and start the container.\ \ Please note that the following command will create a `supra` directory within your current working directory if one does not already exist. execute me!
```bash curl https://raw.githubusercontent.com/supra-labs/supra-dev-hub/refs/heads/main/Scripts/cli/compose.yaml | docker compose -f - up -d ```
You can confirm that the container is running by executing `docker ps --all`. This command will output all docker containers that exist on your machine, whether they are running or stopped. ### Enter the shell of the container To interact with the Supra CLI, we must enter the shell of the container. This will allow us to execute commands within the container from our host machine. execute me!
```bash docker exec -it supra_cli /bin/bash ```
Once inside, execute the `ls` command to gain a simple understanding of the file system. The displayed `configs` directory is bind mounted to the `/supra/configs` directory on your host machine. These directories are shared/linked between your host machine and the container.
![Supra CLI Docker setup](/images/network/move/enter-the-shell-of-the-container.png) Note: "supra" is the CLI binary within the container. \ The compose file automatically setup the alias to interact with the binary using the "supra" command.
### Execute the `supra` command
![Supra CLI Docker terminal](/images/network/move/execute-the-supra-command.jpeg) Example output of the "supra" command
Within the shell of the container, CLI commands operate in the same manner as you would expect on your host machine. For example, executing commands such as `supra move tool init` will initialize the new module within your current working directory. You may view all available arguments of any command by passing the `--help` argument. Example: `supra move tool init --help`
### Source: https://docs.supra.com/network/move/getting-started/create-a-supra-account # Create a Supra Account Generate a key profile and view the public/private keys for use by the Supra CLI. On May 2nd, 2025 a new version of the CLI was released. The new image (v9.0.12) introduced an improved profile feature which deprecated the key command of the previous version (v6.3.0) along with an update to the key file structure. If you have just upgraded, you must execute the following command to migrate your key files to the new version: `supra profile migrate` After migration, you must modify the profiles as shown in step 3. ### Generate a new key/profile Execute the following command to generate a new profile/set of keys. execute me!
```bash supra profile new accountA --network testnet ```
### Or Import an existing key/profile If you already have a private key on hand that you wish to use, you can opt to import it rather than generating a new one. To import an existing private key, use the following command: Profile names must be unique. If you attempt to generate or import a profile using a name that has already been taken, the CLI will throw an error. ``` supra profile new accountA --network testnet ```
--- ## Additional Commands ##### Modify the profile: `supra profile modify` The new version of profiles contain the `rpc_url`, `faucet_url`, and `chain_id` associated with the profile. CLI commands will use the stored values of the calling profile for the respective command parameters unless manually overwritten. The above commands to create a new profile or import an existing profile will set the initial values to that of the testnet. If you wish to use the profile on mainnet, you must modify the profile with the mainnet values.\ \ To modify a profile, use the following command with the desired network: ``` supra profile modify accountA --network ``` ##### Change the active profile: `supra profile activate` CLI commands will be executed from the active profile. To activate another profile, use the following command: ``` supra profile activate accountA ``` ##### View stored profile public keys: `supra profile -l` The active profile will be displayed with a `(*)` by the profile name. If you wish to view existing keys within your current directory, use the following command: ``` supra profile -l ``` ##### View stored profile private keys: `supra profile -l -r` This will print the private keys of all profiles to your terminal. Make sure you are not live streaming, recording, screensharing, etc. before executing this command to prevent compromising your keys. If you wish to view the private key of your profile(s), use the following command: ``` supra profile -l -r ``` ### Source: https://docs.supra.com/network/move/getting-started/create-a-move-package # Create a Move Package Create and deploy your first move module. ## Initialize your move package ### Create a new Move package
execute me!
```bash supra move tool init --package-dir /supra/move_workspace/exampleContract --name exampleContract ```
This will create your project directory automatically, including a `Move.toml` file. This is a manifest file that contains important metadata about your package. This includes the package name, version, dependencies, named addresses, and more. The `SupraFramework` dependency is automatically populated. This framework includes core components that you will interact with during your time on Supra. The framework package includes clearly defined documentation within the `/doc` directory for you to review alongside the Move code within the `/sources` directory. You can view [this package here](https://github.com/Entropy-Foundation/aptos-core/tree/dev/aptos-move/framework/supra-framework). move.toml
```toml [package] name = "exampleContract" version = "1.0.0" authors = [] [addresses] [dev-addresses] [dependencies.SupraFramework] git = "https://github.com/Entropy-Foundation/aptos-core.git" rev = "dev" subdir = "aptos-move/framework/supra-framework" [dev-dependencies] ```
### Update the named addresses Open the `move.toml` file with your code editor. You can find these files on your host machine in the `/Documents/supra/move_workspace/exampleContract` directory if you followed this setup guide. For now, add the below named address to your `Move.toml` file and set the value to your address. You can view the address of your profiles by executing: `supra profile -l` ```toml [addresses] hello_blockchain ="YOUR-ADDRESS-HERE" ``` Named addresses allow identifiers such as `@hello_blockchain` to be used throughout your package, rather than hard coding an address value. When compiled into bytecode, any occurrence of the identifier such as `@hello_blockchain` will be replaced with the value set within the `move.toml` file.
### Source: https://docs.supra.com/network/move/getting-started/create-a-move-package/write-a-module # Write a Module Create and deploy your first move module. If you have not already, open your newly initiatlized project within your code editor of choice on your host machine. Remember, the `move_workspace` directory within the container is bound to the `/supra/move_workspace` directory on your host machine. Any changes made to these files on the host machine will be reflected within the container. \ If you are using VS Code, we highly recommend that you[ install the Supra Move extension](../../supra-move-vs-code-extension). ### Create a new move file within the `sources` directory. In Move, global storage is a forest with trees rooted at an account address. Accounts can store both resource data and module code. Modules are deployed to an account, rather than a unique address being generated at deployment as you may be custom to with other VMs. The sources directory holds the move modules that you will be working on within your project. Within the `sources` directory of your `exampleContract` package, create the `hello_blockchain.move` file.
execute me!
```bash echo > /supra/move_workspace/exampleContract/sources/hello_blockchain.move ```
Once created, open the hello_blockchain.move file within your code editor and add the following code.
hello_blockchain.move
```rust module hello_blockchain::message { use std::error; use std::signer; use std::string; use supra_framework::event; //:!:>resource struct MessageHolder has key { message: string::String, } //<:!:resource #[event] struct MessageChange has drop, store { account: address, from_message: string::String, to_message: string::String, } /// There is no message present const ENO_MESSAGE: u64 = 0; #[view] public fun get_message(addr: address): string::String acquires MessageHolder { assert!(exists(addr), error::not_found(ENO_MESSAGE)); borrow_global(addr).message } public entry fun set_message(account: signer, message: string::String) acquires MessageHolder { let account_addr = signer::address_of(&account); if (!exists(account_addr)) { move_to(&account, MessageHolder { message, }) } else { let old_message_holder = borrow_global_mut(account_addr); let from_message = old_message_holder.message; event::emit(MessageChange { account: account_addr, from_message, to_message: copy message, }); old_message_holder.message = message; } } #[test(account = @0x1)] public entry fun sender_can_set_message(account: signer) acquires MessageHolder { let addr = signer::address_of(&account); supra_framework::account::create_account_for_test(addr); set_message(account, string::utf8(b"Hello, Blockchain")); assert!( get_message(addr) == string::utf8(b"Hello, Blockchain"), ENO_MESSAGE ); } } ```
### Source: https://docs.supra.com/network/move/getting-started/create-a-move-package/compile-and-publish # Compile and Publish Create and deploy your first move module. It is good practice to review the possible arguments of each command before you execute them. You can do this by passing the `--help` argument. Example: `supra move tool publish --help` For the latest RPC URL, please refer to the [Supra Network Information](/network/network-information) page. ### Compile your package You do not need to pass the `--package-dir` command if your current working directory is the root of your package where the `Move.toml` file is located. Compiling your package will fetch any dependencies defined in your `Move.toml` file before building your package. A new directory named `build` will be created storing the bytecode and sources for your package.
execute me!
```bash supra move tool compile --package-dir /supra/move_workspace/exampleContract ```
### Get Testnet Supra from the faucet Note that CLI commands will be executed from the currently activated profile within your CLI. If you want to execute the command from a different profile, you can pass the `--profile` argument or you can activate a different profile with `supra key activate-profile accountB`. To publish our package, we will need some gas. Obtain some Testnet gas from the faucet to proceed. Testnet tokens do not hold any monetary value. execute me!
```bash supra move account fund-with-faucet --rpc-url https://rpc-testnet.supra.com ```
Note, there is no faucet for Mainnet. If you are looking to deploy on Mainnet, you will have to obtain Supra separately. ### Deploy your package Once your package is compiled and you have tokens to cover the gas, execute the following command to publish your package to the network. execute me!
```bash supra move tool publish --package-dir /supra/move_workspace/exampleContract --rpc-url https://rpc-testnet.supra.com ```
### Source: https://docs.supra.com/network/move/getting-started/create-a-move-package/interact-with-a-package # Interact with a Package Create and deploy your first move module. ## Interacting with your module The `hello_blockchain` module stores a string at an account within the `MessageHolder` resource of the calling account that can later be retrieved. To try interacting with the contract we will: 1. Call `set_message` to store a string on-chain 2. Call `get_message` to view the stored message on-chain ### Store a string/message on-chain Replace the place holder values denoted by `<>` with your account address before executing the commands.
replace & execute me!
``` supra move tool run --function-id '::message::set_message' --args string:"Hello world!" --rpc-url https://rpc-testnet.supra.com ```
### View the string/message stored on-chain
replace & execute me!
``` supra move tool view --function-id '::message::get_message' --args address: --rpc-url https://rpc-testnet.supra.com ```
### Final step: [Join our Discord](https://discord.gg/supralabs)!
## Commands used to interact with modules ##### Calling a view function: `supra move tool view` The `view` command is used to call `view` functions, which do not change the state of the VM in any way. View functions are denoted with `#[view]` above the function declaration. Expects the two following arguments:\ `--function-id` which designates the function to be called. The format is as follows: `MODULE_ADR::MODULE_NAME::FUNCTION_NAME` `--args` which designates the arguments to be passed to the function. If multiple parameters must be passed, they are separated by spaces. The format is as follows: `TYPE:VALUE` Execute the following command to better understand the arguments of the command. ```bash supra move tool view --help ``` ##### Executing an entry function: `supra move tool run` The `run` command is used to call `entry` functions, which result in some transaction. `Entry` functions are your gateway to interacting with modules. We are unable to call functions without the `entry` declaration. Expects the two following arguments:\ `--function-id` which designates the function to be called. The format is as follows: `MODULE_ADR::MODULE_NAME::FUNCTION_NAME` `--args` which designates the arguments to be passed to the function. If multiple parameters must be passed, they are separated by spaces. The format is as follows: `TYPE:VALUE` Execute the following command to better understand the arguments of the command. ```bash supra move tool run --help ``` ### Source: https://docs.supra.com/network/move/getting-started/your-first-dapp-with-starkey # Create a dApp with StarKey Create your first Dapp using StarKey wallet, the official wallet of Supra ## Setup the project #### Initialize the frontend ``` npx create-react-app supra-dapp --template typescript ``` #### Navigate into the project directory ``` cd supra-dapp ``` #### Install the TypeScript SDK ``` npm install supra-l1-sdk ``` ## Start building #### Open the `App.tsx` file and update it Remove the template code and replace it with the code below. This will give us a fresh foundation to work with. ```typescript function App() { return
; } export default App; ``` #### Import dependencies We'll be utilizing the react library along with useful functions from the `supra-l1-sdk`. ```typescript ``` #### Initialize the `supraProvider` and state hooks `supraProvider` - used to interact with StarKey wallet. `isStarKeyInstalled` - boolean value of StarKey extension installation status `accounts` - Array of connected accounts `networkData` - Chain ID for the connected network ```typescript function App() { let supraProvider: any = typeof window !== "undefined" && (window as any)?.starkey?.supra; const [isStarkeyInstalled, setIsStarkeyInstalled] = useState(!!supraProvider); const [accounts, setAccounts] = useState([]); const [networkData, setNetworkData] = useState(); return
; } ``` All code from this step forward will be included within the `App()` function. #### Check for the injected StarKey object The following code checks for the injected StarKey object every 500ms for up to 5 seconds. If found, the function will update the StarKey installation status and obtain the connected accounts. ```typescript const checkForStarkey = () => { const intervalId = setInterval(() => { if ((window as any)?.starkey) { supraProvider = (window as any)?.starkey.supra; clearInterval(intervalId); setIsStarkeyInstalled(true); updateAccounts().then(); } }, 500); setTimeout(() => { clearInterval(intervalId); }, 5000); }; useEffect(() => { checkForStarkey(); }, []); ``` #### Get the connected accounts The following code obtains the connected accounts (if any) and stores them. ```typescript const updateAccounts = async () => { if (supraProvider) { try { const response_acc = await supraProvider.account(); if (response_acc.length > 0) { setAccounts(response_acc); } else { setAccounts([]); } } catch (e) { setAccounts([]); } getNetworkData().then(); } }; ``` #### Get the connected network data The following code obtains the network data (chain id) of the connected wallet. ```typescript const getNetworkData = async () => { if (supraProvider) { const data = await supraProvider.getChainId(); console.log(data); if (data) { setNetworkData(data) } } }; ``` #### Initialize additional hooks The following code will assist in maintaining updated network/account data while also handling events emitted by the injected StarKey object. ```typescript useEffect(() => { if (supraProvider) { supraProvider.on("accountChanged", (acc: string[]) => { setAccounts(acc); }); supraProvider.on("networkChanged", (data: any) => { setNetworkData(data); }); supraProvider.on("disconnect", () => { resetWalletData(); }); } }, [supraProvider]); useEffect(() => { if (accounts) { getNetworkData().then(); } }, [accounts]); ``` #### Handle wallet connections The following code will handle the wallet connections, triggered through a button click (which we will setup later) or an emitted event from the StarKey object. When a wallet is connected, the accounts must be updated. When a wallet is disconnected, we must clear the stored accounts and network data. ```typescript const connectWallet = async () => { const response = await supraProvider.connect(); updateAccounts().then(); }; const disconnectWallet = async () => { if (supraProvider) { await supraProvider.disconnect(); } resetWalletData(); }; const resetWalletData = ()=>{ setAccounts([]); setNetworkData({}); } ``` #### Switch between mainnet and testnet The following code will be triggered through a button click to prompt the user to switch between mainnet and testnet ```typescript const switchToTestnet = async (id:string) => { if (supraProvider) { await supraProvider.changeNetwork({chainId:"6"}); await getNetworkData() } }; const switchToMainnet = async () => { if (supraProvider) { await supraProvider.changeNetwork({chainId:"8"}); await getNetworkData() } }; ``` #### Send a transaction The following code creates a raw payload that calls the `transfer` function of the `supra_account` module. Once the raw transaction payload is created, it uses the `supraProvider.sendTransaction` function to prompted the connect wallet to sign and submit.\ \ It will transfer `1 supra` to the address `0x8de4158b48633d853186d5fc790718e5821d7d3c4855e06bcd97b105389a7d0f` . ```typescript const sendRawTransaction = async () => { const txExpiryTime = (Math.ceil(Date.now() / 1000) + 30) //30 seconds /** OptionalTransactionPayloadArgs { maxGas?: bigint; gasUnitPrice?: bigint; txExpiryTime?: bigint; }*/ const optionalTransactionPayloadArgs = { txExpiryTime } const rawTxPayload = [ accounts[0], 0, "0000000000000000000000000000000000000000000000000000000000000001", "supra_account", "transfer", [], [ new HexString("0x8de4158b48633d853186d5fc790718e5821d7d3c4855e06bcd97b105389a7d0f").toUint8Array(), BCS.bcsSerializeUint64(100000000) ], optionalTransactionPayloadArgs ]; const data = await supraProvider.createRawTransactionData(rawTxPayload); if (data) { const params = { data: data, /*from: accounts[0], to: "", chainId: networkData.chainId, value: "100000000",*/ }; const txHash = await supraProvider.sendTransaction(params); } }; ``` #### Create the buttons displayed on the frontend The following code renders buttons on the frontend that will interact with the above functions. ```typescript return

Connected Account(s): {JSON.stringify(accounts)}

Network Data: {JSON.stringify(networkData)}


; ``` #### That's it! Run your project ``` npm start ``` #### Final code for `App.tsx` ```typescript function App() { let supraProvider: any = typeof window !== "undefined" && (window as any)?.starkey?.supra; const [isStarkeyInstalled, setIsStarkeyInstalled] = useState(!!supraProvider); const [accounts, setAccounts] = useState([]); const [networkData, setNetworkData] = useState(); const checkForStarkey = () => { const intervalId = setInterval(() => { if ((window as any)?.starkey) { supraProvider = (window as any)?.starkey.supra; clearInterval(intervalId); setIsStarkeyInstalled(true); updateAccounts().then(); } }, 500); setTimeout(() => { clearInterval(intervalId); }, 5000); }; useEffect(() => { checkForStarkey(); }, []); const getNetworkData = async () => { if (supraProvider) { const data = await supraProvider.getChainId(); console.log(data); if (data) { setNetworkData(data) } } }; const updateAccounts = async () => { if (supraProvider) { try { const response_acc = await supraProvider.account(); if (response_acc.length > 0) { setAccounts(response_acc); } else { setAccounts([]); } } catch (e) { setAccounts([]); } getNetworkData().then(); } }; useEffect(() => { if (supraProvider) { supraProvider.on("accountChanged", (acc: string[]) => { setAccounts(acc); }); supraProvider.on("networkChanged", (data: any) => { setNetworkData(data); }); supraProvider.on("disconnect", () => { resetWalletData(); }); } }, [supraProvider]); useEffect(() => { if (accounts) { getNetworkData().then(); } }, [accounts]); const resetWalletData = ()=>{ setAccounts([]); setNetworkData({}); } const connectWallet = async () => { const response = await supraProvider.connect(); updateAccounts().then(); }; const disconnectWallet = async () => { if (supraProvider) { await supraProvider.disconnect(); } resetWalletData(); }; const switchToTestnet = async () => { if (supraProvider) { await supraProvider.changeNetwork({chainId:"6"}); await getNetworkData() } }; const switchToMainnet = async () => { if (supraProvider) { await supraProvider.changeNetwork({chainId:"8"}); await getNetworkData() } }; const sendRawTransaction = async () => { const txExpiryTime = (Math.ceil(Date.now() / 1000) + 30) //30 seconds /** OptionalTransactionPayloadArgs { maxGas?: bigint; gasUnitPrice?: bigint; txExpiryTime?: bigint; }*/ const optionalTransactionPayloadArgs = { txExpiryTime } const rawTxPayload = [ accounts[0], 0, "0000000000000000000000000000000000000000000000000000000000000001", "supra_account", "transfer", [], [ new HexString("0x8de4158b48633d853186d5fc790718e5821d7d3c4855e06bcd97b105389a7d0f").toUint8Array(), BCS.bcsSerializeUint64(100000000) ], optionalTransactionPayloadArgs ]; const data = await supraProvider.createRawTransactionData(rawTxPayload); if (data) { const params = { data: data, /*from: accounts[0], to: "", chainId: networkData.chainId, value: "100000000",*/ }; const txHash = await supraProvider.sendTransaction(params); } }; return

Connected Account(s): {JSON.stringify(accounts)}

Network Data: {JSON.stringify(networkData)}


; } export default App; ```
### Source: https://docs.supra.com/network/move/getting-started/testnet-faucet # Testnet Faucet #### Using Supra CLI For the latest RPC URL, please refer to the [Supra Network Information](/network/network-information) page. Option 1: Using account profile. ``` supra move account fund-with-faucet --profile --url ``` Option 2: Using account address. ``` supra move account fund-with-faucet --account
--url ``` Example Output: ```json { "Accepted": "TXN-HASH" } ``` #### Using GET request Make a GET call to the faucet endpoint by inserting your address into the following URL. ``` https://rpc-testnet.supra.com/rpc/v1/wallet/faucet/ ``` Example Output: ```json { "Accepted": "TXN-HASH" } ``` #### Using [StarKey Wallet](https://www.starkey.app) - Select Testnet from the network dropdown. - Select the Supra token from the asset list. - Press the "Collect" faucet button. ### Source: https://docs.supra.com/network/move/network-information # Network Information Relative network, faucet, and API details. ---- | ------------------------------- | -------- | | Mainnet | `https://rpc-mainnet.supra.com` | 8 | | Testnet | `https://rpc-testnet.supra.com` | 6 | #### Testnet Faucet `https://rpc-testnet.supra.com/rpc/v1/wallet/faucet/
` --- ### ​[Supra EVM](https://app.gitbook.com/s/c4EYjCJ7ng67f48XRDDD/network-information#supra-evm)​ | Network | Rest API | Chain ID | | ------------- | -------- | -------- | | RPC Info Soon | TBA | TBA | #### EVM Faucet Coming soon... ### Source: https://docs.supra.com/network/move/token-standards # Token Standards ## Fungible Token Standards The migration feature of Coin to Fungible Asset is currently disabled. | Standard Name | Module Address | Links | | ------------------------------------------- | ------------------------------------------------------------------------------- | ------------------------------------------------------------------------------------------------------------------------------------------------------------------------------------------------------------------------------------------------------------------- | | [Fungible Asset](https://suprascan.io/fa) | [0x1](https://suprascan.io/address/0x1/f?tab=modules&moduleName=fungible_asset) | [Module](https://github.com/Entropy-Foundation/aptos-core/blob/dev/aptos-move/framework/supra-framework/sources/fungible_asset.move) / [Docs](https://github.com/Entropy-Foundation/aptos-core/blob/dev/aptos-move/framework/supra-framework/doc/fungible_asset.md) | | [Coin (Legacy)](https://suprascan.io/coins) | [0x1](https://suprascan.io/address/0x1/f?tab=modules&moduleName=coin) | [Module](https://github.com/Entropy-Foundation/aptos-core/blob/dev/aptos-move/framework/supra-framework/sources/coin.move) / [Docs](https://github.com/Entropy-Foundation/aptos-core/blob/dev/aptos-move/framework/supra-framework/doc/coin.md) | ## Non-Fungible Token Standards | Standard Name | Module Address | Links | | -------------- | ---------------------------------------------------------------------- | --------------------------------------------------------------------------------------------------------------------------------------------------------------------------------------------------------------------------------------------------------- | | Digital Asset | [0x4](https://suprascan.io/address/0x4/f?tab=modules&moduleName=token) | [Module](https://github.com/Entropy-Foundation/aptos-core/blob/dev/aptos-move/framework/aptos-token-objects/sources/token.move) / [Docs](https://github.com/Entropy-Foundation/aptos-core/blob/dev/aptos-move/framework/aptos-token-objects/doc/token.md) | | Token (Legacy) | [0x3](https://suprascan.io/address/0x3/f?tab=modules&moduleName=token) | [Module](https://github.com/Entropy-Foundation/aptos-core/blob/dev/aptos-move/framework/aptos-token/sources/token.move) / [Docs](https://github.com/Entropy-Foundation/aptos-core/blob/dev/aptos-move/framework/aptos-token/doc/token.md) | ### Source: https://docs.supra.com/network/move/learn-move # Learn Move 101 Want to learn Move with real examples? Start building today! Here you'll find hands-on Move examples covering smart contracts, asset management, and on-chain logic. Learn by doing with clear, practical guides. borrow_global reads a resource struct from a specific address without a signer, but the function must declare acquires ResourceName. } href="learn-move/reading-resource-data-with-borrow_global" /> vector::push_back adds elements to a vector using a mutable reference (&mut), allowing dynamic storage updates. } href="learn-move/adding-elements-with-vector-push_back" /> ### Source: https://docs.supra.com/network/move/learn-move/move-101 # Getting Started with Move New to Move? Start here with the basics! Learn the fundamentals of the Move programming language with simple, step-by-step examples. This section covers key concepts like integers, math operations, and more, helping you build a solid foundation for smart contract development. --- For the latest RPC URL, please refer to the [Supra Network Information](/network/network-information) page. ## Getting Started with Move Move code is organized into modules that are uploaded to the Supra blockchain. Users can interact with the modules by calling functions from these modules via transactions. Modules are grouped into packages. When uploading code to the blockchain, an entire package of multiple modules will be uploaded. Each Move module has a unique identifier comprising the address it's deployed at and the module name. The fully qualified name is of the format `
::` ```toml module 0xcafe::Dinosaur_nest { } ``` **We'll create a DinosaurNest contract with the following features:** Keep track of all the Dinosaurs it has spawned. Birth new Dinosaurs via a function We'll generate a special Gendna code every time a Dinosaur is spawned to create unique genetics for each Dinosaur. The special abilities genetic code has digits and looks like below: `1234567890` This special Gendna code represents each Dinosaur's unique attributes, with every 2 digits representing one, such as shirts, hats, and glasses. Later, you can have more fun and add new attributes by adding more digits to the special abilities code. Let's start by adding a number to track the number of digits allowed in a Gendna code. This number will be stored on the blockchain (global storage). This data can be accessed and changed by the module's code as well as read by web UI. On Supra, all data written to the blockchain needs to be declared in a struct that has the key attribute. For now, take a look at the simple example below: ```toml module 0xcafe::Dinosaur_nest { // All structs that are written to blockchain need to have the `key` attribute. struct DinosaurGendna has key { Gendna_digits: u64, } } ``` In the example above, we're storing a simple value (`Gendna_digits`) in global storage. This value can be read in functions later. One common confusion is between global storage and local variables. Unless explicitly declared in `struct` the `key` attribute, all variables declared and modified in a function are local variables and thus not stored on the blockchain (in global storage). Also, note that the struct name is capitalized by convention (`DinosaurGendna` instead of `Dinosaur_Gendna`). ### Source: https://docs.supra.com/network/move/learn-move/unsigned-integers-in-move # Unsigned Integers in Move Learn how Move handles different unsigned integer types, their use cases, and how they impact storage, performance, and gas efficiency. For the latest RPC URL, please refer to the [Supra Network Information](/network/network-information) page. ## Unsigned Integers: u8, u32, u64, u128, u256 Move supports multiple different types of unsigned integers. The values of these integers are always zero or larger. The different types of integers have different maximum values they can store. For example, `u8` can store values up to 255, while `u256` can store values up to 2^256 - 1. The most commonly used integer type is `u64`. Smaller types such as `u8` and `u32` are usually only used to save on gas (less storage space used). Larger sizes such as `u128` and `u256` are only used for when you need to store very large numbers. Now that we have defined the `DinosaurGendna` struct, we need to set its initial value. We can’t set the initial value directly when defining a `struct`, so we'll need to create a function to do that. Recall that structs can be stored directly in global storage on Supra. Structs stored in global storage are called Resources. Each Resource needs to be stored at a specific address. This can be the same address where the module is deployed or any other user address. This is different from other blockchains - code and data can coexist at the same address on Supra. For our `Dinosaur_nest module`, we'll keep it simple and store the `DinosaurGendna` resource at the same address as the module. Let’s initialize it by writing the `init_module` function, where we get access to the signer of the address we're deploying to. `init_module` is called when the module is deployed to the blockchain and is the perfect place for initializing data. Don't worry about what a signer is for now - we'll cover that in later lessons. You just need to know that the signer is required to create and store a new resource at an address the first time. Moving on with our code: ```toml module 0xcafe::Dinosaur_nest { struct DinosaurGendna has key { Gendna_digits: u64, } fun init_module(cafe_signer: &signer) { move_to(cafe_signer, DinosaurGendna { Gendna_digits: 10, }); } } ``` In the example above, we're creating a new `DinosaurGendna` resource with a default value (`Gendna_digits`) of 10 (our Gendna Value as shared earlier) and storing it at 0xcafe (same address as the module) with `move_to`. `move_to is` a special function that requires a signer that can be called to store a resource at a specific address. ### Source: https://docs.supra.com/network/move/learn-move/math-operations-in-move # Math Operations in Move Move supports familiar math operations with integer-based precision, requiring typecasting for calculations between different unsigned integer types. For the latest RPC URL, please refer to the [Supra Network Information](/network/network-information) page. ## Math in Move Doing math in Move is easy and very similar to other programming languages: - Add: `x + y` - Subtract: `x - y` - Multiply: `x * y` - Divide: `x / y` - Mod: `x % y` - Exponential: `x ^ y` Note: This is integer math, which means results are rounded down. For example, `5 / 2 = 2` To make sure our Dinosaur's Gendna is only 10 digits, let's make another `u64` value equal to 10^10. That way we can later use the modulus operator `%` to create valid Gendna codes from any randomly generated numbers. Create another integer value named `Gendna_modulus` in the DinosaurGendna struct, and set it equal to 10 to the power of `Gendna_digits` ```toml module 0xcafe::Dinosaur_nest { struct DinosaurGendna has key { Gendna_digits: u64, Gendna_modulus: u64, } fun init_module(cafe_signer: &signer) { move_to(cafe_signer, DinosaurGendna { Gendna_digits: 10, Gendna_modulus: 10 ^ 10, }); } } ``` So far we've seen different types of integers: `u8`, `u32`, `u64`, `u128`, `u256`. Although math can be done easily among integers of the same type, it's not possible to do math directly between integers of different types, ## Example Below: ```toml fun mixed_types_math(): u64 { let x: u8 = 1; let y: u64 = 2; // This will fail to compile as x and y are different types. One is u8, the other is u64. x + y } ``` ### **Let’s cast Gendna_modulus to u256 with (Gendna_modulus as u256). Remember that the parentheses () are required when typecasting:** ```toml fun mixed_types_math(): u64 { let x: u8 = 1; let y: u64 = 2; // This will fail to compile as x and y are different types. One is u8, the other is u64. (x as u64) + y } ``` ### The actual contract would look like this: ```toml module 0xcafe::Dinosaur_nest { struct DinosaurGendna has key { Gendna_digits: u64, Gendna_modulus: u256, } fun init_module(cafe_signer: &signer) { let Gendna_digits = 10; let Gendna_modulus = 10 ^ Gendna_digits; move_to(cafe_signer, DinosaurGendna { Gendna_digits, Gendna_modulus: (Gendna_modulus as u256), }); } } ``` ### Source: https://docs.supra.com/network/move/learn-move/using-vectors-in-move # Using Vectors in Move Vectors in Move are dynamic lists that can grow or shrink as needed, making them essential for managing collections of data, including structs. For the latest RPC URL, please refer to the [Supra Network Information](/network/network-information) page. ## Vectors When you want a list of values, use vectors. A `vector` in Move is dynamic by default and has no fixed size. It can get larger or smaller as needed. Vector in Supra and Aptos are available to import and use at `std::vector`. You just need to do “`use std::vector`” at the top of your module to be able to access it. You can also store structs in vectors, Note that for structs that are stored in a resource struct, you need to add the store attribute to the struct: ```toml struct Balance has store { owner: address, balance: u64, } struct GlobalData has key { balances: vector, } ``` When creating an empty vector you can use the following syntax: `let empty_vector = vector[];` We need to track all the Dinosaurs created from Dinosaur_nest, We can do this by declaring two new structs: `Dinosaur` Struct having Key and a new resource struct named `DinosaurSwarm` which has a vector of Dinosaur structs, this resource needs to be stored at `0xcafe` in `init_module` with an empty vector of Dinosaurs to start with. ## Code Follows Like: ```toml module 0xcafe::Dinosaur_nest { use std::vector; struct DinosaurGendna has key { Gendna_digits: u64, Gendna_modulus: u256, } struct Dinosaur has store { Gendna: u64, } struct DinosaurSwarm has store { Dinosaurs: vector, } fun init_module(cafe_signer: &signer) { let Gendna_digits = 10; let Gendna_modulus = 10 ^ Gendna_digits; move_to(cafe_signer, DinosaurGendna { Gendna_digits, Gendna_modulus: (Gendna_modulus as u256), }); move_to(cafe_signer, DinosaurSwarm { Dinosaurs: vector[], }); } } ``` We've only been using the `init_module` function, which is called when the module is deployed to initialize default values. we'll create one more function that will later be called by the user to create a new Dinosaur. **Let’s create a new function named `spawn_Dinosaur` that takes one argument of type `u64` named `Gendna` and returns a Dinosaur struct with that Gendna:** Note: This function is public, which means it can be called from any other Move module. we'll keep all functions public, except for init_module. init_module has to be private because it's called only once when the module is deployed. ```toml module 0xcafe::Dinosaur_nest { use std::vector; struct DinosaurGendna has key { Gendna_digits: u64, Gendna_modulus: u64, } struct Dinosaur has store { Gendna: u64, } struct DinosaurSwarm has key { Dinosaurs: vector, } fun init_module(cafe_signer: &signer) { let Gendna_digits = 10; let Gendna_modulus = 10 ^ Gendna_digits; move_to(cafe_signer, DinosaurGendna { Gendna_digits, Gendna_modulus: (Gendna_modulus as u256), }); move_to(cafe_signer, DinosaurSwarm { Dinosaurs: vector[], }); } public fun spawn_Dinosaur(Gendna: u64): Dinosaur { Dinosaur { Gendna, } } } ``` ### Source: https://docs.supra.com/network/move/learn-move/reading-resource-data-with-borrow_global # Reading Resource Data with borrow_global `borrow_global` allows you to read an existing resource struct from a specific address without needing a signer, but the function must declare that it accesses the resource using acquires ResourceName. For the latest RPC URL, please refer to the [Supra Network Information](/network/network-information) page. ## `borrow_global`: read an existing resource struct We just need to call `borrow_global` with the right resource type and address. The address can be passed into the function as an argument or referred to specifically with @ such as `@0xcafe`. A signer is not required here. If the resource is not found at the address, the function will error when the code is run on the blockchain. The function that calls `borrow_global` also needs to declare that it does so by adding “`acquires ResourceName`” at the end. **Let’s write a new function named get_Gendna_digits that returns the Gendna_digits field of the DinosaurGendna resource stored at 0xcafe:** ```toml module 0xcafe::Dinosaur_nest { use std::vector; struct DinosaurGendna has key { Gendna_digits: u64, Gendna_modulus: u64, } struct Dinosaur has store { Gendna: u64, } struct DinosaurSwarm has key { Dinosaurs: vector, } fun init_module(cafe_signer: &signer) { let Gendna_digits = 10; let Gendna_modulus = 10 ^ Gendna_digits; move_to(cafe_signer, DinosaurGendna { Gendna_digits, Gendna_modulus: (Gendna_modulus as u256), }); move_to(cafe_signer, DinosaurSwarm { Dinosaurs: vector[], }); } public fun spawn_Dinosaur(Gendna: u64): Dinosaur { Dinosaur { Gendna, } } public fun get_Gendna_digits(): u64 acquires DinosaurGendna { borrow_global(@0xcafe).Gendna_digits } } ``` ### Source: https://docs.supra.com/network/move/learn-move/passing-data-in-move-value-vs.-reference # Passing Data in Move: Value vs. Reference Move uses pass-by-value for copies and pass-by-reference (& for reading, &mut for modifying) to data handling. For the latest RPC URL, please refer to the [Supra Network Information](/network/network-information) page. ## pass-by-value & pass-by-reference In Move, when you pass a simple value as u64 to a function, you might be making a copy of it. This is called pass-by-value, **for example**: ```move fun add_one(value: u64) { // This doesn't change the original value! value = value + 1; } fun call_add_one() { let value = 10; // This is wrong as it makes a copy of value! add_one(value); // This will error out as the value is still 10! assert!(value == 11, 0); } ``` **So how do we modify the original value?** We need to pass a mut reference (`&mut`) to the value instead of the value itself. This is called pass-by-reference. This is similar to how you pass a pointer to a value in C/C++ or Rust. There are two types of references in Move: `references` (&) and `mutable references` (\&mut). The immutable reference (&) is often used to pass a value such as a vector to a function that only intends to read data instead of writing it. A function that takes a reference needs to explicitly declare: ```move // get_first_element takes a reference to a vector and returns the first element. fun get_first_element(values: &vector): u64 { // vector::borrow also takes a vector reference and returns a reference to the value. // * is needed here to dereference the value and make a copy of it to return. *vector::borrow(values, 0) } ``` You can also pass a reference to a struct and modify it: ```move struct Balance { value: u64, } // This would fail if the function takes &Balance instead of &mut Balance. fun double_balance(balance: &mut Balance): u64 { balance.value = balance.value * 2; } ``` **Now, Write a function in `Dinosaur_nest` that returns the Gendna of the first Dinosaur in the `DinosaurSwarm`. Don’t forget the “`acquires`” declaration!** ```move module 0xcafe::Dinosaur_nest { use std::vector; struct DinosaurGendna has key { Gendna_digits: u64, Gendna_modulus: u64, } struct Dinosaur has store { Gendna: u64, } struct DinosaurSwarm has key { Dinosaurs: vector, } fun init_module(cafe_signer: &signer) { let Gendna_digits = 10; let Gendna_modulus = 10 ^ Gendna_digits; move_to(cafe_signer, DinosaurGendna { Gendna_digits, Gendna_modulus: (Gendna_modulus as u256), }); move_to(cafe_signer, DinosaurSwarm { Dinosaurs: vector[], }); } public fun spawn_Dinosaur(Gendna: u64): Dinosaur { Dinosaur { Gendna, } } public fun get_Gendna_digits(): u64 acquires DinosaurGendna { borrow_global(@0xcafe).Gendna_digits } public fun set_Gendna_digits(new_Gendna_digits: u64) acquires DinosaurGendna { let Dinosaur_Gendna = borrow_global_mut(@0xcafe); Dinosaur_Gendna.Gendna_digits = new_Gendna_digits; } public fun get_first_Dinosaur_Gendna(): u64 acquires DinosaurSwarm { let Dinosaur_swarm = borrow_global(@0xcafe); let first_Dinosaur = vector::borrow(&Dinosaur_swarm.Dinosaurs, 0); first_Dinosaur.Gendna } } ``` ### Source: https://docs.supra.com/network/move/learn-move/adding-elements-with-vector-push_back # Adding Elements with vector::push_back `vector::push_back` allows you to add elements to a vector by passing a mutable reference (&mut), enabling dynamic storage updates within a module. For the latest RPC URL, please refer to the [Supra Network Information](/network/network-information) page. ## `vector::push_back`: add all the things we've learned We can add all the things we've learned so far to create a more complex module. One more thing you can do now that you know references: You can add an element to a vector using `vector::push_back` and pass a mutable reference to the vector. **Let’s Modify `spawn_Dinosaur` to add the new Dinosaur to the DinosaurSwarm's vector of Dinosaurs instead of returning it.** ```move module 0xcafe::Dinosaur_nest { use std::vector; struct DinosaurGendna has key { Gendna_digits: u64, Gendna_modulus: u64, } struct Dinosaur has store { Gendna: u64, } struct DinosaurSwarm has key { Dinosaurs: vector, } fun init_module(cafe_signer: &signer) { let Gendna_digits = 10; let Gendna_modulus = 10 ^ Gendna_digits; move_to(cafe_signer, DinosaurGendna { Gendna_digits, Gendna_modulus: (Gendna_modulus as u256), }); move_to(cafe_signer, DinosaurSwarm { Dinosaurs: vector[], }); } public fun spawn_Dinosaur(Gendna: u64) acquires DinosaurSwarm { let Dinosaur = Dinosaur { Gendna, }; let Dinosaur_swarm = borrow_global_mut(@0xcafe); vector::push_back(&mut Dinosaur_swarm.Dinosaurs, Dinosaur); } public fun get_Gendna_digits(): u64 acquires DinosaurGendna { borrow_global(@0xcafe).Gendna_digits } public fun set_Gendna_digits(new_Gendna_digits: u64) acquires DinosaurGendna { let Dinosaur_Gendna = borrow_global_mut(@0xcafe); Dinosaur_Gendna.Gendna_digits = new_Gendna_digits; } public fun get_first_Dinosaur_Gendna(): u64 acquires DinosaurSwarm { let Dinosaur_swarm = borrow_global(@0xcafe); let first_Dinosaur = vector::borrow(&Dinosaur_swarm.Dinosaurs, 0); first_Dinosaur.Gendna } } ``` ### Source: https://docs.supra.com/network/move/learn-move/emitting-events-with-event-emit # Emitting Events with event::emit Events allow smart contracts to emit signals that external applications can listen for, making it possible to track blockchain actions in real time. For the latest RPC URL, please refer to the [Supra Network Information](/network/network-information) page. ## Event::Emit Events are a way for your contract to communicate that something happened on the blockchain to your app front-end, which can be 'listening' for certain events and taking action when they happen. In order to emit an event, you need to do three things: - Define the event struct. - Use `event::emit` to emit it **Note:** Event structs need to be declared with the `#[event]` annotation. **Finally, Let's add an event named `SpawnDinosaurEvent` that contains the new Gendna code & Emit `SpawnDinosaurEvent` when a Dinosaur is created.** ```toml module 0xcafe::Dinosaur_nest { use supra_framework::account; use supra_framework::event; use std::vector; struct DinosaurGendna has key { Gendna_digits: u64, Gendna_modulus: u64, } struct Dinosaur has store { Gendna: u64, } #[event] struct SpawnDinosaurEvent has drop, store { Gendna: u64, } struct DinosaurSwarm has key { Dinosaurs: vector, } fun init_module(cafe_signer: &signer) { let Gendna_modulus = 10 ^ 10; move_to(cafe_signer, DinosaurGendna { Gendna_digits: 10, Gendna_modulus, }); move_to(cafe_signer, DinosaurSwarm { Dinosaurs: vector[], }); } fun spawn_Dinosaur(Gendna: u64) acquires DinosaurSwarm { let Dinosaur = Dinosaur { Gendna, }; let Dinosaur_swarm = borrow_global_mut(@0xcafe); vector::push_back(&mut Dinosaur_swarm.Dinosaurs, Dinosaur); event::emit(SpawnDinosaurEvent { Gendna, }); } public fun get_Gendna_digits(): u64 acquires DinosaurGendna { borrow_global(@0xcafe).Gendna_digits } public fun set_Gendna_digits(new_Gendna_digits: u64) acquires DinosaurGendna { let Dinosaur_Gendna = borrow_global_mut(@0xcafe); Dinosaur_Gendna.Gendna_digits = new_Gendna_digits; } public fun get_first_Dinosaur_Gendna(): u64 acquires DinosaurSwarm { let Dinosaur_swarm = borrow_global(@0xcafe); let first_Dinosaur = vector::borrow(&Dinosaur_swarm.Dinosaurs, 0); first_Dinosaur.Gendna } } ``` ## Wrapping Up Till now you must have gotten a good idea of how things get Built and How Logic works in MOVE. You can find the Move.toml and Source File in the repo, fort it, and run on your side to get hands-on and learn with building your version of the Move Module as well. ## Contribution Feel free to contribute to this project by submitting pull requests or opening issues, all contributions that enhance the functionality or user experience of this project are welcome. ### Source: https://docs.supra.com/network/move/move-book # Move Book The Move Book, modified for the Supra blockchain. ## Introduction Welcome to Move, a next generation language for secure asset programming. Its primary use case is in blockchain environments, where Move programs are used to construct state changes. Move allows developers to write programs that flexibly manage and transfer assets, while providing the security and protections against attacks on those assets. However, Move has been developed with use cases in mind outside a blockchain context as well. Move takes its cue from [Rust](https://www.rust-lang.org/) by using resource types with move (hence the name) semantics as an explicit representation of digital assets, such as currency. ### Source: https://docs.supra.com/network/move/move-book/getting-started # Getting Started ### Source: https://docs.supra.com/network/move/move-book/getting-started/modules-and-scripts # Modules and Scripts ## Modules and Scripts Move has two different types of programs: _**Modules**_ and _**Scripts**_. Modules are libraries that define struct types along with functions that operate on these types. Struct types define the schema of Move's global storage, and module functions define the rules for updating storage. Modules themselves are also stored in global storage. A scripts is an executable entrypoint similar to a `main` function in a conventional language. A script typically calls functions of a published module that perform updates to global storage. Scripts are ephemeral code snippets that are not published in global storage. A Move source file (or **compilation unit**) may contain multiple modules and scripts. However, publishing a module or executing a script are separate VM operations. ### Syntax #### Scripts A script has the following structure: ``` script { * * fun <[type parameters: constraint]*>([identifier: type]*) } ``` A `script` block must start with all of its `use` declarations, followed by any constants and (finally) the mainfunction declaration. The main function can have any name (i.e., it need not be called `main`), is the only function in a script block, can have any number of arguments, and must not return a value. Here is an example with each of these components: ```move script { // Import the debug module published at the named account address std. use std::debug; const ONE: u64 = 1; fun main(x: u64) { let sum = x + ONE; debug::print(&sum) } } ``` Scripts have very limited power—they cannot declare friends, struct types or access global storage. Their primary purpose is to invoke module functions. #### Modules A module has the following syntax: ```move module
:: { ( | | | | )* } ``` where `
` is a valid named or literal address. For example: ```move module 0x42::example { struct Example has copy, drop { i: u64 } use std::debug; friend 0x42::another_example; const ONE: u64 = 1; public fun print(x: u64) { let sum = x + ONE; let example = Example { i: sum }; debug::print(&sum) } } ``` The `module 0x42::example` part specifies that the module `example` will be published under the account address `0x42` in global storage. Modules can also be declared using named addresses. For example: ```move module example_addr::example { struct Example has copy, drop { a: address } use std::debug; friend example_addr::another_example; public fun print() { let example = Example { a: @example_addr }; debug::print(&example) } } ``` Because named addresses only exist at the source language level and during compilation, named addresses will be fully substituted for their value at the bytecode level. For example if we had the following code: ```move script { fun example() { my_addr::m::foo(@my_addr); } } ``` and we compiled it with `my_addr` set to `0xC0FFEE`, then it would be equivalent to the following operationally: ```move script { fun example() { 0xC0FFEE::m::foo(@0xC0FFEE); } } ``` However, at the source level, these _are not equivalent_—the function`m::foo` _must_ be accessed through the `my_addr` named address, and not through the numerical value assigned to that address. Module names can start with letters `a` to `z` or letters `A` to `Z`. After the first character, module names can contain underscores `_`, letters `a` to `z`, letters `A` to `Z`, or digits `0` to `9`. ```move module my_module {} module foo_bar_42 {} ``` Typically, module names start with a lowercase letter. A module named `my_module` should be stored in a source file named `my_module.move`. All elements inside a `module` block can appear in any order. Fundamentally, a module is a collection of `types` and `functions`. The `use` keyword is used to import types from other modules. The `friend` keyword specifies a list of trusted modules. The `const` keyword defines private constants that can be used in the functions of a module. ### Source: https://docs.supra.com/network/move/move-book/getting-started/move-tutorial # Move Tutorial Please refer to the [Move Core Language Tutorial](https://github.com/Entropy-Foundation/aptos-core/tree/dev/aptos-move/move-examples/move-tutorial). ### Source: https://docs.supra.com/network/move/move-book/primitive-types # Primitive Types ### Source: https://docs.supra.com/network/move/move-book/primitive-types/integers # Integers Move supports six unsigned integer types: `u8`, `u16`, `u32`, `u64`, `u128`, and `u256`. Values of these types range from 0 to a maximum that depends on the size of the type. | Type | Value Range | | -------------------------------- | ------------------------ | | Unsigned 8-bit integer, `u8` | 0 to 28 - 1 | | Unsigned 16-bit integer, `u16` | 0 to 216 - 1 | | Unsigned 32-bit integer, `u32` | 0 to 232 - 1 | | Unsigned 64-bit integer, `u64` | 0 to 264 - 1 | | Unsigned 128-bit integer, `u128` | 0 to 2128 - 1 | | Unsigned 256-bit integer, `u256` | 0 to 2256 - 1 | ## Literals Literal values for these types are specified either as a sequence of digits (e.g.,`112`) or as hex literals, e.g., `0xFF`. The type of the literal can optionally be added as a suffix, e.g., `112u8`. If the type is not specified, the compiler will try to infer the type from the context where the literal is used. If the type cannot be inferred, it is assumed to be `u64`. Number literals can be separated by underscores for grouping and readability. (e.g.,`1_234_5678`, `1_000u128`, `0xAB_CD_12_35`). If a literal is too large for its specified (or inferred) size range, an error is reported. ### Examples ```move script { fun example() { // literals with explicit annotations; let explicit_u8 = 1u8; let explicit_u16 = 1u16; let explicit_u32 = 1u32; let explicit_u64 = 2u64; let explicit_u128 = 3u128; let explicit_u256 = 1u256; let explicit_u64_underscored = 154_322_973u64; // literals with simple inference let simple_u8: u8 = 1; let simple_u16: u16 = 1; let simple_u32: u32 = 1; let simple_u64: u64 = 2; let simple_u128: u128 = 3; let simple_u256: u256 = 1; // literals with more complex inference let complex_u8 = 1; // inferred: u8 // right hand argument to shift must be u8 let _unused = 10 << complex_u8; let x: u8 = 38; let complex_u8 = 2; // inferred: u8 // arguments to `+` must have the same type let _unused = x + complex_u8; let complex_u128 = 133_876; // inferred: u128 // inferred from function argument type function_that_takes_u128(complex_u128); // literals can be written in hex let hex_u8: u8 = 0x1; let hex_u16: u16 = 0x1BAE; let hex_u32: u32 = 0xDEAD80; let hex_u64: u64 = 0xCAFE; let hex_u128: u128 = 0xDEADBEEF; let hex_u256: u256 = 0x1123_456A_BCDE_F; } } ``` ## Operations ### Arithmetic Each of these types supports the same set of checked arithmetic operations. For all of these operations, both arguments (the left and right side operands) _must_ be of the same type. If you need to operate over values of different types, you will need to first perform a cast. Similarly, if you expect the result of the operation to be too large for the integer type, perform a cast to a larger size before performing the operation. All arithmetic operations abort instead of behaving in a way that mathematical integers would not (e.g., overflow, underflow, divide-by-zero). | Syntax | Operation | Aborts If | | ------ | ------------------- | ---------------------------------------- | | `+` | addition | Result is too large for the integer type | | `-` | subtraction | Result is less than zero | | `*` | multiplication | Result is too large for the integer type | | `%` | modular division | The divisor is `0` | | `/` | truncating division | The divisor is `0` | ### Bitwise The integer types support the following bitwise operations that treat each number as a series of individual bits, either 0 or 1, instead of as numerical integer values. Bitwise operations do not abort. | Syntax | Operation | Description | | ------ | ----------- | ----------------------------------------------------- | | `&` | bitwise and | Performs a boolean and for each bit pairwise | | `\|` | bitwise or | Performs a boolean or for each bit pairwise | | `^` | bitwise xor | Performs a boolean exclusive or for each bit pairwise | ### Bit Shifts Similar to the bitwise operations, each integer type supports bit shifts. But unlike the other operations, the right-hand side operand (how many bits to shift by) must _always_ be a `u8` and need not match the left side operand (the number you are shifting). Bit shifts can abort if the number of bits to shift by is greater than or equal to `8`, `16`, `32`, `64`, `128` or `256` for `u8`, `u16`, `u32`, `u64`, `u128` and `u256` respectively. | Syntax | Operation | Aborts if | | ------ | ----------- | ----------------------------------------------------------------------- | | `<<` | shift left | Number of bits to shift by is greater than the size of the integer type | | `>>` | shift right | Number of bits to shift by is greater than the size of the integer type | ### Comparisons Integer types are the _only_ types in Move that can use the comparison operators. Both arguments need to be of the same type. If you need to compare integers of different types, you will need to cast one of them first. Comparison operations do not abort. | Syntax | Operation | | ------ | ------------------------ | | `<` | less than | | `>` | greater than | | `<=` | less than or equal to | | `>=` | greater than or equal to | ### Equality Like all types with `drop` in Move, all integer types support the "equal" and "not equal" operations. Both arguments need to be of the same type. If you need to compare integers of different types, you will need to cast one of them first. Equality operations do not abort. | Syntax | Operation | | ------ | --------- | | `==` | equal | | `!=` | not equal | For more details see the section on equality ## Casting Integer types of one size can be cast to integer types of another size. Integers are the only types in Move that support casting. Casts _do not_ truncate. Casting will abort if the result is too large for the specified type | Syntax | Operation | Aborts if | | ---------- | ---------------------------------------------------- | -------------------------------------- | | `(e as T)` | Cast integer expression `e` into an integer type `T` | `e` is too large to represent as a `T` | Here, the type of `e` must be `8`, `16`, `32`, `64`, `128` or `256` and `T` must be `u8`, `u16`, `u32`, `u64`, `u128` or `u256`. For example: - `(x as u8)` - `(y as u16)` - `(873u16 as u32)` - `(2u8 as u64)` - `(1 + 3 as u128)` - `(4/2 + 12345 as u256)` ## Ownership As with the other scalar values built-in to the language, integer values are implicitly copyable, meaning they can be copied without an explicit instruction such as `copy`. ### Source: https://docs.supra.com/network/move/move-book/primitive-types/bool # Bool `bool` is Move's primitive type for boolean `true` and `false` values. ## Literals Literals for `bool` are either `true` or `false`. ## Operations ### Logical `bool` supports three logical operations: | Syntax | Description | Equivalent Expression | | ------ | ---------------------------- | ------------------------------------------------ | | `&&` | short-circuiting logical and | `p && q` is equivalent to `if (p) q else false` | | `\|\|` | short-circuiting logical or | `p \|\| q` is equivalent to `if (p) true else q` | | `!` | logical negation | `!p` is equivalent to `if (p) false else true` | ### Control Flow `bool` values are used in several of Move's control-flow constructs: * `if (bool) { ... }` * `while (bool) { .. }` * `assert!(bool, u64)` ## Ownership As with the other scalar values built-in to the language, boolean values are implicitly copyable,\ meaning they can be copied without an explicit instruction such as`copy`. ### Source: https://docs.supra.com/network/move/move-book/primitive-types/address # Address `address` is a built-in type in Move that is used to represent locations (sometimes called accounts) in global storage. An `address` value is a 256-bit (32-byte) identifier. At a given address, two things can be stored: Modules and Resources. Although an `address` is a 256-bit integer under the hood, Move addresses are intentionally opaque---they cannot be created from integers, they do not support arithmetic operations, and they cannot be modified. Even though there might be interesting programs that would use such a feature (e.g., pointer arithmetic in C fills a similar niche), Move does not allow this dynamic behavior because it has been designed from the ground up to support static verification. You can use runtime address values (values of type `address`) to access resources at that address. You _cannot_ access modules at runtime via address values. ## Addresses and Their Syntax Addresses come in two flavors, named or numerical. The syntax for a named address follows the same rules for any named identifier in Move. The syntax of a numerical address is not restricted to hex-encoded values, and any valid `u256` numerical value can be used as an\ address value, e.g., `42`, `0xCAFE`, and `2021` are all valid numerical address\ literals. To distinguish when an address is being used in an expression context or not, the\ syntax when using an address differs depending on the context where it's used: - When an address is used as an expression the address must be prefixed by the `@` character, i.e., `@` or `@`. - Outside of expression contexts, the address may be written without the leading `@` character, i.e., `` or ``. In general, you can think of `@` as an operator that takes an address from being a namespace item to being an expression item. ## Named Addresses Named addresses are a feature that allow identifiers to be used in place of\ numerical values in any spot where addresses are used, and not just at the\ value level. Named addresses are declared and bound as top level elements\ (outside of modules and scripts) in Move Packages, or passed as arguments\ to the Move compiler. Named addresses only exist at the source language level and will be fully\ substituted for their value at the bytecode level. Because of this, modules\ and module members _must_ be accessed through the module's named address\ and not through the numerical value assigned to the named address during\ compilation, e.g., `use my_addr::foo` is _not_ equivalent to `use 0x2::foo`\ even if the Move program is compiled with `my_addr` set to `0x2`. This\ distinction is discussed in more detail in the section on Modules and Scripts. ### Examples ```move script { fun example() { let a1: address = @0x1; // shorthand for 0x0000000000000000000000000000000000000000000000000000000000000001 let a2: address = @0x42; // shorthand for 0x0000000000000000000000000000000000000000000000000000000000000042 let a3: address = @0xDEADBEEF; // shorthand for 0x00000000000000000000000000000000000000000000000000000000DEADBEEF let a4: address = @0x000000000000000000000000000000000000000000000000000000000000000A; let a5: address = @std; // Assigns `a5` the value of the named address `std` let a6: address = @66; let a7: address = @0x42; } } module 66::some_module { // Not in expression context, so no @ needed use 0x1::other_module; // Not in expression context so no @ needed use std::vector; // Can use a named address as a namespace item when using other modules ... } module std::other_module { // Can use a named address as a namespace item to declare a module ... } ``` ## Global Storage Operations The primary purpose of `address` values are to interact with the global storage operations. `address` values are used with the `exists`, `borrow_global`, `borrow_global_mut`, and `move_from` operations. The only global storage operation that _does not_ use `address` is `move_to`, which uses `signer`. ## Ownership As with the other scalar values built-in to the language, `address` values are implicitly copyable, meaning they can be copied without an explicit instruction such as `copy`. ### Source: https://docs.supra.com/network/move/move-book/primitive-types/vector # Vector `vector` is the only primitive collection type provided by Move. A `vector` is a homogenous\ collection of `T`'s that can grow or shrink by pushing/popping values off the "end". A `vector` can be instantiated with any type `T`. For example, `vector`, `vector
`,`vector<0x42::MyModule::MyResource>`, and `vector>` are all valid vector types. ## Literals ### General `vector` Literals Vectors of any type can be created with `vector` literals. | Syntax | Type | Description | | --------------------- | ----------------------------------------------------------------------------- | ------------------------------------------ | | `vector[]` | `vector[]: vector` where `T` is any single, non-reference type | An empty vector | | `vector[e1, ..., en]` | `vector[e1, ..., en]: vector` where `e_i: T` s.t. `0 < i <= n` and `n > 0` | A vector with `n` elements (of length `n`) | In these cases, the type of the `vector` is inferred, either from the element type or from the vector's usage. If the type cannot be inferred, or simply for added clarity, the type can be specified explicitly: ```move vector[]: vector vector[e1, ..., en]: vector ``` #### Example Vector Literals ```move script { fun example() { (vector[]: vector); (vector[0u8, 1u8, 2u8]: vector); (vector[]: vector); (vector
[@0x42, @0x100]: vector
); } } ``` ### `vector` literals A common use-case for vectors in Move is to represent "byte arrays", which are represented with`vector`. These values are often used for cryptographic purposes, such as a public key or a hash result. These values are so common that specific syntax is provided to make the values more readable, as opposed to having to use `vector[]` where each individual `u8` value is specified in numeric form. There are currently two supported types of `vector` literals, _byte strings_ and _hex strings_. #### Byte Strings Byte strings are quoted string literals prefixed by a `b`, e.g. `b"Hello!\n"`. These are ASCII encoded strings that allow for escape sequences. Currently, the supported escape sequences are: | Escape Sequence | Description | | --------------- | ---------------------------------------------- | | | New line (or Line feed) | | | Carriage return | | | Tab | | `\\` | Backslash | | `\0` | Null | | `\"` | Quote | | `\xHH` | Hex escape, inserts the hex byte sequence `HH` | #### Hex Strings Hex strings are quoted string literals prefixed by a `x`, e.g. `x"48656C6C6F210A"`. Each byte pair, ranging from `00` to `FF`, is interpreted as hex encoded `u8` value. So each byte pair corresponds to a single entry in the resulting `vector`. #### Example String Literals ```move script { fun byte_and_hex_strings() { assert!(b"" == x"", 0); assert!(b"Hello!\n" == x"48656C6C6F210A", 1); assert!(b"\x48\x65\x6C\x6C\x6F\x21\x0A" == x"48656C6C6F210A", 2); assert!( b"\"Hello\tworld!\"\n \r \\Null=\0" == x"2248656C6C6F09776F726C6421220A200D205C4E756C6C3D00", 3 ); } } ``` ## Operations `vector` provides several operations via the `std::vector` module in the Move standard library, as shown below. More operations may be added over time. Up-to-date document on `vector` can be found [here](https://github.com/aptos-labs/aptos-core/blob/main/aptos-move/framework/move-stdlib/doc/vector.mdx#0x1_vector). | Function | Description | Aborts? | | ---------------------------------------------------------------------------------- | --------------------------------------------------------------------------------------------------------------------------------------------------------------- | ------------------------------------------ | | `vector::empty(): vector` | Create an empty vector that can store values of type `T` | Never | | `vector::is_empty(): bool` | Return `true` if the vector `v` has no elements and `false` otherwise. | Never | | `vector::singleton(t: T): vector` | Create a vector of size 1 containing `t` | Never | | `vector::length(v: &vector): u64` | Return the length of the vector `v` | Never | | `vector::push_back(v: &mut vector, t: T)` | Add `t` to the end of `v` | Never | | `vector::pop_back(v: &mut vector): T` | Remove and return the last element in `v` | If `v` is empty | | `vector::borrow(v: &vector, i: u64): &T` | Return an immutable reference to the `T` at index `i` | If `i` is not in bounds | | `vector::borrow_mut(v: &mut vector, i: u64): &mut T` | Return a mutable reference to the `T` at index `i` | If `i` is not in bounds | | `vector::destroy_empty(v: vector)` | Delete `v` | If `v` is not empty | | `vector::append(v1: &mut vector, v2: vector)` | Add the elements in `v2` to the end of `v1` | Never | | `vector::reverse_append(lhs: &mut vector, other: vector)` | Pushes all of the elements of the `other` vector into the `lhs` vector, in the reverse order as they occurred in `other` | Never | | `vector::contains(v: &vector, e: &T): bool` | Return true if `e` is in the vector `v`. Otherwise, returns false | Never | | `vector::swap(v: &mut vector, i: u64, j: u64)` | Swaps the elements at the `i`th and `j`th indices in the vector `v` | If `i` or `j` is out of bounds | | `vector::reverse(v: &mut vector)` | Reverses the order of the elements in the vector `v` in place | Never | | `vector::reverse_slice(v: &mut vector, l: u64, r: u64)` | Reverses the order of the elements `[l, r)` in the vector `v` in place | Never | | `vector::index_of(v: &vector, e: &T): (bool, u64)` | Return `(true, i)` if `e` is in the vector `v` at index `i`. Otherwise, returns `(false, 0)` | Never | | `vector::insert(v: &mut vector, i: u64, e: T)` | Insert a new element `e` at position `0 <= i <= length`, using `O(length - i)` time | If `i` is out of bounds | | `vector::remove(v: &mut vector, i: u64): T` | Remove the `i`th element of the vector `v`, shifting all subsequent elements. This is O(n) and preserves ordering of elements in the vector | If `i` is out of bounds | | `vector::swap_remove(v: &mut vector, i: u64): T` | Swap the `i`th element of the vector `v` with the last element and then pop the element, This is O(1), but does not preserve ordering of elements in the vector | If `i` is out of bounds | | `vector::trim(v: &mut vector, new_len: u64): u64` | Trim the vector `v` to the smaller size `new_len` and return the evicted elements in order | `new_len` is larger than the length of `v` | | `vector::trim_reverse(v: &mut vector, new_len: u64): u64` | Trim the vector `v` to the smaller size `new_len` and return the evicted elements in the reverse order | `new_len` is larger than the length of `v` | | `vector::rotate(v: &mut vector, rot: u64): u64` | `rotate(&mut [1, 2, 3, 4, 5], 2) -> [3, 4, 5, 1, 2]` in place, returns the split point ie. 3 in this example | Never | | `vector::rotate_slice(v: &mut vector, left: u64, rot: u64, right: u64): u64` | rotate a slice `[left, right)` with `left <= rot <= right` in place, returns the split point | Never | ## Example ```move script { use std::vector; fun example() { let v = vector::empty(); vector::push_back(&mut v, 5); vector::push_back(&mut v, 6); assert!(*vector::borrow(&v, 0) == 5, 42); assert!(*vector::borrow(&v, 1) == 6, 42); assert!(vector::pop_back(&mut v) == 6, 42); assert!(vector::pop_back(&mut v) == 5, 42); } } ``` ## Destroying and copying vectors Some behaviors of `vector` depend on the abilities of the element type, `T`. For example, vectors containing elements that do not have `drop` cannot be implicitly discarded like `v` in the example above - they must be explicitly destroyed with `vector::destroy_empty`. Note that `vector::destroy_empty` will abort at runtime unless `vec` contains zero elements: ```move script { fun destroy_any_vector(vec: vector) { vector::destroy_empty(vec) // deleting this line will cause a compiler error } } ``` But no error would occur for dropping a vector that contains elements with `drop`: ```move script { fun destroy_droppable_vector(vec: vector) { // valid! // nothing needs to be done explicitly to destroy the vector } } ``` Similarly, vectors cannot be copied unless the element type has `copy`. In other words, a`vector` has `copy` if and only if `T` has `copy`. For more details see the sections on type abilities and generics. ## Ownership As mentioned above, `vector` values can be copied only if the\ elements can be copied. ### Source: https://docs.supra.com/network/move/move-book/primitive-types/signer # Signer `signer` is a built-in Move resource type. A `signer` is a [capability](https://en.wikipedia.org/wiki/Object-capability_model) that allows the holder to act on behalf of a particular `address`. You can think of the native implementation as being: ```move module 0x1::signer { struct signer has drop { a: address } } ``` A `signer` is somewhat similar to a Unix [UID](https://en.wikipedia.org/wiki/User_identifier) in that it represents a user authenticated by code _outside_ of Move (e.g., by checking a cryptographic signature or password). ## Comparison to `address` A Move program can create any `address` value without special permission using address literals: ```move script { fun example() { let a1 = @0x1; let a2 = @0x2; // ... and so on for every other possible address } } ``` However, `signer` values are special because they cannot be created via literals or\ instructions - only by the Move VM. Before the VM runs a script with parameters of type `signer`, it will automatically create `signer` values and pass them into the script: ```move script { use std::signer; fun main(s: signer) { assert!(signer::address_of(&s) == @0x42, 0); } } ``` This script will abort with code `0` if the script is sent from any address other than `0x42`. A Move script can have an arbitrary number of `signer`s as long as the `signer`s are a prefix to any other arguments. In other words, all of the `signer` arguments must come first: ```move script { use std::signer; fun main(s1: signer, s2: signer, x: u64, y: u8) { // ... } } ``` This is useful for implementing _multi-signer scripts_ that atomically act with the authority of multiple parties. For example, an extension of the script above could perform an atomic currency swap between `s1` and `s2`. ## `signer` Operators The `std::signer` standard library module provides two utility functions over `signer` values: | Function | Description | | ------------------------------------------- | -------------------------------------------------------------- | | `signer::address_of(&signer): address` | Return the `address` wrapped by this `&signer`. | | `signer::borrow_address(&signer): &address` | Return a reference to the `address` wrapped by this `&signer`. | In addition, the `move_to(&signer, T)` global storage operator\ requires a `&signer` argument to publish a resource `T` under `signer.address`'s account. This ensures that only an authenticated user can elect to publish a resource under their `address`. ## Ownership Unlike simple scalar values, `signer` values are not copyable, meaning they cannot be copied from any operation whether it be through an explicit `copy` instruction\ or through a dereference `*`. ### Source: https://docs.supra.com/network/move/move-book/primitive-types/references # References Move has two types of references: immutable `&` and mutable `&mut`. Immutable references are read only, and cannot modify the underlying value (or any of its fields). Mutable references allow for modifications via a write through that reference. Move's type system enforces an ownership discipline that prevents reference errors. For more details on the rules of references, see Structs and Resources ## Reference Operators Move provides operators for creating and extending references as well as converting a mutable reference to an immutable one. Here and elsewhere, we use the notation `e: T` for "expression `e` has type `T`". | Syntax | Type | Description | | ----------- | ----------------------------------------------------- | -------------------------------------------------------------- | | `&e` | `&T` where `e: T` and `T` is a non-reference type | Create an immutable reference to `e` | | `&mut e` | `&mut T` where `e: T` and `T` is a non-reference type | Create a mutable reference to `e`. | | `&e.f` | `&T` where `e.f: T` | Create an immutable reference to field `f` of struct `e`. | | `&mut e.f` | `&mut T` where `e.f: T` | Create a mutable reference to field `f` of struct`e`. | | `freeze(e)` | `&T` where `e: &mut T` | Convert the mutable reference `e` into an immutable reference. | The `&e.f` and `&mut e.f` operators can be used both to create a new reference into a struct or to extend an existing reference: ```move script { fun example() { let s = S { f: 10 }; let f_ref1: &u64 = &s.f; // works let s_ref: &S = &s; let f_ref2: &u64 = &s_ref.f; // also works } } ``` A reference expression with multiple fields works as long as both structs are in the same module: ```move module 0x42::example { struct A { b: B } struct B { c : u64 } fun f(a: &A): &u64 { &a.b.c } } ``` Finally, note that references to references are not allowed: ```move script { fun example() { let x = 7; let y: &u64 = &x; let z: &&u64 = &y; // will not compile } } ``` ## Reading and Writing Through References Both mutable and immutable references can be read to produce a copy of the referenced value. Only mutable references can be written. A write `*x = v` discards the value previously stored in `x` and updates it with `v`. Both operations use the C-like `*` syntax. However, note that a read is an expression, whereas a write is a mutation that must occur on the left hand side of an equals. | Syntax | Type | Description | | ---------- | ----------------------------------- | ----------------------------------- | | `*e` | `T` where `e` is `&T` or `&mut T` | Read the value pointed to by `e` | | `*e1 = e2` | `()` where `e1: &mut T` and `e2: T` | Update the value in `e1` with `e2`. | In order for a reference to be read, the underlying type must have the`copy` ability as reading the reference creates a new copy of the value. This rule prevents the copying of resource values: ```move module 0x42::coin { struct Coin {} // Note does not have copy fun copy_resource_via_ref_bad(c: Coin) { let c_ref = &c; let counterfeit: Coin = *c_ref; // not allowed! pay(c); pay(counterfeit); } } ``` Dually: in order for a reference to be written to, the underlying type must have the`drop` ability as writing to the reference will discard (or "drop") the old value.\ This rule prevents the destruction of resource values: ```move module 0x42::coin { struct Coin {} // Note does not have drop fun destroy_resource_via_ref_bad(ten_coins: Coin, c: Coin) { let ref = &mut ten_coins; *ref = c; // not allowed--would destroy 10 coins! } } ``` ## `freeze` inference A mutable reference can be used in a context where an immutable reference is expected: ```move script { fun example() { let x = 7; let y: &u64 = &mut x; } } ``` This works because the under the hood, the compiler inserts `freeze` instructions where they are needed. Here are a few more examples of `freeze` inference in action: ```move module 0x42::example { fun takes_immut_returns_immut(x: &u64): &u64 { x } // freeze inference on return value fun takes_mut_returns_immut(x: &mut u64): &u64 { x } fun expression_examples() { let x = 0; let y = 0; takes_immut_returns_immut(&x); // no inference takes_immut_returns_immut(&mut x); // inferred freeze(&mut x) takes_mut_returns_immut(&mut x); // no inference assert!(&x == &mut y, 42); // inferred freeze(&mut y) } fun assignment_examples() { let x = 0; let y = 0; let imm_ref: &u64 = &x; imm_ref = &x; // no inference imm_ref = &mut y; // inferred freeze(&mut y) } } ``` ### Subtyping With this `freeze` inference, the Move type checker can view `&mut T` as a subtype of `&T`. As shown above, this means that anywhere for any expression where a `&T` value is used, a `&mut T` value can also be used. This terminology is used in error messages to concisely indicate that a `&mut T` was needed where a `&T` was supplied. For example ```move module 0x42::example { fun read_and_assign(store: &mut u64, new_value: &u64) { *store = *new_value } fun subtype_examples() { let x: &u64 = &0; let y: &mut u64 = &mut 1; x = &mut 1; // valid y = &2; // invalid! read_and_assign(y, x); // valid read_and_assign(x, y); // invalid! } } ``` will yield the following error messages ```bash error: ┌── example.move:12:9 ─── │ 12 │ y = &2; // invalid! │ ^ Invalid assignment to local 'y' · 12 │ y = &2; // invalid! │ -- The type: '&{integer}' · 9 │ let y: &mut u64 = &mut 1; │ -------- Is not a subtype of: '&mut u64' │ error: ┌── example.move:15:9 ─── │ 15 │ read_and_assign(x, y); // invalid! │ ^^^^^^^^^^^^^^^^^^^^^ Invalid call of '0x42::example::read_and_assign'. Invalid argument for parameter 'store' · 8 │ let x: &u64 = &0; │ ---- The type: '&u64' · 3 │ fun read_and_assign(store: &mut u64, new_value: &u64) { │ -------- Is not a subtype of: '&mut u64' │ ``` The only other types currently that has subtyping are tuples ## Ownership Both mutable and immutable references can always be copied and extended _even if there are existing copies or extensions of the same reference_: ```move script { fun reference_copies(s: &mut S) { let s_copy1 = s; // ok let s_extension = &mut s.f; // also ok let s_copy2 = s; // still ok // ... } } ``` This might be surprising for programmers familiar with Rust's ownership system, which would reject the code above. Move's type system is more permissive in its treatment of copies, but equally strict in ensuring unique ownership of mutable\ references before writes. ### References Cannot Be Stored References and tuples are the _only_ types that cannot be stored as a field value of structs, which also means that they cannot exist in global storage. All references created during program execution will be destroyed when a Move program terminates; they are entirely ephemeral. This invariant is also true for values of types without the `store` ability, but note that references and tuples go a step further by never being allowed in structs in the first place. This is another difference between Move and Rust, which allows references to be stored inside of structs. Currently, Move cannot support this because references cannot be [serialized](https://en.wikipedia.org/wiki/Serialization), but _every Move value must be serializable_. This requirement comes from Move's persistent global storage, which needs to serialize values to persist them across program executions. Structs can be written to global storage, and thus they must be serializable. One could imagine a fancier, more expressive, type system that would allow references to be stored in structs _and_ ban those structs from existing in global storage. We could perhaps allow references inside of structs that do not have the `store` ability, but that would not completely solve the problem: Move has a fairly complex system for tracking static reference safety, and this aspect of the type system would also have to be extended to support storing references inside of structs. In short, Move's type system (particularly the aspects around reference safety) would have to expand to support stored references. But it is something we are keeping an eye on as the language evolves. ### Source: https://docs.supra.com/network/move/move-book/primitive-types/tuples-and-unit # Tuples and Unit Move does not fully support tuples as one might expect coming from another language with them as a [first-class value](https://en.wikipedia.org/wiki/First-class_citizen). However, in order to support multiple return values, Move has tuple-like expressions. These expressions do not result in a concrete value at runtime (there are no tuples in the bytecode), and as a result they are very limited: they can only appear in expressions (usually in the return position for a function); they cannot be bound to local variables; they cannot be stored in structs; and tuple types cannot be used to instantiate generics. Similarly, [unit()](https://en.wikipedia.org/wiki/Unit_type) is a type created by the Move source language in order to be expression based. The unit value `()` does not result in any runtime value. We can consider unit`()` to be an empty tuple, and any restrictions that apply to tuples also apply to unit. It might feel weird to have tuples in the language at all given these restrictions. But one of the most common use cases for tuples in other languages is for functions to allow functions to return multiple values. Some languages work around this by forcing the users to write structs that contain the multiple return values. However, in Move, you cannot put references inside of structs. This required Move to support multiple return values. These multiple return values are all pushed on the stack at the bytecode level. At the source level, these multiple return values are represented using tuples. ## Literals Tuples are created by a comma separated list of expressions inside of parentheses. | Syntax | Type | Description | | --------------- | ---------------------------------------------------------------------------- | ------------------------------------------------------------ | | `()` | `(): ()` | Unit, the empty tuple, or the tuple of arity 0 | | `(e1, ..., en)` | `(e1, ..., en): (T1, ..., Tn)` where `e_i: Ti` s.t. `0 < i <= n` and `n > 0` | A `n`-tuple, a tuple of arity `n`, a tuple with `n` elements | Note that `(e)` does not have type `(e): (t)`, in other words there is no tuple with one element. If there is only a single element inside the parentheses, the parentheses are only used for disambiguation and do not carry any other special meaning. Sometimes, tuples with two elements are called "pairs" and tuples with three elements are called "triples." ### Examples ```move module 0x42::example { // all 3 of these functions are equivalent // when no return type is provided, it is assumed to be `()` fun returns_unit_1() { } // there is an implicit () value in empty expression blocks fun returns_unit_2(): () { } // explicit version of `returns_unit_1` and `returns_unit_2` fun returns_unit_3(): () { () } fun returns_3_values(): (u64, bool, address) { (0, false, @0x42) } fun returns_4_values(x: &u64): (&u64, u8, u128, vector) { (x, 0, 1, b"foobar") } } ``` ## Operations The only operation that can be done on tuples currently is destructuring. ### Destructuring For tuples of any size, they can be destructured in either a `let` binding or in an assignment. For example: ```move module 0x42::example { // all 3 of these functions are equivalent fun returns_unit() {} fun returns_2_values(): (bool, bool) { (true, false) } fun returns_4_values(x: &u64): (&u64, u8, u128, vector) { (x, 0, 1, b"foobar") } fun examples(cond: bool) { let () = (); let (x, y): (u8, u64) = (0, 1); let (a, b, c, d) = (@0x0, 0, false, b""); () = (); (x, y) = if (cond) (1, 2) else (3, 4); (a, b, c, d) = (@0x1, 1, true, b"1"); } fun examples_with_function_calls() { let () = returns_unit(); let (x, y): (bool, bool) = returns_2_values(); let (a, b, c, d) = returns_4_values(&0); () = returns_unit(); (x, y) = returns_2_values(); (a, b, c, d) = returns_4_values(&1); } } ``` For more details, see Move Variables. ## Subtyping Along with references, tuples are the only other type that have [subtyping](https://en.wikipedia.org/wiki/Subtyping) in Move. Tuples have subtyping only in the sense that they subtype with references (in a covariant way). For example: ```move script { fun example() { let x: &u64 = &0; let y: &mut u64 = &mut 1; // (&u64, &mut u64) is a subtype of (&u64, &u64) // since &mut u64 is a subtype of &u64 let (a, b): (&u64, &u64) = (x, y); // (&mut u64, &mut u64) is a subtype of (&u64, &u64) // since &mut u64 is a subtype of &u64 let (c, d): (&u64, &u64) = (y, y); // error! (&u64, &mut u64) is NOT a subtype of (&mut u64, &mut u64) // since &u64 is NOT a subtype of &mut u64 let (e, f): (&mut u64, &mut u64) = (x, y); } } ``` ## Ownership As mentioned above, tuple values don't really exist at runtime. And currently they cannot be stored into local variables because of this (but it is likely that this feature will come soon). As such, tuples can only be moved currently, as copying them would require putting them into a local variable first. ### Source: https://docs.supra.com/network/move/move-book/basic-concepts # Basic Concepts ### Source: https://docs.supra.com/network/move/move-book/basic-concepts/local-variables-and-scope # Local Variables and Scope Local variables in Move are lexically (statically) scoped. New variables are introduced with the keyword `let`, which will shadow any previous local with the same name. Locals are mutable and can be updated both directly and via a mutable reference. ## Declaring Local Variables ### `let` bindings Move programs use `let` to bind variable names to values: ```move script { fun example() { let x = 1; let y = x + x; } } ``` `let` can also be used without binding a value to the local. ```move script { fun example() { let x; } } ``` The local can then be assigned a value later. ```move script { fun example() { let x; if (cond) { x = 1 } else { x = 0 } } } ``` This can be very helpful when trying to extract a value from a loop when a default value cannot be provided. ```move script { fun example() { let x; let cond = true; let i = 0; loop { (x, cond) = foo(i); if (!cond) break; i = i + 1; } } } ``` ### Variables must be assigned before use Move's type system prevents a local variable from being used before it has been assigned. ```move script { fun example() { let x; x + x; // ERROR! } } ``` ```move script { fun example() { let x; if (cond) x = 0; x + x; // ERROR! } } ``` ```move script { fun example() { let x; while (cond) x = 0; x + x; // ERROR! } } ``` ### Valid variable names Variable names can contain underscores `_`, letters `a` to `z`, letters `A` to `Z`, and digits `0` to `9`. Variable names must start with either an underscore `_` or a letter `a` through `z`. They _cannot_ start with uppercase letters. ```move script { fun example() { // all valid let x = e; let _x = e; let _A = e; let x0 = e; let xA = e; let foobar_123 = e; // all invalid let X = e; // ERROR! let Foo = e; // ERROR! } } ``` ### Type annotations The type of local variable can almost always be inferred by Move's type system. However, Move allows explicit type annotations that can be useful for readability, clarity, or debuggability. The syntax for adding a type annotation is: ```move script { fun example() { let x: T = e; // "Variable x of type T is initialized to expression e" } } ``` Some examples of explicit type annotations: ```move module 0x42::example { struct S { f: u64, g: u64 } fun annotated() { let u: u8 = 0; let b: vector = b"hello"; let a: address = @0x0; let (x, y): (&u64, &mut u64) = (&0, &mut 1); let S { f, g: f2 }: S = S { f: 0, g: 1 }; } } ``` Note that the type annotations must always be to the right of the pattern: ```move script { fun example() { let (x: &u64, y: &mut u64) = (&0, &mut 1); // ERROR! should be let (x, y): ... = } } ``` ### When annotations are necessary In some cases, a local type annotation is required if the type system cannot infer the type. This commonly occurs when the type argument for a generic type cannot be inferred. For example: ```move script { fun example() { let _v1 = vector::empty(); // ERROR! // ^^^^^^^^^^^^^^^ Could not infer this type. Try adding an annotation let v2: vector = vector::empty(); // no error } } ``` In a rarer case, the type system might not be able to infer a type for divergent code (where all the following code is unreachable). Both `return` and `abort` are expressions and can have any type. A `loop` has type `()` if it has a `break`, but if there is no break out of the `loop`, it could have any type. If these types cannot be inferred, a type annotation is required. For example, this code: ```move script { fun example() { let a: u8 = return (); let b: bool = abort 0; let c: signer = loop (); let x = return (); // ERROR! // ^ Could not infer this type. Try adding an annotation let y = abort 0; // ERROR! // ^ Could not infer this type. Try adding an annotation let z = loop (); // ERROR! // ^ Could not infer this type. Try adding an annotation } } ``` Adding type annotations to this code will expose other errors about dead code or unused local variables, but the example is still helpful for understanding this problem. ### Multiple declarations with tuples `let` can introduce more than one local at a time using tuples. The locals declared inside the parenthesis are initialized to the corresponding values from the tuple. ```move script { fun example() { let () = (); let (x0, x1) = (0, 1); let (y0, y1, y2) = (0, 1, 2); let (z0, z1, z2, z3) = (0, 1, 2, 3); } } ``` The type of the expression must match the arity of the tuple pattern exactly. ```move script { fun example() { let (x, y) = (0, 1, 2); // ERROR! let (x, y, z, q) = (0, 1, 2); // ERROR! } } ``` You cannot declare more than one local with the same name in a single `let`. ```move script { fun example() { let (x, x) = 0; // ERROR! } } ``` ### Multiple declarations with structs `let` can also introduce more than one local at a time when destructuring (or matching against) a struct. In this form, the `let` creates a set of local variables that are initialized to the values of the fields from a struct. The syntax looks like this: ```move script { fun example() { struct T { f1: u64, f2: u64 } } } ``` ```move script { fun example() { let T { f1: local1, f2: local2 } = T { f1: 1, f2: 2 }; // local1: u64 // local2: u64 } } ``` Here is a more complicated example: ```move module 0x42::example { struct X { f: u64 } struct Y { x1: X, x2: X } fun new_x(): X { X { f: 1 } } fun example() { let Y { x1: X { f }, x2 } = Y { x1: new_x(), x2: new_x() }; assert!(f + x2.f == 2, 42); let Y { x1: X { f: f1 }, x2: X { f: f2 } } = Y { x1: new_x(), x2: new_x() }; assert!(f1 + f2 == 2, 42); } } ``` Fields of structs can serve double duty, identifying the field to bind _and_ the name of the variable. This is sometimes referred to as punning. ```move script { fun example() { let X { f } = e; } } ``` is equivalent to: ```move script { fun example() { let X { f: f } = e; } } ``` As shown with tuples, you cannot declare more than one local with the same name in a single `let`. ```move script { fun example() { let Y { x1: x, x2: x } = e; // ERROR! } } ``` ### Destructuring against references In the examples above for structs, the bound value in the let was moved, destroying the struct value and binding its fields. ```move script { fun example() { struct T { f1: u64, f2: u64 } } } ``` ```move script { fun example() { let T { f1: local1, f2: local2 } = T { f1: 1, f2: 2 }; // local1: u64 // local2: u64 } } ``` In this scenario the struct value `T { f1: 1, f2: 2 }` no longer exists after the `let`. If you wish instead to not move and destroy the struct value, you can borrow each of its fields. For example: ```move script { fun example() { let t = T { f1: 1, f2: 2 }; let T { f1: local1, f2: local2 } = &t; // local1: &u64 // local2: &u64 } } ``` And similarly with mutable references: ```move script { fun example() { let t = T { f1: 1, f2: 2 }; let T { f1: local1, f2: local2 } = &mut t; // local1: &mut u64 // local2: &mut u64 } } ``` This behavior can also work with nested structs. ```move module 0x42::example { struct X { f: u64 } struct Y { x1: X, x2: X } fun new_x(): X { X { f: 1 } } fun example() { let y = Y { x1: new_x(), x2: new_x() }; let Y { x1: X { f }, x2 } = &y; assert!(*f + x2.f == 2, 42); let Y { x1: X { f: f1 }, x2: X { f: f2 } } = &mut y; *f1 = *f1 + 1; *f2 = *f2 + 1; assert!(*f1 + *f2 == 4, 42); } } ``` ### Ignoring Values In `let` bindings, it is often helpful to ignore some values. Local variables that start with `_` will be ignored and not introduce a new variable ```move module 0x42::example { fun three(): (u64, u64, u64) { (0, 1, 2) } fun example() { let (x1, _, z1) = three(); let (x2, _y, z2) = three(); assert!(x1 + z1 == x2 + z2, 42); } } ``` This can be necessary at times as the compiler will error on unused local variables ```move module 0x42::example { fun example() { let (x1, y, z1) = three(); // ERROR! // ^ unused local 'y' } } ``` ### General `let` grammar All the different structures in `let` can be combined! With that we arrive at this general grammar for `let` statements: > _let-binding_ → **let** _pattern-or-list_ _type-annotation__opt_ _initializer__opt_ > _pattern-or-list_ → _pattern_ | **(** _pattern-list_ **)** > _pattern-list_ → _pattern_ **,**_opt_ | _pattern_ **,** _pattern-list_ > _type-annotation_ → **:** _type_ > _initializer_ → **=** _expression_ The general term for the item that introduces the bindings is a _pattern_. The pattern serves to both destructure data (possibly recursively) and introduce the bindings. The pattern grammar is as follows: > _pattern_ → _local-variable_ | _struct-type_ **\{** _field-binding-list_ **\}** > _field-binding-list_ → _field-binding_ **,**_opt_ | _field-binding_ **,** _field-binding-list_ > _field-binding_ → _field_ | _field_ **:** _pattern_ A few concrete examples with this grammar applied: ```move script { fun example() { let (x, y): (u64, u64) = (0, 1); // ^ local-variable // ^ pattern // ^ local-variable // ^ pattern // ^ pattern-list // ^^^^ pattern-list // ^^^^^^ pattern-or-list // ^^^^^^^^^^^^ type-annotation // ^^^^^^^^ initializer // ^^^^^^^^^^^^^^^^^^^^^^^^^^^^^^^^ let-binding let Foo { f, g: x } = Foo { f: 0, g: 1 }; // ^^^ struct-type // ^ field // ^ field-binding // ^ field // ^ local-variable // ^ pattern // ^^^^ field-binding // ^^^^^^^ field-binding-list // ^^^^^^^^^^^^^^^ pattern // ^^^^^^^^^^^^^^^ pattern-or-list // ^^^^^^^^^^^^^^^^^^^^ initializer // ^^^^^^^^^^^^^^^^^^^^^^^^^^^^^^^^^^^^^^^^^^ let-binding } } ``` ## Mutations ### Assignments After the local is introduced (either by `let` or as a function parameter), the local can be modified via an assignment: ```move script { fun example(e: u8) { let x = 0; x = e } } ``` Unlike `let` bindings, assignments are expressions. In some languages, assignments return the value that was assigned, but in Move, the type of any assignment is always `()`. ```move script { fun example(e: u8) { let x = 0; (x = e) == () } } ``` Practically, assignments being expressions means that they can be used without adding a new expression block with braces (`{`...`}`). ```move script { fun example(e: u8) { let x = 0; if (cond) x = 1 else x = 2; } } ``` The assignment uses the same pattern syntax scheme as `let` bindings: ```move module 0x42::example { struct X { f: u64 } fun new_x(): X { X { f: 1 } } // This example will complain about unused variables and assignments. fun example() { let (x, _, z) = (0, 1, 3); let (x, y, f, g); (X { f }, X { f: x }) = (new_x(), new_x()); assert!(f + x == 2, 42); (x, y, z, f, _, g) = (0, 0, 0, 0, 0, 0); } } ``` Note that a local variable can only have one type, so the type of the local cannot change between assignments. ```move script { fun example() { let x; x = 0; x = false; // ERROR! } } ``` ### Mutating through a reference In addition to directly modifying a local with assignment, a local can be modified via a mutable reference `&mut`. ```move script { fun example() { let x = 0; let r = &mut x; *r = 1; assert!(x == 1, 42); } } ``` This is particularly useful if either: (1) You want to modify different variables depending on some condition. ```move script { fun example() { let x = 0; let y = 1; let r = if (cond) { &mut x } else { &mut y }; *r = *r + 1; } } ``` (2) You want another function to modify your local value. ```move script { fun example() { let x = 0; modify_ref(&mut x); } } ``` This sort of modification is how you modify structs and vectors! ```move script { use 0x1::vector; fun example() { let v = vector::empty(); vector::push_back(&mut v, 100); assert!(*vector::borrow(&v, 0) == 100, 42); } } ``` For more details, see Move references. ## Scopes Any local declared with `let` is available for any subsequent expression, _within that scope_. Scopes are declared with expression blocks, `{`...`}`. Locals cannot be used outside the declared scope. ```move script { fun example() { let x = 0; { let y = 1; }; x + y // ERROR! // ^ unbound local 'y' } } ``` But, locals from an outer scope _can_ be used in a nested scope. ```move script { fun example() { { let x = 0; { let y = x + 1; // valid } } } } ``` Locals can be mutated in any scope where they are accessible. That mutation survives with the local, regardless of the scope that performed the mutation. ```move script { fun example() { let x = 0; x = x + 1; assert!(x == 1, 42); { x = x + 1; assert!(x == 2, 42); }; assert!(x == 2, 42); } } ``` ### Expression Blocks An expression block is a series of statements separated by semicolons (`;`). The resulting value of an expression block is the value of the last expression in the block. ```move script { fun example() { { let x = 1; let y = 1; x + y } } } ``` In this example, the result of the block is `x + y`. A statement can be either a `let` declaration or an expression. Remember that assignments (`x = e`) are expressions of type `()`. ```move script { fun example() { { let x; let y = 1; x = 1; x + y } } } ``` Function calls are another common expression of type `()`. Function calls that modify data are commonly used as statements. ```move script { fun example() { { let v = vector::empty(); vector::push_back(&mut v, 1); v } } } ``` This is not just limited to `()` types---any expression can be used as a statement in a sequence! ```move script { fun example() { { let x = 0; x + 1; // value is discarded x + 2; // value is discarded b"hello"; // value is discarded } } } ``` But! If the expression contains a resource (a value without the `drop` ability),\ you will get an error. This is because Move's type system guarantees that any value that is dropped has the `drop` ability. (Ownership must be transferred or the value must be explicitly destroyed within its declaring module.) ```move script { fun example() { { let x = 0; Coin { value: x }; // ERROR! // ^^^^^^^^^^^^^^^^^ unused value without the `drop` ability x } } } ``` If a final expression is not present in a block---that is, if there is a trailing semicolon `;`, there is an implicit [unit `()` value](https://en.wikipedia.org/wiki/Unit_type). Similarly, if the expression block is empty, there is an implicit unit `()` value. ```move script { fun example() { // Both are equivalent { x = x + 1; 1 / x; }; { x = x + 1; 1 / x; () }; } } ``` ```move script { fun example() { // Both are equivalent {} { () } } } ``` An expression block is itself an expression and can be used anyplace an expression is used. (Note: The body of a function is also an expression block, but the function body cannot be replaced by another expression.) ```move script { fun example() { let my_vector: vector> = { let v = vector::empty(); vector::push_back(&mut v, b"hello"); vector::push_back(&mut v, b"goodbye"); v }; } } ``` (The type annotation is not needed in this example and only added for clarity.) ### Shadowing If a `let` introduces a local variable with a name already in scope, that previous variable can no longer be accessed for the rest of this scope. This is called _shadowing_. ```move script { fun example() { let x = 0; assert!(x == 0, 42); let x = 1; // x is shadowed assert!(x == 1, 42); } } ``` When a local is shadowed, it does not need to retain the same type as before. ```move script { fun example() { let x = 0; assert!(x == 0, 42); let x = b"hello"; // x is shadowed assert!(x == b"hello", 42); } } ``` After a local is shadowed, the value stored in the local still exists, but will no longer be accessible. This is important to keep in mind with values of types without the`drop` ability, as ownership of the value must be transferred by the end of the\ function. ```move module 0x42::example { struct Coin has store { value: u64 } fun unused_resource(): Coin { let x = Coin { value: 0 }; // ERROR! // ^ This local still contains a value without the `drop` ability x.value = 1; let x = Coin { value: 10 }; x // ^ Invalid return } } ``` When a local is shadowed inside a scope, the shadowing only remains for that scope. The shadowing is gone once that scope ends. ```move script { fun example() { let x = 0; { let x = 1; assert!(x == 1, 42); }; assert!(x == 0, 42); } } ``` Remember, locals can change type when they are shadowed. ```move script { fun example() { let x = 0; { let x = b"hello"; assert!(x = b"hello", 42); }; assert!(x == 0, 42); } } ``` ## Move and Copy All local variables in Move can be used in two ways, either by `move` or `copy`. If one or the other is not specified, the Move compiler is able to infer whether a `copy` or a `move` should be used. This means that in all the examples above, a `move` or a `copy` would be inserted by the compiler. A local variable cannot be used without the use of `move` or `copy`. `copy` will likely feel the most familiar coming from other programming languages, as it creates a new copy of the value inside the variable to use in that expression. With `copy`, the local variable can be used more than once. ```move script { fun example() { let x = 0; let y = copy x + 1; let z = copy x + 2; } } ``` Any value with the `copy` ability can be copied in this way. `move` takes the value out of the local variable _without_ copying the data. After a `move` occurs, the local variable is unavailable. ```move script { fun example() { let x = 1; let y = move x + 1; // ------ Local was moved here let z = move x + 2; // Error! // ^^^^^^ Invalid usage of local 'x' y + z; } } ``` ### Safety Move's type system will prevent a value from being used after it is moved. This is the same safety check described in `let` declaration that prevents local variables from being used before it is assigned a value. ### Inference As mentioned above, the Move compiler will infer a `copy` or `move` if one is not indicated. The algorithm for doing so is quite simple: - Any value with the `copy` ability is given a `copy`. - Any reference (both mutable `&mut` and immutable `&`) is given a `copy`. - Except under special circumstances where it is made a `move` for predictable borrow checker\ errors. - Any other value is given a `move`. - If the compiler can prove that the source value with copy ability is not used after the\ assignment, then a move may be used instead of a copy for performance, but this will be invisible\ to the programmer (except in possible decreased time or gas cost). For example: ```move module 0x42::example { struct Foo { f: u64 } struct Coin has copy { value: u64 } fun example() { let s = b"hello"; let foo = Foo { f: 0 }; let coin = Coin { value: 0 }; let s2 = s; // copy let foo2 = foo; // move let coin2 = coin; // copy let x = 0; let b = false; let addr = @0x42; let x_ref = &x; let coin_ref = &mut coin2; let x2 = x; // copy let b2 = b; // copy let addr2 = @0x42; // copy let x_ref2 = x_ref; // copy let coin_ref2 = coin_ref; // copy } } ``` ### Source: https://docs.supra.com/network/move/move-book/basic-concepts/equality # Equality Move supports two equality operations `==` and `!=` ## Operations | Syntax | Operation | Description | | ------ | --------- | --------------------------------------------------------------------------- | | `==` | equal | Returns `true` if the two operands have the same value, `false` otherwise | | `!=` | not equal | Returns `true` if the two operands have different values, `false` otherwise | ### Typing Both the equal (`==`) and not-equal (`!=`) operations only work if both operands are the same type ```move script { fun example() { 0 == 0; // `true` 1u128 == 2u128; // `false` b"hello" != x"00"; // `true` } } ``` Equality and non-equality also work over user defined types! ```move module 0x42::example { struct S has copy, drop { f: u64, s: vector } fun always_true(): bool { let s = S { f: 0, s: b"" }; // parens are not needed but added for clarity in this example (copy s) == s } fun always_false(): bool { let s = S { f: 0, s: b"" }; // parens are not needed but added for clarity in this example (copy s) != s } } ``` If the operands have different types, there is a type checking error ```move script { fun example() { 1u8 == 1u128; // ERROR! // ^^^^^ expected an argument of type 'u8' b"" != 0; // ERROR! // ^ expected an argument of type 'vector' } } ``` ### Typing with references When comparing references, the type of the reference (immutable or mutable) does\ not matter. This means that you can compare an immutable `&` reference with a mutable one `&mut` of the same underlying type. ```move script { fun example() { let i = &0; let m = &mut 1; i == m; // `false` m == i; // `false` m == m; // `true` i == i; // `true` } } ``` The above is equivalent to applying an explicit freeze to each mutable reference where needed ```move script { fun example() { let i = &0; let m = &mut 1; i == freeze(m); // `false` freeze(m) == i; // `false` m == m; // `true` i == i; // `true` } } ``` But again, the underlying type must be the same type ```move script { fun example() { let i = &0; let s = &b""; i == s; // ERROR! // ^ expected an argument of type '&u64' } } ``` ## Restrictions Both `==` and `!=` consume the value when comparing them. As a result, the type system enforces that the type must have `drop`. Recall that without the`drop` ability, ownership must be transferred by the end of the function, and such\ values can only be explicitly destroyed within their declaring module. If these were used directly with either equality `==` or non-equality `!=`, the value would be destroyed which would break`drop` ability safety guarantees! ```move module 0x42::example { struct Coin has store { value: u64 } fun invalid(c1: Coin, c2: Coin) { c1 == c2 // ERROR! // ^^ ^^ These resources would be destroyed! } } ``` But, a programmer can _always_ borrow the value first instead of directly comparing the value, and reference types have the `drop` ability. For example ```move module 0x42::example { struct Coin has store { value: u64 } fun swap_if_equal(c1: Coin, c2: Coin): (Coin, Coin) { let are_equal = &c1 == &c2; // valid if (are_equal) (c2, c1) else (c1, c2) } } ``` ## Avoid Extra Copies While a programmer _can_ compare any value whose type has `drop`, a programmer\ should often compare by reference to avoid expensive copies. ```move script { fun example() { let v1: vector = function_that_returns_vector(); let v2: vector = function_that_returns_vector(); assert!(copy v1 == copy v2, 42); // ^^^^ ^^^^ use_two_vectors(v1, v2); let s1: Foo = function_that_returns_large_struct(); let s2: Foo = function_that_returns_large_struct(); assert!(copy s1 == copy s2, 42); // ^^^^ ^^^^ use_two_foos(s1, s2); } } ``` This code is perfectly acceptable (assuming `Foo` has `drop`), just not efficient.\ The highlighted copies can be removed and replaced with borrows ```move script { fun example() { let v1: vector = function_that_returns_vector(); let v2: vector = function_that_returns_vector(); assert!(&v1 == &v2, 42); // ^ ^ use_two_vectors(v1, v2); let s1: Foo = function_that_returns_large_struct(); let s2: Foo = function_that_returns_large_struct(); assert!(&s1 == &s2, 42); // ^ ^ use_two_foos(s1, s2); } } ``` The efficiency of the `==` itself remains the same, but the `copy`s are removed and thus the program is more efficient. ### Source: https://docs.supra.com/network/move/move-book/basic-concepts/abort-and-assert # Abort and Assert `return` and `abort` are two control flow constructs that end execution, one for\ the current function and one for the entire transaction. More information on `return` can be found in the linked section ## `abort` `abort` is an expression that takes one argument: an **abort code** of type `u64`. For example: ```move abort 42 ``` The `abort` expression halts execution of the current function and reverts all changes made to global state by the current transaction. There is no mechanism for "catching" or otherwise handling an`abort`. Luckily, in Move transactions are all or nothing, meaning any changes to global storage are made all at once only if the transaction succeeds. Because of this transactional commitment of changes, after an abort there is no need to worry about backing out changes. While this approach is lacking in flexibility, it is incredibly simple and predictable. Similar to `return`, `abort` is useful for exiting control flow when some\ condition cannot be met. In this example, the function will pop two items off of the vector, but will abort early if the vector does not have two items ```move script { use std::vector; fun pop_twice(v: &mut vector): (T, T) { if (vector::length(v) < 2) abort 42; (vector::pop_back(v), vector::pop_back(v)) } } ``` This is even more useful deep inside a control-flow construct. For example, this function checks that all numbers in the vector are less than the specified `bound`. And aborts otherwise ```move script { use std::vector; fun check_vec(v: &vector, bound: u64) { let i = 0; let n = vector::length(v); while (i < n) { let cur = *vector::borrow(v, i); if (cur > bound) abort 42; i = i + 1; } } } ``` ### `assert` `assert` is a builtin, macro-like operation provided by the Move compiler. It takes two arguments, a condition of type `bool` and a code of type `u64` ```move assert!(condition: bool, code: u64) ``` Since the operation is a macro, it must be invoked with the `!`. This is to convey that the arguments to `assert` are call-by-expression. In other words, `assert` is not a normal function and does not exist at the bytecode level. It is replaced inside the compiler with ```move if (condition) () else abort code ``` `assert` is more commonly used than just `abort` by itself. The `abort` examples above can be rewritten using `assert` ```move script { use std::vector; fun pop_twice(v: &mut vector): (T, T) { assert!(vector::length(v) >= 2, 42); // Now uses 'assert' (vector::pop_back(v), vector::pop_back(v)) } } ``` and ```move script { use std::vector; fun check_vec(v: &vector, bound: u64) { let i = 0; let n = vector::length(v); while (i < n) { let cur = *vector::borrow(v, i); assert!(cur <= bound, 42); // Now uses 'assert' i = i + 1; } } } ``` Note that because the operation is replaced with this `if-else`, the argument for the `code` is not always evaluated. For example: ```move assert!(true, 1 / 0) ``` Will not result in an arithmetic error, it is equivalent to ```move if (true) () else (1 / 0) ``` So the arithmetic expression is never evaluated! ### Abort codes in the Move VM When using `abort`, it is important to understand how the `u64` code will be used by the VM. Normally, after successful execution, the Move VM produces a change-set for the changes made to global storage (added/removed resources, updates to existing resources, etc.). If an `abort` is reached, the VM will instead indicate an error. Included in that error will be two pieces of information: * The module that produced the abort (address and name) * The abort code. For example ```move module 0x42::example { public fun aborts() { abort 42 } } script { fun always_aborts() { 0x2::example::aborts() } } ``` If a transaction, such as the script `always_aborts` above, calls `0x2::example::aborts`, the VM would produce an error that indicated the module `0x2::example` and the code `42`. This can be useful for having multiple aborts being grouped together inside a module. In this example, the module has two separate error codes used in multiple functions ```move module 0x42::example { use std::vector; const EMPTY_VECTOR: u64 = 0; const INDEX_OUT_OF_BOUNDS: u64 = 1; // move i to j, move j to k, move k to i public fun rotate_three(v: &mut vector, i: u64, j: u64, k: u64) { let n = vector::length(v); assert!(n > 0, EMPTY_VECTOR); assert!(i < n, INDEX_OUT_OF_BOUNDS); assert!(j < n, INDEX_OUT_OF_BOUNDS); assert!(k < n, INDEX_OUT_OF_BOUNDS); vector::swap(v, i, k); vector::swap(v, j, k); } public fun remove_twice(v: &mut vector, i: u64, j: u64): (T, T) { let n = vector::length(v); assert!(n > 0, EMPTY_VECTOR); assert!(i < n, INDEX_OUT_OF_BOUNDS); assert!(j < n, INDEX_OUT_OF_BOUNDS); assert!(i > j, INDEX_OUT_OF_BOUNDS); (vector::remove(v, i), vector::remove(v, j)) } } ``` ## The type of `abort` The `abort i` expression can have any type! This is because both constructs break from the normal control flow, so they never need to evaluate to the value of that type. The following are not useful, but they will type check ```move let y: address = abort 0; ``` This behavior can be helpful in situations where you have a branching instruction that produces a value on some branches, but not all. For example: ```move script { fun example() { let b = if (x == 0) false else if (x == 1) true else abort 42; // ^^^^^^^^ `abort 42` has type `bool` } } ``` ### Source: https://docs.supra.com/network/move/move-book/basic-concepts/conditionals # Conditionals An `if` expression specifies that some code should only be evaluated if a certain condition is true. For example: ```move script { fun example() { if (x > 5) x = x - 5 } } ``` The condition must be an expression of type `bool`. An `if` expression can optionally include an `else` clause to specify another expression to evaluate when the condition is false. ```move script { fun example() { if (y <= 10) y = y + 1 else y = 10 } } ``` Either the "true" branch or the "false" branch will be evaluated, but not both. Either branch can be a single expression or an expression block. The conditional expressions may produce values so that the `if` expression has a result. ```move script { fun example() { let z = if (x < 100) x else 100; } } ``` The expressions in the true and false branches must have compatible types. For example: ```move script { fun example() { // x and y must be u64 integers let maximum: u64 = if (x > y) x else y; // ERROR! branches different types let z = if (maximum < 10) 10u8 else 100u64; // ERROR! branches different types, as default false-branch is () not u64 if (maximum >= 10) maximum; } } ``` If the `else` clause is not specified, the false branch defaults to the unit value. The following are equivalent: ```move script { fun example() { if (condition) true_branch // implied default: else () if (condition) true_branch else () } } ``` Commonly, `if` expressions are used in conjunction with expression blocks. ```move script { fun example() { let maximum = if (x > y) x else y; if (maximum < 10) { x = x + 10; y = y + 10; } else if (x >= 10 && y >= 10) { x = x - 10; y = y - 10; } } } ``` ## Grammar for Conditionals > _if-expression_ → **if (** _expression_ **)** _expression_ _else-clause__opt_ > _else-clause_ → **else** _expression_ ### Source: https://docs.supra.com/network/move/move-book/basic-concepts/while-for-and-loop # While, For, and Loop Move offers three constructs for looping: `while`, `for`, and `loop`. ## `while` loops The `while` construct repeats the body (an expression of type unit) until the condition (an expression of type `bool`) evaluates to `false`. Here is an example of simple `while` loop that computes the sum of the numbers from `1` to `n`: ```move script { fun sum(n: u64): u64 { let sum = 0; let i = 1; while (i <= n) { sum = sum + i; i = i + 1 }; sum } } ``` Infinite loops are allowed: ```move script { fun foo() { while (true) { } } } ``` ### `break` The `break` expression can be used to exit a loop before the condition evaluates to `false`. For example, this loop uses `break` to find the smallest factor of `n` that's greater than 1: ```move script { fun smallest_factor(n: u64): u64 { // assuming the input is not 0 or 1 let i = 2; while (i <= n) { if (n % i == 0) break; i = i + 1 }; i } } ``` The `break` expression cannot be used outside of a loop. ### `continue` The `continue` expression skips the rest of the loop and continues to the next iteration. This loop uses `continue` to compute the sum of `1, 2, ..., n`, except when the number is divisible by 10: ```move script { fun sum_intermediate(n: u64): u64 { let sum = 0; let i = 0; while (i < n) { i = i + 1; if (i % 10 == 0) continue; sum = sum + i; }; sum } } ``` The `continue` expression cannot be used outside of a loop. ### The type of `break` and `continue` `break` and `continue`, much like `return` and `abort`, can have any type. The following examples illustrate where this flexible typing can be helpful: ```move script { fun pop_smallest_while_not_equal( v1: vector, v2: vector, ): vector { let result = vector::empty(); while (!vector::is_empty(&v1) && !vector::is_empty(&v2)) { let u1 = *vector::borrow(&v1, vector::length(&v1) - 1); let u2 = *vector::borrow(&v2, vector::length(&v2) - 1); let popped = if (u1 < u2) vector::pop_back(&mut v1) else if (u2 < u1) vector::pop_back(&mut v2) else break; // Here, `break` has type `u64` vector::push_back(&mut result, popped); }; result } } ``` ```move script { fun pick( indexes: vector, v1: &vector
, v2: &vector
): vector
{ let len1 = vector::length(v1); let len2 = vector::length(v2); let result = vector::empty(); while (!vector::is_empty(&indexes)) { let index = vector::pop_back(&mut indexes); let chosen_vector = if (index < len1) v1 else if (index < len2) v2 else continue; // Here, `continue` has type `&vector
` vector::push_back(&mut result, *vector::borrow(chosen_vector, index)) }; result } } ``` ## The `for` expression The `for` expression iterates over a range defined using integer-typed `lower_bound` (inclusive) and `upper_bound` (non-inclusive) expressions, executing its loop body for each element of the range. `for` is designed for scenarios where the number of iterations of a loop is determined by a specific range. Here is an example of a `for` loop that computes the sum of the elements in a range from `0` to `n-1`: ```move script { fun sum(n: u64): u64 { let sum = 0; for (i in 0..n) { sum = sum + i; }; sum } } ``` The loop iterator variable (`i` in the above example) currently must be a numeric type (inferred from the bounds), and the bounds `0` and `n` here can be replaced by arbitrary numeric expressions. Each is only evaluated once at the start of the loop. The iterator variable `i` is assigned the `lower_bound` (in this case `0`) and incremented after each loop iteration; the loop exits when the iterator `i` reaches or exceeds `upper_bound` (in this case `n`). ### `break` and `continue` in `for` loops Similar to `while` loops, the `break` expression can be used in `for` loops to exit prematurely. The `continue` expression can be used to skip the current iteration and move to the next. Here's an example that demonstrates the use of both `break` and `continue`. The loop will iterate through numbers from `0` to `n-1`, summing up them up. It will skip numbers that are divisible by `3` (using `continue`) and stop when it encounters a number greater than `10` (using `break`): ```move script { fun sum_conditional(n: u64): u64 { let sum = 0; for (iter in 0..n) { if (iter > 10) { break; // Exit the loop if the number is greater than 10 }; if (iter % 3 == 0) { continue; // Skip the current iteration if the number is divisible by 3 }; sum = sum + iter; }; sum } } ``` ## The `loop` expression The `loop` expression repeats the loop body (an expression with type `()`) until it hits a `break` Without a `break`, the loop will continue forever ```move script { fun foo() { let i = 0; loop { i = i + 1 } } } ``` Here is an example that uses `loop` to write the `sum` function: ```move script { fun sum(n: u64): u64 { let sum = 0; let i = 0; loop { i = i + 1; if (i > n) break; sum = sum + i }; sum } } ``` As you might expect, `continue` can also be used inside a `loop`. Here is `sum_intermediate` from above rewritten using `loop` instead of `while` ```move script { fun sum_intermediate(n: u64): u64 { let sum = 0; let i = 0; loop { i = i + 1; if (i % 10 == 0) continue; if (i > n) break; sum = sum + i }; sum } } ``` ## The type of `while`, `loop`, and `for` expression Move loops are typed expressions. The `while` and `for` expression always has type `()`. ```move script { fun example() { let () = while (i < 10) { i = i + 1 }; let () = for (i in 0..10) {}; } } ``` If a `loop` contains a `break`, the expression has type unit `()` ```move script { fun example() { (loop { if (i < 10) i = i + 1 else break }: ()); let () = loop { if (i < 10) i = i + 1 else break }; } } ``` If `loop` does not have a `break`, `loop` can have any type much like `return`, `abort`, `break`, and `continue`. ```move script { fun example() { (loop (): u64); (loop (): address); (loop (): &vector>); } } ``` ### Source: https://docs.supra.com/network/move/move-book/basic-concepts/functions # Functions ## Functions Function syntax in Move is shared between module functions and script functions. Functions inside of modules are reusable, whereas script functions are only used once to invoke a transaction. ### Declaration Functions are declared with the `fun` keyword followed by the function name, type parameters, parameters, a return type, acquires annotations, and finally the function body. ``` fun <[type_parameters: constraint],*>([identifier: type],*): ``` For example ```move fun foo(x: u64, y: T1, z: T2): (T2, T1, u64) { (z, y, x) } ``` #### Visibility Module functions, by default, can only be called within the same module. These internal (sometimes called private) functions cannot be called from other modules or from scripts. ```move address 0x42 { module m { fun foo(): u64 { 0 } fun calls_foo(): u64 { foo() } // valid } module other { fun calls_m_foo(): u64 { 0x42::m::foo() // ERROR! // ^^^^^^^^^^^^ 'foo' is internal to '0x42::m' } } } script { fun calls_m_foo(): u64 { 0x42::m::foo() // ERROR! // ^^^^^^^^^^^^ 'foo' is internal to '0x42::m' } } ``` To allow access from other modules or from scripts, the function must be declared `public` or `public(friend)`. **`public` visibility** A `public` function can be called by _any_ function defined in _any_ module or script. As shown in the following example, a `public` function can be called by: - other functions defined in the same module, - functions defined in another module, or - the function defined in a script. There are also no restrictions for what the argument types a public function can take and its return type. ```move address 0x42 { module m { public fun foo(): u64 { 0 } fun calls_foo(): u64 { foo() } // valid } module other { fun calls_m_foo(): u64 { 0x42::m::foo() // valid } } } script { fun calls_m_foo(): u64 { 0x42::m::foo() // valid } } ``` **`public(friend)` visibility** The `public(friend)` visibility modifier is a more restricted form of the `public` modifier to give more control about where a function can be used. A `public(friend)` function can be called by: - other functions defined in the same module, or - functions defined in modules which are explicitly specified in the **friend list** (see Friends on how to specify the friend list). Note that since we cannot declare a script to be a friend of a module, the functions defined in scripts can never call a `public(friend)` function. ```move address 0x42 { module m { friend 0x42::n; // friend declaration public(friend) fun foo(): u64 { 0 } fun calls_foo(): u64 { foo() } // valid } module n { fun calls_m_foo(): u64 { 0x42::m::foo() // valid } } module other { fun calls_m_foo(): u64 { 0x42::m::foo() // ERROR! // ^^^^^^^^^^^^ 'foo' can only be called from a 'friend' of module '0x42::m' } } } script { fun calls_m_foo(): u64 { 0x42::m::foo() // ERROR! // ^^^^^^^^^^^^ 'foo' can only be called from a 'friend' of module '0x42::m' } } ``` #### `entry` modifier The `entry` modifier is designed to allow module functions to be safely and directly invoked much like scripts. This allows module writers to specify which functions can be invoked to begin execution. The module writer then knows that any non-`entry` function will be called from a Move program already in execution. Essentially, `entry` functions are the "main" functions of a module, and they specify where Move programs start executing. Note though, an `entry` function _can_ still be called by other Move functions. So while they _can_ serve as the start of a Move program, they aren't restricted to that case. For example: ```move address 0x42 { module m { public entry fun foo() {} fun calls_foo(): u64 { foo() } // valid! } module n { fun calls_m_foo(): u64 { 0x42::m::foo() // valid! } } module other { public entry fun calls_m_foo() { 0x42::m::foo(); // valid! } } } script { fun calls_m_foo(): u64 { 0x42::m::foo() // valid! } } ``` Even internal functions can be marked as `entry`! This lets you guarantee that the function is called only at the beginning of execution (assuming you do not call it elsewhere in your module) ```move address 0x42 { module m { entry fun foo() { 0 } // valid! entry functions do not have to be public } module n { fun calls_m_foo(): u64 { 0x42::m::foo() // ERROR! // ^^^^^^^^^^^^ 'foo' is internal to '0x42::m' } } module other { public entry fun calls_m_foo() { 0x42::m::foo() // ERROR! // ^^^^^^^^^^^^ 'foo' is internal to '0x42::m' } } } script { fun calls_m_foo(): u64 { 0x42::m::foo() // ERROR! // ^^^^^^^^^^^^ 'foo' is internal to '0x42::m' } } ``` Entry functions can take primitive types, String, and vector arguments but cannot take Structs (e.g. Option). They also must not have any return values. #### Name Function names can start with letters `a` to `z` or letters `A` to `Z`. After the first character, function names can contain underscores `_`, letters `a` to `z`, letters `A` to `Z`, or digits `0` to `9`. ```move module 0x42::example { // all valid fun FOO() {} fun bar_42() {} fun bAZ19() {} // invalid fun _bAZ19() {} // Function names cannot start with '_' } ``` #### Type Parameters After the name, functions can have type parameters ```move module 0x42::example { fun id(x: T): T { x } fun example(x: T1, y: T2): (T1, T1, T2) { (copy x, x, y) } } ``` For more details, see Move generics. #### Parameters Functions parameters are declared with a local variable name followed by a type annotation ```move module 0x42::example { fun add(x: u64, y: u64): u64 { x + y } } ``` We read this as `x` has type `u64` A function does not have to have any parameters at all. ```move module 0x42::example { fun useless() {} } ``` This is very common for functions that create new or empty data structures ```move module 0x42::example { struct Counter { count: u64 } fun new_counter(): Counter { Counter { count: 0 } } } ``` #### Acquires When a function accesses a resource using `move_from`, `borrow_global`, or `borrow_global_mut`, the function must indicate that it `acquires` that resource. This is then used by Move's type system to ensure the references into global storage are safe, specifically that there are no dangling references into global storage. ```move module 0x42::example { struct Balance has key { value: u64 } public fun add_balance(s: &signer, value: u64) { move_to(s, Balance { value }) } public fun extract_balance(addr: address): u64 acquires Balance { let Balance { value } = move_from(addr); // acquires needed value } } ``` `acquires` annotations must also be added for transitive calls within the module. Calls to these functions from another module do not need to annotated with these acquires because one module cannot access resources declared in another module - --so the annotation is not needed to ensure reference safety. ```move module 0x42::example { struct Balance has key { value: u64 } public fun add_balance(s: &signer, value: u64) { move_to(s, Balance { value }) } public fun extract_balance(addr: address): u64 acquires Balance { let Balance { value } = move_from(addr); // acquires needed value } public fun extract_and_add(sender: address, receiver: &signer) acquires Balance { let value = extract_balance(sender); // acquires needed here add_balance(receiver, value) } } module 0x42::other { fun extract_balance(addr: address): u64 { 0x42::example::extract_balance(addr) // no acquires needed } } ``` A function can `acquire` as many resources as it needs to ```move module 0x42::example { use std::vector; struct Balance has key { value: u64 } struct Box has key { items: vector } public fun store_two( addr: address, item1: Item1, item2: Item2, ) acquires Balance, Box { let balance = borrow_global_mut(addr); // acquires needed balance.value = balance.value - 2; let box1 = borrow_global_mut>(addr); // acquires needed vector::push_back(&mut box1.items, item1); let box2 = borrow_global_mut>(addr); // acquires needed vector::push_back(&mut box2.items, item2); } } ``` #### Return type After the parameters, a function specifies its return type. ```move module 0x42::example { fun zero(): u64 { 0 } } ``` Here `: u64` indicates that the function's return type is `u64`. A function can return an immutable \`&\` or mutable \`\&mut\` \[reference]\(references.mdx) if derived from an input reference. Keep in mind, this means that a function \[cannot return a reference to global storage]\(references.mdx#references-cannot-be-stored) unless it is an \[inline function]\(#inline-functions). Using tuples, a function can return multiple values: ```move module 0x42::example { fun one_two_three(): (u64, u64, u64) { (0, 1, 2) } } ``` If no return type is specified, the function has an implicit return type of unit `()`. These functions are equivalent: ```move module 0x42::example { fun just_unit1(): () { () } fun just_unit2() { () } fun just_unit3() {} } ``` `script` functions must have a return type of unit `()`: ```move script { fun do_nothing() {} } ``` As mentioned in the tuples section, these tuple "values" are virtual and do not exist at runtime. So for a function that returns unit `()`, it will not be returning any value at all during execution. #### Function body A function's body is an expression block. The return value of the function is the last value in the sequence ```move module 0x42::example { fun example(): u64 { let x = 0; x = x + 1; x // returns 'x' } } ``` See the section below for more information on returns For more information on expression blocks, see Move variables. #### Native Functions Some functions do not have a body specified, and instead have the body provided by the VM. These functions are marked `native`. Without modifying the VM source code, a programmer cannot add new native functions. Furthermore, it is the intent that `native` functions are used for either standard library code or for functionality needed for the given Move environment. Most `native` functions you will likely see are in standard library code such as `vector` ```move module std::vector { native public fun empty(): vector; // ... } ``` ### Calling When calling a function, the name can be specified either through an alias or fully qualified ```move module 0x42::example { public fun zero(): u64 { 0 } } script { use 0x42::example::{Self, zero}; fun call_zero() { // With the `use` above all of these calls are equivalent 0x42::example::zero(); example::zero(); zero(); } } ``` When calling a function, an argument must be given for every parameter. ```move module 0x42::example { public fun takes_none(): u64 { 0 } public fun takes_one(x: u64): u64 { x } public fun takes_two(x: u64, y: u64): u64 { x + y } public fun takes_three(x: u64, y: u64, z: u64): u64 { x + y + z } } script { use 0x42::example; fun call_all() { example::takes_none(); example::takes_one(0); example::takes_two(0, 1); example::takes_three(0, 1, 2); } } ``` Type arguments can be either specified or inferred. Both calls are equivalent. ```move module 0x42::example { public fun id(x: T): T { x } } script { use 0x42::example; fun call_all() { example::id(0); example::id(0); } } ``` For more details, see Move generics. ### Returning values The result of a function, its "return value", is the final value of its function body. For example ```move module 0x42::example { fun add(x: u64, y: u64): u64 { x + y } } ``` As mentioned above, the function's body is an expression block. The expression block can be a sequence of various statements, and the final expression in the block will be the value of that block. ```move module 0x42::example { fun double_and_add(x: u64, y: u64): u64 { let double_x = x * 2; let double_y = y * 2; double_x + double_y } } ``` The return value here is `double_x + double_y` #### `return` expression A function implicitly returns the value that its body evaluates to. However, functions can also use the explicit `return` expression: ```move module 0x42::example { fun f1(): u64 { return 0 } fun f2(): u64 { 0 } } ``` These two functions are equivalent. In this slightly more involved example, the function subtracts two `u64` values, but returns early with `0` if the second value is too large: ```move module 0x42::example { fun safe_sub(x: u64, y: u64): u64 { if (y > x) return 0; x - y } } ``` Note that the body of this function could also have been written as `if (y > x) 0 else x - y`. However, where `return` really shines is in exiting deep within other control flow constructs. In this example, the function iterates through a vector to find the index of a given value: ```move module 0x42::example { use std::vector; use std::option::{Self, Option}; fun index_of(v: &vector, target: &T): Option { let i = 0; let n = vector::length(v); while (i < n) { if (vector::borrow(v, i) == target) return option::some(i); i = i + 1 }; option::none() } } ``` Using `return` without an argument is shorthand for `return ()`. That is, the following two functions are equivalent: ```move module 0x42::example { fun foo1() { return } fun foo2() { return () } } ``` ### Inline Functions Inline functions are functions whose bodies are expanded in place at the caller location during compile time. Thus, inline functions do not appear in Move bytecode as a separate functions: all calls to them are expanded away by the compiler.\ In certain circumstances, they may lead to faster execution and save gas.\ However, users should be aware that they could lead to larger bytecode size: excessive inlining potentially triggers various size restrictions. One can define an inline function by adding the `inline` keyword to a function declaration as shown below: ```move module 0x42::example { inline fun percent(x: u64, y: u64): u64 { x * 100 / y } } ``` If we call this inline function as `percent(2, 200)`, the compiler will replace this call with the inline function's body, as if the user has written `2 * 100 / 200`. #### Function parameters and lambda expressions Inline functions support _function parameters_, which accept lambda expressions (i.e., anonymous functions) as arguments.\ This feature allows writing several common programming patterns elegantly.\ Similar to inline functions, lambda expressions are also expanded at call site. A lambda expression includes a list of parameter names (enclosed within `||`) followed by the body. Some simple examples are: `|x| x + 1`, `|x, y| x + y`, `|| 1`, `|| { 1 }`. A lambda's body can refer to variables available in the scope where the lambda is defined: this is also known as capturing. Such variables can be read or written (if mutable) by the lambda expression. The type of function parameter is written as `|| `. For example, when the function parameter type is `|u64, u64| bool`, any lambda expression that takes two `u64` parameters and returns a `bool` value can be provided as the argument. Below is an example that showcases many of these concepts in action (this example is taken from the `std::vector` module): ```move module 0x42::example { /// Fold the function over the elements. /// E.g, `fold(vector[1,2,3], 0, f)` is the same as `f(f(f(0, 1), 2), 3)`. public inline fun fold( v: vector, init: Accumulator, f: |Accumulator, Element|Accumulator ): Accumulator { let accu = init; // Note: `for_each` is an inline function, but is not shown here. for_each(v, |elem| accu = f(accu, elem)); accu } } ``` The type signature of the elided public inline function `for_each` is `fun for_each(v: vector, f: |Element|)`. Its second parameter `f` is a function parameter which accepts any lambda expression that consumes an `Element` and returns nothing. In the code example, we use the lambda expression `|elem| accu = f(accu, elem)` as an argument to this function parameter. Note that this lambda expression captures the variable `accu` from the outer scope. #### Current restrictions There are plans to loosen some of these restrictions in the future, but for now, - Only inline functions can have function parameters. - Only explicit lambda expressions can be passed as an argument to an inline function's function parameters. - Inline functions and lambda expressions - cannot have `return` expressions; or free `break` or `continue` expressions (occurring outside of a loop) - cannot return lambda expressions. - Cyclic recursion involving only inline functions is not allowed. - Parameters in lambda expressions must not be type annotated (e.g., `|x: u64| x + 1` is not allowed): their types are inferred. #### Additional considerations - Avoid using module-private constants/methods in public inline functions.\ When such inline functions are called outside of that module, an in-place expansion at call site leads to invalid access of the private constants/methods. - Avoid marking large functions that are called at different locations as inline. Also avoid inline functions calling lots of other inline functions transitively.\ These may lead to excessive inlining and increase the bytecode size. - Inline functions can be useful for returning references to global storage, which non-inline functions cannot do. #### Inline functions and references As mentioned briefly in a "tip" above `inline` functions can use references more freely than normal functions. For example, actual arguments to a call to a non-`inline` function may not be aliased unsafely (multiple `&` parameters referring to the same object, with at least one of them `&mut`), but calls to `inline` functions do not necessarily have that restriction, as long as no reference usage conflicts remain after the function is inlined. ```move inline fun add(dest: &mut u64, a: &u64, b: &u64) { *dest = *a + *b; } fun user(...) { ... x = 3; add(&mut x, &x, &x); // legal only because of inlining ... } ``` A reference-typed value returned from a non-inline function must be derived from a reference parameter passed to the function, but this need not be the case for an inline function, as long as the referred value is in the function scope after inlining. The exact details of reference safety and "borrow checking" are complex and documented elsewhere. Advanced Move users find new expressiveness by understanding that "borrow checking" happens only after all `inline` function calls are expanded. However, with this power comes new responsibility: documentation of a nontrivial `inline` function should probably explain any underlying restrictions on reference parameters and results at a call site. ### Source: https://docs.supra.com/network/move/move-book/basic-concepts/structs-and-resources # Structs and Resources A _struct_ is a user-defined data structure containing typed fields. Structs can store any non-reference type, including other structs. We often refer to struct values as _resources_ if they cannot be copied and cannot be dropped. In this case, resource values must have ownership transferred by the end of the function. This property makes resources particularly well served for defining global storage schemas or for representing important values (such as a token). By default, structs are linear and ephemeral. By this we mean that they: cannot be copied, cannot be dropped, and cannot be stored in global storage. This means that all values have to have ownership transferred (linear) and the values must be dealt with by the end of the program's execution (ephemeral). We can relax this behavior by giving the struct abilities which allow values to be copied or dropped and also to be stored in global storage or to define global storage schemas. ## Defining Structs Structs must be defined inside a module: ```move module 0x2::m { struct Foo { x: u64, y: bool } struct Bar {} struct Baz { foo: Foo, } // ^ note: it is fine to have a trailing comma } ``` Structs cannot be recursive, so the following definition is invalid: ```move module 0x2::m { struct Foo { x: Foo } // ^ error! Foo cannot contain Foo } ``` As mentioned above: by default, a struct declaration is linear and ephemeral. So to allow the value to be used with certain operations (that copy it, drop it, store it in global storage, or use it as a storage schema), structs can be granted abilities by annotating them with`has `: ```move module 0x2::m { struct Foo has copy, drop { x: u64, y: bool } } ``` For more details, see the annotating structs section. ### Naming Structs must start with a capital letter `A` to `Z`. After the first letter, struct names can contain underscores `_`, letters `a` to `z`, letters `A` to `Z`, or digits `0` to `9`. ```move module 0x2::m { struct Foo {} struct BAR {} struct B_a_z_4_2 {} } ``` This naming restriction of starting with `A` to `Z` is in place to give room for future language features. It may or may not be removed later. ## Using Structs ### Creating Structs Values of a struct type can be created (or "packed") by indicating the struct name, followed by value for each field: ```move module 0x2::m { struct Foo has drop { x: u64, y: bool } struct Baz has drop { foo: Foo } fun example() { let foo = Foo { x: 0, y: false }; let baz = Baz { foo }; } } ``` If you initialize a struct field with a local variable whose name is the same as the field, you can use the following shorthand: ```move module 0x2::m { fun example() { let baz = Baz { foo: foo }; // is equivalent to let baz = Baz { foo }; } } ``` This is called sometimes called "field name punning". ### Destroying Structs via Pattern Matching Struct values can be destroyed by binding or assigning them patterns. ```move module 0x2::m { struct Foo { x: u64, y: bool } struct Bar { foo: Foo } struct Baz {} fun example_destroy_foo() { let foo = Foo { x: 3, y: false }; let Foo { x, y: foo_y } = foo; // ^ shorthand for `x: x` // two new bindings // x: u64 = 3 // foo_y: bool = false } fun example_destroy_foo_wildcard() { let foo = Foo { x: 3, y: false }; let Foo { x, y: _ } = foo; // only one new binding since y was bound to a wildcard // x: u64 = 3 } fun example_destroy_foo_assignment() { let x: u64; let y: bool; Foo { x, y } = Foo { x: 3, y: false }; // mutating existing variables x & y // x = 3, y = false } fun example_foo_ref() { let foo = Foo { x: 3, y: false }; let Foo { x, y } = &foo; // two new bindings // x: &u64 // y: &bool } fun example_foo_ref_mut() { let foo = Foo { x: 3, y: false }; let Foo { x, y } = &mut foo; // two new bindings // x: &mut u64 // y: &mut bool } fun example_destroy_bar() { let bar = Bar { foo: Foo { x: 3, y: false } }; let Bar { foo: Foo { x, y } } = bar; // ^ nested pattern // two new bindings // x: u64 = 3 // y: bool = false } fun example_destroy_baz() { let baz = Baz {}; let Baz {} = baz; } } ``` ### Borrowing Structs and Fields The `&` and `&mut` operator can be used to create references to structs or fields. These examples include some optional type annotations (e.g., `: &Foo`) to demonstrate the type of operations. ```move module 0x2::m { fun example() { let foo = Foo { x: 3, y: true }; let foo_ref: &Foo = &foo; let y: bool = foo_ref.y; // reading a field via a reference to the struct let x_ref: &u64 = &foo.x; let x_ref_mut: &mut u64 = &mut foo.x; *x_ref_mut = 42; // modifying a field via a mutable reference } } ``` It is possible to borrow inner fields of nested structs: ```move module 0x2::m { fun example() { let foo = Foo { x: 3, y: true }; let bar = Bar { foo }; let x_ref = &bar.foo.x; } } ``` You can also borrow a field via a reference to a struct: ```move module 0x2::m { fun example() { let foo = Foo { x: 3, y: true }; let foo_ref = &foo; let x_ref = &foo_ref.x; // this has the same effect as let x_ref = &foo.x } } ``` ### Reading and Writing Fields If you need to read and copy a field's value, you can then dereference the borrowed field: ```move module 0x2::m { fun example() { let foo = Foo { x: 3, y: true }; let bar = Bar { foo: copy foo }; let x: u64 = *&foo.x; let y: bool = *&foo.y; let foo2: Foo = *&bar.foo; } } ``` If the field is implicitly copyable, the dot operator can be used to read fields of a struct without any borrowing. (Only scalar values with the `copy` ability are implicitly copyable.) ```move module 0x2::m { fun example() { let foo = Foo { x: 3, y: true }; let x = foo.x; // x == 3 let y = foo.y; // y == true } } ``` Dot operators can be chained to access nested fields: ```move module 0x2::m { fun example() { let baz = Baz { foo: Foo { x: 3, y: true } }; let x = baz.foo.x; // x = 3; } } ``` However, this is not permitted for fields that contain non-primitive types, such a vector or another struct: ```move module 0x2::m { fun example() { let foo = Foo { x: 3, y: true }; let bar = Bar { foo }; let foo2: Foo = *&bar.foo; let foo3: Foo = bar.foo; // error! must add an explicit copy with *& } } ``` The reason behind this design decision is that copying a vector or another struct might be an expensive operation. It is important for a programmer to be aware of this copy and make others aware with the explicit syntax `*&`. In addition, reading from fields, the dot syntax can be used to modify fields, regardless of the field being a primitive type or some other struct. ```move module 0x2::m { fun example() { let foo = Foo { x: 3, y: true }; foo.x = 42; // foo = Foo { x: 42, y: true } foo.y = !foo.y; // foo = Foo { x: 42, y: false } let bar = Bar { foo }; // bar = Bar { foo: Foo { x: 42, y: false } } bar.foo.x = 52; // bar = Bar { foo: Foo { x: 52, y: false } } bar.foo = Foo { x: 62, y: true }; // bar = Bar { foo: Foo { x: 62, y: true } } } } ``` The dot syntax also works via a reference to a struct: ```move module 0x2::m { fun example() { let foo = Foo { x: 3, y: true }; let foo_ref = &mut foo; foo_ref.x = foo_ref.x + 1; } } ``` ## Privileged Struct Operations Most struct operations on a struct type `T` can only be performed inside the module that declares`T`: * Struct types can only be created ("packed"), destroyed ("unpacked") inside the module that defines\ the struct. * The fields of a struct are only accessible inside the module that defines the struct. Following these rules, if you want to modify your struct outside the module, you will need to provide public APIs for them. The end of the chapter contains some examples of this. However, struct _types_ are always visible to another module or script: ```move // m.move module 0x2::m { struct Foo has drop { x: u64 } public fun new_foo(): Foo { Foo { x: 42 } } } ``` ```move // n.move module 0x2::n { use 0x2::m; struct Wrapper has drop { foo: m::Foo } fun f1(foo: m::Foo) { let x = foo.x; // ^ error! cannot access fields of `foo` here } fun f2() { let foo_wrapper = Wrapper { foo: m::new_foo() }; } } ``` Note that structs do not have visibility modifiers (e.g., `public` or `private`). ## Ownership As mentioned above in Defining Structs, structs are by default linear and\ ephemeral. This means they cannot be copied or dropped. This property can be very useful when modeling real world resources like money, as you do not want money to be duplicated or get lost in circulation. ```move module 0x2::m { struct Foo { x: u64 } public fun copying_resource() { let foo = Foo { x: 100 }; let foo_copy = copy foo; // error! 'copy'-ing requires the 'copy' ability let foo_ref = &foo; let another_copy = *foo_ref // error! dereference requires the 'copy' ability } public fun destroying_resource1() { let foo = Foo { x: 100 }; // error! when the function returns, foo still contains a value. // This destruction requires the 'drop' ability } public fun destroying_resource2(f: &mut Foo) { *f = Foo { x: 100 } // error! // destroying the old value via a write requires the 'drop' ability } } ``` To fix the second example (`fun destroying_resource1`), you would need to manually "unpack" the resource: ```move module 0x2::m { struct Foo { x: u64 } public fun destroying_resource1_fixed() { let foo = Foo { x: 100 }; let Foo { x: _ } = foo; } } ``` Recall that you are only able to deconstruct a resource within the module in which it is defined. This can be leveraged to enforce certain invariants in a system, for example, conservation of money. If on the other hand, your struct does not represent something valuable, you can add the abilities`copy` and `drop` to get a struct value that might feel more familiar from other programming languages: ```move module 0x2::m { struct Foo has copy, drop { x: u64 } public fun run() { let foo = Foo { x: 100 }; let foo_copy = copy foo; // ^ this code copies foo, whereas `let x = foo` or // `let x = move foo` both move foo let x = foo.x; // x = 100 let x_copy = foo_copy.x; // x = 100 // both foo and foo_copy are implicitly discarded when the function returns } } ``` ## Storing Resources in Global Storage Only structs with the `key` ability can be saved directly inpersistent global storage. All values stored within those `key` structs must have the `store` ability. See the ability andglobal storage chapters for more detail. ## Examples Here are two short examples of how you might use structs to represent valuable data (in the case of`Coin`) or more classical data (in the case of `Point` and `Circle`). ### Example 1: Coin ```move module 0x2::m { // We do not want the Coin to be copied because that would be duplicating this "money", // so we do not give the struct the 'copy' ability. // Similarly, we do not want programmers to destroy coins, so we do not give the struct the // 'drop' ability. // However, we *want* users of the modules to be able to store this coin in persistent global // storage, so we grant the struct the 'store' ability. This struct will only be inside of // other resources inside of global storage, so we do not give the struct the 'key' ability. struct Coin has store { value: u64, } public fun mint(value: u64): Coin { // You would want to gate this function with some form of access control to prevent // anyone using this module from minting an infinite amount of coins. Coin { value } } public fun withdraw(coin: &mut Coin, amount: u64): Coin { assert!(coin.balance >= amount, 1000); coin.value = coin.value - amount; Coin { value: amount } } public fun deposit(coin: &mut Coin, other: Coin) { let Coin { value } = other; coin.value = coin.value + value; } public fun split(coin: Coin, amount: u64): (Coin, Coin) { let other = withdraw(&mut coin, amount); (coin, other) } public fun merge(coin1: Coin, coin2: Coin): Coin { deposit(&mut coin1, coin2); coin1 } public fun destroy_zero(coin: Coin) { let Coin { value } = coin; assert!(value == 0, 1001); } } ``` ### Example 2: Geometry ```move module 0x2::point { struct Point has copy, drop, store { x: u64, y: u64, } public fun new(x: u64, y: u64): Point { Point { x, y } } public fun x(p: &Point): u64 { p.x } public fun y(p: &Point): u64 { p.y } fun abs_sub(a: u64, b: u64): u64 { if (a < b) { b - a } else { a - b } } public fun dist_squared(p1: &Point, p2: &Point): u64 { let dx = abs_sub(p1.x, p2.x); let dy = abs_sub(p1.y, p2.y); dx*dx + dy*dy } } ``` ```move module 0x2::circle { use 0x2::point::{Self, Point}; struct Circle has copy, drop, store { center: Point, radius: u64, } public fun new(center: Point, radius: u64): Circle { Circle { center, radius } } public fun overlaps(c1: &Circle, c2: &Circle): bool { let dist_squared_value = point::dist_squared(&c1.center, &c2.center); let r1 = c1.radius; let r2 = c2.radius; dist_squared_value <= r1*r1 + 2*r1*r2 + r2*r2 } } ``` ### Source: https://docs.supra.com/network/move/move-book/basic-concepts/constants # Constants Constants are a way of giving a name to shared, static values inside of a `module` or `script`. The constant's must be known at compilation. The constant's value is stored in the compiled module or script. And each time the constant is used, a new copy of that value is made. ## Declaration Constant declarations begin with the `const` keyword, followed by a name, a type, and a value. They can exist in either a script or module ``` const : = ; ``` For example ```move script { const MY_ERROR_CODE: u64 = 0; fun main(input: u64) { assert!(input > 0, MY_ERROR_CODE); } } module 0x42::example { const MY_ADDRESS: address = @0x42; public fun permissioned(s: &signer) { assert!(std::signer::address_of(s) == MY_ADDRESS, 0); } } ``` ## Naming Constants must start with a capital letter `A` to `Z`. After the first letter, constant names can contain underscores `_`, letters `a` to `z`, letters `A` to `Z`, or digits `0` to `9`. ```move script { const FLAG: bool = false; const MY_ERROR_CODE: u64 = 0; const ADDRESS_42: address = @0x42; } ``` Even though you can use letters `a` to `z` in a constant. The general style guidelines are to use just uppercase letters `A` to `Z`, with underscores `_` between each word. This naming restriction of starting with `A` to `Z` is in place to give room for future language features. It may or may not be removed later. ## Visibility `public` constants are not currently supported. `const` values can be used only in the declaring module. ## Valid Expressions Currently, constants are limited to the primitive types `bool`, `u8`, `u16`, `u32`, `u64`, `u128`, `u256`, `address`, and`vector`. Future support for other `vector` values (besides the "string"-style literals) will come later. ### Values Commonly, `const`s are assigned a simple value, or literal, of their type. For example ```move script { const MY_BOOL: bool = false; const MY_ADDRESS: address = @0x70DD; const BYTES: vector = b"hello world"; const HEX_BYTES: vector = x"DEADBEEF"; } ``` ### Complex Expressions In addition to literals, constants can include more complex expressions, as long as the compiler is able to reduce the expression to a value at compile time. Currently, equality operations, all boolean operations, all bitwise operations, and all arithmetic operations can be used. ```move script { const RULE: bool = true && false; const CAP: u64 = 10 * 100 + 1; const SHIFTY: u8 = { (1 << 1) * (1 << 2) * (1 << 3) * (1 << 4) }; const HALF_MAX: u128 = 340282366920938463463374607431768211455 / 2; const REM: u256 = 57896044618658097711785492504343953926634992332820282019728792003956564819968 % 654321; const EQUAL: bool = 1 == 1; } ``` If the operation results in a runtime exception, the compiler will give an error that it is unable to generate the constant's value ```move script { const DIV_BY_ZERO: u64 = 1 / 0; // error! const SHIFT_BY_A_LOT: u64 = 1 << 100; // error! const NEGATIVE_U64: u64 = 0 - 1; // error! } ``` Note that constants cannot currently refer to other constants. This feature, along with support for other expressions, will be added in the future. ### Source: https://docs.supra.com/network/move/move-book/basic-concepts/generics # Generics Generics can be used to define functions and structs over different input data types. This language feature is sometimes referred to as _parametric polymorphism_. In Move, we will often use the term generics interchangeably with type parameters and type arguments. Generics are commonly used in library code, such as in vector, to declare code that works over any possible instantiation (that satisfies the specified constraints). In other frameworks, generic code can sometimes be used to interact with global storage many different ways that all still share the same implementation. ## Declaring Type Parameters Both functions and structs can take a list of type parameters in their signatures, enclosed by a pair of angle brackets `<...>`. ### Generic Functions Type parameters for functions are placed after the function name and before the (value) parameter list. The following code defines a generic identity function that takes a value of any type and returns that value unchanged. ```move module 0x42::example { fun id(x: T): T { // this type annotation is unnecessary but valid (x: T) } } ``` Once defined, the type parameter `T` can be used in parameter types, return types, and inside the function body. ### Generic Structs Type parameters for structs are placed after the struct name, and can be used to name the types of the fields. ```move module 0x42::example { struct Foo has copy, drop { x: T } struct Bar has copy, drop { x: T1, y: vector, } } ``` Note that type parameters do not have to be used ## Type Arguments ### Calling Generic Functions When calling a generic function, one can specify the type arguments for the function's type parameters in a list enclosed by a pair of angle brackets. ```move module 0x42::example { fun foo() { let x = id(true); } } ``` If you do not specify the type arguments, Move's type inference will supply them for you. ### Using Generic Structs Similarly, one can attach a list of type arguments for the struct's type parameters when constructing or destructing values of generic types. ```move module 0x42::example { fun foo() { let foo = Foo { x: true }; let Foo { x } = foo; } } ``` If you do not specify the type arguments, Move's type inference will supply them for you. ### Type Argument Mismatch If you specify the type arguments, and they conflict with the actual values supplied, an error will be given: ```move module 0x42::example { fun foo() { let x = id(true); // error! true is not a u64 } } ``` and similarly: ```move module 0x42::example { fun foo() { let foo = Foo { x: 0 }; // error! 0 is not a bool let Foo
{ x } = foo; // error! bool is incompatible with address } } ``` ## Type Inference In most cases, the Move compiler will be able to infer the type arguments, so you don't have to write them down explicitly. Here's what the examples above would look like if we omit the type arguments: ```move module 0x42::example { fun foo() { let x = id(true); // ^ is inferred let foo = Foo { x: true }; // ^ is inferred let Foo { x } = foo; // ^ is inferred } } ``` Note: when the compiler is unable to infer the types, you'll need annotate them manually. A common scenario is to call a function with type parameters appearing only at return positions. ```move module 0x2::m { use std::vector; fun foo() { // let v = vector::new(); // ^ The compiler cannot figure out the element type. let v = vector::new(); // ^~~~~ Must annotate manually. } } ``` However, the compiler will be able to infer the type if that return value is used later in that function: ```move module 0x2::m { use std::vector; fun foo() { let v = vector::new(); // ^ is inferred vector::push_back(&mut v, 42); } } ``` ## Unused Type Parameters For a struct definition, an unused type parameter is one that does not appear in any field defined in the struct, but is checked statically at compile time. Move allows unused type parameters so the following struct definition is valid: ```move module 0x2::m { struct Foo { foo: u64 } } ``` This can be convenient when modeling certain concepts. Here is an example: ```move module 0x2::m { // Currency Specifiers struct Currency1 {} struct Currency2 {} // A generic coin type that can be instantiated using a currency // specifier type. // e.g. Coin, Coin etc. struct Coin has store { value: u64 } // Write code generically about all currencies public fun mint_generic(value: u64): Coin { Coin { value } } // Write code concretely about one currency public fun mint_concrete(value: u64): Coin { Coin { value } } } ``` In this example,`struct Coin` is generic on the `Currency` type parameter, which specifies the currency of the coin and allows code to be written either generically on any currency or concretely on a specific currency. This genericity applies even when the `Currency` type parameter does not appear in any of the fields defined in `Coin`. ### Phantom Type Parameters In the example above, although `struct Coin` asks for the `store` ability,\ neither `Coin` nor `Coin` will have the `store` ability. This is because of the rules forConditional Abilities and Generic Types and the fact that `Currency1` and `Currency2` don't have the `store` ability, despite the fact that they are not even used in the body of `struct Coin`. This might cause some unpleasant consequences. For example, we are unable to put `Coin` into a wallet in the global storage. One possible solution would be to add spurious ability annotations to `Currency1` and `Currency2` (i.e., `struct Currency1 has store {}`). But, this might lead to bugs or security vulnerabilities because it weakens the types with unnecessary ability declarations. For example, we would never expect a resource in the global storage to have a field in type `Currency1`, but this would be possible with the spurious `store` ability. Moreover, the spurious annotations would be infectious, requiring many functions generic on the unused type parameter to also include the necessary constraints. Phantom type parameters solve this problem. Unused type parameters can be marked as _phantom_ type parameters, which do not participate in the ability derivation for structs. In this way, arguments to phantom type parameters are not considered when deriving the abilities for generic types, thus avoiding the need for spurious ability annotations. For this relaxed rule to be sound, Move's type system guarantees that a parameter declared as `phantom` is either not used at all in the struct definition, or it is only used as an argument to type parameters also declared as `phantom`. #### Declaration In a struct definition a type parameter can be declared as phantom by adding the `phantom` keyword before its declaration. If a type parameter is declared as phantom we say it is a phantom type parameter. When defining a struct, Move's type checker ensures that every phantom type parameter is either not used inside the struct definition or it is only used as an argument to a phantom type parameter. More formally, if a type is used as an argument to a phantom type parameter\ we say the type appears in _phantom position_. With this definition in place, the rule for the correct use of phantom parameters can be specified as follows: **A phantom type parameter can only appear in phantom position**. The following two examples show valid uses of phantom parameters. In the first one, the parameter `T1` is not used at all inside the struct definition. In the second one, the parameter `T1` is only used as an argument to a phantom type parameter. ```move module 0x2::m { struct S1 { f: u64 } // ^^ // Ok: T1 does not appear inside the struct definition struct S2 { f: S1 } // ^^ // Ok: T1 appears in phantom position } ``` The following code shows examples of violations of the rule: ```move module 0x2::m { struct S1 { f: T } // ^ // Error: Not a phantom position struct S2 { f: T } struct S3 { f: S2 } // ^ // Error: Not a phantom position } ``` #### Instantiation When instantiating a struct, the arguments to phantom parameters are excluded when deriving the struct abilities. For example, consider the following code: ```move module 0x2::m { struct S has copy { f: T1 } struct NoCopy {} struct HasCopy has copy {} } ``` Consider now the type `S`. Since `S` is defined with `copy` and all non-phantom arguments have `copy` then `S` also has `copy`. #### Phantom Type Parameters with Ability Constraints Ability constraints and phantom type parameters are orthogonal features in the sense that phantom parameters can be declared with ability constraints. When instantiating a phantom type parameter with an ability constraint, the type argument has to satisfy that constraint, even though the parameter is phantom. For example, the following definition is perfectly valid: ```move module 0x2::m { struct S {} } ``` The usual restrictions apply and `T` can only be instantiated with arguments having `copy`. ## Constraints In the examples above, we have demonstrated how one can use type parameters to define "unknown" types that can be plugged in by callers at a later time. This however means the type system has little information about the type and has to perform checks in a very conservative way. In some sense, the type system must assume the worst case scenario for an unconstrained generic. Simply put, by default generic type parameters have no abilities. This is where constraints come into play: they offer a way to specify what properties these unknown types have so the type system can allow operations that would otherwise be unsafe. ### Declaring Constraints Constraints can be imposed on type parameters using the following syntax. ```move // T is the name of the type parameter T: (+ )* ``` The `` can be any of the four abilities, and a type parameter can be constrained with multiple abilities at once. So all the following would be valid type parameter declarations: ```move T: copy T: copy + drop T: copy + drop + store + key ``` ### Verifying Constraints Constraints are checked at call sites so the following code won't compile. ```move module 0x2::m { struct Foo { x: T } struct Bar { x: Foo } // ^ error! u8 does not have 'key' struct Baz { x: Foo } // ^ error! T does not have 'key' } ``` ```move module 0x2::m { struct R {} fun unsafe_consume(x: T) { // error! x does not have 'drop' } fun consume(x: T) { // valid! // x will be dropped automatically } fun foo() { let r = R {}; consume(r); // ^ error! R does not have 'drop' } } ``` ```move module 0x2::m { struct R {} fun unsafe_double(x: T) { (copy x, x) // error! x does not have 'copy' } fun double(x: T) { (copy x, x) // valid! } fun foo(): (R, R) { let r = R {}; double(r) // ^ error! R does not have 'copy' } } ``` For more information, see the abilities section on conditional abilities and generic types. ## Limitations on Recursions ### Recursive Structs Generic structs can not contain fields of the same type, either directly or indirectly, even with different type arguments. All the following struct definitions are invalid: ```move module 0x2::m { struct Foo { x: Foo // error! 'Foo' containing 'Foo' } struct Bar { x: Bar // error! 'Bar' containing 'Bar' } // error! 'A' and 'B' forming a cycle, which is not allowed either. struct A { x: B } struct B { x: A, y: A } } ``` ### Advanced Topic: Type-level Recursions Move allows generic functions to be called recursively. However, when used in combination with generic structs, this could create an infinite number of types in certain cases, and allowing this means adding unnecessary complexity to the compiler, vm and other language components. Therefore, such recursions are forbidden. Allowed: ```move module 0x2::m { struct A {} // Finitely many types -- allowed. // foo1 -> foo1 -> foo1 -> ... is valid fun foo1() { foo1(); } // Finitely many types -- allowed. // foo2 -> foo2> -> foo2> -> ... is valid fun foo2() { foo2>(); } } ``` Not allowed: ```move module 0x2::m { struct A {} // Infinitely many types -- NOT allowed. // error! // foo -> foo> -> foo>> -> ... fun foo() { foo>(); } } ``` ```move module 0x2::n { struct A {} // Infinitely many types -- NOT allowed. // error! // foo -> bar -> foo> // -> bar, T2> -> foo, A> // -> bar, A> -> foo, A>> // -> ... fun foo() { bar(); } fun bar() { foo>(); } } ``` Note, the check for type level recursions is based on a conservative analysis on the call sites and does NOT take control flow or runtime values into account. ```move module 0x2::m { struct A {} fun foo(n: u64) { if (n > 0) { foo>(n - 1); }; } } ``` The function in the example above will technically terminate for any given input and therefore only creating finitely many types, but it is still considered invalid by Move's type system. ### Source: https://docs.supra.com/network/move/move-book/basic-concepts/type-abilities # Type Abilities Abilities are a typing feature in Move that control what actions are permissible for values of a given type. This system grants fine-grained control over the "linear" typing behavior of values, as well as if and how values are used in global storage. This is implemented by gating access to certain bytecode instructions so that for a value to be used with the bytecode instruction, it must have the ability required (if one is required at all—not every instruction is gated by an ability). ## The Four Abilities The four abilities are: - `copy` - Allows values of types with this ability to be copied. - `drop` - Allows values of types with this ability to be popped/dropped. - `store` - Allows values of types with this ability to exist inside a struct in global storage. - `key` - Allows the type to serve as a key for global storage operations. ### `copy` The `copy` ability allows values of types with that ability to be copied. It gates the ability to copy values out of local variables with the `copy` operator and to copy values via references with dereference `*e`. If a value has `copy`, all values contained inside of that value have `copy`. ### `drop` The `drop` ability allows values of types with that ability to be dropped. By dropped, we mean that value is not transferred and is effectively destroyed as the Move program executes. As such, this ability gates the ability to ignore values in a multitude of locations, including: - not using the value in a local variable or parameter - not using the value in a sequence via `;` - overwriting values in variables in assignments - overwriting values via references when writing `*e1 = e2`. If a value has `drop`, all values contained inside of that value have `drop`. ### `store` The `store` ability allows values of types with this ability to exist inside a struct (resource) in global storage, _but_ not necessarily as a top-level resource in global storage. This is the only ability that does not directly gate an operation. Instead, it gates the existence in global storage when used in tandem with `key`. If a value has `store`, all values contained inside of that value have `store` ### `key` The `key` ability allows the type to serve as a key for global storage operations. It gates all global storage operations, so in order for a type to be used with `move_to`, `borrow_global`, `move_from`, etc., the type must have the `key` ability. Note that the operations still must be used in the module where the `key` type is defined (in a sense, the operations are private to the defining module). If a value has `key`, all values contained inside of that value have `store`. This is the only ability with this sort of asymmetry. ## Builtin Types Most primitive, builtin types have `copy`, `drop`, and `store` except for `signer`, which just has `drop` - `bool`, `u8`, `u16`, `u32`, `u64`, `u128`, `u256`, and `address` all have `copy`, `drop`, and `store`. - `signer` has `drop` - Cannot be copied and cannot be put into global storage - `vector` may have `copy`, `drop`, and `store` depending on the abilities of `T`. - See Conditional Abilities and Generic Types for more details. - Immutable references `&` and mutable references `&mut` both have `copy` and `drop`. - This refers to copying and dropping the reference itself, not what they refer to. - References cannot appear in global storage, hence they do not have `store`. None of the primitive types have `key`, meaning none of them can be used directly with the global storage operations. ## Annotating Structs To declare that a `struct` has an ability, it is declared with `has ` after the struct name but before the fields. For example: ```move module 0x42::example { struct Ignorable has drop { f: u64 } struct Pair has copy, drop, store { x: u64, y: u64 } } ``` In this case: `Ignorable` has the `drop` ability. `Pair` has `copy`, `drop`, and `store`. All of these abilities have strong guarantees over these gated operations. The operation can be performed on the value only if it has that ability; even if the value is deeply nested inside some other collection! As such: when declaring a struct’s abilities, certain requirements are placed on the fields. All fields must satisfy these constraints. These rules are necessary so that structs satisfy the reachability rules for the abilities given above. If a struct is declared with the ability... - `copy`, all fields must have `copy`. - `drop`, all fields must have `drop`. - `store`, all fields must have `store`. - `key`, all fields must have `store`. - `key` is the only ability currently that doesn't require itself. For example: ```move module 0x42::example { // A struct without any abilities struct NoAbilities {} struct WantsCopy has copy { f: NoAbilities, // ERROR 'NoAbilities' does not have 'copy' } } ``` and similarly: ```move module 0x42::example { // A struct without any abilities struct NoAbilities {} struct MyResource has key { f: NoAbilities, // Error 'NoAbilities' does not have 'store' } } ``` ## Conditional Abilities and Generic Types When abilities are annotated on a generic type, not all instances of that type are guaranteed to have that ability. Consider this struct declaration: ```move module 0x42::example { struct Cup has copy, drop, store, key { item: T } } ``` It might be very helpful if `Cup` could hold any type, regardless of its abilities. The type system can _see_ the type parameter, so it should be able to remove abilities from `Cup` if it _sees_ a type parameter that would violate the guarantees for that ability. This behavior might sound a bit confusing at first, but it might be more understandable if we think about collection types. We could consider the builtin type `vector` to have the following type declaration: ```move vector has copy, drop, store; ``` We want `vector`s to work with any type. We don't want separate `vector` types for different abilities. So what are the rules we would want? Precisely the same that we would want with the field rules above. So, it would be safe to copy a `vector` value only if the inner elements can be copied. It would be safe to ignore a `vector` value only if the inner elements can be ignored/dropped. And, it would be safe to put a `vector` in global storage only if the inner elements can be in global storage. To have this extra expressiveness, a type might not have all the abilities it was declared with depending on the instantiation of that type; instead, the abilities a type will have depends on both its declaration **and** its type arguments. For any type, type parameters are pessimistically assumed to be used inside the struct, so the abilities are only granted if the type parameters meet the requirements described above for fields. Taking `Cup` from above as an example: - `Cup` has the ability `copy` only if `T` has `copy`. - It has `drop` only if `T` has `drop`. - It has `store` only if `T` has `store`. - It has `key` only if `T` has `store`. Here are examples for this conditional system for each ability: ### Example: conditional `copy` ```move module 0x42::example { struct NoAbilities {} struct S has copy, drop { f: bool } struct Cup has copy, drop, store { item: T } fun example(c_x: Cup, c_s: Cup) { // Valid, 'Cup' has 'copy' because 'u64' has 'copy' let c_x2 = copy c_x; // Valid, 'Cup' has 'copy' because 'S' has 'copy' let c_s2 = copy c_s; } fun invalid(c_account: Cup, c_n: Cup) { // Invalid, 'Cup' does not have 'copy'. // Even though 'Cup' was declared with copy, the instance does not have 'copy' // because 'signer' does not have 'copy' let c_account2 = copy c_account; // Invalid, 'Cup' does not have 'copy' // because 'NoAbilities' does not have 'copy' let c_n2 = copy c_n; } } ``` ### Example: conditional `drop` ```move module 0x42::example { struct NoAbilities {} struct S has copy, drop { f: bool } struct Cup has copy, drop, store { item: T } fun unused() { Cup { item: true }; // Valid, 'Cup' has 'drop' Cup { item: S { f: false } }; // Valid, 'Cup' has 'drop' } fun left_in_local(c_account: Cup): u64 { let c_b = Cup { item: true }; let c_s = Cup { item: S { f: false } }; // Valid return: 'c_account', 'c_b', and 'c_s' have values // but 'Cup', 'Cup', and 'Cup' have 'drop' 0 } fun invalid_unused() { // Invalid, Cannot ignore 'Cup' because it does not have 'drop'. // Even though 'Cup' was declared with 'drop', the instance does not have 'drop' // because 'NoAbilities' does not have 'drop' Cup { item: NoAbilities {} }; } fun invalid_left_in_local(): u64 { let c_n = Cup { item: NoAbilities {} }; // Invalid return: 'c_n' has a value // and 'Cup' does not have 'drop' 0 } } ``` ### Example: conditional `store` ```move module 0x42::example { struct Cup has copy, drop, store { item: T } // 'MyInnerResource' is declared with 'store' so all fields need 'store' struct MyInnerResource has store { yes: Cup, // Valid, 'Cup' has 'store' // no: Cup, Invalid, 'Cup' does not have 'store' } // 'MyResource' is declared with 'key' so all fields need 'store' struct MyResource has key { yes: Cup, // Valid, 'Cup' has 'store' inner: Cup, // Valid, 'Cup' has 'store' // no: Cup, Invalid, 'Cup' does not have 'store' } } ``` ### Example: conditional `key` ```move module 0x42::example { struct NoAbilities {} struct MyResource has key { f: T } fun valid(account: &signer) acquires MyResource { let addr = signer::address_of(account); // Valid, 'MyResource' has 'key' let has_resource = exists>(addr); if (!has_resource) { // Valid, 'MyResource' has 'key' move_to(account, MyResource { f: 0 }) }; // Valid, 'MyResource' has 'key' let r = borrow_global_mut>(addr) r.f = r.f + 1; } fun invalid(account: &signer) { // Invalid, 'MyResource' does not have 'key' let has_it = exists>(addr); // Invalid, 'MyResource' does not have 'key' let NoAbilities {} = move_from(addr); // Invalid, 'MyResource' does not have 'key' move_to(account, NoAbilities {}); // Invalid, 'MyResource' does not have 'key' borrow_global(addr); } } ``` ### Source: https://docs.supra.com/network/move/move-book/basic-concepts/uses-and-aliases # Uses and Aliases The `use` syntax can be used to create aliases to members in other modules. `use` can be used to create aliases that last either for the entire module, or for a given expression block scope. ## Syntax There are several different syntax cases for `use`. Starting with the most simple, we have the following for creating aliases to other modules ```move use
::; use
:: as ; ``` For example ```move script { use std::vector; use std::vector as V; } ``` `use std::vector;` introduces an alias `vector` for `std::vector`. This means that anywhere you would want to use the module name `std::vector` (assuming this `use` is in scope), you could use`vector` instead. `use std::vector;` is equivalent to `use std::vector as vector;` Similarly `use std::vector as V;` would let you use `V` instead of `std::vector` ```move module 0x42::example { use std::vector; use std::vector as V; fun new_vecs(): (vector, vector, vector) { let v1 = std::vector::empty(); let v2 = vector::empty(); let v3 = V::empty(); (v1, v2, v3) } } ``` If you want to import a specific module member (such as a function, struct, or constant). You can use the following syntax. ```move use
::::; use
:::: as ; ``` For example ```move script { use std::vector::empty; use std::vector::empty as empty_vec; } ``` This would let you use the function `std::vector::empty` without full qualification. Instead, you could use `empty` and `empty_vec` respectively. Again, `use std::vector::empty;` is equivalent to`use std::vector::empty as empty;` ```move module 0x42::example { use std::vector::empty; use std::vector::empty as empty_vec; fun new_vecs(): (vector, vector, vector) { let v1 = std::vector::empty(); let v2 = empty(); let v3 = empty_vec(); (v1, v2, v3) } } ``` If you want to add aliases for multiple module members at once, you can do so with the following syntax ```move use
::::{, as ... }; ``` For example ```move module 0x42::example { use std::vector::{push_back, length as len, pop_back}; fun swap_last_two(v: &mut vector) { assert!(len(v) >= 2, 42); let last = pop_back(v); let second_to_last = pop_back(v); push_back(v, last); push_back(v, second_to_last) } } ``` If you need to add an alias to the Module itself in addition to module members, you can do that in a single `use` using `Self`. `Self` is a member of sorts that refers to the module. ```move script { use std::vector::{Self, empty}; } ``` For clarity, all the following are equivalent: ```move script { use std::vector; use std::vector as vector; use std::vector::Self; use std::vector::Self as vector; use std::vector::{Self}; use std::vector::{Self as vector}; } ``` If needed, you can have as many aliases for any item as you like ```move module 0x42::example { use std::vector::{ Self, Self as V, length, length as len, }; fun pop_twice(v: &mut vector): (T, T) { // all options available given the `use` above assert!(vector::length(v) > 1, 42); assert!(V::length(v) > 1, 42); assert!(length(v) > 1, 42); assert!(len(v) > 1, 42); (vector::pop_back(v), vector::pop_back(v)) } } ``` ## Inside a `module` Inside a `module` all `use` declarations are usable regardless of the order of declaration. ```move module 0x42::example { use std::vector; fun example(): vector { let v = empty(); vector::push_back(&mut v, 0); vector::push_back(&mut v, 10); v } use std::vector::empty; } ``` The aliases declared by `use` in the module usable within that module. Additionally, the aliases introduced cannot conflict with other module members. See Uniqueness for more details ## Inside an expression You can add `use` declarations to the beginning of any expression block ```move module 0x42::example { fun example(): vector { use std::vector::{empty, push_back}; let v = empty(); push_back(&mut v, 0); push_back(&mut v, 10); v } } ``` As with `let`, the aliases introduced by `use` in an expression block are removed at the end of that block. ```move module 0x42::example { fun example(): vector { let result = { use std::vector::{empty, push_back}; let v = empty(); push_back(&mut v, 0); push_back(&mut v, 10); v }; result } } ``` Attempting to use the alias after the block ends will result in an error ```move module 0x42::example { fun example(): vector { let result = { use std::vector::{empty, push_back}; let v = empty(); push_back(&mut v, 0); push_back(&mut v, 10); v }; let v2 = empty(); // ERROR! // ^^^^^ unbound function 'empty' result } } ``` Any `use` must be the first item in the block. If the `use` comes after any expression or `let`, it will result in a parsing error ```move script { fun example() { { let x = 0; use std::vector; // ERROR! let v = vector::empty(); } } } ``` ## Naming rules Aliases must follow the same rules as other module members. This means that aliases to structs or constants must start with `A` to `Z` ```move address 0x42 { module data { struct S {} const FLAG: bool = false; fun foo() {} } module example { use 0x42::data::{ S as s, // ERROR! FLAG as fLAG, // ERROR! foo as FOO, // valid foo as bar, // valid }; } } ``` ## Uniqueness Inside a given scope, all aliases introduced by `use` declarations must be unique. For a module, this means aliases introduced by `use` cannot overlap ```move module 0x42::example { use std::vector::{empty as foo, length as foo}; // ERROR! // ^^^ duplicate 'foo' use std::vector::empty as bar; use std::vector::length as bar; // ERROR! // ^^^ duplicate 'bar' } ``` And, they cannot overlap with any of the module's other members ```move address 0x42 { module data { struct S {} } module example { use 0x42::data::S; struct S { value: u64 } // ERROR! // ^ conflicts with alias 'S' above } } ``` Inside an expression block, they cannot overlap with each other, but they can shadow other aliases or names from an outer scope ## Shadowing `use` aliases inside of an expression block can shadow names (module members or aliases) from the outer scope. As with shadowing of locals, the shadowing ends at the end of the expression block; ```move module 0x42::example { struct WrappedVector { vec: vector } fun empty(): WrappedVector { WrappedVector { vec: std::vector::empty() } } fun example1(): (WrappedVector, WrappedVector) { let vec = { use std::vector::{empty, push_back}; // 'empty' now refers to std::vector::empty let v = empty(); push_back(&mut v, 0); push_back(&mut v, 1); push_back(&mut v, 10); v }; // 'empty' now refers to Self::empty (empty(), WrappedVector { vec }) } fun example2(): (WrappedVector, WrappedVector) { use std::vector::{empty, push_back}; let w: WrappedVector = { use 0x42::example::empty; empty() }; push_back(&mut w.vec, 0); push_back(&mut w.vec, 1); push_back(&mut w.vec, 10); let vec = empty(); push_back(&mut vec, 0); push_back(&mut vec, 1); push_back(&mut vec, 10); (w, WrappedVector { vec }) } } ``` ## Unused Use or Alias An unused `use` will result in an error ```move module 0x42::example { use std::vector::{empty, push_back}; // ERROR! // ^^^^^^^^^ unused alias 'push_back' fun example(): vector { empty() } } ``` ### Source: https://docs.supra.com/network/move/move-book/basic-concepts/friends # Friends The `friend` syntax is used to declare modules that are trusted by the current module. A trusted module is allowed to call any function defined in the current module that have the `public(friend)` visibility. For details on function visibilities, please refer to the _Visibility_ section in Functions. ## Friend declaration A module can declare other modules as friends via friend declaration statements, in the format of - `friend ` — friend declaration using fully qualified module name like the example below, or ```move module 0x42::a { friend 0x42::b; } ``` - `friend ` — friend declaration using a module name alias, where the module alias is introduced via the `use` statement. ```move module 0x42::a { use 0x42::b; friend b; } ``` A module may have multiple friend declarations, and the union of all the friend modules forms the friend list. In the example below, both `0x42::B` and `0x42::C` are considered as friends of `0x42::A`. ```move module 0x42::a { friend 0x42::b; friend 0x42::c; } ``` Unlike `use` statements, `friend` can only be declared in the module scope and not in the expression block scope.`friend` declarations may be located anywhere a top-level construct (e.g., `use`, `function`, `struct`, etc.) is allowed.\ However, for readability, it is advised to place friend declarations near the beginning of the module definition. Note that the concept of friendship does not apply to Move scripts: - A Move script cannot declare `friend` modules as doing so is considered meaningless: there is no mechanism to call the function defined in a script. - A Move module cannot declare `friend` scripts as well because scripts are ephemeral code snippets that are never published to global storage. ### Friend declaration rules Friend declarations are subject to the following rules: - A module cannot declare itself as a friend. ```move module 0x42::m { friend Self; // ERROR! // ^^^^ Cannot declare the module itself as a friend } module 0x43::m { friend 0x43::M; // ERROR // ^^^^^^^ Cannot declare the module itself as a friend } ``` - Friend modules must be known by the compiler ```move module 0x42::m { friend 0x42::nonexistent; // ERROR! // ^^^^^^^^^^^^^^^^^ Unbound module '0x42::nonexistent' } ``` - Friend modules must be within the same account address. (Note: this is not a technical requirement but rather a policy decision which _may_ be relaxed later.) ```move module 0x42::m {} module 0x43::n { friend 0x42::m; // ERROR! // ^^^^^^^ Cannot declare modules out of the current address as a friend } ``` - Friends relationships cannot create cyclic module dependencies. Cycles are not allowed in the friend relationships, e.g., the relation `0x2::a` friends `0x2::b` friends `0x2::c` friends `0x2::a` is not allowed. More generally, declaring a friend module adds a dependency upon the current module to the friend module (because the purpose is for the friend to call functions in the current module). If that friend module is already used, either directly or transitively, a cycle of dependencies would be created. ```move address 0x2 { module a { use 0x2::c; friend 0x2::b; public fun a() { c::c() } } module b { friend 0x2::c; // ERROR! // ^^^^^^ This friend relationship creates a dependency cycle: '0x2::b' is a friend of '0x2::a' uses '0x2::c' is a friend of '0x2::b' } module c { public fun c() {} } } ``` - The friend list for a module cannot contain duplicates. ```move address 0x42 { module a {} module m { use 0x42::a as aliased_a; friend 0x42::A; friend aliased_a; // ERROR! // ^^^^^^^^^ Duplicate friend declaration '0x42::a'. Friend declarations in a module must be unique } } ``` ### Source: https://docs.supra.com/network/move/move-book/basic-concepts/packages # Packages ## Packages Packages allow Move programmers to more easily re-use code and share it\ across projects. The Move package system allows programmers to easily do the following: - Define a package containing Move code; - Parameterize a package by named addresses; - Import and use packages in other Move code and instantiate named addresses; - Build packages and generate associated compilation artifacts from packages; and - Work with a common interface around compiled Move artifacts. ### Package Layout and Manifest Syntax A Move package source directory contains a `Move.toml` package manifest\ file along with a set of subdirectories: The directories marked `required` _must_ be present in order for the directory\ to be considered a Move package and to be compiled. Optional directories can\ be present, and if so will be included in the compilation process. Depending on\ the mode that the package is built with (`test` or `dev`), the `tests` and`examples` directories will be included as well. The `sources` directory can contain both Move modules and Move scripts (both\ Move scripts and modules containing script functions). The `examples`\ directory can hold additional code to be used only for development and/or\ tutorial purposes that will not be included when compiled outside `test` or`dev` mode. A `scripts` directory is supported so Move scripts can be separated\ from modules if that is desired by the package author. The `scripts`\ directory will always be included for compilation if it is present.\ Documentation will be built using any documentation templates present in\ the `doc_templates` directory. #### Move.toml The Move package manifest is defined within the `Move.toml` file and has the\ following syntax. Optional fields are marked with `*`, `+` denotes\ one or more elements: ```toml [package] name = # e.g., "MoveStdlib" version = ".." # e.g., "0.1.1" license* = # e.g., "MIT", "GPL", "Apache 2.0" authors* = [] # e.g., ["Joe Smith (joesmith@noemail.com)", "Jane Smith (janesmith@noemail.com)"] [addresses] # (Optional section) Declares named addresses in this package and instantiates named addresses in the package graph # One or more lines declaring named addresses in the following format = "_" | "" # e.g., std = "_" or my_addr = "0xC0FFEECAFE" [dependencies] # (Optional section) Paths to dependencies and instantiations or renamings of named addresses from each dependency # One or more lines declaring dependencies in the following format = { local = , addr_subst* = { ( = ( | ""))+ } } # local dependencies = { git = , subdir=, rev=, addr_subst* = { ( = ( | ""))+ } } # git dependencies [dev-addresses] # (Optional section) Same as [addresses] section, but only included in "dev" and "test" modes # One or more lines declaring dev named addresses in the following format = "_" | "" # e.g., std = "_" or my_addr = "0xC0FFEECAFE" [dev-dependencies] # (Optional section) Same as [dependencies] section, but only included in "dev" and "test" modes # One or more lines declaring dev dependencies in the following format = { local = , addr_subst* = { ( = ( |
))+ } } ``` An example of a minimal package manifest with one local dependency and one git dependency: ```toml [package] name = "AName" version = "0.0.0" ``` An example of a more standard package manifest that also includes the Move\ standard library and instantiates the named address `Std` from it with the\ address value `0x1`: ```toml [package] name = "AName" version = "0.0.0" license = "Apache 2.0" [addresses] address_to_be_filled_in = "_" specified_address = "0xB0B" [dependencies] # Local dependency LocalDep = { local = "projects/move-awesomeness", addr_subst = { "std" = "0x1" } } # Git dependency MoveStdlib = { git = "https://github.com/diem/diem.git", subdir="language/move-stdlib", rev = "56ab033cc403b489e891424a629e76f643d4fb6b" } [dev-addresses] # For use when developing this module address_to_be_filled_in = "0x101010101" ``` Most of the sections in the package manifest are self-explanatory, but named\ addresses can be a bit difficult to understand, so it's worth examining them in\ a bit more detail. ### Named Addresses During Compilation Recall that Move has named addresses and that named addresses cannot be declared in Move. Because of this, until now named addresses and their values needed to be passed to the compiler on the command line. With the Move package system this is no longer needed, and you can declare named addresses in the package, instantiate other named addresses in scope, and rename named addresses from other packages within the Move package system manifest file. Let's go through each of these individually: #### Declaration Let's say we have a Move module in `example_pkg/sources/A.move` as follows: ```move module named_addr::A { public fun x(): address { @named_addr } } ``` We could in `example_pkg/Move.toml` declare the named address `named_addr` in\ two different ways. The first: ```toml [package] name = "ExamplePkg" # ... [addresses] named_addr = "_" ``` Declares `named_addr` as a named address in the package `ExamplePkg` and\ that _this address can be any valid address value_. Therefore, an importing package can pick the value of the named address `named_addr` to be any address\ it wishes. Intuitively you can think of this as parameterizing the package`ExamplePkg` by the named address `named_addr`, and the package can then be instantiated later on by an importing package. `named_addr` can also be declared as: ```toml [package] name = "ExamplePkg" # ... [addresses] named_addr = "0xCAFE" ``` which states that the named address `named_addr` is exactly `0xCAFE` and cannot be changed. This is useful so other importing packages can use this named\ address without needing to worry about the exact value assigned to it. With these two different declaration methods, there are two ways that\ information about named addresses can flow in the package graph: - The former ("unassigned named addresses") allows named address values to flow\ from the importation site to the declaration site. - The latter ("assigned named addresses") allows named address values to flow\ from the declaration site upwards in the package graph to usage sites. With these two methods for flowing named address information throughout the\ package graph the rules around scoping and renaming become important to\ understand. ### Scoping and Renaming of Named Addresses A named address `N` in a package `P` is in scope if: 1. It declares a named address `N`; or 2. A package in one of `P`'s transitive dependencies declares the named address`N` and there is a dependency path in the package graph between `P` and the\ declaring package of `N` with no renaming of `N`. Additionally, every named address in a package is exported. Because of this and\ the above scoping rules each package can be viewed as coming with a set of\ named addresses that will be brought into scope when the package is imported,\ e.g., if the `ExamplePkg` package was imported, that importation would bring\ into scope the `named_addr` named address. Because of this, if `P` imports two\ packages `P1` and `P2` both of which declare a named address `N` an issue\ arises in `P`: which "`N`" is meant when `N` is referred to in `P`? The one\ from `P1` or `P2`? To prevent this ambiguity around which package a named\ address is coming from, we enforce that the sets of scopes introduced by all\ dependencies in a package are disjoint, and provide a way to _rename named_\ _addresses_ when the package that brings them into scope is imported. Renaming a named address when importing can be done as follows in our `P`,`P1`, and `P2` example above: ```toml [package] name = "P" # ... [dependencies] P1 = { local = "some_path_to_P1", addr_subst = { "P1N" = "N" } } P2 = { local = "some_path_to_P2" } ``` With this renaming `N` refers to the `N` from `P2` and `P1N` will refer to `N`\ coming from `P1`: ```move module N::A { public fun x(): address { @P1N } } ``` It is important to note that _renaming is not local_: once a named address `N`\ has been renamed to `N2` in a package `P` all packages that import `P` will not\ see `N` but only `N2` unless `N` is reintroduced from outside of `P`. This is\ why rule (2) in the scoping rules at the start of this section specifies a\ "dependency path in the package graph between `P` and the declaring\ package of `N` with no renaming of `N`." #### Instantiation Named addresses can be instantiated multiple times across the package graph as\ long as it is always with the same value. It is an error if the same named\ address (regardless of renaming) is instantiated with differing values across\ the package graph. A Move package can only be compiled if all named addresses resolve to a value.\ This presents issues if the package wishes to expose an uninstantiated named\ address. This is what the `[dev-addresses]` section solves. This section can\ set values for named addresses, but cannot introduce any named addresses.\ Additionally, only the `[dev-addresses]` in the root package are included in `dev` mode. For example a root package with the following manifest would not compile\ outside of `dev` mode since `named_addr` would be uninstantiated: ```toml [package] name = "ExamplePkg" # ... [addresses] named_addr = "_" [dev-addresses] named_addr = "0xC0FFEE" ``` ### Usage, Artifacts, and Data Structures The Move package system comes with a command line option as part of the Move\ CLI `move `. Unless a\ particular path is provided, all package commands will run in the current working\ directory. The full list of commands and flags for the Move CLI can be found by\ running `move --help`. #### Usage A package can be compiled either through the Move CLI commands, or as a library\ command in Rust with the function `compile_package`. This will create a`CompiledPackage` that holds the compiled bytecode along with other compilation artifacts (source maps, documentation, ABIs) in memory. This `CompiledPackage` can be converted to an `OnDiskPackage` and vice versa - the latter being the data of the `CompiledPackage` laid out in the file system in the following format: See the `move-package` crate for more information on these data structures and\ how to use the Move package system as a Rust library. ### Using Bytecode for Dependencies Move bytecode can be used as dependencies when the Move source code for those dependencies are not available locally. To use this feature, you will need co-locate the files in directories at the same level and then specify their paths in the corresponding `Move.toml` files. ### Requirements and limitations Using local bytecode as dependencies requires bytecode files to be downloaded locally, and the actual address for each named address must be specified in either `Move.toml` or through `--named-addresses`. Note, both `supra move prove` and `supra move test` commands, currently, do not support bytecode as dependencies. ### Recommended structure We use an example to illustrate the development flow of using this feature. Suppose we want to compile the package `A`. The package layout is: `A.move` is defined below, depending on the modules `Bar` and `Foo`: ```move module A::AModule { use B::Bar; use C::Foo; public fun foo(): u64 { Bar::foo() + Foo::bar() } } ``` Suppose the source of `Bar` and `Foo` are not available but the corresponding bytecode `Bar.mv` and `Foo.mv` are available locally. To use them as dependencies, we would: Specify `Move.toml` for `Bar` and `Foo`. Note that named addresses are already instantiated with the actual address in the bytecode. In our example, the actual address for `C` is already bound to `0x3`. As a result, `[addresses]` must be specified `C` as `0x3`, as shown below: ```toml [package] name = "Foo" version = "0.0.0" [addresses] C = "0x3" ``` Place the bytecode file and the corresponding `Move.toml` file in the same directory with the bytecode in a `build` subdirectory. Note an empty `sources` directory is **required**. For instance, the layout of the folder `B` (for the package `Bar`) and `C` (for the package `Foo`) would resemble: Specify `[dependencies]` in the `Move.toml` of the target (first) package with the location of the dependent (secondary) packages. For instance, assuming all three package directories are at the same level, `Move.toml` of `A` would resemble: ```toml [package] name = "A" version = "0.0.0" [addresses] A = "0x2" [dependencies] Bar = { local = "../B" } Foo = { local = "../C" } ``` Note that if both the bytecode and the source code of the same package exist in the search paths, the compiler will complain that the declaration is duplicated. ### Source: https://docs.supra.com/network/move/move-book/basic-concepts/package-upgrades # Package Upgrades ## Package Upgrades Move code (e.g., Move modules) on the Supra blockchain can be upgraded. This\ allows code owners and module developers to update and evolve their contracts\ under a single, stable, well-known account address that doesn't change. If a\ module upgrade happens, all consumers of that module will automatically receive\ the latest version of the code (e.g., the next time they interact with it). The Supra blockchain natively supports different _upgrade policies_, which allow\ move developers to explicitly define the constraints around how their move code\ can be upgraded. The default policy is _backwards compatible_. This means that\ code upgrades are accepted only if they guarantee that no existing resource storage or public APIs are broken by the upgrade (including public functions).\ This compatibility checking is possible because of Move's strongly typed bytecode\ semantics. We note, however, that even compatible upgrades can have hazardous effects on\ applications and dependent Move code (for example, if the semantics of the underlying module are modified). As a result, developers should be careful when depending on third-party Move code that can be upgraded on-chain. See Security considerations for dependencies for more details. ### How it works Move code upgrades on the Supra blockchain happen at the Move package\ granularity. A package specifies an upgrade policy in the `Move.toml` manifest: ```toml [package] name = "MyApp" version = "0.0.1" upgrade_policy = "compatible" ... ``` Supra checks compatibility at the time a Move package is published via an Supra transaction. This transaction will abort if deemed incompatible. ### How to upgrade To upgrade already published Move code, simply attempt to republish the code at\ the same address that it was previously published. This can be done by following the instructions for code compilation and publishing using that Supra CLI. For an example, see the Your First Move Module tutorial. ### Upgrade policies There are two different upgrade policies currently supported by Supra: * `compatible`: these upgrades must be backwards compatible, specifically: * For storage, all old struct declarations must be the same in\ the new code. This ensures that the existing state of storage is\ correctly interpreted by the new code. However, new struct declarations\ can be added. * For APIs, all existing public functions must have the same signature as\ before. New functions, including public and entry functions, can be added. * `immutable`: the code is not upgradeable and is guaranteed to stay the same\ forever. Those policies are ordered regarding strength such that `compatible < immutable`, i.e., compatible is weaker than immutable. The policy of a package on-chain can only get stronger, not weaker. Moreover, the policy of all dependencies of a package must be stronger or equal to the policy of the given package. For example, an `immutable` package cannot refer directly or indirectly to a `compatible` package. This gives users the guarantee that no unexpected updates can happen under the hood. Note that there is one exception to the above rule: framework packages\ installed at addresses `0x1` to `0xa` are exempted from the dependency check.\ This is necessary so one can define an `immutable` package based on the standard\ libraries, which have the `compatible` policy to allow critical upgrades and fixes. ### Compatibility rules When using `compatible` upgrade policy, a module package can be upgraded. However, updates to existing modules already\ published previously need to be compatible and follow the rules below: * All existing structs' fields cannot be updated. This means no new fields can be added and existing fields cannot be\ modified. Struct abilities also cannot be changed (no new ones added or existing removed). * All public and entry functions cannot change their signature (argument types, type argument, return types). However,\ argument names can change. * `public(friend)` functions are treated as private and thus their signature can arbitrarily change. This is safe as\ only modules in the same package can call friend functions anyway, and they need to be updated if the signature changes. When updating your modules, if you see an incompatible error, make sure to check the above rules and fix any violations. ### Security considerations for dependencies As mentioned above, even compatible upgrades can have disastrous effects for\ applications that depend on the upgraded code. These effects can come from bugs, but they can also be the result of malicious upgrades. For example,\ an upgraded dependency can suddenly make all functions abort, breaking the\ operation of your Move code. Alternatively, an upgraded dependency can make\ all functions suddenly cost much more gas to execute then before the upgrade.\ As result, dependencies to upgradeable packages need to be handled with care: * The safest dependency is, of course, an `immutable` package. This guarantees\ that the dependency will never change, including its transitive dependencies.\ In order to update an immutable package, the owner would have to introduce a\ new major version, which is practically like deploying a new, separate\ and independent package. This is because major versioning can be expressed\ only by name (e.g. `module feature_v1` and `module feature_v2`). However,\ not all package owners like to publish their code as `immutable`, because this\ takes away the ability to fix bugs and update the code in place. * If you have a dependency to a `compatible` package, it is highly\ recommended you know and understand the entity publishing the package.\ The highest level of assurance is when the package is governed by a\ Decentralized Autonomous Organization (DAO) where no single user can initiate an upgrade; a vote or similar has to be taken. This is the case for the Supra framework. ### Programmatic upgrade In general, Supra offers, via the Move module `supra_framework::code`,\ ways to publish code from anywhere in your smart contracts. However,\ notice that code published in the current transaction can be executed\ only after that transaction ends. The Supra framework itself, including all the on-chain administration logic, is\ an example for programmatic upgrade. The framework is marked as `compatible`.\ Upgrades happen via specific generated governance scripts. For more details,\ see Supra Governance. ### Source: https://docs.supra.com/network/move/move-book/basic-concepts/unit-tests # Unit Tests Unit testing for Move adds three new annotations to the Move source language: - `#[test]` - `#[test_only]`, and - `#[expected_failure]`. They respectively mark a function as a test, mark a module or module member (`use`, function, or struct) as code to be included for testing only, and mark that a test is expected to fail. These annotations can be placed on a function with any visibility. Whenever a module or module member is annotated as `#[test_only]` or `#[test]`, it will not be included in the compiled bytecode unless it is compiled for testing. ## Testing Annotations: Their Meaning and Usage Both the `#[test]` and `#[expected_failure]` annotations can be used either with or without arguments. Without arguments, the `#[test]` annotation can only be placed on a function with no parameters. This annotation simply marks this function as a test to be run by the unit testing harness. ```move module 0x42::example { #[test] // OK fun this_is_a_test() { /* ... */ } #[test] // Will fail to compile since the test takes an argument fun this_is_not_correct(arg: signer) { /* ... */ } } ``` ### Expected Failure A test can also be annotated as an `#[expected_failure]`. This annotation marks that the test should is expected to raise an error. You can ensure that a test is aborting with a specific abort `` by annotating it with `#[expected_failure(abort_code = )]`, corresponding to the parameter to an `abort` statement (or failing `assert!` macro). Instead of an `abort_code`, an `expected_failure` may specify program\ execution errors, such as `arithmetic_error`, `major_status`,`vector_error`, and `out_of_gas`. For more specificity, a`minor_status` may optionally be specified. If the error is expected from a specific location, that may also be specified:`#[expected_failure(abort_code = , location = )]`. If the test then fails with the right error but in a different module, the test will also fail. Note that `` can be `Self`(in the current module) or a qualified name, e.g. `vector::std`. Only functions that have the `#[test]` annotation can also be annotated as an #`[expected_failure]`. ```move module 0x42::example { #[test] #[expected_failure] public fun this_test_will_abort_and_pass() { abort 1 } #[test] #[expected_failure] public fun test_will_error_and_pass() { 1/0; } #[test] #[expected_failure(abort_code = 0, location = Self)] public fun test_will_error_and_fail() { 1/0; } #[test, expected_failure] // Can have multiple in one attribute. This test will pass. public fun this_other_test_will_abort_and_pass() { abort 1 } #[test] #[expected_failure(vector_error, minor_status = 1, location = Self)] fun borrow_out_of_range() { /* ... */ } #[test] #[expected_failure(abort_code = 26113, location = extensions::table)] fun test_destroy_fails() { /* ... */ } } ``` ### Test parameters With arguments, a test annotation takes the form `#[test( =
, ..., =
)]`. If a function is annotated in such a manner, the function's parameters must be a permutation of the parameters `, ..., `, i.e., the order of these parameters as they occur in the function and their order in the test annotation do not have to be the same, but they must be able to be matched up with each other by name. Only parameters with a type of `signer` are supported as test parameters. If a parameter other than `signer` is supplied, the test will result in an error when run. ```move module 0x42::example { #[test(arg = @0xC0FFEE)] // OK fun this_is_correct_now(arg: signer) { /* ... */ } #[test(wrong_arg_name = @0xC0FFEE)] // Not correct: arg name doesn't match fun this_is_incorrect(arg: signer) { /* ... */ } #[test(a = @0xC0FFEE, b = @0xCAFE)] // OK. We support multiple signer arguments, but you must always provide a value for that argument fun this_works(a: signer, b: signer) { /* ... */ } // somewhere a named address is declared #[test_only] // test-only named addresses are supported address TEST_NAMED_ADDR = @0x1; ... #[test(arg = @TEST_NAMED_ADDR)] // Named addresses are supported! fun this_is_correct_now(arg: signer) { /* ... */ } } ``` ### Arbitrary code to support tests A module and any of its members can be declared as test only. In such a case the item will only be included in the compiled Move bytecode when compiled in test mode. Additionally, when compiled outside of test mode, any non-test `use`s of a `#[test_only]` module will raise an error during compilation. ```move #[test_only] // test only attributes can be attached to modules module 0x42::abc { /*... */ } module 0x42::other { #[test_only] // test only attributes can be attached to named addresses address ADDR = @0x1; #[test_only] // .. to uses use 0x1::some_other_module; #[test_only] // .. to structs struct SomeStruct { /* ... */ } #[test_only] // .. and functions. Can only be called from test code, but not a test fun test_only_function(/* ... */) { /* ... */ } } ``` ## Running Unit Tests Unit tests for a Move package can be run with the `supra move tool test` command. See package for more info. When running tests, every test will either `PASS`, `FAIL`, or `TIMEOUT`. If a test case fails, the location of the failure along with the function name that caused the failure will be reported if possible. You can see an example of this below. A test will be marked as timing out if it exceeds the maximum number of instructions that can be executed for any single test. This bound can be changed using the options below, and its default value is set to 100000 instructions. Additionally, while the result of a test is always deterministic, tests are run in parallel by default, so the ordering of test results in a test run is non-deterministic unless running with only one thread (see `OPTIONS` below). There are also a number of options that can be passed to the unit testing binary to fine-tune testing and to help debug failing tests. These can be found using the help flag: ```bash $ supra move tool test -h ``` ## Example A simple module using some of the unit testing features is shown in the following example: First create an empty package inside an empty directory: ```bash $ supra move tool init --name TestExample ``` Next add the following to the `Move.toml`: ```toml [dependencies.SupraFramework] git = "https://github.com/Entropy-Foundation/aptos-core.git" rev = "dev" subdir = "aptos-move/framework/supra-framework" ``` Next add the following module under the `sources` directory: ```move // filename: sources/my_module.move module 0x1::my_module { struct MyCoin has key { value: u64 } public fun make_sure_non_zero_coin(coin: MyCoin): MyCoin { assert!(coin.value > 0, 0); coin } public fun has_coin(addr: address): bool { exists(addr) } #[test] fun make_sure_non_zero_coin_passes() { let coin = MyCoin { value: 1 }; let MyCoin { value: _ } = make_sure_non_zero_coin(coin); } #[test] // Or #[expected_failure] if we don't care about the abort code #[expected_failure(abort_code = 0, location = Self)] fun make_sure_zero_coin_fails() { let coin = MyCoin { value: 0 }; let MyCoin { value: _ } = make_sure_non_zero_coin(coin); } #[test_only] // test only helper function fun publish_coin(account: &signer) { move_to(account, MyCoin { value: 1 }) } #[test(a = @0x1, b = @0x2)] fun test_has_coin(a: signer, b: signer) { publish_coin(&a); publish_coin(&b); assert!(has_coin(@0x1), 0); assert!(has_coin(@0x2), 1); assert!(!has_coin(@0x3), 1); } } ``` ### Running Tests You can then run these tests with the `supra move tool test` command: ```bash $ supra move tool test BUILDING MoveStdlib BUILDING TestExample Running Move unit tests [ PASS ] 0x1::my_module::make_sure_non_zero_coin_passes [ PASS ] 0x1::my_module::make_sure_zero_coin_fails [ PASS ] 0x1::my_module::test_has_coin Test result: OK. Total tests: 3; passed: 3; failed: 0 ``` ### Using Test Flags #### `-f ` or `--filter ` This will only run tests whose fully qualified name contains ``. For example if we wanted to only run tests with `"zero_coin"` in their name: ```bash $ supra move tool test -f zero_coin CACHED MoveStdlib BUILDING TestExample Running Move unit tests [ PASS ] 0x1::my_module::make_sure_non_zero_coin_passes [ PASS ] 0x1::my_module::make_sure_zero_coin_fails Test result: OK. Total tests: 2; passed: 2; failed: 0 ``` #### `--coverage` This will compute code being covered by test cases and generate coverage summary. ```bash $ supra move tool test --coverage INCLUDING DEPENDENCY SupraFramework INCLUDING DEPENDENCY AptosStdlib INCLUDING DEPENDENCY MoveStdlib BUILDING TestExample Running Move unit tests [ PASS ] 0x1::my_module::make_sure_non_zero_coin_passes [ PASS ] 0x1::my_module::make_sure_zero_coin_fails [ PASS ] 0x1::my_module::test_has_coin Test result: OK. Total tests: 3; passed: 3; failed: 0 +-------------------------+ | Move Coverage Summary | +-------------------------+ Module 0000000000000000000000000000000000000000000000000000000000000001::my_module >>> % Module coverage: 100.00 +-------------------------+ | % Move Coverage: 100.00 | +-------------------------+ Please use `supra move tool coverage -h` for more detailed source or bytecode test coverage of this package ``` Then by running `supra move tool coverage`, we can get more detailed coverage information. These can be found using the help flag: ```bash $ supra move tool coverage -h ``` ### Source: https://docs.supra.com/network/move/move-book/global-storage # Global Storage ### Source: https://docs.supra.com/network/move/move-book/global-storage/structure # Structure The purpose of Move programs is to read from and write to tree-shaped persistent global storage. Programs cannot access the filesystem, network, or any other data outside of this tree. In pseudocode, the global storage looks something like: ```move module 0x42::example { struct GlobalStorage { resources: Map<(address, ResourceType), ResourceValue>, modules: Map<(address, ModuleName), ModuleBytecode> } } ``` Structurally, global storage is a [forest](https://en.wikipedia.org/wiki/Tree_\(graph_theory\)) consisting of trees rooted at an account `address`. Each address can store both resource data values and module code values. As the pseudocode above indicates, each `address` can store at most one resource value of a given type and at most one module with a given name. ### Source: https://docs.supra.com/network/move/move-book/global-storage/operators # Operators Move programs can create, delete, and update resources in global storage using the following five instructions: | Operation | Description | Aborts? | | --------------------------------------- | --------------------------------------------------------------- | --------------------------------------- | | `move_to(&signer,T)` | Publish `T` under `signer.address` | If `signer.address` already holds a `T` | | `move_from(address): T` | Remove `T` from `address` and return it | If `address` does not hold a `T` | | `borrow_global_mut(address): &mut T` | Return a mutable reference to the `T` stored under `address` | If `address` does not hold a `T` | | `borrow_global(address): &T` | Return an immutable reference to the `T` stored under `address` | If `address` does not hold a `T` | | `exists(address): bool` | Return `true` if a `T` is stored under `address` | Never | Each of these instructions is parameterized by a type `T` with the `key` ability. However, each type `T` _must be declared in the current module_. This ensures that a resource can only be manipulated via the API exposed by its defining module. The instructions also take either an `address` or `&signer` representing the account address where the resource of type `T` is stored. ## References to resources References to global resources returned by `borrow_global` or `borrow_global_mut` mostly behave like references to local storage: they can be extended, read, and written using ordinary reference operators and passed as arguments to other function. However, there is one important difference between local and global references: **a function cannot return a reference that points into global storage**. For example, these two functions will each fail to compile: ```move module 0x42::example { struct R has key { f: u64 } // will not compile fun ret_direct_resource_ref_bad(a: address): &R { borrow_global(a) // error! } // also will not compile fun ret_resource_field_ref_bad(a: address): &u64 { &borrow_global(a).f // error! } } ``` Move must enforce this restriction to guarantee absence of dangling references to global storage. This section contains much more detail for the interested reader. ## Global storage operators with generics Global storage operations can be applied to generic resources with both instantiated and uninstantiated generic type parameters: ```move module 0x42::example { struct Container has key { t: T } // Publish a Container storing a type T of the caller's choosing fun publish_generic_container(account: &signer, t: T) { move_to>(account, Container { t }) } /// Publish a container storing a u64 fun publish_instantiated_generic_container(account: &signer, t: u64) { move_to>(account, Container { t }) } } ``` The ability to index into global storage via a type parameter chosen at runtime is a powerful Move feature known as _storage polymorphism_. For more on the design patterns enabled by this feature, see Move generics. ## Example: `Counter` The simple `Counter` module below exercises each of the five global storage operators. The API exposed by this module allows: - Anyone to publish a `Counter` resource under their account - Anyone to check if a `Counter` exists under any address - Anyone to read or increment the value of a `Counter` resource under any address - An account that stores a `Counter` resource to reset it to zero - An account that stores a `Counter` resource to remove and delete it ```move module 0x42::counter { use std::signer; /// Resource that wraps an integer counter struct Counter has key { i: u64 } /// Publish a `Counter` resource with value `i` under the given `account` public fun publish(account: &signer, i: u64) { // "Pack" (create) a Counter resource. This is a privileged operation that // can only be done inside the module that declares the `Counter` resource move_to(account, Counter { i }) } /// Read the value in the `Counter` resource stored at `addr` public fun get_count(addr: address): u64 acquires Counter { borrow_global(addr).i } /// Increment the value of `addr`'s `Counter` resource public fun increment(addr: address) acquires Counter { let c_ref = &mut borrow_global_mut(addr).i; *c_ref = *c_ref + 1 } /// Reset the value of `account`'s `Counter` to 0 public fun reset(account: &signer) acquires Counter { let c_ref = &mut borrow_global_mut(signer::address_of(account)).i; *c_ref = 0 } /// Delete the `Counter` resource under `account` and return its value public fun delete(account: &signer): u64 acquires Counter { // remove the Counter resource let c = move_from(signer::address_of(account)); // "Unpack" the `Counter` resource into its fields. This is a // privileged operation that can only be done inside the module // that declares the `Counter` resource let Counter { i } = c; i } /// Return `true` if `addr` contains a `Counter` resource public fun exists_at(addr: address): bool { exists(addr) } } ``` ## Annotating functions with `acquires` In the `counter` example, you might have noticed that the `get_count`, `increment`, `reset`, and `delete` functions are annotated with `acquires Counter`. A Move function `m::f` must be annotated with `acquires T` if and only if: - The body of `m::f` contains a `move_from`, `borrow_global_mut`, or `borrow_global` instruction, or - The body of `m::f` invokes a function `m::g` declared in the same module that is annotated with `acquires` For example, the following function inside `Counter` would need an `acquires` annotation: ```move module 0x42::example { // Needs `acquires` because `increment` is annotated with `acquires` fun call_increment(addr: address): u64 acquires Counter { counter::increment(addr) } } ``` However, the same function _outside_ `Counter` would not need an annotation: ```move module 0x43::m { use 0x42::counter; // Ok. Only need annotation when resource acquired by callee is declared // in the same module fun call_increment(addr: address): u64 { counter::increment(addr) } } ``` If a function touches multiple resources, it needs multiple `acquires`: ```move module 0x42::two_resources { struct R1 has key { f: u64 } struct R2 has key { g: u64 } fun double_acquires(a: address): u64 acquires R1, R2 { borrow_global(a).f + borrow_global(a).g } } ``` The `acquires` annotation does not take generic type parameters into account: ```move module 0x42::m { struct R has key { t: T } // `acquires R`, not `acquires R` fun acquire_generic_resource(a: addr) acquires R { let _ = borrow_global>(a); } // `acquires R`, not `acquires R fun acquire_instantiated_generic_resource(a: addr) acquires R { let _ = borrow_global>(a); } } ``` Finally: redundant `acquires` are not allowed. Adding this function inside `Counter` will result in a compilation error: ```move module 0x42::m { // This code will not compile because the body of the function does not use a global // storage instruction or invoke a function with `acquires` fun redundant_acquires_bad() acquires Counter {} } ``` For more information on `acquires`, see Move functions. ## Reference Safety For Global Resources Move prohibits returning global references and requires the `acquires` annotation to prevent dangling references. This allows Move to live up to its promise of static reference safety (i.e., no dangling references, no `null` or `nil` dereferences) for all reference types. This example illustrates how the Move type system uses `acquires` to prevent a dangling reference: ```move module 0x42::dangling { struct T has key { f: u64 } fun borrow_then_remove_bad(a: address) acquires T { let t_ref: &mut T = borrow_global_mut(a); let t = remove_t(a); // type system complains here // t_ref now dangling! let uh_oh = *&t_ref.f; } fun remove_t(a: address): T acquires T { move_from(a) } } ``` In this code, line 6 acquires a reference to the `T` stored at address `a` in global storage. The callee `remove_t` then removes the value, which makes `t_ref` a dangling reference. Fortunately, this cannot happen because the type system will reject this program. The `acquires` annotation on `remove_t` lets the type system know that line 7 is dangerous, without having to recheck or introspect the body of `remove_t` separately! The restriction on returning global references prevents a similar, but even more insidious problem: ```move address 0x42 { module m1 { struct T has key {} public fun ret_t_ref(a: address): &T acquires T { borrow_global(a) // error! type system complains here } public fun remove_t(a: address) acquires T { let T {} = move_from(a); } } module m2 { fun borrow_then_remove_bad(a: address) { let t_ref = m1::ret_t_ref(a); let t = m1::remove_t(a); // t_ref now dangling! } } } ``` Line 16 acquires a reference to a global resource `m1::T`, then line 17 removes that same resource, which makes `t_ref` dangle. In this case, `acquires` annotations do not help us because the `borrow_then_remove_bad` function is outside the `m1` module that declares `T` (recall that `acquires` annotations can only be used for resources declared in the current module). Instead, the type system avoids this problem by preventing the return of a global reference at line 6. Fancier type systems that would allow returning global references without sacrificing reference safety are possible, and we may consider them in future iterations of Move. We chose the current design because it strikes a good balance between being expressive, annotation burden, and type system complexity. ### Source: https://docs.supra.com/network/move/move-book/reference # Reference ### Source: https://docs.supra.com/network/move/move-book/reference/standard-library # Standard Library Supra provides multiple useful libraries for developers. The complete up-to-date\ [docs can be found here](https://github.com/Entropy-Foundation/aptos-core/tree/dev/aptos-move/framework/supra-framework). ### Source: https://docs.supra.com/network/move/move-book/reference/coding-conventions # Coding Conventions This section lays out some basic coding conventions for Move that the Move team has found helpful. These are only recommendations, and you should feel free to use other formatting guidelines and conventions if you have a preference for them. ## Naming * **Module names**: should be lowercase snake case, e.g., `fixed_point32`, `vector`. * **Type names**: should be camel case if they are not a native type, e.g., `Coin`, `RoleId`. * **Function names**: should be lowercase snake case, e.g., `destroy_empty`. * **Constant names**: should be upper camel case and begin with an `E` if they represent error codes (e.g., `EIndexOutOfBounds`) and upper snake case if they represent a non-error value (e.g., `MIN_STAKE`). * * **Generic type names**: should be descriptive, or anti-descriptive where appropriate, e.g., `T` or `Element` for the Vector generic type parameter. Most of the time the "main" type in a module should be the same name as the module e.g., `option::Option`, `fixed_point32::FixedPoint32`. * **Module file names**: should be the same as the module name e.g., `option.move`. * **Script file names**: should be lowercase snake case and should match the name of the "main" function in the script. * **Mixed file names**: If the file contains multiple modules and/or scripts, the file name should be lowercase snake case, where the name does not match any particular module/script inside. ## Imports * All module `use` statements should be at the top of the module. * Functions should be imported and used fully qualified from the module in which they are declared, and not imported at the top level. * Types should be imported at the top-level. Where there are name clashes, `as` should be used to rename the type locally as appropriate. For example, if there is a module: ```move module 0x1::foo { struct Foo { } const CONST_FOO: u64 = 0; public fun do_foo(): Foo { Foo{} } // ... } ``` this would be imported and used as: ```move module 0x1::bar { use 0x1::foo::{Self, Foo}; public fun do_bar(x: u64): Foo { if (x == 10) { foo::do_foo() } else { abort 0 } } // ... } ``` And, if there is a local name-clash when importing two modules: ```move module 0x1::other_foo { struct Foo {} // ... } module 0x1::importer { use 0x1::other_foo::Foo as OtherFoo; use 0x1::foo::Foo; // ... } ``` ## Comments * Each module, struct, and public function declaration should be commented. * Move has doc comments `///`, regular single-line comments `//`, block comments `/* */`, and block doc comments `/** */`. ### Comments Example Doc comments must be directly above the item they are commenting on. For example, the following is valid: ```move /// My awesome module, doc comment can be used here module 0x42::example { // double slash can be anywhere // Double slash can be anywhere /// My awesome constant const MY_VALUE: u64 = 5; /// My awesome error message const E_MY_ERROR: u64 = 10; #[view] /// My awesome view function fun show_me_the_money() { // ... } /* Similarly block comments can be anywhere */ } ``` Below here are examples of doc comments `///` that will fail ```move module 0x42::example { /// My awesome view function <- must be below the annotation, right above the thing commented #[view] fun show_me_the_money() { // ... /// Within a function } /// Not attached to anything } ``` ## Formatting The Move team plans to write an auto-formatter to enforce formatting conventions. However, in the meantime: * Four space indentation should be used except for `script` and `address` blocks whose contents should not be indented. * Lines should be broken if they are longer than 100 characters. * Structs and constants should be declared before all functions in a module. ### Source: https://docs.supra.com/network/move/aptos-to-supra-cheatsheet # Aptos to Supra Cheatsheet This quick-reference guide helps you take what you know from the Aptos framework and translate it into building Move modules with the Supra framework. ### Framework Overview Both frameworks share a few similar foundational designs of code. As such, many modules and patterns are familiar, but the migration requires updating import paths, constants, and sometimes function names to reflect the Supra ecosystem. #### What’s Different? - **Module Prefixes:** All module references in Aptos starting with `aptos_framework::` are replaced with `supra_framework::` in Supra. - **Additional Features**: Supra includes extra modules (e.g., for randomness, advanced governance) that expand functionality. - **Configuration and Constants**: Some constants, such as domain separators or error codes, have been updated to reflect the Supra ecosystem. ## Import Paths and Their Changes There are differences in import paths that set Supra apart: #### Aptos Example: ``` use aptos_framework::account::{Self, SignerCapability, new_event_handle, create_resource_address}; use aptos_framework::aptos_coin::AptosCoin; ``` #### Supra Example: ``` use supra_framework::account::{Self, SignerCapability, new_event_handle, create_resource_address}; use supra_framework::supra_coin::SupraCoin; ``` All your module imports should replace `aptos_framework` with `supra_framework` accordingly. ## Module and Naming Conventions Table mapping **a few key modules and their counterparts** between Aptos & Supra Move Framework | Functionality | aptos_framework | supra_framework | | ------------------------ | ------------------------------------- | ---------------------------------------------------------------------------------------------------------------------------------------------------------------------------------------- | | Account Management | aptos_framework::account | supra_framework::account | | Coin Operations | aptos_coin:: AptosCoin | supra_coin::SupraCoin | | Multisig & Voting | aptos_framework::multisig_account | supra_framework::multisig_account | | Fungible Assets | aptos_framework::fungible_asset | supra_framework::fungible_asset | | Event Handling | aptos_framework::event | supra_framework::event | | Governance | aptos_framework::governance | supra_framework::supra_governance | | Staking/Consensus | aptos_framework::staking_config | supra_framework::staking_config | | Randomness Configuration | Customized or external implementation | [dependencies.SupraVrf] git = "https://github.com/Entropy-Foundation/vrf-interface"

**_Supra offers its own Supra dVRF services for developers to integrate_** | The Fungible Assets Module has Migration disabled on Mainnet, kindly use the coin_wrapper for using FA Standard in any Supra project from [**THIS REPO** ](https://github.com/Entropy-Foundation/aptos-core/blob/dev/aptos-move/move-examples/swap/sources/coin_wrapper.move) ## Detailed Code Template Comparisons Here is an example of diff in code for both frameworks, **let’s take a look at Multisig_account module from both Frameworks**: #### Aptos Version ``` Aptos Version: module aptos_framework::multisig_account { use aptos_framework::account::{Self, SignerCapability, new_event_handle, create_resource_address}; use aptos_framework::aptos_coin::AptosCoin; // Other imports ... const DOMAIN_SEPARATOR: vector = b"aptos_framework::multisig_account"; // Error codes const EDUPLICATE_OWNER: u64 = 1; const EACCOUNT_NOT_MULTISIG: u64 = 2002; const ENOT_OWNER: u64 = 2003; const EPAYLOAD_CANNOT_BE_EMPTY: u64 = 4; const ENOT_ENOUGH_OWNERS: u64 = 5; const ETRANSACTION_NOT_FOUND: u64 = 2006; /// Creates a new multisig account with specified owners. public fun create_multisig_account(account: &signer, owners: vector
) { // Validate and setup multisig account... } } ``` #### Supra Version ``` module supra_framework::multisig_account { use supra_framework::account::{Self, SignerCapability, new_event_handle, create_resource_address}; use supra_framework::supra_coin::SupraCoin; // Other updated imports ... const DOMAIN_SEPARATOR: vector = b"supra_framework::multisig_account"; // Error codes remain conceptually similar const EDUPLICATE_OWNER: u64 = 1; const EACCOUNT_NOT_MULTISIG: u64 = 2002; const ENOT_OWNER: u64 = 2003; const EPAYLOAD_CANNOT_BE_EMPTY: u64 = 4; const ENOT_ENOUGH_OWNERS: u64 = 5; const ETRANSACTION_NOT_FOUND: u64 = 2006; /// Creates a new multisig account with specified owners. public fun create_multisig_account(account: &signer, owners: vector
) { // Implementation logic for Supra. The business logic is generally identical; // only the references and potentially some internal data structures have changed. } } ``` Aside from updating the import paths and the domain separator, the business logic and error codes often remain the same. However, for advanced operations, check the Supra-specific documentation for changes in transaction handling or resource setup. ## Additional Modules Supra extends many functionalities to support a broader set of on-chain applications. Here’s a closer look at some specialized modules: #### Governance & Voting - **Aptos Governance**: Typically found under `aptos_framework::governance` - **Supra Governance**: Mapped to `supra_framework::supra_governance` #### Randomness - **Aptos**: May rely on external or manually configured randomness. - **Supra**: Supra offers its own Supra dVRF services for developers to integrate: [https://supra-documentation.com/oracles/dvrf](/oracles/dvrf) ### Source: https://docs.supra.com/network/move/ethereum-to-supra-move-cheatsheet # Ethereum to Supra Move Cheatsheet ## High Level Overview | Feature | Ethereum | Supra Move | | ----------------- | ---------------------------------------- | ----------------------------------------------------- | | Smart Contracts | Solidity, EVM | Move, MoveVM | | Benefits | Mature, wide adoption | Scalability, low latency, Optimal fees | | Transaction Fees | Variable, can be high | Lower and more predictable | | Account Addresses | 160-bit | 256-bit | | Account Structure | Balance in a single field, uses nonce | Modules and resources, uses sequence number | | Data Storage | Patricia Merkle Trees | Global storage with resources and modules | | Storage Mindset | Contract-based storage | Account & Resources centric mindset for code and data | | Parallelization | Limited due to shared storage space | Enhanced parallel execution due to resource model | | Type Safety | Contract types provide basic type safety | Module structs and generics offer robust type safety | | Unique Features | Wide ecosystem, EVM compatibility | Native VRF, Automation, Oracle price feeds | ## Comparing Token Standards | Aspect | Ethereum/Solidity | Supra Move | | ------------------ | ---------------------------------------------------------- | ----------------------------------------------------------------- | | Token Structure | Each token is its own contract | Every token uses typed Coin with single, reusable contract | | Token Standard | Must conform to standards like ERC20; implementations vary | Uniform interface and implementation for all tokens | | Balance Storage | Balances stored in contract using mapping structure | Resource-Oriented: Balances stored as resource in user's account | | Transfer Mechanism | Tokens can be transferred without receiver's permission | Tokens require receiver's explicit consent for transfer | | Safety | Depends on implementation quality | Resources cannot be arbitrarily created, ensuring token integrity | ## Comparing EVM and Move VM | Aspect | EVM (Ethereum Virtual Machine) | Move VM (Supra Move Virtual Machine) | | --------------------------- | ------------------------------------------------ | -------------------------------------------------------------- | | Data Storage | Data stored in smart contract's storage space | Data stored across smart contracts, user accounts, and objects | | Parallelization | Limited parallel execution due to shared storage | Enhanced parallel execution enabled by flexible split storage | | VM and Language Integration | Separate layers for EVM and languages (Solidity) | Seamless integration between VM layer and Move language | | Critical Network Operations | Complex implementation of network operations | Critical operations natively implemented in Move | | Function Calling | Dynamic dispatch allows arbitrary contract calls | Static dispatch focuses on security and predictable behavior | | Type Safety | Contract types provide basic type safety | Module structs and generics offer robust type safety | | Transaction Safety | Uses nonces for transaction ordering | Uses sequence numbers for transaction ordering | | Object Accessibility | Objects bound to smart contract scope | Guaranteed global accessibility of objects | ## Module Structure & Initialization ### Ethereum (Solidity) ```solidity // SPDX-License-Identifier: MIT pragma solidity ^0.8.0; contract MyContract { address public owner; uint256 public value; constructor(uint256 _initialValue) { owner = msg.sender; value = _initialValue; } modifier onlyOwner() { require(msg.sender == owner, "Not owner"); _; } } ``` ### Supra Move ``` module my_address::my_contract { use supra_framework::signer; use supra_framework::account; use std::error; struct ContractData has key { owner: address, value: u64, } const E_NOT_OWNER: u64 = 1; // Called once when module is published fun init_module(account: &signer) { let owner = signer::address_of(account); move_to(account, ContractData { owner, value: 0, }); } // Manual initialization function public entry fun initialize(account: &signer, initial_value: u64) { let addr = signer::address_of(account); move_to(account, ContractData { owner: addr, value: initial_value, }); } } ``` #### Key Differences: * **Supra Move**: Uses `init_module` for automatic initialization or explicit initialization functions * **Ethereum**: Uses constructors that run once during deployment * **Supra Move:** Resources are stored under user accounts, not contract addresses * **Ethereum**: State stored in contract storage slots ## Functions ### Ethereum (Solidity) ```solidity contract Functions { uint256 private _value; // Public function (external callable) function setValue(uint256 newValue) public { _value = newValue; } // View function (read-only) function getValue() public view returns (uint256) { return _value; } // Pure function (no state access) function add(uint256 a, uint256 b) public pure returns (uint256) { return a + b; } // Internal function function _internalHelper() internal pure returns (uint256) { return 42; } // Payable function function deposit() public payable { // Function can receive Ether } } ``` ### Supra Move ``` module my_address::functions { use supra_framework::signer; struct Storage has key { value: u64, } // Public entry function (blockchain callable) public entry fun set_value(account: &signer, new_value: u64) acquires Storage { let addr = signer::address_of(account); let storage = borrow_global_mut(addr); storage.value = new_value; } // View function (read-only) #[view] public fun get_value(addr: address): u64 acquires Storage { borrow_global(addr).value } // Public function (can be called by other modules) public fun add(a: u64, b: u64): u64 { a + b } // Private function (module internal only) fun internal_helper(): u64 { 42 } // Function that can receive coins public entry fun deposit(account: &signer, amount: u64) { // Use coin framework for transfers // coin::transfer(account, target, amount); } } ``` #### Key Differences: * **Supra Move**: Uses `#[view]` for read-only functions, public entry for blockchain calls * **Ethereum**: Uses view, pure, public, external modifiers * **Supra Move**: acquires keyword declares which resources the function accesses * **Ethereum**: Automatic state access without declaration ## Basic Types ### Ethereum (Solidity) ```solidity contract BasicTypes { // Integers uint8 smallNumber; // 0 to 255 uint256 bigNumber; // 0 to 2^256-1 int256 signedNumber; // -2^255 to 2^255-1 // Boolean bool isActive; // Address address userAddress; // Bytes bytes32 hash; bytes dynamicBytes; // String string text; // Arrays uint256[] dynamicArray; uint256[5] fixedArray; // Mapping mapping(address => uint256) balances; // Struct struct User { string name; uint256 age; } } ``` ### Supra Move ``` module my_address::basic_types { use std::string::{Self, String}; use std::vector; use aptos_std::table::{Self, Table}; struct BasicTypes has key { // Integers (unsigned only) small_number: u8, // 0 to 255 medium_number: u64, // 0 to 2^64-1 big_number: u128, // 0 to 2^128-1 huge_number: u256, // 0 to 2^256-1 // Boolean is_active: bool, // Address user_address: address, // Vector (dynamic array) dynamic_array: vector, // String text: String, // Table (like mapping) balances: Table, } // Struct struct User has store, drop { name: String, age: u64, } } ``` ## Structs and Resources ### Ethereum (Solidity) ```solidity contract StructsExample { struct Token { string name; uint256 totalSupply; mapping(address => uint256) balances; } Token public token; constructor() { token.name = "MyToken"; token.totalSupply = 1000000; } function transfer(address to, uint256 amount) public { require(token.balances[msg.sender] >= amount, "Insufficient balance"); token.balances[msg.sender] -= amount; token.balances[to] += amount; } } ``` ### Supra Move ``` module my_address::token { use supra_framework::signer; use aptos_std::table::{Self, Table}; use std::string::String; use std::error; // Resource stored under account struct Token has key { name: String, total_supply: u64, balances: Table, } const E_INSUFFICIENT_BALANCE: u64 = 1; public entry fun initialize(account: &signer, name: String, total_supply: u64) { move_to(account, Token { name, total_supply, balances: table::new(), }); } public entry fun transfer( account: &signer, to: address, amount: u64 ) acquires Token { let from = signer::address_of(account); let token = borrow_global_mut(@my_address); let from_balance = table::borrow_mut(&mut token.balances, from); assert!(*from_balance >= amount, error::invalid_argument(E_INSUFFICIENT_BALANCE)); *from_balance = *from_balance - amount; if (table::contains(&token.balances, to)) { let to_balance = table::borrow_mut(&mut token.balances, to); *to_balance = *to_balance + amount; } else { table::add(&mut token.balances, to, amount); }; } } ``` #### Key Differences: * **Supra Move**: Resources have abilities (`key, store, drop, copy`) * **Ethereum**: Structs are simple data containers * **Supra Move**: Resources ensure linear type safety * **Ethereum**: No built-in protection against double-spending ## Events ### Ethereum (Solidity) ```solidity contract Events { event Transfer( address indexed from, address indexed to, uint256 value ); event Approval( address indexed owner, address indexed spender, uint256 value ); function transfer(address to, uint256 amount) public { // Transfer logic... emit Transfer(msg.sender, to, amount); } } ``` ### Supra Move ``` module my_address::events { use supra_framework::event; use supra_framework::signer; #[event] struct TransferEvent has drop, store { from: address, to: address, value: u64, } #[event] struct ApprovalEvent has drop, store { owner: address, spender: address, value: u64, } public entry fun transfer(account: &signer, to: address, amount: u64) { let from = signer::address_of(account); // Transfer logic... event::emit(TransferEvent { from, to, value: amount, }); } } ``` #### Key Differences: * **Supra Move**: Events are structs with `#[event]` attribute * **Ethereum**: Events are declared with `event` keyword * **Supra Move**: Uses `event::emit()` to emit events * **Ethereum**: Uses `emit` keyword * **Supra Move**: No indexed parameters concept * **Ethereum**: Supports indexed parameters for filtering ## Storage & State Management ### Ethereum (Solidity) ```solidity contract Storage { // State variables stored in contract storage uint256 private _totalSupply; mapping(address => uint256) private _balances; function updateBalance(address user, uint256 amount) internal { _balances[user] = amount; } function getBalance(address user) public view returns (uint256) { return _balances[user]; } } ``` ### Supra Move ``` module my_address::storage { use supra_framework::signer; use aptos_std::table::{Self, Table}; struct TokenStorage has key { total_supply: u64, balances: Table, } public entry fun initialize(account: &signer) { move_to(account, TokenStorage { total_supply: 0, balances: table::new(), }); } fun update_balance(storage: &mut TokenStorage, user: address, amount: u64) { if (table::contains(&storage.balances, user)) { *table::borrow_mut(&mut storage.balances, user) = amount; } else { table::add(&mut storage.balances, user, amount); }; } #[view] public fun get_balance(addr: address, user: address): u64 acquires TokenStorage { let storage = borrow_global(addr); if (table::contains(&storage.balances, user)) { *table::borrow(&storage.balances, user) } else { 0 } } } ``` #### Key Differences: * Supra Move: Resources stored under specific account addresses * Ethereum: State stored in contract's storage slots * Supra Move: Must explicitly declare resource access with `acquires` * Ethereum: Automatic state access ## Testing ### Ethereum (Solidity with Hardhat) ```solidity const { expect } = require("chai"); describe("Token", function () { it("Should transfer tokens correctly", async function () { const Token = await ethers.getContractFactory("Token"); const token = await Token.deploy(); await token.transfer(addr1.address, 100); expect(await token.balanceOf(addr1.address)).to.equal(100); }); }); ``` ### Supra Move ``` #[test_only] module my_address::token_tests { use my_address::token; use supra_framework::account; use std::signer; #[test(account = @0x123)] public entry fun test_transfer(account: signer) { let addr = signer::address_of(&account); account::create_account_for_test(addr); token::initialize(&account, string::utf8(b"Test"), 1000); token::transfer(&account, @0x456, 100); assert!(token::get_balance(addr, @0x456) == 100, 1); } } ``` ## Deployment ### Ethereum ```sh # Using Hardhat npx hardhat compile npx hardhat run scripts/deploy.js --network mainnet ``` ### Supra Move ```powershell # Compile and publish module supra move tool publish \ --package-dir /path/to/project \ --rpc-url https://rpc-testnet.supra.com ``` ## Account Structure & Transaction Model ### Ethereum Account Model ```solidity // Ethereum accounts have: // - Address (160-bit) // - Balance (single ETH balance) // - Nonce (for transaction ordering) // - Contract code (for contract accounts) // - Storage (key-value store) contract Example { mapping(address => uint256) balances; function transfer(address to, uint256 amount) public { require(balances[msg.sender] >= amount); balances[msg.sender] -= amount; balances[to] += amount; } } ``` ### Supra Move Account Model ``` // Supra accounts have: // - Address (256-bit) // - Sequence number (for transaction ordering) // - Resources (typed data structures) // - Modules (code) module my_address::example { use supra_framework::coin; use supra_framework::supra_coin::SupraCoin; // Each account can hold resources directly public entry fun transfer(from: &signer, to: address, amount: u64) { coin::transfer(from, to, amount); } } ``` | **Feature** | **Ethereum/Solidity** | **Supra Move** | | ------------------- | ------------------------------ | ---------------------------------- | | Type System | Dynamic typing, runtime checks | Static typing, compile-time safety | | Resource Management | Manual memory management | Automatic resource lifecycle | | Upgrades | Proxy patterns, complex | Module upgrades, simpler | | State Storage | Contract storage | Account resources | | Safety | Runtime safety | Compile-time + runtime safety | | Arrays | Fixed/dynamic arrays | Vectors | | Mappings | Built-in mappings | Table data structure | | Events | Built-in event system | Struct-based events | | Testing | External frameworks | Built-in testing | ### Source: https://docs.supra.com/network/move/typescript-sdk # TypeScript SDK The Supra L1 TypeScript SDK provides a convenient way to interact with and perform operations on Supra. It offers a set of utility functions, classes, and types to simplify the integration process and enhance developer productivity. ## Install the TypeScript SDK ```sh npm install supra-l1-sdk ``` ## Import the Package ```typescript ``` ## Example ### Initialize a new project ``` npm init && npm add -D typescript @types/node ts-node && npx tsc --init && mkdir src && > src/quickstart.ts ``` ### Install the TypeScript SDK ``` npm install supra-l1-sdk ``` ### Import dependencies ```typescript HexString, SupraAccount, SupraClient, BCS, TxnBuilderTypes, } from "supra-l1-sdk"; ``` ### Initialize the SupraClient ```typescript let supraClient = await SupraClient.init( "https://rpc-testnet.supra.com/" ); ``` ### Initialize a SupraAccount ```typescript let senderAccount = new SupraAccount( Uint8Array.from( Buffer.from( "2b9654793a999d1d487dabbd1b8f194156e15281fa1952af121cc97b27578d89", "hex" ) ) ); ``` ### Fund the account with the testnet faucet ```typescript console.log( 'Funding Sender With Faucet: ', // To Fund Account With Test Supra Tokens await supraClient.fundAccountWithFaucet(senderAccount.address()), ) ``` ### Set the receiver address ```typescript let receiverAddress = new HexString( "0xb8922417130785087f9c7926e76542531b703693fdc74c9386b65cf4427f4e80" ); ``` ### Transfer supra to the receiver address ```typescript // To Transfer Supra Coin From Sender To Receiver let txResData = await supraClient.transferSupraCoin( senderAccount, receiverAddress, BigInt(100000000), { enableTransactionWaitAndSimulationArgs: { enableWaitForTransaction: true, enableTransactionSimulation: true, }, } ); console.log("Transfer SupraCoin TxRes: ", txResData); ``` ### Full quickstart code
```typescript (async () => { // To Create Instance Of Supra Client, But In This Method We Don't Need To Pass ChainId. // ChainId Will Be Identified At Instance Creation Time By Making RPC Call. let supraClient = await SupraClient.init( "https://rpc-autonet.supra.com/" ); //Init a SupraAccount from a private key. let senderAccount = new SupraAccount( Uint8Array.from( Buffer.from( "2b9654793a999d1d487dabbd1b8f194156e15281fa1952af121cc97b27578d89", "hex" ) ) ); //Fund the sender account with the testnet faucet await supraClient.fundAccountWithFaucet(senderAccount.address()) //Set the receiver address let receiverAddress = new HexString( "0xb8922417130785087f9c7926e76542531b703693fdc74c9386b65cf4427f4e80" ); // To Transfer Supra Coin From Sender To Receiver let txResData = await supraClient.transferSupraCoin( senderAccount, receiverAddress, BigInt(1000), { enableTransactionWaitAndSimulationArgs: { enableWaitForTransaction: true, enableTransactionSimulation: true, }, } ); //Output the transaction data console.log("Transfer SupraCoin TxRes: ", txResData); })(); ```
### Execute the code: `npx ts-node src/quickstart.ts`
### Source: https://docs.supra.com/network/move/typescript-sdk/guides # Guides ### Source: https://docs.supra.com/network/move/typescript-sdk/guides/create-supra-accounts # Create Supra Accounts How to create new and import existing accounts. ## [`SupraAccount`](https://sdk-docs.supra.com/classes/SupraAccount.html#constructor) class constructor ```typescript new SupraAccount() new SupraAccount(Buffer.from('YOUR_PRIVATE_KEY', 'hex')) ``` Create a new supra account or create one from the provided private key.\ If no `privateKeyBytes` parameter is provided, a new account will be generated. **Parameters** | Name | Type | Optional | | --------------- | -------------- | ----------------------------------- | | privateKeyBytes | Uint8Array | | | address | MaybeHexString | | **Returns** [SupraAccount](https://sdk-docs.supra.com/classes/SupraAccount.html) ------ | ------ | ------------------------------------------------------------ | | path | string | | | mnemonics | string | | **Returns** [SupraAccount](https://sdk-docs.supra.com/classes/SupraAccount.html) --- ## Example The SupraAccount class allows you to generate new accounts, import private key, or derive from mnemonics. #### Initialize a new project ```typescript npm init && npm add -D typescript @types/node ts-node && npx tsc --init ``` #### Install Supra's TypeScript SDK ``` npm install supra-l1-sdk ``` #### Create `supra_account_example.ts` and import dependencies
supra_account_example.ts
```typescript import {SupraAccount} from 'supra-l1-sdk'; ```
#### Generate a new account ```typescript const newAccount = new SupraAccount() ``` #### Generate an account from private key ```typescript const accountFromPk = new SupraAccount(Buffer.from('YOUR_PRIVATE_KEY', 'hex')) ``` #### Generate an account from mnemonics ```typescript const path = "m/44'/637'/0'/0'/0'" const mnemonic = '' const accountFromMnemonics = SupraAccount.fromDerivePath(path, mnemonic) ``` #### Complete code
supra_account_example.ts
```typescript async function main() { const newAccount = new SupraAccount() console.log('newAccount: ', newAccount.address()) const accountFromPk = new SupraAccount(Buffer.from('YOUR_PRIVATE_KEY', 'hex')) console.log('accountFromPk Address: ', accountFromPk.address()) const path = "m/44'/637'/0'/0'/0'" const mnemonic = '' const accountFromMnemonics = SupraAccount.fromDerivePath(path, mnemonic) console.log('accountFromMnemonics: ', accountFromMnemonics.address()) } main() ```
#### Execute code `npx ts-node supra_account_example.ts`
### Source: https://docs.supra.com/network/move/typescript-sdk/guides/publish-a-package # Publish a Package How to publish a package using the TypeScript SDK. ## [`publishPackage`](https://sdk-docs.supra.com/classes/SupraClient.html#publishPackage) function ```typescript await supraClient.publishPackage(senderAccount, packageMetadata, modulesCode) ``` **Parameters** | Name | Type | | ----------------------- | ---------------------------------------------------------------------------------------------------------------------------------------- | | senderAccount | [`SupraAccount`](https://sdk-docs.supra.com/classes/SupraAccount.html) | | packageMetadata | `Uint8Array` | | modulesCode | `Uint8Array[]` | | optionalTransactionArgs | [`OptionalTransactionArgs`](https://sdk-docs.supra.com/interfaces/OptionalTransactionArgs.html) | **Returns** | Name | Type | | ----------------------------- | ------------------------------------------------------------------------------------- | | Promise\ | [TransactionResponse](https://sdk-docs.supra.com/interfaces/TransactionResponse.html) | ```json { "txHash": "", "result": "" } ``` --- ## Example The `publishPackage` function requires the package metadata and module bytecode as the second and third parameter. These are obtained through the `build-publish-payload` command of the Supra CLI. Once obtained, parse the JSON file for the data and pass it to the `publishPackage` function. #### Build the publish payload with the Supra CLI ``` supra move tool build-publish-payload --package-dir /supra/configs/move_workspace/{YOUR_PROJECT_NAME} --json-output-file ./configs/move_workspace/{YOUR_PROJECT_NAME}/publish-payload.json ``` #### Initialize a new project ```typescript npm init && npm add -D typescript @types/node ts-node && npx tsc --init ``` #### Install Supra's TypeScript SDK ``` npm install supra-l1-sdk ``` #### Create `publish_example.ts` and import dependencies
```typescript ```
#### Parse the JSON file and extract data
```typescript function getPackageData(filePath: string) { const jsonData = JSON.parse(fs.readFileSync(filePath, "utf8")); const packageMetadata = new HexString(jsonData.args[0].value).toUint8Array(); const modulesCode = []; for(let e of jsonData.args[1].value){ modulesCode.push(new HexString(e).toUint8Array()) } return { packageMetadata, modulesCode }; } ```
#### Call the `publishPackage` function
```typescript async function main(){ const { packageMetadata, modulesCode } = getPackageData("YOUR_PATH_TO_JSON_FILE"); let supraClient = await SupraClient.init( "https://rpc-testnet.supra.com/" ); let senderAccount = new SupraAccount( new HexString("YOUR_PRIVATE_KEY").toUint8Array() ); const publishTxn = await supraClient.publishPackage(senderAccount, packageMetadata, modulesCode) console.log(publishTxn); } ```
#### Complete code
```typescript function getPackageData(filePath: string) { const jsonData = JSON.parse(fs.readFileSync(filePath, "utf8")); const packageMetadata = new HexString(jsonData.args[0].value).toUint8Array(); const modulesCode = []; for(let e of jsonData.args[1].value){ modulesCode.push(new HexString(e).toUint8Array()) } return { packageMetadata, modulesCode }; } async function main(){ const { packageMetadata, modulesCode } = getPackageData("YOUR_PATH_TO_JSON_FILE"); let supraClient = await SupraClient.init( "https://rpc-testnet.supra.com/" ); let senderAccount = new SupraAccount( new HexString("YOUR_PRIVATE_KEY").toUint8Array() ); const publishTxn = await supraClient.publishPackage(senderAccount, packageMetadata, modulesCode) console.log(publishTxn); } main() ```
#### Execute code `npx ts-node publish_example.ts`
### Source: https://docs.supra.com/network/move/python-sdk # Python SDK ### Introduction The `supra-python-sdk` provides a seamless interface for interacting with the Supra-L1 network. It offers comprehensive support for Move VM operations and transactions, enabling developers to both build on-chain and submit MoveVM-based transactions with ease. ### Key Features - **Complete Move VM Support** - Full compatibility with Move VM operations - **On-chain Data Queries** - Efficient methods to query blockchain state - **Transaction Management** - Submit and manage transactions seamlessly - **Cryptographic Operations** - Built-in support for ED25519 and multi-signature operations - **Token Operations** - Native support for token creation and management - **BCS Serialization** - Efficient Binary Canonical Serialization support For detailed API documentation of all modules, see the [Official Python SDK Reference](https://supra-python-sdk.docs.supra.com/index.html) and for some more reference examples, you can check [official examples repo here.](https://github.com/Entropy-Foundation/supra-python-sdk/tree/master/examples) ### Quick Start #### Initialize the Client ```python from supra_sdk.account import Account from supra_sdk.clients.rest import SupraClient async def main(): # Initialize client with RPC endpoint client = SupraClient("https://rpc-testnet.supra.com") # Create a new account account = Account.generate() print(f"Address: {account.address()}") print(f"Private Key: {account.private_key.hex()}") # Close client when done await client.close() if __name__ == "__main__": asyncio.run(main()) ``` #### Request Testnet Tokens ```python async def get_testnet_tokens(): client = SupraClient("https://rpc-testnet.supra.com") account = Account.generate() # Request tokens from faucet tx_hash = await client.faucet(account.address()) if tx_hash: print(f"Faucet successful! Tx: {tx_hash}") # Optionally wait for confirmation await client.wait_for_faucet(tx_hash) await client.close() ``` #### Submit Your First Transaction ```python from supra_sdk.transactions import EntryFunction, TransactionArgument, TransactionPayload from supra_sdk.type_tag import TypeTag, StructTag from supra_sdk.bcs import Serializer from supra_sdk.account import Account from supra_sdk.clients.rest import SupraClient from supra_sdk.account_address import AccountAddress async def transfer_coins(): client = SupraClient("https://rpc-testnet.supra.com") sender = Account.generate() recipient = Account.generate() # Fund sender account await client.faucet(sender.address()) # Create transfer payload payload = EntryFunction.natural( "0x1::coin", "transfer", [TypeTag(StructTag.from_str("0x1::supra_coin::SupraCoin"))], [ TransactionArgument(recipient.address(), Serializer.struct), TransactionArgument(100_000, Serializer.u64), ], ) # Create and submit signed transaction signed_txn = await client.create_signed_transaction( sender, TransactionPayload(payload) ) result = await client.submit_signed_transaction(signed_txn) print(f"Transaction Hash: {result}") await client.close() ``` --- ### API Reference - SupraClient `SupraClient` is the main interface for interacting with the Supra blockchain. #### Constructor ```python SupraClient(base_url: str, client_config: Optional[ClientConfig] = None) ``` **Parameters:** - `base_url`: RPC endpoint URL - `client_config`: Optional configuration for the client **Example:** ```python client = SupraClient("https://rpc-testnet.supra.com") ``` #### Core Methods **`faucet(address: AccountAddress, wait_for_faucet: bool = True) -> Optional[str]`** Request testnet tokens from the faucet. **Parameters:** - `address`: Recipient address - `wait_for_faucet`: Whether to wait for transaction confirmation (default: True) **Returns:** Transaction hash or None if failed **Example:** ```python tx_hash = await client.faucet(account.address()) # Or without waiting tx_hash = await client.faucet(account.address(), wait_for_faucet=False) if tx_hash: await client.wait_for_faucet(tx_hash) ``` **`wait_for_faucet(tx_hash: str) -> None`** Wait for faucet transaction to complete. **Parameters:** - `tx_hash`: Faucet transaction hash **`create_signed_transaction(sender: Account, payload: TransactionPayload) -> SignedTransaction`** Create a signed transaction ready for submission. **Parameters:** - `sender`: Account signing the transaction - `payload`: Transaction payload (EntryFunction, Script, etc.) **Returns:** Signed transaction object **Example:** ```python payload = EntryFunction.natural(...) signed_txn = await client.create_signed_transaction(account, TransactionPayload(payload)) ``` **`submit_signed_transaction(signed_transaction: SignedTransaction) -> str`** Submit a signed transaction to the blockchain. **Parameters:** - `signed_transaction`: Signed transaction object **Returns:** Transaction hash --- ### API Reference - Account `Account` class manages cryptographic keys and signing operations. #### Creating Accounts ```python from supra_sdk.account import Account # Generate new random account account = Account.generate() # Load from private key hex string account = Account.load_key("0x1234...private_key_hex") # Save account to file account.store("./my_account.json") # Load account from file account = Account.load("./my_account.json") ``` --- ### API Reference - Token Clients #### SupraTokenClient High-level client for fungible token operations. **Constructor** ```python from supra_sdk.clients import SupraTokenClient token_client = SupraTokenClient(supra_client) ``` **Key Methods** **`create_collection(account: Account, name: str, description: str, uri: str) -> str`** Create a new token collection. **Example:** ```python await token_client.create_collection( account, "My Collection", "Collection description", "https://example.com/collection" ) ``` **`create_token(account: Account, collection_name: str, name: str, description: str, supply: int, uri: str, royalty_points_numerator: int) -> str`** Mint a new token in a collection. **Example:** ```python await token_client.create_token( account, "My Collection", "Token #1", "First token", supply=1, uri="https://example.com/token/1", royalty_points_numerator=5 # 5% royalty ) ``` **`offer_token(sender: Account, receiver: AccountAddress, creator: AccountAddress, collection_name: str, token_name: str, property_version: int, amount: int) -> str`** Offer a token to another account. **`claim_token(receiver: Account, sender: AccountAddress, creator: AccountAddress, collection_name: str, token_name: str, property_version: int) -> str`** Claim an offered token. **`get_token_balance(owner: AccountAddress, creator: AccountAddress, collection_name: str, token_name: str, property_version: int) -> int`** Get token balance for an account. **`get_collection(creator: AccountAddress, collection_name: str) -> dict`** Get collection data. **`get_token_data(creator: AccountAddress, collection_name: str, token_name: str) -> dict`** Get token metadata. --- ### API Reference - Transactions #### Creating Transaction Payloads ```python from supra_sdk.transactions import ( EntryFunction, TransactionArgument, TransactionPayload ) from supra_sdk.type_tag import TypeTag, StructTag from supra_sdk.bcs import Serializer # Create an entry function payload payload = EntryFunction.natural( "0x1::coin", # Module "transfer", # Function [TypeTag(StructTag.from_str("0x1::supra_coin::SupraCoin"))], # Type args [ TransactionArgument(recipient_address, Serializer.struct), TransactionArgument(amount, Serializer.u64), ] # Arguments ) # Wrap in TransactionPayload tx_payload = TransactionPayload(payload) ``` #### EntryFunction **`natural(module: str, function: str, ty_args: list[TypeTag], args: list[TransactionArgument]) -> EntryFunction` (static)** Create an entry function with natural argument encoding. **Parameters:** - `module`: Module identifier (e.g., "0x1::coin") - `function`: Function name - `ty_args`: Type arguments - `args`: Function arguments as TransactionArgument objects #### TransactionArgument ```python TransactionArgument(value: Any, serializer: Callable) ``` Wraps an argument with its serializer function. **Common serializers from `Serializer`:** - `Serializer.u8`, `Serializer.u64`, `Serializer.u128`, `Serializer.u256` - `Serializer.bool` - `Serializer.struct` (for addresses and complex types) - `Serializer.str` (for strings) --- ### API Reference - Type System #### TypeTag & StructTag ```python from supra_sdk.type_tag import TypeTag, StructTag # Parse struct type from string coin_type = StructTag.from_str("0x1::supra_coin::SupraCoin") # Use in type arguments type_arg = TypeTag(coin_type) # Complex nested types token_type = StructTag.from_str( "0x3::token::Token<0x1::supra_coin::SupraCoin>" ) ``` #### StructTag **`from_str(type_tag: str) -> StructTag` (static)** Parse a struct type from string representation. **Example:** ```python # Simple type simple = StructTag.from_str("0x1::coin::Coin") # Generic type with type parameters generic = StructTag.from_str("0x1::coin::Coin<0x1::supra_coin::SupraCoin>") ``` --- ### API Reference - BCS Serialization Binary Canonical Serialization (BCS) is the format used by Move VM. #### Serializer ```python from supra_sdk.bcs import Serializer serializer = Serializer() serializer.u64(12345) serializer.str("Hello") serializer.bool(True) # Get serialized bytes data = serializer.output() ``` #### Deserializer ```python from supra_sdk.bcs import Deserializer deserializer = Deserializer(data) number = deserializer.u64() text = deserializer.str() flag = deserializer.bool() ``` #### Common Serialization Methods - `u8(value: int)`, `u16(value: int)`, `u32(value: int)`, `u64(value: int)` - `u128(value: int)`, `u256(value: int)` - `bool(value: bool)` - `str(value: str)` - `struct(value: Serializable)` - `sequence(values: list, encoder: Callable)` --- ### NFT Collection Example: This example demonstrates how to create and manage an NFT collection using the Supra Python SDK. Create a common.py file in the same directory as the below file to import RPC_NODE_URL. ```python from examples.common import RPC_NODE_URL from supra_sdk.account import Account from supra_sdk.clients import SupraTokenClient from supra_sdk.clients.rest import SupraClient async def main(): supra_client = SupraClient(RPC_NODE_URL) token_client = SupraTokenClient(supra_client) alice = Account.generate() bob = Account.generate() collection_name = "Alice's" token_name = "Alice's first token" property_version = 0 print(f"Alice account address: {alice.address()}") print(f"Bob account address: {bob.address()}") await supra_client.faucet(alice.address()) await supra_client.faucet(bob.address()) print("\n=== Creating Collection and Token ===") await token_client.create_collection( alice, collection_name, "Alice's simple collection", "https://supra.com" ) await token_client.create_token( alice, collection_name, token_name, "Alice's simple token", 1, "https://supra.dev/img/temp.jpeg", 0, ) collection_data = await token_client.get_collection( alice.address(), collection_name ) print( f"Alice's collection: {json.dumps(collection_data, indent=4, sort_keys=True)}" ) balance = await token_client.get_token_balance( alice.address(), alice.address(), collection_name, token_name, property_version ) print(f"Alice's token balance: {balance}") token_data = await token_client.get_token_data( alice.address(), collection_name, token_name ) print(f"Alice's token data: {json.dumps(token_data, indent=4, sort_keys=True)}") print("\n=== Transferring the token to Bob ===") await token_client.offer_token( alice, bob.address(), alice.address(), collection_name, token_name, property_version, 1, ) await token_client.claim_token( bob, alice.address(), alice.address(), collection_name, token_name, property_version, ) alice_balance = token_client.get_token_balance( alice.address(), alice.address(), collection_name, token_name, property_version ) bob_balance = token_client.get_token_balance( bob.address(), alice.address(), collection_name, token_name, property_version ) [alice_balance, bob_balance] = await asyncio.gather(*[alice_balance, bob_balance]) print(f"Alice's token balance: {alice_balance}") print(f"Bob's token balance: {bob_balance}") print("\n=== Transferring the token back to Alice using MultiAgent ===") await token_client.direct_transfer_token( bob, alice, alice.address(), collection_name, token_name, 0, 1 ) alice_balance = token_client.get_token_balance( alice.address(), alice.address(), collection_name, token_name, property_version ) bob_balance = token_client.get_token_balance( bob.address(), alice.address(), collection_name, token_name, property_version ) [alice_balance, bob_balance] = await asyncio.gather(*[alice_balance, bob_balance]) print(f"Alice's token balance: {alice_balance}") print(f"Bob's token balance: {bob_balance}") await supra_client.close() if __name__ == "__main__": asyncio.run(main()) ``` --- ### Source: https://docs.supra.com/network/move/rest-api # REST API ### Source: https://docs.supra.com/network/move/supra-multisig-guide # Supra Multisig Guide The Supra Multisig module control to Multisig accounts unlike traditional Multisig systems that require users to specify public keys, this Module only requires addresses as owners. This module also supports updating owners without having to change the auth key. It offers two options for storing transaction payloads: either a full on-chain payload (providing full decentralization and transparency) or a lightweight payload hash (saving gas without sacrificing security during execution). ### Key Benefits 1. **Dynamic Owner Management:** Easily add or remove owners without resetting the auth key. 2. **Flexible Transaction Storage:** - **Full Payload:** Maximum transparency and resilience. - **Hash-only:** Saves gas while retaining verification ability. 3. **Nonce-Based Order Enforcement:** Transactions execute in order, ensuring predictable behavior. 4. **Simple Onboarding:** Create Multisig accounts with a default owner and extend as needed. ## Interacting with Multisig via Supra CLI Supra offers intuitive CLI commands to interact with multisig accounts. Here’s guide for CLI Commands: #### Create a new multisig account on-chain: ```powershell supra move multisig create --timeout-duration --num-signatures-required --additional-owners ``` Use `--additional-owners` Even if you want a single threshold multisig, you must add the other owner's/owners address to not face "**MULTISIG_TRANSACTION_INSUFFICIENT_APPROVALS**" ERROR while Executing Proposed Transaction. #### Approve a pending multisig transaction: ```powershell supra move multisig approve --multisig-address --sequence-number ``` #### Propose a new multisig transaction: ```powershell supra move multisig create-transaction --multisig-address --function-id ``` #### Execute a multisig transaction that has its full payload stored on-chain: ```powershell supra move multisig execute --multisig-address --max-gas 500 ``` #### Removes a proposed multisig transaction (finalizes a rejection): ```powershell supra move multisig execute-reject --multisig-address --max-gas 500 ``` #### Execute a multisig transaction where only a payload hash was stored on-chain: **you will provide the full payload at execution time.** ```powershell supra move multisig execute-with-payload --multisig-address --function-id --max-gas 500 ``` #### Reject a multisig transaction: ```powershell supra move multisig reject --multisig-address --sequence-number ``` #### Verify that the entry function matches the on-chain transaction proposal (serialization check) ```powershell supra move multisig serialize-proposal --function-id ``` #### Verify that the proposed transaction (its entry function and parameters) matches the on-chain proposal: ```powershell supra move multisig verify-proposal --multisig-address --sequence-number --function-id ``` ## Transaction Flow Overview The typical workflow when interacting with a multisig account is as follows: 1. Creation of the Multisig Account: - **`create`:** Instantiates a multisig account with a single default owner. 2. Transaction Creation: - `create_transaction`: An owner can initiate a multisig transaction by providing the entire transaction payload. - A unique transaction Sequence ID is assigned to every newly proposed transaction. 1. Transaction Voting (Approval/Rejection): - `approve`: Other owners can approve the pending transaction by submitting their approval with the transaction ID. - `reject`: Conversely, owners can reject a transaction if they do not agree with its content. 2. Transaction Execution: - `execute` or `execute_with_payload` : - If enough approvals have accumulated, any owner can execute the transaction. - Depending on whether the full payload or just a hash is stored, the appropriate execute function is called. - Execution Details: - The multisig module first verifies that the payload has received the required number of signatures. - The executing owner pays for the gas fee. 3. Finalizing Rejected Transactions: - `execute_reject` : - Once a transaction accumulates enough rejections, any owner can finalize the rejection of that transaction. ## Practical Tips - Transaction Proposals: Depending on your cost and transparency preferences, choose between storing the full payload or just the payload hash when using `create-transaction`. - Voting and Execution: Utilize the `approve` or `reject` sub-command with the appropriate sequence numbers. When ready, execute the transaction using either `execute` (if the full payload is on-chain) or `execute-with-payload` (if you stored only a hash). - Verification: Always verify the proposal details with `serialize-proposal` or `verify-proposal` prior to voting, ensuring the on-chain data aligns with your expected parameters. ## Link to Module & Repository Docs: ### Source: https://docs.supra.com/network/move/supra-fungible-asset-fa-module # Supra Fungible Asset (FA) Module The Supra Framework's fungible asset module provides a comprehensive standard for creating, managing, and transferring fungible tokens on the Supra. This module enables the creation of fungible assets with any metadata object that is equipped with the `Metadata` resource. ## Module Structure ```move module supra_framework::fungible_asset { use supra_framework::aggregator_v2; use supra_framework::create_signer; use supra_framework::event; use supra_framework::function_info; use supra_framework::object; use std::string; use std::features; use std::error; use std::option; use std::signer; } ``` ### Friend Modules The module declares the following friend relationships: * `supra_framework::coin` - For coin-to-FA migration support * `supra_framework::primary_fungible_store` - For primary store management * `supra_framework::supra_account` - For account integration * `supra_framework::dispatchable_fungible_asset` - For custom dispatch logic ## Supply and Validation Constrants ```move const MAX_U128: u128 = 340282366920938463463374607431768211455; const MAX_NAME_LENGTH: u64 = 32; const MAX_SYMBOL_LENGTH: u64 = 10; const MAX_DECIMALS: u8 = 32; const MAX_URI_LENGTH: u64 = 512; ``` ## Core Data Structures ### FungibleAsset ```move struct FungibleAsset { metadata: Object, amount: u64, } ``` Represents a specific amount of fungible asset with type safety guarantees. This is ephemeral and cannot be stored directly - it must be deposited back into a store. ### Metadata ```move #[resource_group_member(group = supra_framework::object::ObjectGroup)] struct Metadata has key, copy, drop { name: String, // Asset name, max 32 characters symbol: String, // Asset symbol, max 10 characters decimals: u8, // Display decimals, max 32 icon_uri: String, // Icon URI, max 512 characters project_uri: String, // Project URI, max 512 characters } ``` ### FungibleStore ```move #[resource_group_member(group = supra_framework::object::ObjectGroup)] struct FungibleStore has key { metadata: Object, // The address of the base metadata object balance: u64, // The balance of the fungible metadata frozen: bool, // If true, only TransferRef can move in/out } ``` ### Supply Management ```move #[resource_group_member(group = supra_framework::object::ObjectGroup)] struct Supply has key { current: u128, maximum: Option, // None = unlimited supply } #[resource_group_member(group = supra_framework::object::ObjectGroup)] struct ConcurrentSupply has key { current: Aggregator, } ``` ### Reference Types ```move struct MintRef has drop, store { metadata: Object } struct BurnRef has drop, store { metadata: Object } struct TransferRef has drop, store { metadata: Object } struct MutateMetadataRef has drop, store { metadata: Object } ``` ### **Dispatch Functions** ```move #[resource_group_member(group = supra_framework::object::ObjectGroup)] struct DispatchFunctionStore has key { withdraw_function: Option, deposit_function: Option, derived_balance_function: Option, } ``` ### **Concurrent Balance Tracking** ```move #[resource_group_member(group = supra_framework::object::ObjectGroup)] struct ConcurrentFungibleBalance has key { balance: Aggregator, } ``` ### **Untransferable Assets** ```move #[resource_group_member(group = supra_framework::object::ObjectGroup)] struct Untransferable has key {} ``` ## Events ```move #[event] struct Deposit has drop, store { store: address, amount: u64, } #[event] struct Withdraw has drop, store { store: address, amount: u64, } #[event] struct Frozen has drop, store { store: address, frozen: bool, } ``` ## Utility Functions ```move inline fun default_to_concurrent_fungible_supply(): bool ``` #### Returns whether concurrent fungible supply is enabled by default. ```move inline fun allow_upgrade_to_concurrent_fungible_balance(): bool ``` #### Returns whether upgrading to concurrent fungible balance is allowed. ```move inline fun default_to_concurrent_fungible_balance(): bool ``` #### Returns whether concurrent fungible balance is enabled by default. ```move #[view] public fun store_exists(store: address): bool ``` #### Returns whether the provided address has a store initialized. ```move inline fun store_exists_inline(store: address): bool ``` #### Inline version of store existence check for internal use. ```move inline fun concurrent_fungible_balance_exists_inline(store: address): bool ``` #### Returns whether the provided address has concurrent fungible balance initialized. ```move #[view] public fun is_balance_at_least(store: Object, amount: u64): bool ``` #### Checks whether the balance of a store is >= amount. ```move public(friend) fun is_address_balance_at_least(store_addr: address, amount: u64): bool ``` #### Friend function to check if address balance is at least the specified amount. ## Core Functions ### Asset Creation #### **add_fungibility** ```move public fun add_fungibility( constructor_ref: &ConstructorRef, maximum_supply: Option, name: String, symbol: String, decimals: u8, icon_uri: String, project_uri: String, ): Object ``` Creates a fungible asset by adding metadata and supply tracking to an existing object. This returns the capabilities to mint, burn, and transfer. **Parameters:** * `constructor_ref` - Object constructor reference * `maximum_supply` - Maximum supply behavior: * `option::none()` - Unlimited supply monitoring * `option::some(max)` - Fixed supply with `max` as maximum * `name` - Asset name (≤32 characters) * `symbol` - Asset symbol (≤10 characters) * `decimals` - Decimal places (≤32) * `icon_uri` - Icon URI (≤512 characters) * `project_uri` - Project URI (≤512 characters) **Important**: The object must be non-deletable. This function initializes either `Supply` or `ConcurrentSupply` based on feature flags. ### Reference Generation #### **generate_mint_ref** ```move public fun generate_mint_ref(constructor_ref: &ConstructorRef): MintRef ``` Creates a mint reference that can be used to mint fungible assets. Can only be called at object creation time. #### **generate_burn_ref** ```move public fun generate_burn_ref(constructor_ref: &ConstructorRef): BurnRef ``` Creates a burn reference that can be used to burn fungible assets. Can only be called at object creation time. #### **generate_transfer_ref** ```move public fun generate_transfer_ref(constructor_ref: &ConstructorRef): TransferRef ``` Creates a transfer reference for freeze/unfreeze/transfer operations. Can only be called at object creation time. #### **generate_mutate_metadata_ref** ```move public fun generate_mutate_metadata_ref(constructor_ref: &ConstructorRef): MutateMetadataRef ``` Creates a metadata mutation reference. Can only be called at object creation time. ### Store Management #### **create_store** ```move public fun create_store( constructor_ref: &ConstructorRef, metadata: Object, ): Object ``` Creates a store for holding fungible assets of a specific type. Applications can use this to create multiple stores for isolating fungible assets for different purposes. #### **remove_store** ```move public fun remove_store(delete_ref: &DeleteRef) ``` Removes an empty store. The store must be completely empty prior to removal. ### Asset Operations #### **mint** ```move public fun mint(ref: &MintRef, amount: u64): FungibleAsset ``` Mints the specified amount of fungible asset. #### **mint_internal** ```move public(friend) fun mint_internal(metadata: Object, amount: u64): FungibleAsset ``` Friend function for minting - can only be called by coin.move for migration. #### **mint_to** ```move public fun mint_to(ref: &MintRef, store: Object, amount: u64) ``` Mints the specified amount directly to a destination store. #### **burn** ```move public fun burn(ref: &BurnRef, fa: FungibleAsset) ``` Burns a fungible asset, removing it from circulation. #### **burn_internal** ```move public(friend) fun burn_internal(fa: FungibleAsset): u64 ``` Friend function for burning - can only be called by coin.move for migration. #### **burn_from** ```move public fun burn_from(ref: &BurnRef, store: Object, amount: u64) ``` Burns the specified amount from the given store. #### **address_burn_from** ```move public(friend) fun address_burn_from(ref: &BurnRef, store_addr: address, amount: u64) ``` Friend function to burn from a specific address. ### Transfer Operations #### **transfer** ```move public entry fun transfer( sender: &signer, from: Object, to: Object, amount: u64, ) ``` Transfers an amount of fungible asset from one store to another. The sender must own the source store. #### **withdraw** ```move public fun withdraw( owner: &signer, store: Object, amount: u64, ): FungibleAsset ``` Withdraws an amount of fungible asset from a store by the owner. #### **deposit** ```move public fun deposit(store: Object, fa: FungibleAsset) ``` Deposits a fungible asset into a store. ### Sanity Check Functions #### **withdraw_sanity_check** ```move public(friend) fun withdraw_sanity_check( owner: &signer, store: Object, abort_on_dispatch: bool, ) ``` Checks the permissions and conditions for withdraw operations, including: * Owner verification * Dispatch function validation * Frozen state checking #### **deposit_sanity_check** ```move public fun deposit_sanity_check( store: Object, abort_on_dispatch: bool ) ``` Validates conditions for deposit operations, including: * Dispatch function validation * Frozen state checking ### Internal Operations #### **deposit_internal** ```move public(friend) fun deposit_internal(store_addr: address, fa: FungibleAsset) ``` Internal function for depositing fungible assets with event emission. #### **withdraw_internal** ```move public(friend) fun withdraw_internal(store_addr: address, amount: u64): FungibleAsset ``` Internal function for withdrawing fungible assets with event emission. ### Reference-Based Operations ### **withdraw_with_ref** ```move public fun withdraw_with_ref( ref: &TransferRef, store: Object, amount: u64 ): FungibleAsset ``` Withdraws fungible assets using a TransferRef, ignoring frozen status. ### **deposit_with_ref** ```move public fun deposit_with_ref( ref: &TransferRef, store: Object, fa: FungibleAsset ) ``` Deposits fungible assets using a TransferRef, ignoring frozen status. #### **transfer_with_ref** ```move public fun transfer_with_ref( transfer_ref: &TransferRef, from: Object, to: Object, amount: u64, ) ``` Transfers fungible assets with TransferRef even if stores are frozen. ### Asset Manipulation #### **extract** ```move public fun extract( fungible_asset: &mut FungibleAsset, amount: u64, ): FungibleAsset ``` Extracts a given amount from a fungible asset and returns a new one. #### **merge** ```move public fun merge( dst_fungible_asset: &mut FungibleAsset, src_fungible_asset: FungibleAsset ) ``` Merges two fungible assets. The destination asset will have the sum of both amounts. #### **zero** ```move public fun zero(metadata: Object): FungibleAsset ``` Creates a fungible asset with zero amount. Useful for starting computations. #### **destroy_zero** ```move public fun destroy_zero(fungible_asset: FungibleAsset) ``` Destroys an empty fungible asset. ### Metadata Accessor Functions #### **metadata_from_asset** ```move public fun metadata_from_asset(fa: &FungibleAsset): Object ``` Returns the underlying metadata object from a fungible asset. #### **store_metadata** ```move #[view] public fun store_metadata(store: Object): Object ``` Returns the underlying metadata object from a store. #### **amount** ```move public fun amount(fa: &FungibleAsset): u64 ``` Returns the amount of a given fungible asset. #### **asset_metadata** ```move public fun asset_metadata(fa: &FungibleAsset): Object ``` Returns the metadata object from a fungible asset. #### **mint_ref_metadata** ```move public fun mint_ref_metadata(ref: &MintRef): Object ``` Gets the underlying metadata object from a MintRef. #### **transfer_ref_metadata** ```move public fun transfer_ref_metadata(ref: &TransferRef): Object ``` Gets the underlying metadata object from a TransferRef. #### **burn_ref_metadata** ```move public fun burn_ref_metadata(ref: &BurnRef): Object ``` Gets the underlying metadata object from a BurnRef. #### **object_from_metadata_ref** ```move public fun object_from_metadata_ref(ref: &MutateMetadataRef): Object ``` Gets the underlying metadata object from a MutateMetadataRef. ### **View Functions** ```move #[view] public fun supply(metadata: Object): Option ``` #### Returns the current supply from the metadata object. ```move #[view] public fun maximum(metadata: Object): Option ``` #### Returns the maximum supply. Returns none if unlimited. ```move #[view] public fun name(metadata: Object): String ``` #### Returns the name of the fungible asset. ```move #[view] public fun symbol(metadata: Object): String ``` #### Returns the symbol of the fungible asset. ```move #[view] public fun decimals(metadata: Object): u8 ``` #### Returns the decimals from the metadata object. ```move #[view] public fun icon_uri(metadata: Object): String ``` #### Returns the icon URI from the metadata object. ```move #[view] public fun project_uri(metadata: Object): String ``` #### Returns the project URI from the metadata object. ```move #[view] public fun metadata(metadata: Object): Metadata ``` #### Returns the complete metadata struct from the metadata object. ```move #[view] public fun balance(store: Object): u64 ``` #### Returns the balance of a given store. ```move #[view] public fun is_frozen(store: Object): bool ``` #### Returns whether a store is frozen. Defaults to false if store doesn't exist. ## Migration Support Supra provides migration support from the legacy coin standard through friend functions: ```move // Friend functions for coin migration public(friend) fun mint_internal(metadata: Object, amount: u64): FungibleAsset public(friend) fun burn_internal(fa: FungibleAsset): u64 ``` These functions are restricted to the `supra_framework::coin` module for seamless migration. ## Testing Support The module includes comprehensive test functions for development: ```move #[test_only] public fun create_test_token(creator: &signer): (ConstructorRef, Object) #[test_only] public fun init_test_metadata(constructor_ref: &ConstructorRef): (MintRef, TransferRef, BurnRef, MutateMetadataRef) #[test_only] public fun create_fungible_asset(creator: &signer): (MintRef, TransferRef, BurnRef, MutateMetadataRef, Object) #[test_only] public fun create_test_store(owner: &signer, metadata: Object): Object ``` ### Source: https://docs.supra.com/network/move/binary-canonical-serialization-bcs-standard-guide # Binary Canonical Serialization (BCS) Standard Guide Binary Canonical Serialization (BCS) is the fundamental serialization format powering the Supra L1 ecosystem. BCS is a binary canonical non-self-describing serialization format designed for efficient data structure serialization. The Supra MoveVM, utilizes BCS for all critical blockchain operations, ensuring deterministic and efficient data handling across the network. ### Overview Key Characteristics: - **Binary format**: Compact, efficient storage and transmission - **Canonical:** Deterministic serialization ensures identical outputs for identical inputs - **Non-self-describing:** The reader must know the expected data format beforehand - **Comprehensive**: Used for all on-chain data, API responses, and transaction arguments ## Primitive Types All primitive types in BCS follow little-endian byte ordering for multi-byte integers. ### Boolean (bool) Booleans are serialized as a single byte with strict value constraints. | Value | Bytes | | ----- | ----- | | true | 0x01 | | false | 0x00 | ``` #[test_only] module supra_example::bcs_examples { use std::bcs; use std::from_bcs; #[test] fun test_bool_serialization() { // Serialize let val: bool = true; let bytes: vector = bcs::to_bytes(&val); assert!(bytes == vector[0x01], 0); // Deserialize let val_des = from_bcs::to_bool(bytes); assert!(val_des == true, 1); } } ``` ### Unsigned Integers #### **U8 (8-bit unsigned integer)** ``` let val: u8 = 255; let bytes = bcs::to_bytes(&val); // Results in [0xFF] ``` #### **U16 (16-bit unsigned integer)** 2 bytes in little-endian order: ``` #[test_only] module supra_example::bcs_examples { use std::bcs; use std::from_bcs; #[test] fun test_u16_serialization() { // Serialize let val: u16 = 1000; let bytes: vector = bcs::to_bytes(&val); assert!(bytes == vector[0xe8, 0x03], 0); // 1000 in little-endian // Deserialize let val_des = from_bcs::to_u16(bytes); assert!(val_des == 1000, 1); } } ``` #### **U32 (32-bit unsigned integer)** 4 bytes in little-endian order: ``` #[test] fun test_u32_serialization() { // Serialize let val: u32 = 1000000000; let bytes: vector = bcs::to_bytes(&val); assert!(bytes == vector[0x00, 0xca, 0x9a, 0x3b], 0); // Deserialize let val_des = from_bcs::to_u32(bytes); assert!(val_des == 1000000000, 1); } ``` #### **U64 (64-bit unsigned integer)** 8 bytes in little-endian order: ``` #[test] fun test_u64_serialization() { // Serialize let val: u64 = 10000000000000000; let bytes: vector = bcs::to_bytes(&val); assert!(bytes == vector[0x00, 0x40, 0x9c, 0x4f, 0x2c, 0x68, 0x00, 0x00], 0); // Deserialize let val_des = from_bcs::to_u64(bytes); assert!(val_des == 10000000000000000, 1); } ``` #### **U128 (128-bit unsigned integer)** 16 bytes in little-endian order: ``` #[test] fun test_u128_serialization() { // Serialize let val: u128 = 10000000000000000; let bytes: vector = bcs::to_bytes(&val); assert!(vector::length(&bytes) == 16, 0); // Always 16 bytes // Deserialize let val_des = from_bcs::to_u128(bytes); assert!(val_des == 10000000000000000, 1); } ``` #### **U256 (256-bit unsigned integer)** 32 bytes in little-endian order: ``` #[test] fun test_u256_serialization() { // Serialize let val: u256 = 10000000000000000; let bytes: vector = bcs::to_bytes(&val); assert!(vector::length(&bytes) == 32, 0); // Always 32 bytes // Deserialize let val_des = from_bcs::to_u256(bytes); assert!(val_des == 10000000000000000, 1); } ``` #### Variable Length Encoding (Uleb128) Uleb128 (unsigned 128-bit variable length integer) uses a variable number of bytes where the most significant bit indicates continuation. This encoding is commonly used for: `// Currently not supported by itself in Move` ## Complex Types ### Sequences and Fixed Sequences **Sequences (Vectors):** Sequences are serialized as a variable length vector of an item. The length of the vector is serialized as a Uleb128 followed by repeated items. ``` #[test] fun test_vector_serialization() { let val = vector[1u8, 2u8, 3u8]; let bytes = bcs::to_bytes(&val); assert!(bytes == vector[3, 1, 2, 3], 0); // Length (3) + items let val_des = from_bcs::to_bytes(bytes); assert!(val_des == vector[1, 2, 3], 1); } ``` **Fixed Sequences**: Fixed Sequences are serialized without the leading size byte. The reader must know the number of bytes prior to deserialization. This is efficient when the size is known at compile time. ``` // For a fixed array of 3 u8 values: [1, 2, 3] // Serialized as: [0x01, 0x02, 0x03] (no length prefix) ``` ### Strings Strings are serialized as a vector of bytes with `UTF-8` encoding. The length is stored as a Uleb128 prefix followed by the UTF-8 encoded bytes. ``` #[test] fun test_string_serialization() { // Simple ASCII string let simple_str = b"hello"; let bytes = bcs::to_bytes(&simple_str); assert!(bytes == vector[5, b'h', b'e', b'l', b'l', b'o'], 0); // UTF-8 string with special characters // Note: "çå∞≠¢õß∂ƒ∫" has 10 characters but 24 bytes in UTF-8 let utf8_str = "çå∞≠¢õß∂ƒ∫"; let bytes = bcs::to_bytes(&utf8_str); // First byte is length (24), followed by UTF-8 encoded bytes assert!(*vector::borrow(&bytes, 0) == 24, 1); } ``` ### Account Addresses Account Address is serialized as a fixed `32-byte` vector of bytes. ``` // Address @0x1 becomes: // [0x00, 0x00, ..., 0x00, 0x01] (32 bytes total ``` ### Structs Structs are serialized as an ordered set of fields. The fields are serialized in the order they are defined in the struct. ``` struct Color { r: u8, // Red component g: u8, // Green component b: u8, // Blue component } // Color { r: 1, g: 2, b: 3 } serializes to [0x01, 0x02, 0x03] ``` ### Option Types Options are serialized as a single byte to determine whether it's filled. If the option is None, the byte is `0x00`. If the option is Some, the byte is `0x01` followed by the serialized value. ``` let some_data: Option = option::some(8); // Serializes to [0x01, 0x08] let no_data: Option = option::none(); // Serializes to [0x00] ``` ### Enums Enums are serialized as a `uleb128` to determine which variant is being used. The variant index is followed by the serialized value of the variant data. ``` // Example enum definition enum PaymentMethod has drop { Cash(u64), // Variant 0 CreditCard(vector), // Variant 1 Crypto(address), // Variant 2 } // Serialization examples: // PaymentMethod::Cash(1000) => [0x00, 0xe8, 0x03] (variant 0 + amount) // PaymentMethod::CreditCard(b"1234") => [0x01, 0x04, 0x31, 0x32, 0x33, 0x34] (variant 1 + length + data) // PaymentMethod::Crypto(@0x1) => [0x02, ...32 bytes of address] (variant 2 + address) ``` ### Maps Maps are stored as a sequence of key-value tuples. The length of the map is serialized as a `Uleb128` followed by repeated key-value pairs. Maps are typically sorted by key for canonical ordering. ``` // Example with SimpleMap or Table use std::simple_map::{Self, SimpleMap}; public fun serialize_map_example(): vector { let map = simple_map::create(); simple_map::add(&mut map, 1, 10); simple_map::add(&mut map, 2, 20); simple_map::add(&mut map, 3, 30); bcs::to_bytes(&map) // Results in: [0x03, 0x01, 0x0a, 0x02, 0x14, 0x03, 0x1e] // Format: length(3) + (key1, value1) + (key2, value2) + (key3, value3) } ``` ## BCS Stream Deserialization Module Supra includes a specialized BCS stream deserialization module that enables efficient processing of BCS-formatted byte arrays into Move primitive types. This module is available in the official Supra framework repository. ### Deserialization Strategies **Per-Byte Deserialization** - Used for most primitive types to minimize gas consumption - Processes each byte individually to match length and type requirements - Optimized for cost-effective on-chain operations **Function-Based Deserialization** - Used specifically for `deserialize_address` function - Leverages `aptos_std::from_bcs` due to type constraints - Higher gas cost but necessary for certain complex types ### Key Features ``` // Example usage of BCS stream deserialization module supra_framework::bcs_stream { // Deserializes primitive types byte-by-byte for efficiency public fun deserialize_u8(bytes: &vector, offset: &mut u64): u8 { ... } public fun deserialize_u16(bytes: &vector, offset: &mut u64): u16 { ... } public fun deserialize_u32(bytes: &vector, offset: &mut u64): u32 { ... } public fun deserialize_u64(bytes: &vector, offset: &mut u64): u64 { ... } public fun deserialize_u128(bytes: &vector, offset: &mut u64): u128 { ... } public fun deserialize_bool(bytes: &vector, offset: &mut u64): bool { ... } // Uses function-based approach for address due to type constraints public fun deserialize_address(bytes: &vector, offset: &mut u64): address { ... } } ``` ## Important Considerations ### Non-Self-Describing Format **BCS is a non-self-describing format, which means:** - The `serialized` data does not contain type information - The `deserializer` must know the expected type structure beforehand - Schema evolution requires careful planning and versioning - Type mismatches during deserialization can cause runtime errors ### Canonical Ordering **BCS ensures canonical (deterministic) serialization:** - Same input always produces same output - Field order in structs matters and must be consistent - Map entries are typically sorted by key - This is crucial for consensus and verification ## Sample Example **Learn how to Initialize & Publish a Move Module** [**from HERE.**](getting-started/create-a-move-package/) ``` module supra_example::framework_integration { use supra_framework::supra_coin::SupraCoin; use supra_framework::coin; use supra_framework::account; use supra_framework::event; use std::bcs; use std::signer; #[event] struct SupraTransactionEvent has drop, store { transaction_data: vector, transaction_hash: vector, } public entry fun supra_transfer_with_verification( sender: &signer, recipient: address, amount: u64 ) { // Create account for recipient if needed if (!account::exists_at(recipient)) { account::create_account(recipient); }; // Register SupraCoin if needed if (!coin::is_account_registered(recipient)) { coin::register(sender); }; // Perform transfer using Supra framework coin::transfer(sender, recipient, amount); // Serialize transaction for verification struct TransactionData has drop { sender: address, recipient: address, amount: u64, timestamp: u64, } let tx_data = TransactionData { sender: signer::address_of(sender), recipient, amount, timestamp: timestamp::now_seconds(), }; let serialized_tx = bcs::to_bytes(&tx_data); let tx_hash = hash::sha3_256(serialized_tx); // Emit event with BCS-serialized data event::emit(SupraTransactionEvent { transaction_data: serialized_tx, transaction_hash: tx_hash, }); } } ``` ## Conclusion Binary Canonical Serialization provides Supra Move developers with a robust, efficient, and deterministic foundation for data handling across the entire Supra ecosystem. By mastering BCS fundamentals and leveraging the specialized stream deserialization capabilities within the Supra framework, developers can build more efficient and reliable applications while minimizing gas costs and maximizing performance. ### Source: https://docs.supra.com/network/move/cli-commands # CLI Commands On May 2nd, 2025 a new version of the CLI was released. The new image (v9.0.12) introduced a number of changes, including an improved profile feature which deprecated the key command of the previous version (v6.3.0). Please be advised that these pages have not yet been updated. Welcome to the CLI Commands section of Supra's documentation! Here, you’ll find resources and guides to help you effectively utilize Supra's Command Line Interface (CLI) for managing and interacting with the blockchain. --- ## Command Reference Guide Your quick reference guide to efficiently navigate and execute key commands in the Supra CLI for seamless blockchain development. ## Manage Your Profiles Learn how to use Supra CLI Profiles to configure, manage, and interact with key pairs for secure and flexible blockchain operations. ## Manage Your Accounts Learn how to use Supra CLI Accounts to create, fund, and interact with blockchain identities for seamless and secure on-chain operations. ## Manage Your Tools Learn how to use Supra CLI Tools to compile, publish, test, and manage Move packages and smart contracts for efficient blockchain development and deployment. ### Source: https://docs.supra.com/network/move/cli-commands/accounts # Accounts On May 2nd, 2025 a new version of the CLI was released. The new image (v9.0.12) introduced a number of changes, including an improved profile feature which deprecated the key command of the previous version (v6.3.0). Please be advised that this page has not yet been updated. ## What are Supra CLI Accounts? Accounts in the Supra CLI are blockchain identities used to interact with the Supra network. They allow users to perform actions such as creating new accounts, funding them with tokens, checking balances, and transferring assets. These accounts serve as the foundation for managing transactions and participating in blockchain activities. For the latest RPC URL, please refer to the [Supra Network Information](/network/network-information) page. --- ## CLI Commands for Accounts Here's how to use the Supra CLI commands to work with accounts: Not all CLI commands are listed here. Use the `--help` option to see the full list. ## Fund Your Profiles Fund an account with SUPRA tokens from a faucet URL: ```powershell supra move account fund-with-faucet [OPTIONS] --url [URL_RPC] ``` **Additional Options:** - \[OPTIONS] - \--sender-account ``: Sender account address - \--profile ``: Profile to use from the CLI config - \--url: ``: Full node on the network - \--account ``: Address to fund If the account wasn't previously created, it will be created when being funded **Example:** ```powershell supra move account fund-with-faucet --profile exampleAddress --url https://rpc-testnet.supra.com ``` **Result:** ```powershell URL: https://rpc-testnet.supra.com/rpc/v1/wallet/faucet/e5992efbb8e2f5978964335536c334e1d71d2d7afec00fbda0446b893d2b988c { "Accepted": "0x6cac6e55b5c63da2d15871de27894cce627cf342451d167c72f9104267e340ef" } ``` ## Check Profile Balance Show the account's balance of SUPRA coins: ```powershell supra move account balance [OPTIONS] --url [URL_RPC] ``` **Additional Options:** - \[OPTIONS] - \--account ``: Address of the account you want to list balance - \--profile ``: Profile to use from the CLI config - \--url ``: URL to a full node on the network **Example:** ```powershell supra move account balance --profile exampleAddress --url https://rpc-testnet.supra.com ``` **Result:** ``` URL: https://rpc-testnet.supra.com/rpc/v1/accounts/e5992efbb8e2f5978964335536c334e1d71d2d7afec00fbda0446b893d2b988c/reso urces/0x1::coin::CoinStore%3C0x1::supra_coin::SupraCoin%3E {"result":[{"coin":{"value":"500000000"},"deposit_events":{"counter":"1","guid":{"id":{"addr":"0xe5992efbb8e2f5978964 335536c334e1d71d2d7afec00fbda0446b893d2b988c","creation_num":"2"}}},"frozen":false,"withdraw_events":{"counter":"0","guid": {"id":{"addr":"0xe5992efbb8e2f5978964335536c334e1d71d2d7afec00fbda0446b893d2b988c","creation_num":"3"}}}}]} ``` ## Transfer $SUPRA Transfer $SUPRA between accounts ```powershell supra move account transfer [OPTIONS] --account --amount --url [URL_RPC] ``` **Additional Options:** - **\[**OPTIONS**]** - \--account ``: Address of account to send $SUPRA - \--url ``: URL to a full node on the network - \--amount `` : Amount of Quants (10^-8 SUPRA) to transfer This will be used to override associated settings such as the REST URL, the Faucet URL, and the private key arguments. **Example:** ```powershell supra move account transfer --account 0xec07bc3d5c30f85fb8a4c799aba5e2f185e420a2b223f4c1fc2a2a8eeef8192d --amount 1000 --url https://rpc-testnet.supra.com ``` **Result:** ```powershell account: e5992efbb8e2f5978964335536c334e1d71d2d7afec00fbda0446b893d2b988c URL: https://rpc-testnet.supra.com/rpc/v1/transactions/submit Chain_id = 6 Sequence Number = 1 URL: https://rpc-testnet.supra.com/rpc/v1/transactions/8f6607c103763fcc32c79ca60ba58cebac5d00b5b0c34f056087212a263da056 { "authenticator": { "Move": { "Ed25519": { "public_key": "0x0cf652de472c6aea9f33442a3fe91a9ce3c7181a3cf1a9119b38c4444fbefd4e", "signature": "0xe8c9e6901cae727640a3309187537c56a37cf8e04ef4745e8f69b5e6c4c3969f01f5e38956a06a53f53c9b7a3eb681e27d10bd5e0425a97a3a42020d111bc90b" } } }, "block_header": { "hash": "0x760e49d5731a92875b8046c92f4b77d81ba88e1781975c6061c06beee13cbf34", "height": 5454904, "timestamp": { "microseconds_since_unix_epoch": 1734471953424357, "utc_date_time": "2024-12-17T21:45:53.424357+00:00" } }, "hash": "0x8f6607c103763fcc32c79ca60ba58cebac5d00b5b0c34f056087212a263da056", "header": { "chain_id": 6, "expiration_timestamp": { "microseconds_since_unix_epoch": 1734475552000000, "utc_date_time": "2024-12-17T22:45:52+00:00" }, "sender": { "Move": "0xe5992efbb8e2f5978964335536c334e1d71d2d7afec00fbda0446b893d2b988c" }, "sequence_number": 1, "gas_unit_price": 100, "max_gas_amount": 500000 }, "payload": { "Move": { "type": "entry_function_payload", "function": "0x1::supra_account::transfer_coins", "type_arguments": [ "0x1::supra_coin::SupraCoin" ], "arguments": [ "0xec07bc3d5c30f85fb8a4c799aba5e2f185e420a2b223f4c1fc2a2a8eeef8192d", "1000" ] } }, "output": { "Move": { "gas_used": 9, "events": [ { "guid": { "creation_number": "0", "account_address": "0x0" }, "sequence_number": "0", "type": "0x1::coin::CoinWithdraw", "data": { "account": "0xe5992efbb8e2f5978964335536c334e1d71d2d7afec00fbda0446b893d2b988c", "amount": "1000", "coin_type": "0x1::supra_coin::SupraCoin" } }, { "guid": { "creation_number": "3", "account_address": "0xe5992efbb8e2f5978964335536c334e1d71d2d7afec00fbda0446b893d2b988c" }, "sequence_number": "1", "type": "0x1::coin::WithdrawEvent", "data": { "amount": "1000" } }, { "guid": { "creation_number": "0", "account_address": "0x0" }, "sequence_number": "0", "type": "0x1::coin::CoinDeposit", "data": { "account": "0xec07bc3d5c30f85fb8a4c799aba5e2f185e420a2b223f4c1fc2a2a8eeef8192d", "amount": "1000", "coin_type": "0x1::supra_coin::SupraCoin" } }, { "guid": { "creation_number": "2", "account_address": "0xec07bc3d5c30f85fb8a4c799aba5e2f185e420a2b223f4c1fc2a2a8eeef8192d" }, "sequence_number": "2", "type": "0x1::coin::DepositEvent", "data": { "amount": "1000" } }, { "guid": { "creation_number": "0", "account_address": "0x0" }, "sequence_number": "0", "type": "0x1::transaction_fee::FeeStatement", "data": { "execution_gas_units": "4", "io_gas_units": "5", "storage_fee_quants": "0", "storage_fee_refund_quants": "0", "total_charge_gas_units": "9" } } ], "vm_status": "Executed successfully" } }, "status": "Success" } ``` ## Multiple Wallets Creates a wallet requiring multiple approvals for transactions. ```powershell supra move account derive-multi-sig-address --owner-address --sequence-number ``` **Additional Options:** - \[OPTIONS] - \--owner-address ``: Specifies the blockchain address of the account owner for a given operation. - \--sequence-number ``: Indicates the unique sequence number to track and order transactions for the specified account. **Example:** ```powershell supra move account derive-multi-sig-address --owner-address 0xec07bc3d5c30f85fb8a4c799aba5e2f185e420a2b223f4c1fc2a2a8eeef8192d --sequence-number 2 ``` **Result:** ```powershell 833eb6eb23a73f3e343045cd999a8f83c1b188680f0a68353e5c9d52efc03f35 ``` ### Source: https://docs.supra.com/network/move/cli-commands/profiles # Profiles On May 2nd, 2025 a new version of the CLI was released. The new image (v9.0.12) introduced a number of changes, including an improved profile feature which deprecated the key command of the previous version (v6.3.0). Please be advised that this page has not yet been updated. ## What Are CLI Key Profiles? Profiles in the Supra CLI are configurations that allow you to manage multiple key pairs within your environment. Each profile is tied to a unique public/private key pair and serves as an identity for various operations, such as running a validator node, managing accounts, or accessing specific resources. Profiles can be created, activated, imported, or removed as needed, providing flexibility and security when working with different roles or use cases. --------------------------------- Profile List ----------------------------------- exampleAddress SmrPublicKey { account_address: "0xcdf7ac195644bd834c2f127bf17f970cdc90fec69414fe33fa461c7b8baa668d", ed25519_public_key : 08b957cbd5c17bcca5769c8349a9bc9c5e235a19b2170d23d61360f2d8b7fb1d } -------------------------------------------------------------------------------------- ``` ## Active a Profile Set a specific profile as active, so it is used for subsequent CLI commands: ```powershell supra key activate-profile [OPTIONS] ``` **Additional Options:** - \[OPTIONS] = -f: Run without password prompt but read from the `NODE_OPERATOR_KEY_PASSWORD` environment variable. - `` = Name of profile to activate **Example:** ```powershell supra key activate-profile exampleAddress ``` **Result:** ```powershell ------------------------------------ Profile List ----------------------------------- (*)exampleAddress SmrPublicKey { account_address: "0xcdf7ac195644bd834c2f127bf17f970cdc90fec69414fe33fa461c7b8baa668d", ed25519_public_key : 08b957cbd5c17bcca5769c8349a9bc9c5e235a19b2170d23d61360f2d8b7fb1d } -------------------------------------------------------------------------------------- ``` ## Generate a Profile Create a new profile with a fresh key pair: ```powershell supra key generate-profile [OPTIONS] ``` **Additional Options:** - \[OPTIONS] = -f: Run without password prompt but read from the `NODE_OPERATOR_KEY_PASSWORD` environment variable. - `` = Name of the profile to generate **Example:** ```powershell supra key generate-profile anotherExampleAddress ``` **Result:** powershell ``` ------------------------------------ Profile List ----------------------------------- (*)exampleAddress SmrPublicKey { account_address: "0xcdf7ac195644bd834c2f127bf17f970cdc90fec69414fe33fa461c7b8baa668d", ed25519_public_key : 08b957cbd5c17bcca5769c8349a9bc9c5e235a19b2170d23d61360f2d8b7fb1d } anotherExampleAddress SmrPublicKey { account_address: "0xec07bc3d5c30f85fb8a4c799aba5e2f185e420a2b223f4c1fc2a2a8eeef8192d", ed25519_public_key : 680fffd96e017cc0dacf9350b7258e971e02d27c2e2686483bd2dbee5c13f5f5 } -------------------------------------------------------------------------------------- ``` ## Import an Existing Profile Add an existing profile using its private key: ```powershell supra key import-profile [OPTIONS] ``` **Additional Options:** - \[OPTIONS] = -f: Run without password prompt but read from the `NODE_OPERATOR_KEY_PASSWORD` environment variable. - `` = Name of the profile for the newly imported key - `` = A private key is a secret code that secures and controls access to a blockchain account. **Example:** ```powershell supra key import-profile anotherOneAddress 0x4c88b4a9e5c8924d36a8c9f8e2f9a7d4e6b9f1a2c3d4b5e6f7a8c9d012345678 ``` **Result:** ```powershell ------------------------------------ Profile List ----------------------------------- (*)exampleAddress SmrPublicKey { account_address: "0xcdf7ac195644bd834c2f127bf17f970cdc90fec69414fe33fa461c7b8baa668d", ed25519_public_key : 08b957cbd5c17bcca5769c8349a9bc9c5e235a19b2170d23d61360f2d8b7fb1d } anotherExampleAddress SmrPublicKey { account_address: "0xec07bc3d5c30f85fb8a4c799aba5e2f185e420a2b223f4c1fc2a2a8eeef8192d", ed25519_public_key : 680fffd96e017cc0dacf9350b7258e971e02d27c2e2686483bd2dbee5c13f5f5 } anotherOneAddress SmrPublicKey { account_address: "0x608d604fd055b5428bb81c9a0591cfc62509f9965b88e3c633341e24b09982fb", ed25519_public_key : 5ac625dee2f520734462774d60c8f9e02ab65b5a8815540e900c86b1cff80b39 } -------------------------------------------------------------------------------------- ``` ## Delete Profile Delete an existing profile from your environment: ```powershell supra key remove-profile ``` **Additional Options:** - `` = Name of the profile to be removed **Example:** ```powershell supra key remove-profile anotherOneAddress ``` **Result:** ```powershell ------------------------------------ Profile List ----------------------------------- (*)exampleAddress SmrPublicKey { account_address: "0xcdf7ac195644bd834c2f127bf17f970cdc90fec69414fe33fa461c7b8baa668d", ed25519_public_key : 08b957cbd5c17bcca5769c8349a9bc9c5e235a19b2170d23d61360f2d8b7fb1d } anotherExampleAddress SmrPublicKey { account_address: "0xec07bc3d5c30f85fb8a4c799aba5e2f185e420a2b223f4c1fc2a2a8eeef8192d", ed25519_public_key : 680fffd96e017cc0dacf9350b7258e971e02d27c2e2686483bd2dbee5c13f5f5 } -------------------------------------------------------------------------------------- ``` ### Source: https://docs.supra.com/network/move/cli-commands/tools # Tools On May 2nd, 2025 a new version of the CLI was released. The new image (v9.0.12) introduced a number of changes, including an improved profile feature which deprecated the key command of the previous version (v6.3.0). Please be advised that this page has not yet been updated. ## What are Supra CLI Tools? Tools in the Supra CLI are a set of commands designed to help developers interact with Move packages and smart contracts on the Supra network. They allow users to perform tasks such as compiling, publishing, testing, and running Move scripts, as well as documenting packages and managing on-chain resources. These tools serve as the foundation for building, deploying, and maintaining blockchain applications efficiently. --- For the latest RPC URL, please refer to the [Supra Network Information](/network/network-information) page. ## CLI Commands for Tools Here's how to use the Supra CLI commands to work with tools: Not all CLI commands are listed here. Use the `--help` option to see the full list. ## Clean Derived Artifacts Removes derived artifacts of a Move package: ```powershell supra move tool clean [OPTIONS] ``` **Additional Options:** - \--package-dir ``: Path to a move package (the folder with a Move.toml file) **Example:** ```powershell supra move tool clean ``` **Result:** ```powershell { "Result": "succeeded" } ``` ## Compile a Package Compiles a Move package and returns associated ModuleIds: ```powershell supra move tool compile --package-dir /supra/configs/move_workspace/ ``` **Additional Options:** - \[OPTIONS] - \--package-dir ``: Path to a move package (the folder with a Move.toml file) **Example:** ```powershell supra move tool compile --package-dir /supra/configs/move_workspace/move ``` **Result:** ```powershell Compiling, may take a little while to download git dependencies... FETCHING GIT DEPENDENCY https://github.com/Entropy-Foundation/aptos-core.git INCLUDING DEPENDENCY AptosStdlib INCLUDING DEPENDENCY MoveStdlib INCLUDING DEPENDENCY SupraFramework BUILDING supra_move { "Result": [ "ec07bc3d5c30f85fb8a4c799aba5e2f185e420a2b223f4c1fc2a2a8eeef8192d::transfer" ] } ``` ## Initialize a Package Creates a new Move package at a specified location: ```powershell supra move tool init --name ``` **Additional Options:** - \[OPTIONS] - \--name ``: Name of the new Move package **Example:** ```powershell supra move tool move_project --name move ``` **Result:** ```powershell { "Result": "Success" } ``` ## Publish a Smart Contract Publishes a compiled smart contract to the Supra blockchain: ```powershell supra move tool publish --package-dir /supra/configs/move_workspace/ --profile --url ``` **Additional Options:** - \[OPTIONS] - \--package-dir ``: Path to a move package (the folder with a Move.toml file) - \--profile ``: Profile to use from the CLI config - \--url ``: URL to a full node on the network **Example:** ```powershell supra move tool publish --package-dir /supra/configs/move_workspace/move --profile exampleAddress --url https://rpc-testnet.supra.com ``` **Result:** ```powershell account: ec07bc3d5c30f85fb8a4c799aba5e2f185e420a2b223f4c1fc2a2a8eeef8192d URL: https://rpc-testnet.supra.com/rpc/v1/transactions/submit Chain_id = 6 Sequence Number = 1 URL: https://rpc-testnet.supra.com/rpc/v1/transactions/e18bdea56737ce52c0b90bcb7f416ca91576ff6d1c75ee8618026fe89d8d797c { "authenticator": { "Move": { "Ed25519": { "public_key": "0x680fffd96e017cc0dacf9350b7258e971e02d27c2e2686483bd2dbee5c13f5f5", "signature": "0x97dc4930b11cd8bfc8791a4d96291b18b73c6804644bc046f75f9452838b4becafee676ada60b594155d4e99ac010ed999fced934c39bdc4c2eac7b761247b02" } } }, "block_header": { "hash": "0x8f21036f4de17e1e5e49adb67f4d78adfef637399d06e519f4bf27f143a8eec0", "height": 5526696, "timestamp": { "microseconds_since_unix_epoch": 1734539568750390, "utc_date_time": "2024-12-18T16:32:48.750390+00:00" } }, "hash": "0xe18bdea56737ce52c0b90bcb7f416ca91576ff6d1c75ee8618026fe89d8d797c", "header": { "chain_id": 6, "expiration_timestamp": { "microseconds_since_unix_epoch": 1734539599000000, "utc_date_time": "2024-12-18T16:33:19+00:00" }, "sender": { "Move": "0xec07bc3d5c30f85fb8a4c799aba5e2f185e420a2b223f4c1fc2a2a8eeef8192d" }, "sequence_number": 1, "gas_unit_price": 100, "max_gas_amount": 500000 }, "payload": { "Move": { "type": "entry_function_payload", "function": "0x1::code::publish_package_txn", "type_arguments": [], "arguments": [ "0x0a73757072615f6d6f7665010000000000000000403043453446333545323733354539384338333441384542443034333245393645443835353132364538333035364430393846393832303437423536314132383481021f8b08000000000002ff4d90c16ec3201044ef7c45c4dd06135bb12bf5d043f3033d5a56b5c0125ba9010176d3bf2f344a95e38c76f46667f4a0ae70c1895858f1f07aa071f3013e57b723253b86b8385beca6e635a704b634bb10b3334e848ca075c018314e046fb0fa2f7cbb3b25c26fa8f849aaa3eed4919bbe33b287569d86012474284cd377d80a0e420a7134ad6a8c1220a04744d33783d0342334eed513a6181ead46ab168cf547697b0eb9fbb70bd7895c9654d0734a3ebe3096e5bcc95ab995bddb149cffa9ce6eb31a527e8b814f2e56ca05acf3212501f712ce444ae226f5128abc5f9541987980d8df4ad5bf7e147dee36915f462ea0685d01000001087472616e73666572a6081f8b08000000000002ffad57cd8edb3610be07c83bb00960c88002db6a5314725db4d8a0400fbd748b5e82854049d42e1b5934482a1b27c8bb67863f1225cb8ad7892fb2c8f9f93833df0cb517655b33c23ed0fda1667f94a5644aa5a996b4511593e4d3f367cf9f11f8b58a11d51e24cd2a49f7ec51c877696a170ac19bed8cd4785f97a0c9ef1b26c7abb42844db685cb63bab15f9b36d0acd4543b4201d2cfd001a0756f08ab392d03d6a198147414aa6346f28ea285249b1b7d2a295053c8c5f6bfcd0e6352f086bb43c92aa6d503bcb8f193c222b81bf8a4ba553b2b09a71bf61bd666ebffdf9a760af54dd06b5311d6d2a5688a61cef2e31de5e0ccefeef57cf0bebc64f78eade0446be4fe6af7dbad2f416ffdfc0dfdf226320ee31c7e1c996db194490e211187bae6f47d3c7282653703efbba1c97c87bce1e0d929cd6b4818c8b8ad0c6c7d9eabc7c8b5277832ac0fce36ae6f422a7d1a56869721c26c84277f2e78ee3b547b05fbed510a24c34f5f16e448292e5ed7d9a1e24b74c18d046c32a6cb6bafa65eb6d615ac0181ec186a11212aaba7ca5c52b787491281e58f18ed04a63fa5c165408271a5197ecc8efeb0f9bd893c7be263fc6617e376e79b3192c2776394992e59d077a4a388c0140ccb4c047c0ba71132127f4b3982636426cf3db493ae80763f6dd320d92f7a43d10d7989409ad8b061dd6b9ea746ba69d4c86d98740582fd0df6c3164a28a165622a097f301fd5232aa41d7be67e032b3d9e96d2eb7a42380f3181e7bce6f28f714ef27f6e73124176248aec4904c61c0acfdd570cd69cd3f62ea0c110932d1640e8d0c1147792b9baca08798ec816ff86f89a00332736f90f54016a3fa0cbb645843ffb07bae906f5d47305d03c82c2423100f5b4a86b0b478f01118f718e9cc9c6b32a7c574a9e2996ab8423d391703f23704160801b3020d28479c8350dc8c0d4fa7b043fbf418850c3303636fe750e1eb39449bf53a268b2e952727727e432ec5032fcb6d5850abd51bae40c38c112c15031e250998a739afb93e1291ffcf0aad4e7d41bb16c7cc9758576b53b0aca8071e852708e1dc9ac2519a4ad39a5c6b1f06cd9dcded6539ab50c78eafdd70c80d5aca4c3fb9c4d6448398e90e4fb498741607a585d9a9e991388efa7804a93063345ae0c08cf217b7b6d61e698d80fc607418fc4c4c5f2c43e8cec26454878086bede8433f21a8f3319b8d06ff2ad7e9359bfabd50d9837b7adfeeadc5f438032fa812bb2b7df18e1fdfdf5dab6585c348d6ff2c218dcc75df863d08c4f475d4cbe5e2a3778fb41ce98f663ebc64ef7926277f1a533ba20cd52cb8a7e1766cd98ba8e5897199c0ad62594f1511b06eb22e618956b89f314bfe7e37c2d7daef49ecc79c7dafc8f495ec19518e4a77a18558a49fd4374d10747587864b7236b12937588ef49d64e6b0f6dbe46a39bef613419194d820fbccf5f00cb97e0369d10000000000300000000000000000000000000000000000000000000000000000000000000010b4170746f735374646c696200000000000000000000000000000000000000000000000000000000000000010a4d6f76655374646c696200000000000000000000000000000000000000000000000000000000000000010e53757072614672616d65776f726b00", [ "0xa11ceb0b0600000009010006020604030a16042004052413073743087a4010ba01270ce1012200000101010202050800000300010000040203000100050101000106020301000204030404060c030505000105010301080003060c0503087472616e7366657204636f696e0a73757072615f636f696e0a74776f5f62795f74776f0c766965775f62616c616e6365095375707261436f696e0762616c616e6365ec07bc3d5c30f85fb8a4c799aba5e2f185e420a2b223f4c1fc2a2a8eeef8192d0000000000000000000000000000000000000000000000000000000000000001126170746f733a3a6d657461646174615f7631130000010c766965775f62616c616e63650101000001040001090a000b020a0138000b000b030b013800020101000001030b0038010200" ] ] } }, "output": { "Move": { "gas_used": 73, "events": [ { "guid": { "creation_number": "0", "account_address": "0x0" }, "sequence_number": "0", "type": "0x1::code::PublishPackage", "data": { "code_address": "0xec07bc3d5c30f85fb8a4c799aba5e2f185e420a2b223f4c1fc2a2a8eeef8192d", "is_upgrade": true } }, { "guid": { "creation_number": "0", "account_address": "0x0" }, "sequence_number": "0", "type": "0x1::transaction_fee::FeeStatement", "data": { "execution_gas_units": "6", "io_gas_units": "68", "storage_fee_quants": "0", "storage_fee_refund_quants": "0", "total_charge_gas_units": "73" } } ], "vm_status": "Executed successfully" } }, "status": "Success" } ``` ## Run a Function Executes a specified Move function: ```powershell supra move tool run --function-id '::CONTRACT_NAME::FUNCTION_NAME' --args [ADD_ARGS] --url ``` Note: The args will depend on your function. ## Run Unit Tests Executes Move unit tests for a package: ```powershell supra move tool test --package-dir /supra/configs/move_workspace/ ``` **Additional Options:** - \[OPTIONS] - \--package-dir ``: Path to a move package (the folder with a Move.toml file) **Example:** ```powershell supra move tool test --package-dir /supra/configs/move_workspace/move ``` **Result:** ```powershell INCLUDING DEPENDENCY AptosStdlib INCLUDING DEPENDENCY MoveStdlib INCLUDING DEPENDENCY SupraFramework BUILDING supra_move Running Move unit tests [debug] "Source wallet balance before transfer:" [debug] 100 [debug] "Destination1 wallet balance before transfer:" [debug] 0 [debug] "Destination2 wallet balance before transfer:" [debug] 0 [debug] "Source wallet balance updated after transfer:" [debug] 0 [debug] "Destination1 wallet balance updated after transfer:" [debug] 50 [debug] "Destination2 wallet balance updated after transfer:" [debug] 50 [ PASS ] 0xec07bc3d5c30f85fb8a4c799aba5e2f185e420a2b223f4c1fc2a2a8eeef8192d::transfer::test_end_to_end Test result: OK. Total tests: 1; passed: 1; failed: 0 { "Result": "Success" } ``` ## Run a View Function Executes a read-only Move function: ```powershell supra move tool view --function-id '
::CONTRACT_NAME::FUNCTION_NAME’ --args [ADD_ARGS] --url ``` **Additional Options:** - \[OPTIONS] - \--function-id `` = Function name as `
::::` - \--args \[`` ...] = TypeTag arguments separated by spaces. Supported types \[address, bool, hex, string, u8, u16, u32, u64, u128, u256, raw] - \--url ``: URL to a full node on the network **Example:** ```powershell supra move tool view --function-id 0xcdf7ac195644bd834c2f127bf17f970cdc90fec69414fe33fa461c7b8baa668d::transfer::view_balance --args address:0xcdf7ac195644bd834c2f127bf17f970cdc90fec69414fe33fa461c7b8baa668d --url https://rpc-testnet.supra.com ``` **Result:** ```powershell {"result":["500000000"]} ``` ### Source: https://docs.supra.com/network/move/cli-commands/cheat-sheet # Cheat Sheet On May 2nd, 2025 a new version of the CLI was released. The new image (v9.0.12) introduced a number of changes, including an improved profile feature which deprecated the key command of the previous version (v6.3.0). Please be advised that this page has not yet been updated. ## Accounts Commands Perform essential operations such as creating accounts, funding them, checking balances, and transferring assets. ## Create Account Creates a new on-chain account within the Supra blockchain. ```powershell supra move account create --profile --url ``` ``: Profile to use. ``: Full node URL on the network. ## Fund Account with Faucet Funds the specified account with testnet $SUPRA tokens. ```powershell supra move account fund-with-faucet --profile --url ``` ``: Profile to use. ``: Full node URL on the network. ## Check Balance Checks the balance of the specified account. ```powershell supra move account balance --profile --url ``` ``: Profile to use. ``: Full node URL on the network. ## Transfer Tokens Transfers tokens from one account to another. ```powershell supra move account transfer --account --amount --url ``` ``: Address to send SUPRA to. ``: Amount of Quants (10^-8 SUPRA) to transfer. ``: Full node URL on the network. --- ## Tools Commands Handle tasks related to building, compiling, testing, and deploying Move packages and smart contracts. ## Compile Move Package Compiles the Move package in the specified directory. ```powershell supra move tool compile --package-dir ``` ``: Path to a Move package (folder with a `Move.toml` file). ## Publish Move Package Publishes the compiled Move package to the blockchain. ```powershell supra move tool publish --profile --package-dir --url ``` ``: Profile to use for publishing. ``: Path to a Move package. ``: Blockchain node URL. ## Run Smart Contract Function Executes a smart contract function with the provided arguments. ```powershell supra move tool run --function-id ‘::::’ --args --url ``` ``: Address executing the function. ``: Contract containing the function. ``: Function being executed. ``: Arguments for the function. ``: Blockchain node URL. ## Run Unit Tests Runs unit tests for the Move package in the specified directory. ```powershell supra move tool test --package-dir ``` ``: Path to a Move package. ## View Smart Contract Data Executes a read-only view function to query contract data. ``` supra move tool view --function-id ‘::::’ --args --url ``` ``: Address making the query. ``: Contract containing the view function. ``: Read-only function to retrieve data. ``: Query-specific arguments. ``: Blockchain node URL. ### Source: https://docs.supra.com/network/move/dev/supra-move-ide # Supra Move IDE Supra IDE is a browser-based development environment for writing, compiling, and deploying Move smart contracts on the Supra blockchain. This guide will walk you through its key features and how to use them effectively. **Supra IDE is LIVE:** [**IDE.Supra.com↗**](https://ide.supra.com/) ![Supra Move IDE](/images/move/supra-move-ide.jpeg)
These are the main components of your workspace: - **Editor**: This is the large area where you write and edit your code. - Multi-Tab Support: Open and manage multiple files at once, just like in VS Code. - Syntax Highlighting: Provides full color and syntax support for Move, TOML, and Rust files. - Auto-Save: All changes to your files are saved automatically.
- **Console**: The panel at the bottom of the screen shows the output from all actions. - Real-time Feedback: See the results from compiling, deploying, and testing as they happen. - Read-Only: You cannot type commands directly into the console; it is for viewing output only. - Controls: You can Clear the console history or use the arrow icon to toggle its visibility. ### Source: https://docs.supra.com/network/move/dev/supra-move-ide/project-and-files-management # Project & Files Management ## Project Management The IDE makes it easy to manage your projects directly in the browser. All project data is stored locally in your browser's IndexedDB. - **Create:** Start a new project by clicking Create a new project on the home screen or the + icon in the Explorer. You can create a blank project or start from a pre-built template. - **Switch & Read:** Use the dropdown menu in the Explorer to easily switch between your existing projects. Selecting a project will load its file tree. - **Update:** - **Editing:** Simply open a file and type in the editor. All changes are saved automatically. - **Renaming:** Right-click on any file or folder in the file explorer to open a context menu where you can select Rename. - **Delete:** To delete a project, select it from the project dropdown menu and click the trash can icon. This action is permanent and will delete all associated files. - **Import / Export:** Use the Import and Export buttons to load a project from a .zip file or to save your currently selected project as a .zip file for backup or sharing. ## File & Folder Management You can manage all files and folders directly from the Explorer tab. All operations are performed using a context menu (right-click). - **Create (New File / New Folder)** - Right-click on a folder or the project's root folder in the file explorer to open the context menu. - Select New File or New Folder. - An input box will appear in the file tree. Type the desired name and press Enter to create it. - **Read (Open a File)** - Left-click on any file in the explorer. - The file will open in a new tab in the editor, and its content will be displayed. - **Update (Rename a File or Folder)** - Right-click on the file or folder you wish to rename. - Select Rename from the context menu. - The name will become an editable input field. Type the new name, and press Enter to save the change. - **Delete (Remove a File or Folder)** - Right-click on the file or folder you want to remove. - Select Delete from the context menu. - A confirmation dialog will appear to prevent accidental deletion. Click Delete to permanently remove the item. If you delete a folder, all files and subfolders within it will also be deleted. ### Source: https://docs.supra.com/network/move/dev/supra-move-ide/ide-core-actions # IDE Core Actions ## Actions: Compile, Deploy, & Test These action buttons in the Explorer tab allow you to interact with your Move code and the Supra blockchain. - **Compile:** Click the Compile button to convert your Move source code into bytecode. The progress and any success messages or errors will be displayed in the Console at the bottom. - **Deploy:** Click the Deploy button to publish your compiled project to the Supra blockchain. This action requires a connected wallet to sign the transaction. A confirmation with a link to the transaction on SupraScan will appear in the Console. - **Run Tests:** Click the Test button to run any tests you've written for your project. A popup will allow you to filter which tests to run, or you can leave it blank to run all of them. The test results will stream into the Console. ## Success and Error Cases ### Compile Successfully ### Compile Failed ### Test Successfully ### Test Failed ### Build Succeeded but Deploy Failed ### Deploy Successfully ### Source: https://docs.supra.com/network/move/dev/supra-move-ide/contract-interactions-and-transaction-history # Contract Interactions & Transaction History ## Contract Interactions This tab is used to execute view or run functions for your created addresses. Steps: 1. **Address** – Select one of your available addresses. 2. **Type** – 1. View – Read data (no changes, no gas). 2. Run – Execute transaction (changes data, requires gas). 3. **Modules** – Choose from dropdown. 4. **Function** – Select the function to call. 5. **Action Button** – Click View or Run. **“View” functions do not consume gas, while “Run” functions require a signed transaction and may incur fees.** ## Transaction History This tab allows you to view a list of your recent transactions and their details. 1. **Recent Transactions** (Left Panel) – Displays your latest transactions, including: 1. Date & Time – When the transaction occurred. 2. Amount – The amount of SUPRA transferred. 3. Status – The completion status of the transaction (e.g., Completed). 2. **Transaction Details** – When you click on a transaction, you will see: 1. Transaction Hash – The unique identifier of the transaction. 2. From – The sender’s address 3. Network Fee – The gas fee paid for the transaction. 4. View on SupraScan – A button to open the transaction in the SupraScan blockchain explorer. 3. **Activities** (Right Panel) Enter an address to view its activity history. **You can use the copy icon next to the transaction hash or address to quickly copy them to your clipboard.** ### Source: https://docs.supra.com/network/move/dev/supra-move-ide/accounts-and-balance # Accounts and Balance ## Switching Between Accounts 1. **Click Local Wallets to view wallets stored locally** 2. **Select an address to switch wallets** 3. **Click Add Wallet to create a new one** --- ## Connecting StarKey Wallet 1. **Click Connect StarKey** 2. **Select StarKey** 3. **If not installed → redirected to the installation page** 4. **If installed → connects to your wallet** ### Source: https://docs.supra.com/network/move/dev/supra-move-vs-code-extension # Supra Move VS Code Extension Welcome to the official documentation for the **Supra Move VS Code Extension**, a comprehensive developer tool designed to streamline development on the Supra MoveVM. ## Quick Installation
1. Open VS Code. 2. Navigate to the **Extensions** view from the Activity Bar. 3. Search for `Supra Move`. 4. Click **Install** on the official Supra extension. Visit the [VS Code Marketplace](https://marketplace.visualstudio.com/items?itemName=Supra.supramove) and click **Install** to automatically open the VS Code desktop application and install the extension.
After installation, look for the Supra logo in your VS Code tray to access built-in explorer features. ## Support & Troubleshooting #### IntelliSense not activating? - Ensure your file uses the `.move` extension. - Check that the language mode shows `move` in the status bar. #### Explorer features not visible? - Look for the Supra logo in your VS Code interface. - Make sure you are running the latest version, `v3.1.1`. - Check the VS Code activity bar and side panels, and make sure `SupraMove` is not hidden. --- ## Extension in Action
Demo
### Source: https://docs.supra.com/network/move/dev/supra-dapp-templates # Supra Dapp Templates Welcome to [@supranpm/supra-dapp-templates](https://www.npmjs.com/package/@supranpm/supra-dapp-templates), your go-to starter kit for dapp development on the Supra network. This npm package allows developers to bootstrap their dapps with ease and efficiency. ## Prerequisites Before getting started, ensure the following: - [Node.js and npm](https://nodejs.org/) installed. - [Python 3.6+](https://www.python.org/) installed. ## How to use: Follow these steps to create your dapp: ##### Navigate to your desired directory: ```bash cd your/workspace ``` ##### Run the following command: ```bash npx @supranpm/supra-dapp-templates ``` ##### Follow the CLI prompts: - Name your project. - Choose a template.
## Running Your Project: After you've selected your template and completed the setup, here's how you can execute and run your project `assuming` you have used Supra StarKey Wallet Dapp Template: ##### Navigate to your project directory. ```bash cd your/project-name ``` ##### Build & Run the Frontend of the Dapp. ```bash npm run build npm start ``` ###### And your project should be up and running! Connect to your Starkey Wallet. ### Templates Available in the Package: `npx @supranpm/supra-dapp-templates` offers multiple templates to accelerate dapp development: - **Basic Smart Contract Template:** Boilerplate smart contract for quick access. - **Supra SDK Dapp Template:** Sample Supra SDK with StarKey Wallet integration for building a to-do list dApp and frontend integration. - **Supra StarKey Wallet Dapp Template:** A Spin the Wheel dapp built on Supra MoveVM Testnet with `supra_framework`, StarKey Wallet, and frontend integration. - **Supra dVRF Template:** Template to get started with dapp on Supra dVRF on Supra MoveVM. - **Supra Automation Template:** Template to get your first Supra Automation task registered for the auto wallet top-up use case. - **Supra Push Oracles Template:** Template to integrate Supra's push oracle data feeds in Move smart contracts on Supra Move. ## Contribution: We welcome contributions to enhance the functionality, add more dapp templates, or improve the user experience of this package. Here's how you can contribute: - Fork the main repository on GitHub. } arrow /> - Clone the forked repository to your local machine. - Make your changes and push them. - Submit a pull request to the main repository. --- ## Supra EVM ### Source: https://docs.supra.com/network/evm # Welcome to Early Access You're now exploring the early-access environment for Supra's MultiVM Testnet, a major step toward a fully unified, multi-language smart contract platform. This testnet gives developers the ability to experiment with Supra's MultiVM architecture before full public release, offering early insight into how different programming languages and virtual machines come together seamlessly on a single Layer-1 network. During early access, you can deploy and test smart contracts using the supported VMs, explore cross-VM workflows, and provide feedback that will help shape the final production environment. This phase is designed for hands-on experimentation, rapid iteration, and developer discovery as we expand support for more ecosystems. --- ## Where to Start? ### Source: https://docs.supra.com/network/evm/network-information # Network Information Relative network, faucet, and API details. ----------------------------------------- | ----------------------------------------------------------- | | Network Name | SupraEVM MultiVM Testnet | | RPC URL Endpoints | learn more below | | \*Direct RPC Endpoint | https://rpc-multivm.supra.com/rpc/v1/eth | | \*Wallet & Tooling Integration Endpoint | https://rpc-multivm.supra.com/rpc/v1/eth/wallet_integration | --- ## Notes for Third-Party Tooling Supra’s EVM chain uses Moonshot consensus, which finalizes blocks in **sub-second time**.\ Because of this, **Supra EVM only supports `BlockTag=latest`.** Tools like Foundry or Hardhat automatically request a specific block height, which the standard RPC endpoint will **reject**. To support both direct RPC calls and tools we don’t control, we provide two endpoints: **Direct RPC Endpoint**\ `https://rpc-multivm.supra.com/rpc/v1/eth`\ Use this when calling the RPC directly or building custom tooling for Supra. **Wallet & Tooling Integration Endpoint**\ `https://rpc-multivm.supra.com/rpc/v1/eth/wallet_integration`\ Use this when working with Foundry, Hardhat, or 3rd-party wallets.\ This endpoint ignores block-height tags and always returns the latest block state, so no extra configuration is required. ### Source: https://docs.supra.com/network/evm/getting-started # Getting Started Developing on Supra's EVM network is no different than other EVM networks. Using existing development tools, you can start immediately. **Supra MultiVM** is a core feature of the Supra Layer-1 blockchain that allows developers to deploy smart contracts written in different languages across ecosystems. MultiVM support means: - No need to learn a new language - No need to port existing code - Use familiar tooling and environments ### Supported / Planned VMs - **MoveVM** → Move (Aptos, Sui) - **EVM** → Solidity (Ethereum ecosystem) - **SolanaVM (SVM)** → Rust (Coming soon) For the latest RPC URL, refer to: [Supra Network Information](https://supraoracles.gitbook.io/supra/network/evm/overview/network-information) ## Libraries JavaScript libraries that allow developers to interact with smart contracts deployed on Supra's EVM. These libraries enable reading blockchain data, sending transactions, and integrating smart contracts into decentralized applications (dApps). ### Source: https://docs.supra.com/network/evm/getting-started/remix-ide # Remix IDE Set up Starkey Wallet, fund it, write, deploy, and interact with a smart contract on SupraEVM using Remix IDE. --- ### Source: https://docs.supra.com/network/evm/getting-started/remix-ide/connect-starkey-wallet # Connect StarKey Wallet to Remix Learn how to link Starkey Wallet with Remix IDE to deploy and interact with smart contracts on SupraEVM. Ensure your wallet is connected to the correct network for seamless transactions. *** ### Using Remix IDE * Open [Remix IDE](https://remix.ethereum.org/#lang=en\&optimize=false\&runs=200\&evmVersion=null\&version=soljson-v0.8.18+commit.87f61d96.js). * Click on the Deploy and Run Transactions icon on the left sidebar. * Click on Customize this List. * Select Injected Provider - [Starkey Wallet](https://starkey.app/). Ensure your Starkey Wallet is connected to the Supra EVM network.
![Connect Wallet](/images/remix-ide/connect-wallet.jpg)
### Source: https://docs.supra.com/network/evm/getting-started/remix-ide/fund-your-wallet # Fund Your Wallet Ensure your Starkey Wallet has sufficient funds by using the faucet endpoint. --- ### Using StarKey Wallet: - Select EVM Stagingnet from the network dropdown. - Select the EVM Staging token from the asset list. - Press the "**Collect**" faucet button. - Run the following command in your terminal, replacing `0xYourStarkeyAddress` with your actual wallet address: ```powershell curl https://rpc-evmstaging.supra.com/rpc/v1/wallet/evm_faucet/0xYourStarkeyAddress ``` ### Result: ![Faucet Result](/images/remix-ide/faucet-result.jpg) ### Source: https://docs.supra.com/network/evm/getting-started/remix-ide/deploy-smart-contract # Guide to Deploy Smart Contract Follow this step-by-step guide to write, compile, deploy, and interact with a smart contract on SupraEVM using Remix IDE. Learn how to set up your contract, verify deployment, and test functionality. *** ### Create a New File * Click on the **File Explorers** icon on the left sidebar. * Click on the **New File** button. * Name the file `SimpleSupraStorage.sol`. ### Write the Smart Contract Copy and paste the following Solidity code into the `SimpleSupraStorage.sol` file: ### What is this Contract Doing? The `SimpleSupraStorage` contract allows you to store a number (using the `set` function) and retrieve it (using the `get` function). This basic example is perfect for learning to write and deploy Solidity smart contracts in SupraEVM ### What are the Functions Doing? `storedData` is a public variable storing a single `uint256` value. As a public variable, anyone can read this value by calling the automatically generated `storedData()` function. The `set` function takes a `uint256` value as an input and stores it in the `storedData` variable. This function is public, meaning anyone can call it to change the value of `storedData`. The `get` function returns the current value of the `storedData` variable. It's marked as `view`, meaning it doesn't modify the state. It is also public, so anyone can call it to read the value of `storedData`. ```solidity // SPDX-License-Identifier: MIT pragma solidity ^0.8.0; contract SimpleSupraStorage { uint256 public storedData; function set(uint256 x) public { storedData = x; } function get() public view returns (uint256) { return storedData; } } ``` ### Compile the Smart Contract * Click on the **Solidity Compiler** icon on the left sidebar. * Select the appropriate Solidity compiler version (e.g., `0.8.0`). * Click on the **Compile** `SimpleStorage.sol` button.
![Remix Deploy UI](/images/remix-ide/deploy-ui.png)
### Deploy the Smart Contract * Click on the **Deploy & Run Transactions** icon on the left sidebar. * Under the **Environment** dropdown, select **Injected Web3** (this will connect your Starkey Wallet to Remix). * Ensure that your Starkey Wallet is connected to the Supra EVM network. * Click on the **Deploy** button.
![Remix Deploy UI](/images/remix-ide/wallet-confirm.png)
Make sure your Starkey wallet is switched to Supra EVM Network and not any other before it. You can verify it by checking the network selected under an environment in the top section. ### Interact with the Deployed Smart Contract * After deployment, you'll see your smart contract under the Deployed Contracts section. * You can now interact with the contract. ### Verify Transaction on Block Explorer You can click the transaction hash to open Supra's EVM Block Explorer and view all the details of your contract deployment and interactions. [Supra's EVM Block Explorer](https://evm.suprascan.io/) ### Source: https://docs.supra.com/network/evm/getting-started/hardhat # Hardhat Set up, configure, compile, and deploy smart contracts on SupraEVM using Hardhat. --- ### Source: https://docs.supra.com/network/evm/getting-started/hardhat/create-hardhat-project # Create Hardhat Project Set up a Hardhat project by installing dependencies, initializing a new npm project, and creating a sample Hardhat environment to deploy smart contracts on SupraEVM. *** We will be using the Javascript project option after having the init command. ### Install Hardhat and Dependencies * Create a new project directory and navigate into it: ``` mkdir hardhat-project cd hardhat-project ``` * Initialize a new npm project: ``` npm init -y ``` * Install Hardhat: ``` npm install --save-dev hardhat ``` * Create a sample project using Hardhat: ``` npx hardhat init ``` ### Source: https://docs.supra.com/network/evm/getting-started/hardhat/getting-private-key-from-starkey # Getting Private Key from StarKey To use your StarKey wallet with Hardhat or Foundry, you'll need your Ethereum private key. ## Steps to Export Your Private Key: 1. Open your **StarKey Wallet** and go to **Settings** 2. Navigate to **Security** → **Recovery phrase & keys** 3. Select **Private Key**, then enter your password to reveal it 4. Copy the **Ethereum private key** — you'll use this in your Hardhat or Foundry config files.
![StarKey Private Key](/images/hardhat/private-key-export.png)
**Important:** Never share your private key. Store it securely — anyone with this key has full control over your wallet. ### Source: https://docs.supra.com/network/evm/getting-started/hardhat/update-hardhat-config # Write Smart Contract Configure Hardhat to connect with SupraEVM, write a Solidity smart contract, and create a deployment script to automate deployment using Hardhat scripts. *** ### Configure Hardhat for SupraEVM Update `hardhat.config.js` to define the **SupraEVM network**, specifying the RPC URL, chain ID, and private key to enable seamless contract deployment and interaction. * Change your hardhat.config.js file and add the following configuration: ```javascript require("@nomicfoundation/hardhat-toolbox"); module.exports = { solidity: "0.8.4", networks: { supra: { url: "https://rpc-evmstaging.supra.com/rpc/v1/eth", chainId: 119, accounts: [`0xPRIVATE_KEY`] } } }; ``` ### Create a Smart Contract File Define a **Solidity smart contract** in `SimpleStorage.sol` to store and retrieve a `uint256` value, providing a basic example for deployment on **SupraEVM**. * Create a `SimpleStorage.sol` File ```solidity // SPDX-License-Identifier: MIT pragma solidity ^0.8.0; contract SimpleStorage { uint256 public storedData; function set(uint256 x) public { storedData = x; } function get() public view returns (uint256) { return storedData; } } ``` ### Create a Deployment Script Write a **deployment script** in `deploy.js` to automate smart contract deployment on **SupraEVM** using **Hardhat**, enabling seamless contract execution and interaction. * Create a `scripts` directory and a file named `deploy.js`: ```javascript const { ethers } = require("hardhat"); async function main() { const [deployer] = await ethers.getSigners(); console.log("Deploying contracts with the account:", deployer.address); const SimpleStorage = await ethers.getContractFactory("SimpleStorage"); console.log("Deploying SimpleStorage..."); const simpleStorage = await SimpleStorage.deploy(); // Directly access the target property console.log("Contract Address from target property:", simpleStorage.target); } main().catch((error) => { console.error("Error:", error); process.exitCode = 1; }); ``` ### Source: https://docs.supra.com/network/evm/getting-started/hardhat/deploy-smart-contract # Deploy Smart Contract Compile your Solidity smart contract using Hardhat, then deploy it to SupraEVM by running the deployment script, ensuring successful contract execution on the network. *** ### Compile Smart Contract Use **Hardhat** to compile your **Solidity smart contract**, ensuring it is error-free and ready for deployment on **SupraEVM**. * Compile the contract using Hardhat: ```bash npx hardhat compile ``` ### Run Deployment Script Execute the **Hardhat deployment script** to deploy your smart contract on **SupraEVM**, ensuring it is live and ready for interaction. * Run the deployment script: ```bash npx hardhat run --network supra scripts/deploy.js ```
![Hardhat Deploy Result](/images/hardhat/deploy-result.jpg)
### Source: https://docs.supra.com/network/evm/getting-started/foundry # Foundry Initialize, configure, compile, deploy, and interact with smart contracts on SupraEVM using Foundry. ### Source: https://docs.supra.com/network/evm/getting-started/foundry/create-foundry-project # Create Foundry Project Initialize and configure a Foundry project for SupraEVM by setting up the directory, configuring the foundry.toml file, and defining the RPC URL, chain ID, and private key for deployment. *** ### Initialize and Set Up Your Project Directory Create and navigate to your **Foundry** project directory, similar to Hardhat, to prepare for smart contract development. ```bash forge init foundry-project cd foundry-project ``` ### Configure foundry.toml Set up the **Foundry** configuration by specifying the **SupraEVM RPC URL**, chain ID, and your private key to enable seamless deployment and interaction with smart contracts. ```toml [profile.supra] rpc_url = "https://rpc-evmstaging.supra.com/rpc/v1/eth" chain_id = 119 private_key = "0xYourPrivateKey" ### Source: https://docs.supra.com/network/evm/getting-started/foundry/getting-private-key-from-starkey # Getting Private Key from StarKey To use your StarKey wallet with Hardhat or Foundry, you'll need your Ethereum private key. ## Steps to Export Your Private Key: 1. Open your **StarKey Wallet** and go to **Settings** 2. Navigate to **Security** → **Recovery phrase & keys** 3. Select **Private Key**, then enter your password to reveal it 4. Copy the **Ethereum private key** — you'll use this in your Hardhat or Foundry config files.
![StarKey Private Key](/images/hardhat/private-key-export.png)
Never share your private key with anyone. Anyone with your private key can access your funds. ### Source: https://docs.supra.com/network/evm/getting-started/foundry/write-smart-contract # Write Smart Contract Create a Solidity contract to store and retrieve data, then set up a deployment script to automate deployment on SupraEVM using Foundry. *** ### Create a Smart Contract File Set up the `SimpleStorage.sol` file in the `src` directory to define a basic **Solidity smart contract** that allows storing and retrieving a `uint256` value on **SupraEVM**. ```solidity // SPDX-License-Identifier: MIT pragma solidity ^0.8.0; contract SimpleStorage { uint256 public storedData; function set(uint256 x) public { storedData = x; } function get() public view returns (uint256) { return storedData; } } ``` ### Create a Deployment Script Write a deployment script in the `script` directory (`DeploySimpleStorage.sol`) to automate smart contract deployment on **SupraEVM** using **Foundry’s scripting tools**. ```solidity // SPDX-License-Identifier: MIT pragma solidity ^0.8.0; contract DeploySimpleStorage is Script { function run() external { uint256 privateKey = vm.envUint("PRIVATE_KEY"); vm.startBroadcast(privateKey); new SimpleStorage(); vm.stopBroadcast(); } } ``` ### Source: https://docs.supra.com/network/evm/getting-started/foundry/deploying-smart-contract # Deploying Smart Contract Compile and deploy your Solidity smart contract on SupraEVM using Foundry. After deployment, interact with the contract using cast send to execute functions and cast call to read stored data. ### Using Cast Send for Transactions Interact with your deployed contract using `cast send`, which allows you to execute functions on-chain. You can interact with the deployed contract using `cast send`. For example, to call the `set` function: ```bash cast send "set(uint256)" 42 --rpc-url https://rpc-evmstaging.supra.com/rpc/v1/eth --private-key 0xYourPrivateKey ``` --- ### View Contract State using Cast Call Retrieve stored data from your contract using `cast call`, which reads contract state without sending a transaction, making it gas-free. To view the state of the contract, use `cast call`: ```bash cast call "get() view returns (uint256)" --rpc-url https://rpc-evmstaging.supra.com/rpc/v1/eth ``` By using `forge create` and `cast send`, you can deploy and interact with your smart contract on the Supra EVM network. ### Source: https://docs.supra.com/network/evm/build-on-supraevm # Build on SupraEVM Supra MultiVM is a core feature of the Supra Layer-1 blockchain that allows developers to deploy smart contracts written in different programming languages and from various blockchain ecosystems natively on the Supra network. The MultiVM (Multiple Virtual Machine) support means developers do not need to learn a new language or port their existing code to build on Supra. Instead, they can use the Virtual Machine and programming language they are already familiar with. Supra’s MultiVM architecture currently supports or plans to support: - **MoveVM:** For smart contracts written in the Move language (used by Aptos and Sui) - **EVM:** For Solidity smart contracts from the Ethereum ecosystem - **SolanaVM (SVM):** Coming soon, for smart contracts written in Rust (used by Solana) --- ### Source: https://docs.supra.com/network/evm/build-on-supraevm/add-multivm-to-starkey # Add MultiVM to StarKey Connect your StarKey Wallet to the Supra MultiVM Testnet by adding the custom network details and funding your account using the built-in faucet. This setup ensures your wallet is ready to deploy and --- ### Step 1: Open StarKey Wallet Make sure the [StarKey Wallet](https://starkey.app/) extension app is installed and unlocked. ### Step 2: Navigate to Networks Click the **All Networks** at the top of the wallet.\ Select **Add Network** (the **+** icon). ### Step 3: Enter the Network Details Use the Supra MultiVM Testnet settings: - **Network Name:** Supra MultiVM Testnet - **Network Type:** Ethereum - **RPC URL:** _Use the URL from the_ [_Network Information_](../network-information) _page_ - **Symbol:** SupEVM - **Chain ID:** _(will auto-fill)_ Click **Add** to save the network. ### Step 4: Fund Your Wallet Visit the MultiVM RPC endpoint: > [https://rpc-multivm.supra.com/docs/#/operations/evm_faucet](https://rpc-multivm.supra.com/docs/#/operations/evm_faucet) Scroll to **Faucet > EVM Faucet Endpoint**\ Copy the GET request: ``` curl --request GET \ --url https://rpc-multivm.supra.com/rpc/v1/wallet/evm_faucet/{address} \ --header 'Accept: application/json' ``` Replace `{address}` with your StarKey wallet address, then run the command in your terminal. Example Response: ``` { "Accepted": "c8f87d0d-6e96-45a2-9ac9-94ce41e8aae1" } ``` Your wallet will receive test funds within a few moments. ### Source: https://docs.supra.com/network/evm/build-on-supraevm/hardhat # Hardhat This guide walks you through building a Solidity-based DAO Management Contract on SupraEVM, including development, deployment, and interaction using Hardhat. Hardhat is one of the most popular development frameworks for Solidity, making it easy to compile, test, and deploy smart contracts. On SupraEVM, you can use Hardhat the same way you would on any EVM chain, with just a few small configuration changes. This guide will show you how to: - Set up a new Hardhat project for SupraEVM - Configure the SupraEVM RPC and private key - Write and compile a Solidity contract - Deploy to the SupraEVM MultiVM Testnet - Interact with your deployed contract from scripts Whether you're experimenting, testing DAO mechanics, or building production-ready applications, Hardhat provides a fast and flexible workflow for building on SupraEVM. --- ### Source: https://docs.supra.com/network/evm/build-on-supraevm/hardhat/prerequisites # Prerequisites Before starting, make sure you have: - [**Node.js**](https://nodejs.org/en/download) - [**Hardhat** ](https://hardhat.org/)**installed globally** - **A** [**StarKey Wallet**](https://starkey.app/) with a private key for signing transactions - **Your** [**SupraEVM RPC URL**](../../network-information) from the Network Information page ``` npm install -g hardhat ``` These tools allow Hardhat to compile contracts, connect to the SupraEVM network, and sign transactions. ### Source: https://docs.supra.com/network/evm/build-on-supraevm/hardhat/start-building # Start Building Initialize a new Hardhat project and prepare it for deployment on SupraEVM. --- ### Step 1: Initialize Your Project Set up your folder, initialize Hardhat, and prepare your config file. ``` mkdir SupDAO cd SupDAO npx hardhat init ``` Choose the **empty `hardhat.config.js` template** and install any required node modules. ### Step 2: Configure Hardhat for SupraEVM Update your `hardhat.config.js` file with the SupraEVM network: For the latest RPC URL, please refer to the [Supra Network Information](/network/network-information) page. ``` module.exports = { solidity: "0.8.17", networks: { supra: { url: "SUPRAEVM_RPC_URL", accounts: ["YOUR_STARKEY_WALLET_PRIVATE_KEY"] } } }; ``` ### Step 3: Create Your DAO Contract Inside a new `contracts/` directory, create your Solidity file (e.g., `CrossChainDAO.sol`): ``` // SPDX-License-Identifier: MIT pragma solidity ^0.8.28; contract CrossChainDAO { struct Proposal { uint id; string description; uint voteCount; bool executed; } address public owner; uint public proposalCount; mapping(uint => Proposal) public proposals; mapping(address => bool) public members; event ProposalCreated(uint id, string description); event VoteCasted(uint id, address voter); event ProposalExecuted(uint id); modifier onlyOwner() { require(msg.sender == owner, "Only owner can call this function"); _; } modifier onlyMember() { require(members[msg.sender], "Only DAO members can vote"); _; } constructor() { owner = msg.sender; } function addMember(address _member) external onlyOwner { members[_member] = true; } function createProposal(string memory _description) external onlyMember { proposalCount++; proposals[proposalCount] = Proposal(proposalCount, _description, 0, false); emit ProposalCreated(proposalCount, _description); } function vote(uint _id) external onlyMember { Proposal storage proposal = proposals[_id]; require(!proposal.executed, "Proposal already executed"); proposal.voteCount++; emit VoteCasted(_id, msg.sender); } function executeProposal(uint _id) external onlyOwner { Proposal storage proposal = proposals[_id]; require(!proposal.executed, "Proposal already executed"); require(proposal.voteCount > 0, "Insufficient votes to execute the proposal"); proposal.executed = true; emit ProposalExecuted(_id); } } ``` ### Step 4: Compile Your Contract Make sure the Solidity code builds successfully. ``` npx hardhat compile ``` ### Step 5: Create a Deployment Script Add a `scripts/deploy.js` file to deploy your DAO contract to SupraEVM. ``` const { ethers } = require("hardhat"); async function main() { const CrossChainDAO = await ethers.getContractFactory("CrossChainDAO"); const dao = await CrossChainDAO.deploy(); await dao.deployed(); console.log("DAO deployed to:", dao.address); } main().catch((error) => { console.error(error); process.exitCode = 1; }); ``` ### Step 6: Deploy to SupraEVM Run your deploy script on the SupraEVM network. ``` npx hardhat run scripts/deploy.js --network supra ``` ### Step 7: Create Interaction Script Add a menu-based script that interacts with your deployed DAO. ``` const { ethers } = require("hardhat"); async function main() { const daoAddress = ""; // Replace with your deployed DAO contract address const abi = []; // Add ABI after deployment const signer = await ethers.getSigner(); const daoContract = new ethers.Contract(daoAddress, abi, signer); const readline = require("readline").createInterface({ input: process.stdin, output: process.stdout, }); async function menu() { console.log("\nWelcome to the DAO Interaction Script!"); console.log("1. Add a DAO Member"); console.log("2. Create a Proposal"); console.log("3. Vote on a Proposal"); console.log("4. Execute a Proposal"); console.log("5. Exit"); readline.question("Enter your choice: ", async (action) => { try { if (action === "1") { readline.question("Member address: ", async (address) => { const tx = await daoContract.addMember(address); await tx.wait(); console.log(`Member added: ${address}`); await menu(); }); } else if (action === "2") { readline.question("Proposal description: ", async (description) => { const tx = await daoContract.createProposal(description); await tx.wait(); console.log("Proposal created!"); await menu(); }); } else if (action === "3") { readline.question("Proposal ID: ", async (id) => { const tx = await daoContract.vote(id); await tx.wait(); console.log(`Voted on proposal ${id}`); await menu(); }); } else if (action === "4") { readline.question("Proposal ID: ", async (id) => { const tx = await daoContract.executeProposal(id); await tx.wait(); console.log(`Executed proposal ${id}`); await menu(); }); } else if (action === "5") { console.log("Exiting..."); readline.close(); } else { console.log("Invalid choice."); await menu(); } } catch (err) { console.error("Error:", err.message); await menu(); } }); } await menu(); } main().catch((error) => { console.error(error); process.exitCode = 1; }); ``` ### Step 8: Run the Interaction Script Run your interaction script: ``` npx hardhat run scripts/interact.js --network supra ``` ### Source: https://docs.supra.com/network/evm/build-on-supraevm/foundry # Foundry This guide walks you through building and deploying a Solidity smart contract on SupraEVM using Foundry, including project setup, configuration, compilation, deployment, and contract interaction usin Foundry is a blazing-fast Ethereum development toolkit written in Rust. On SupraEVM, you can use Foundry the same way you would on any EVM-compatible chain, with only a few small configuration changes. This guide will show you how to: - Set up a new Foundry project for SupraEVM - Configure `foundry.toml` with your RPC + private key - Write and compile a Solidity contract - Deploy using `forge create` or a Foundry script - Interact with your deployed contract using `cast` Whether you're experimenting, building simple demos, or deploying production-grade smart contracts, Foundry gives you a powerful and lightweight workflow for developing on SupraEVM. --- ### Source: https://docs.supra.com/network/evm/build-on-supraevm/foundry/start-building # Start Building Initialize a new Foundry project and prepare it for deployment on SupraEVM. --- ### Step 1: Initialize Your Project Create and enter a new Foundry project directory: ``` forge init foundry-project cd foundry-project ``` ### Step 2: Configure `foundry.toml` Add a SupraEVM profile to configure your RPC, chain ID, and private key: For the latest RPC URL, please refer to the [Supra Network Information](/network/network-information) page. ``` [profile.supra] rpc_url = "" private_key = "0xYourPrivateKey" ``` This allows Foundry to deploy and broadcast transactions to SupraEVM. ### Step 3: Create a Smart Contract Inside `src/`, create **SimpleStorage.sol**: ``` // SPDX-License-Identifier: MIT pragma solidity ^0.8.0; contract SimpleStorage { uint256 public storedData; function set(uint256 x) public { storedData = x; } function get() public view returns (uint256) { return storedData; } } ``` ### Step 4: Create a Deployment Script In `script/DeploySimpleStorage.sol`: ``` // SPDX-License-Identifier: MIT pragma solidity ^0.8.0; contract DeploySimpleStorage is Script { function run() external { uint256 privateKey = vm.envUint("PRIVATE_KEY"); vm.startBroadcast(privateKey); new SimpleStorage(); vm.stopBroadcast(); } } ``` ### Step 5: Compile Your Contract ``` forge build ``` ### Step 6: Deploy to SupraEVM Use `forge create` to deploy the contract: ``` forge create src/SimpleStorage.sol:SimpleStorage \ --rpc-url \ --private-key 0xYourPrivateKey \ --broadcast ``` This broadcasts the deployment transaction to SupraEVM. ### Step 7: Interact Using `cast send` Call functions on your deployed contract: **Set a value:** ``` cast send "set(uint256)" 42 \ --rpc-url \ --private-key 0xYourPrivateKey ``` ### Step 8: Read the Contract State with `cast call` This is a gas-free read: ``` cast call "get() view returns (uint256)" \ --rpc-url ``` ### Source: https://docs.supra.com/network/evm/build-on-supraevm/remix-ide # Remix IDE Remix IDE lets you write, compile, deploy, and interact with Solidity smart contracts directly in your browser, no local setup required. With SupraEVM’s MultiVM support, Remix integrates seamlessly using **StarKey Wallet** as the injected provider. This guide will show you how to: - Connect Remix to StarKey Wallet on Supra MultiVM - Create and compile a Solidity contract - Deploy it using the Remix interface - Interact with the deployed contract - Verify transactions on Supra’s MultiVM Explorer Whether you're experimenting with simple storage contracts or validating complex dApp logic, Remix provides a simple and beginner-friendly workflow for building on SupraEVM. --- ### Source: https://docs.supra.com/network/evm/build-on-supraevm/remix-ide/prerequisites # Prerequisites Before starting, make sure you have: - **A** [**StarKey Wallet**](https://starkey.app/) is installed - A wallet account with [testnet funds](../add-multivm-to-starkey) - [**Supra MultiVM RPC**](../../network-information) is already selected inside StarKey Wallet Request the testnet fund [here](https://rpc-multivm.supra.com/docs/#/operations/evm_faucet). These tools allow Remix to connect to the SupraEVM network and sign transactions using StarKey Wallet. ### Source: https://docs.supra.com/network/evm/build-on-supraevm/remix-ide/start-building # Start Building Set up Remix, connect StarKey Wallet, and deploy your first smart contract on SupraEVM. --- ### Step 1: Open Remix IDE Visit [**https://remix.ethereum.org**](https://remix.ethereum.org)\ On the left sidebar, click **Deploy & Run Transactions**\ Click **Customize this list**\ Select **Injected Provider – StarKey Wallet**\ Ensure your wallet is connected to **Supra MultiVM**\ A confirmation modal will appear in StarKey Wallet. ### Step 2: Create a New Solidity File Click the **File Explorer** icon\ Click **New File**\ Name it: ``` SimpleSupraStorage.sol ``` Paste the following contract: ``` // SPDX-License-Identifier: MIT pragma solidity ^0.8.0; contract SimpleSupraStorage { uint256 public storedData; function set(uint256 x) public { storedData = x; } function get() public view returns (uint256) { return storedData; } } ``` #### What this contract does: - `storedData`: stores one number - `set(x)`: updates the stored number - `get()`: returns the stored number Perfect for learning SupraEVM deployment flow. ### Step 3: Compile the Contract Click the **Solidity Compiler** tab\ Choose compiler version: **0.8.x**\ Click **Compile SimpleSupraStorage.sol**\ A green checkmark means success. ### Step 4: Deploy to SupraEVM MultiVM Open **Deploy & Run Transactions**\ Under **Environment**, choose: **Injected Web3 (StarKey Wallet)** - Make sure StarKey Wallet is switched to:\ ✔ **Supra MultiVM Testnet**\ ✘ Not Ethereum, BNB, or any other network Click **Deploy**\ Confirm the transaction in StarKey Wallet **Your contract is now deployed on SupraEVM.** ### Step 6: Verify Transactions on the Explorer Every action (deploy, set, get) is recorded on Supra’s MultiVM Explorer.\ Paste your transaction hash or contract address into: [**Supra MultiVM Block Explorer**](https://multivm.suprascan.io/) You can view: - Gas used - Function calls - Storage changes - Contract creator - Execution results ### Source: https://docs.supra.com/network/evm/supraevm-resources # SupraEVM Resources Your complete hub for learning Solidity, Move, and building smart contracts on SupraEVM. SupraEVM Resources brings together everything developers need to start building on the EVM side of Supra’s multi-VM network. Whether you're learning Solidity, exploring Move, comparing both languages, or browsing tools and frameworks, this section gives you clear explanations, examples, and hands-on resources to accelerate your development workflow. From introductory guides to in-depth documentation, this is your starting point for mastering smart contract development on SupraEVM. --- ### Source: https://docs.supra.com/network/evm/supraevm-resources/solidity # Solidity Understand how Solidity works and start building smart contracts across the EVM ecosystem. ### What is a Smart Contract? [](#what-is-a-smart-contract) _A program stored on-chain that executes automatically when conditions are met._ A smart contract is a set of instructions deployed to a blockchain. Once live, it runs without intervention from third parties. The code you write defines how it reacts to input, just like any computer program. Because it has its own on-chain address (similar to a wallet), it can hold and manage assets like ETH or ERC-20 tokens, send or receive them, and trigger actions when events happen. This ability to combine data, logic, and asset handling makes smart contracts the foundation of decentralized applications. In advanced cases, smart contracts can receive off-chain data such as market prices or weather information via oracles, allowing them to connect blockchain logic with real-world data. ### What is Solidity? [](#what-is-solidity) _A high-level programming language for writing smart contracts on EVM-based blockchains._ Solidity is specifically designed for smart contract development. If you’ve worked with JavaScript or C-style languages, the syntax will feel familiar. When you write a contract in Solidity, you define the rules, data structures, and behaviors that will run on the Ethereum Virtual Machine (EVM) or other EVM-compatible chains. You compile that code into bytecode, deploy it to the blockchain, and it executes in a decentralized, deterministic environment. ### Why Learn Solidity? [](#why-learn-solidity) _Because Solidity opens the door to creating decentralized applications across the EVM ecosystem._ Solidity is the go-to language for writing contracts on major EVM-based chains such as Ethereum, BNB Chain, Polygon, and many others. Learning Solidity gives you access to a large ecosystem of tools, libraries, frameworks, and community support. It enables you to build tokens, DeFi protocols, DAOs, games, and more. If you want to work in blockchain development or deploy smart contracts that can interact with the EVM, Solidity is the best starting point. ### How Does Solidity Work? [](#how-does-solidity-work) _Write code, compile it, deploy it, and let the EVM handle execution._ When you write a Solidity contract, you save it as a .sol file and compile it into bytecode that the EVM understands. Once deployed, every node on the network executes the same code to ensure consistent results across the blockchain. The contract lives at a specific address, holds its own state, and can be interacted with by users or other contracts. Because the network is decentralized, you need to consider gas costs, permissions, and security from the start. ### What Can You Build With Solidity? [](#what-can-you-build-with-solidity) **Examples of what’s possible with smart contracts.** - Tokens and NFTs: Create ERC-20, ERC-721, or ERC-1155 tokens. - DeFi protocols: Build staking, liquidity, lending, or yield systems. - DAOs: Create decentralized organizations with on-chain voting. - Games and collectibles: Design ownership and trading logic for in-game assets. - Hybrid applications: Connect your contracts to real-world data through oracles. ### Source: https://docs.supra.com/network/evm/supraevm-resources/move # Move Learn how Move enables secure, resource-oriented smart contracts on the Supra L1. ### What is a Smart Contract? [](#what-is-a-smart-contract) _A program stored on-chain that executes automatically when conditions are met._ A smart contract is a set of instructions deployed to a blockchain. Once deployed, it runs automatically without third-party intervention. The code defines how it responds to inputs, similar to any traditional program, but it operates in a decentralized and tamper-proof environment. Because smart contracts have their own on-chain address, they can hold and transfer tokens, track ownership, and perform actions on behalf of users. This makes them essential for building decentralized applications that manage assets transparently. Smart contracts can also connect to off-chain data through oracles, letting them interact with real-world information like prices, events, or sensor data while maintaining on-chain trust and automation. ### What is Move? [](#what-is-move) _A resource-oriented programming language designed for safe and predictable smart contracts._ Move is a next-generation smart contract language built for security, flexibility, and performance. Unlike Solidity, which models everything as numbers and storage slots, Move treats assets as resources, values that can’t be copied or accidentally lost. This design prevents common issues like double-spending and reentrancy, giving developers stronger safety guarantees by default. Originally developed for Diem (Meta’s blockchain project), Move has evolved into a powerful ecosystem language used by several modern blockchains, including Supra, Aptos, and Sui. On Supra, Move ensures each transaction executes with precision and security, making it ideal for both financial and enterprise-grade applications. ### Why Learn Move? [](#why-learn-move) _Because Move gives you fine-grained control and built-in safety for digital assets._ Move introduces a unique resource-based type system that enforces strong ownership rules at the language level. Assets in Move can’t be duplicated or destroyed without explicit permission, meaning developers don’t have to rely solely on external audits or manual safety checks. Learning Move helps you write more secure and predictable code from the start. It’s perfect for developers who want to create high-performance dApps, design custom tokens, or work with complex logic, without sacrificing safety or composability. ### How Does Move Work? [](#how-does-move-work) _Write modules, compile them, and deploy them directly to the blockchain._ Move organizes code into modules that define data structures and functions. You write your logic in `.move` files, compile them, and deploy them to the chain. Each module becomes part of the blockchain state and can be imported or called by other contracts. When executed, the Move Virtual Machine (MoveVM) ensures every transaction follows strict type and resource rules. This guarantees consistent results and prevents unintended asset loss or unauthorized access. ### What Can You Build With Move? [](#what-can-you-build-with-move) _Applications built with security and scalability at their core._ - Tokens and assets: Create custom coins or NFTs using Move’s resource types. - Financial dApps: Build lending, staking, or payment systems with predictable logic. - DAOs and governance tools: Design secure on-chain voting and proposal systems. - Game logic: Build games that require strong ownership guarantees for assets. ### Source: https://docs.supra.com/network/evm/supraevm-resources/solidity-resources # Solidity Resources Explore tools, frameworks, tutorials, and advanced guides to level up your Solidity development. Solidity is the most widely used language for writing smart contracts on EVM-compatible blockchains. It provides developers with a familiar, high-level syntax for building decentralized applications that run securely on-chain. Most Ethereum development tools, such as Hardhat, Foundry, and Remix, are fully compatible with Solidity and can be used to compile, test, and deploy smart contracts across multiple networks. This page highlights essential resources to help developers learn and build with Solidity, from beginner tutorials and interactive IDEs to advanced guides on gas optimization, testing, and security. Whether you’re new to smart contracts or looking to refine your development workflow, these resources cover everything from the basics of Solidity syntax to professional practices used in production-grade dApps. ### Frameworks [](#frameworks) - [**Remix.Ethereum:**](https://remix.ethereum.org/) A web-based IDE for writing, compiling, and deploying Solidity smart contracts directly in the browser. - [**Hardhat:**](https://hardhat.org/) A development framework for compiling, testing, and deploying EVM-based smart contracts with built-in debugging tools. - [**Foundry:**](https://getfoundry.sh/) A fast, Rust-based framework for smart contract development that supports testing, deployment, and automation. - [**Scaffold-ETH:**](https://github.com/scaffold-eth/scaffold-eth) A development framework that combines Solidity smart contracts with a React front end for rapid dApp prototyping. ### Examples [](#examples) - [Solidity by Example:](https://solidity-by-example.org/) A concise guide that introduces Solidity concepts through simple, progressive examples. - [Solidity Patterns:](https://github.com/fravoll/solidity-patterns) A collection of reusable code templates with explanations for common Solidity design patterns. - [Damn Vulnerable DeFi:](https://www.damnvulnerabledefi.xyz/) A collection of intentionally vulnerable contracts designed as hands-on challenges to practice attacking and securing DeFi protocols. ### Courses [](#courses) - [CryptoZombies:](https://cryptozombies.io/en/course) An interactive beginner course that teaches how to build dApps on the EVM through gamified lessons. - [Blockchain Basics course by Cyfrin Updraft:](https://updraft.cyfrin.io/courses/blockchain-basics) A course covering the fundamentals of blockchain, DeFi, and smart contracts. - [Solidity Smart Contract Development by Cyfrin Updraft:](https://updraft.cyfrin.io/courses/solidity) A hands-on course for learning Solidity and building real smart contract projects. - [Smart Contract DevOps course by Cyfrin Updraft:](https://updraft.cyfrin.io/courses/wallets) A course on wallet management, deployment security, and maintaining live web3 protocols. - [Smart Contract Security course by Cyfrin Updraft:](https://updraft.cyfrin.io/courses/security) A course focused on auditing and building secure smart contracts and DeFi protocols. - [Assembly and Formal Verification course by Cyfrin Updraft:](https://updraft.cyfrin.io/courses/formal-verification) A technical course covering Huff, Yul, EVM opcodes, and advanced verification tools. - [Advanced Foundry course by Cyfrin Updraft:](https://updraft.cyfrin.io/courses/advanced-foundry) A course on advanced smart contract development, DeFi protocols, DAOs, and testing using Foundry. - [Ethernaut:](https://ethernaut.openzeppelin.com/) A web-based game where you learn Solidity and smart-contract security by solving interactive hacking puzzles. - [Foundry Fundamentals course by Cyfrin Updraft:](https://updraft.cyfrin.io/courses/foundry) A complete course teaching Foundry for building, deploying, and testing smart contracts. - [The Solidity Language:](https://docs.soliditylang.org/en/v0.8.21/introduction-to-smart-contracts.html) The official guide covering smart contracts, compilation, deployment, and key concepts for EVM-based development. - [Cookbook.dev:](https://www.cookbook.dev/search?q=cookbook&categories=Contracts&sort=popular&filter=&page=1) A platform offering interactive contract templates with live editing, one-click deployment, and AI assistance. ### Advanced Languages & Optimization [](#advanced-languages--optimization) - The [Solmate repository](https://github.com/transmissions11/solmate) and [Solady repository](https://github.com/Vectorized/solady/tree/main): Repositories offering gas-optimized Solidity and Yul contracts for efficient, high-performance development. - [Yul](https://docs.soliditylang.org/en/latest/yul.html): An intermediate, low-level language for Solidity that enables developers to write optimized EVM code using structured control flow. - [Huff](https://docs.huff.sh/get-started/overview): A low-level language for writing EVM assembly directly, ideal for performance-critical or educational use cases. - [Vyper](https://github.com/vyperlang/vyper): A Python-inspired smart contract language designed for simplicity and security, offering a more readable and audit-friendly alternative to Solidity. ### Tutorials [](#tutorials) - [Learn Solidity, Blockchain Development, & Smart Contracts (Patrick Collins):](https://www.youtube.com/watch?v=umepbfKp5rI&list=PL4Rj_WH6yLgWe7TxankiqkrkVKXIwOP42) A comprehensive beginner-to-advanced tutorial series on smart contract development. - [Learning Solidity in 20 Mins (dApp University):](https://www.youtube.com/watch?v=RQzuQb0dfBM&t=60s) A quick video tutorial that walks you through the basics of Solidity and how to write your first smart contract. - [Secureum YT Channel:](https://www.youtube.com/@SecureumVideos/videos) A channel offering advanced Solidity lessons on fuzzing, auditing, and security best practices. - [Smart Contract Programmer YT channel:](https://www.youtube.com/@smartcontractprogrammer) A channel with detailed tutorials on Solidity topics like ABI encoding, storage, and EVM internals. ### Security Tools [](#security-tools) - [MythX:](https://mythx.io/) A security analysis platform for detecting vulnerabilities in Solidity smart contracts. ### Testing [](#testing) - [Echidna:](https://github.com/crytic/echidna) A fuzz testing tool for Solidity that automatically generates inputs to uncover vulnerabilities in smart contracts. - [Slither:](https://github.com/crytic/slither) A static analysis framework that detects potential security issues and inefficiencies in Solidity code. - [solidity-coverage:](https://github.com/sc-forks/solidity-coverage/tree/master) A testing utility that measures code coverage for Solidity smart contracts to ensure all logic paths are tested. ### Reference & Standards [](#reference--standards) - [Ethereum Improvement Proposals (EIPs):](https://eips.ethereum.org/) Official documentation for ERC standards like ERC-20, ERC-721, and ERC-1155. - [OpenZeppelin:](https://www.openzeppelin.com/contracts) A trusted library of customizable smart contract templates for tokens and access control standards. ### Blog [](#blog) - [Rareskills Blog:](https://www.rareskills.io/category/solidity) In-depth articles exploring advanced Solidity concepts and development best practices. ### Source: https://docs.supra.com/network/evm/supraevm-resources/evm-movevm-cheatsheet # EVM/MoveVM Cheatsheet Quickly compare Solidity and Move, and understand how the EVM and MoveVM differ in design and execution. ### High-Level Overview [](#high-level-overview) | Feature | Ethereum | Supra Move | | ----------------- | ---------------------------------------- | ----------------------------------------------------- | | Smart Contracts | Solidity, EVM | Move, MoveVM | | Benefits | Mature, wide adoption | Scalability, low latency, Optimal fees | | Transaction Fees | Variable, can be high | Lower and more predictable | | Account Addresses | 160-bit | 256-bit | | Account Structure | Balance in a single field, uses nonce | Modules and resources, uses sequence number | | Data Storage | Patricia Merkle Trees | Global storage with resources and modules | | Storage Mindset | Contract-based storage | Account & Resources centric mindset for code and data | | Parallelization | Limited due to shared storage space | Enhanced parallel execution due to resource model | | Type Safety | Contract types provide basic type safety | Module structs and generics offer robust type safety | | Unique Features | Wide ecosystem, EVM compatibility | Native VRF, Automation, Oracle price feeds | ### Comparing Token Standards [](#comparing-token-standards) | Aspect | Ethereum/Solidity | Supra Move | | ------------------ | ---------------------------------------------------------- | ----------------------------------------------------------------- | | Token Structure | Each token is its own contract | Every token uses typed Coin with single, reusable contract | | Token Standard | Must conform to standards like ERC20; implementations vary | Uniform interface and implementation for all tokens | | Balance Storage | Balances stored in contract using mapping structure | Resource-Oriented: Balances stored as resource in user’s account | | Transfer Mechanism | Tokens can be transferred without receiver’s permission | Tokens require receiver’s explicit consent for transfer | | Safety | Depends on implementation quality | Resources cannot be arbitrarily created, ensuring token integrity | ### Comparing EVM and Move VM [](#comparing-evm-and-move-vm) | Aspect | EVM (Ethereum Virtual Machine) | Move VM (Supra Move Virtual Machine) | | --------------------------- | ------------------------------------------------ | -------------------------------------------------------------- | | Data Storage | Data stored in smart contract’s storage space | Data stored across smart contracts, user accounts, and objects | | Parallelization | Limited parallel execution due to shared storage | Enhanced parallel execution enabled by flexible split storage | | VM and Language Integration | Separate layers for EVM and languages (Solidity) | Seamless integration between VM layer and Move language | | Critical Network Operations | Complex implementation of network operations | Critical operations natively implemented in Move | | Function Calling | Dynamic dispatch allows arbitrary contract calls | Static dispatch focuses on security and predictable behavior | | Type Safety | Contract types provide basic type safety | Module structs and generics offer robust type safety | | Transaction Safety | Uses nonces for transaction ordering | Uses sequence numbers for transaction ordering | | Object Accessibility | Objects bound to smart contract scope | Guaranteed global accessibility of objects | ### Module Structure & Initialization [](#module-structure--initialization) #### Ethereum (Solidity) [](#ethereum-solidity) ``` // SPDX-License-Identifier: MITpragma solidity ^0.8.0; contract MyContract { address public owner; uint256 public value; constructor(uint256 _initialValue) { owner = msg.sender; value = _initialValue; } modifier onlyOwner() { require(msg.sender == owner, "Not owner"); _; }} ``` #### Supra Move [](#supra-move) ``` module my_address::my_contract { use supra_framework::signer; use supra_framework::account; use std::error; struct ContractData has key { owner: address, value: u64, } const E_NOT_OWNER: u64 = 1; // Called once when module is published fun init_module(account: &signer) { let owner = signer::address_of(account); move_to(account, ContractData { owner, value: 0, }); } // Manual initialization function public entry fun initialize(account: &signer, initial_value: u64) { let addr = signer::address_of(account); move_to(account, ContractData { owner: addr, value: initial_value, }); }} ``` **Key Differences:** - **Supra Move**: Uses `init_module` for automatic initialization or explicit initialization functions - **Ethereum**: Uses constructors that run once during deployment - **Supra Move:** Resources are stored under user accounts, not contract addresses - **Ethereum**: State stored in contract storage slots ### Functions [](#functions) #### Ethereum (Solidity) [](#ethereum-solidity-1) ``` contract Functions { uint256 private _value; // Public function (external callable) function setValue(uint256 newValue) public { _value = newValue; } // View function (read-only) function getValue() public view returns (uint256) { return _value; } // Pure function (no state access) function add(uint256 a, uint256 b) public pure returns (uint256) { return a + b; } // Internal function function _internalHelper() internal pure returns (uint256) { return 42; } // Payable function function deposit() public payable { // Function can receive Ether }} ``` #### Supra Move [](#supra-move-1) ``` module my_address::functions { use supra_framework::signer; struct Storage has key { value: u64, } // Public entry function (blockchain callable) public entry fun set_value(account: &signer, new_value: u64) acquires Storage { let addr = signer::address_of(account); let storage = borrow_global_mut(addr); storage.value = new_value; } // View function (read-only) #[view] public fun get_value(addr: address): u64 acquires Storage { borrow_global(addr).value } // Public function (can be called by other modules) public fun add(a: u64, b: u64): u64 { a + b } // Private function (module internal only) fun internal_helper(): u64 { 42 } // Function that can receive coins public entry fun deposit(account: &signer, amount: u64) { // Use coin framework for transfers // coin::transfer(account, target, amount); }} ``` **Key Differences:** - **Supra Move**: Uses `#[view]` for read-only functions, public entry for blockchain calls - **Ethereum**: Uses view, pure, public, external modifiers - **Supra Move**: acquires keyword, declares which resources the function accesses - **Ethereum**: Automatic state access without declaration ### Basic Types [](#basic-types) #### Ethereum (Solidity) [](#ethereum-solidity-2) ``` contract BasicTypes { // Integers uint8 smallNumber; // 0 to 255 uint256 bigNumber; // 0 to 2^256-1 int256 signedNumber; // -2^255 to 2^255-1 // Boolean bool isActive; // Address address userAddress; // Bytes bytes32 hash; bytes dynamicBytes; // String string text; // Arrays uint256[] dynamicArray; uint256[5] fixedArray; // Mapping mapping(address => uint256) balances; // Struct struct User { string name; uint256 age; }} ``` #### Supra Move [](#supra-move-2) ``` module my_address::basic_types { use std::string::{Self, String}; use std::vector; use aptos_std::table::{Self, Table}; struct BasicTypes has key { // Integers (unsigned only) small_number: u8, // 0 to 255 medium_number: u64, // 0 to 2^64-1 big_number: u128, // 0 to 2^128-1 huge_number: u256, // 0 to 2^256-1 // Boolean is_active: bool, // Address user_address: address, // Vector (dynamic array) dynamic_array: vector, // String text: String, // Table (like mapping) balances: Table, } // Struct struct User has store, drop { name: String, age: u64, }} ``` ### Structs and Resources [](#structs-and-resources) #### Ethereum (Solidity) [](#ethereum-solidity-3) ``` contract StructsExample { struct Token { string name; uint256 totalSupply; mapping(address => uint256) balances; } Token public token; constructor() { token.name = "MyToken"; token.totalSupply = 1000000; } function transfer(address to, uint256 amount) public { require(token.balances[msg.sender] >= amount, "Insufficient balance"); token.balances[msg.sender] -= amount; token.balances[to] += amount; }} ``` #### Supra Move [](#supra-move-3) ``` module my_address::token { use supra_framework::signer; use aptos_std::table::{Self, Table}; use std::string::String; use std::error; // Resource stored under account struct Token has key { name: String, total_supply: u64, balances: Table, } const E_INSUFFICIENT_BALANCE: u64 = 1; public entry fun initialize(account: &signer, name: String, total_supply: u64) { move_to(account, Token { name, total_supply, balances: table::new(), }); } public entry fun transfer( account: &signer, to: address, amount: u64 ) acquires Token { let from = signer::address_of(account); let token = borrow_global_mut(@my_address); let from_balance = table::borrow_mut(&mut token.balances, from); assert!(*from_balance >= amount, error::invalid_argument(E_INSUFFICIENT_BALANCE)); *from_balance = *from_balance - amount; if (table::contains(&token.balances, to)) { let to_balance = table::borrow_mut(&mut token.balances, to); *to_balance = *to_balance + amount; } else { table::add(&mut token.balances, to, amount); }; }} ``` **Key Differences:** - **Supra Move**: Resources have abilities (`key, store, drop, copy`) - **Ethereum**: Structs are simple data containers - **Supra Move**: Resources ensure linear type safety - **Ethereum**: No built-in protection against double-spending ### Events [](#events) #### Ethereum (Solidity) [](#ethereum-solidity-4) ``` contract Events { event Transfer( address indexed from, address indexed to, uint256 value ); event Approval( address indexed owner, address indexed spender, uint256 value ); function transfer(address to, uint256 amount) public { // Transfer logic... emit Transfer(msg.sender, to, amount); }} ``` #### Supra Move [](#supra-move-4) ``` module my_address::events { use supra_framework::event; use supra_framework::signer; #[event] struct TransferEvent has drop, store { from: address, to: address, value: u64, } #[event] struct ApprovalEvent has drop, store { owner: address, spender: address, value: u64, } public entry fun transfer(account: &signer, to: address, amount: u64) { let from = signer::address_of(account); // Transfer logic... event::emit(TransferEvent { from, to, value: amount, }); }} ``` **Key Differences:** - **Supra Move**: Events are structs with `#[event]` attribute - **Ethereum**: Events are declared with `event` keyword - **Supra Move**: Uses `event::emit()` to emit events - **Ethereum**: Uses `emit` keyword - **Supra Move**: No indexed parameters concept - **Ethereum**: Supports indexed parameters for filtering ### Storage & State Management [](#storage--state-management) #### Ethereum (Solidity) [](#ethereum-solidity-5) ``` contract Storage { // State variables stored in contract storage uint256 private _totalSupply; mapping(address => uint256) private _balances; function updateBalance(address user, uint256 amount) internal { _balances[user] = amount; } function getBalance(address user) public view returns (uint256) { return _balances[user]; }} ``` #### Supra Move [](#supra-move-5) ``` module my_address::storage { use supra_framework::signer; use aptos_std::table::{Self, Table}; struct TokenStorage has key { total_supply: u64, balances: Table, } public entry fun initialize(account: &signer) { move_to(account, TokenStorage { total_supply: 0, balances: table::new(), }); } fun update_balance(storage: &mut TokenStorage, user: address, amount: u64) { if (table::contains(&storage.balances, user)) { *table::borrow_mut(&mut storage.balances, user) = amount; } else { table::add(&mut storage.balances, user, amount); }; } #[view] public fun get_balance(addr: address, user: address): u64 acquires TokenStorage { let storage = borrow_global(addr); if (table::contains(&storage.balances, user)) { *table::borrow(&storage.balances, user) } else { 0 } }} ``` **Key Differences:** - Supra Move: Resources stored under specific account addresses - Ethereum: State stored in contract’s storage slots - Supra Move: Must explicitly declare resource access with `acquires` - Ethereum: Automatic state access ### Testing [](#testing) #### Ethereum (Solidity with Hardhat) [](#ethereum-solidity-with-hardhat) ``` const { expect } = require("chai"); describe("Token", function () { it("Should transfer tokens correctly", async function () { const Token = await ethers.getContractFactory("Token"); const token = await Token.deploy(); await token.transfer(addr1.address, 100); expect(await token.balanceOf(addr1.address)).to.equal(100); });}); ``` #### Supra Move [](#supra-move-6) ``` #[test_only]module my_address::token_tests { use my_address::token; use supra_framework::account; use std::signer; #[test(account = @0x123)] public entry fun test_transfer(account: signer) { let addr = signer::address_of(&account); account::create_account_for_test(addr); token::initialize(&account, string::utf8(b"Test"), 1000); token::transfer(&account, @0x456, 100); assert!(token::get_balance(addr, @0x456) == 100, 1); }} ``` ### Deployment [](#deployment) #### Ethereum [](#ethereum) ``` # Using Hardhatnpx hardhat compilenpx hardhat run scripts/deploy.js --network mainnet ``` #### Supra Move [](#supra-move-7) ``` # Compile and publish modulesupra move tool publish \ --package-dir /path/to/project \ --rpc-url https://rpc-testnet.supra.com ``` ### Account Structure & Transaction Model [](#account-structure--transaction-model) #### Ethereum Account Model [](#ethereum-account-model) ``` // Ethereum accounts have:// - Address (160-bit)// - Balance (single ETH balance)// - Nonce (for transaction ordering)// - Contract code (for contract accounts)// - Storage (key-value store) contract Example { mapping(address => uint256) balances; function transfer(address to, uint256 amount) public { require(balances[msg.sender] >= amount); balances[msg.sender] -= amount; balances[to] += amount; }} ``` #### Supra Move Account Model [](#supra-move-account-model) ``` // Supra accounts have:// - Address (256-bit)// - Sequence number (for transaction ordering)// - Resources (typed data structures)// - Modules (code) module my_address::example { use supra_framework::coin; use supra_framework::supra_coin::SupraCoin; // Each account can hold resources directly public entry fun transfer(from: &signer, to: address, amount: u64) { coin::transfer(from, to, amount); }} ``` ### Recap [](#recap) | **Feature** | **Ethereum/Solidity** | **Supra Move** | | ------------------- | ------------------------------ | ---------------------------------- | | Type System | Dynamic typing, runtime checks | Static typing, compile-time safety | | Resource Management | Manual memory management | Automatic resource lifecycle | | Upgrades | Proxy patterns, complex | Module upgrades, simpler | | State Storage | Contract storage | Account resources | | Safety | Runtime safety | Compile-time + runtime safety | | Arrays | Fixed/dynamic arrays | Vectors | | Mappings | Built-in mappings | Table data structure | | Events | Built-in event system | Struct-based events | | Testing | External frameworks | Built-in testing | --- ## Node Operations ### Source: https://docs.supra.com/network/node # Overview Please note that Node Operation is currently permissioned to select node operators and is not available to the public at this time. Welcome to the Supra Node Operation Program documentation. This resource is designed to guide new and experienced participants through the core principles and technical structure of running a node within the Supra ecosystem. As a node operator, you play a crucial role in supporting Supra’s high-performance Layer 1 network and powering its decentralized oracle infrastructure. Your participation helps ensure transaction finality, oracle data reliability, and the security of smart contract operations across an expanding multi-chain environment. At the heart of Supra’s design is a unique node architecture that combines performance, decentralization, and scalability in a vertical stack. Node operators engage in validating transactions, aggregating data feeds, and contributing to the consensus mechanism—known as Moonshot. Supra’s innovative protocols, paired with its Tribe-Clan hierarchy, ensures that data is processed securely and efficiently. This documentation will walk you through setup, configuration, responsibilities, and rewards. Welcome aboard—your contributions are vital to shaping the future of decentralized finance and Web3 infrastructure. --- ### Source: https://docs.supra.com/network/node/node-operator-faq # Node Operator FAQ ## Onboarding & Setup Yes, you should run all the steps of Round onboarding for Public Testnet on the machine that will act as the validator. Below are the hardware requirements: - **Cores:** 16 to 32 - **RAM:** 64GB - **CPU:** Intel Xeon @ 2.8GHz or higher - **Architecture:** x86/64 - **Disk Type:** SSD - **Minimum Disk Size:** 500GB - **Network Bandwidth:** 2Gbps In your `latest_validator_info.json` file, your derived pool address is the value of `account_address`. Validator Testnet: [Relocating a Supra Validator](https://docs.google.com/document/d/16j8dq7glIf7CjlqC-gM8R-i_Ys2d6YLot_-Y5DTsUsQ/edit?usp=sharing) RPC Testnet: [Move Node to New Server - RPC Testnet](https://docs.google.com/document/d/1ig7uuIXSbnSNHTc3pb3JFdNYDr5sZ99g5E6htNJTSpQ/edit?usp=sharing) ## Staking & Rewards You can view your current stake balance using the following script: ```bash supra move tool view --function-id 0x1::pbo_delegation_pool::get_stake --args address:"$POOL_ADDRESS" address:"$DELEGATOR_ADDRESS" --url "$RPC_URL" ``` Example Response: ```json { "result": ["5854055647855", "0", "0"] } ``` - The **first value** (`5854055647855`) represents your active stake. - The **second value** represents your inactive stake. - The **third value** represents your pending inactive stake. To claim rewards, you need to first unlock your stake and then withdraw your inactive stake. Here are the steps: **Step 1: Unlock Stake Amount:** You need to first check your active stake using the provided script. Once you know your active stake, you can unlock an amount less than or equal to your active stake. Please make sure the `AMOUNT_TO_UNLOCK` is at least `100000000` (1 SUPRA). ```bash #!/bin/bash RPC_URL="https://rpc-mainnet.supra.com/" POOL_ADDRESS="0xdbd2155f2f5aee0e75bcf08b4aaab6f8332baf125623b839c3a3f2280099f27b" # Replace with your pool address AMOUNT_TO_UNLOCK="100000000" # Replace with the amount you want to unlock supra move tool run --function-id 0x1::pbo_delegation_pool::unlock --args address:"$POOL_ADDRESS" u64:"$AMOUNT_TO_UNLOCK" --url "$RPC_URL" ``` **Step 2: Withdraw Inactive Stake Amount** **Note:** This step can only be executed during the next lockup cycle. ```bash #!/bin/bash RPC_URL="https://rpc-mainnet.supra.com/" POOL_ADDRESS="0xdbd2155f2f5aee0e75bcf08b4aaab6f8332baf125623b839c3a3f2280099f27b" # Replace with your pool address AMOUNT_TO_WITHDRAW="100000000" # Replace with the amount you want to withdraw supra move tool run --function-id 0x1::pbo_delegation_pool::withdraw --args address:"$POOL_ADDRESS" u64:"$AMOUNT_TO_WITHDRAW" --url "$RPC_URL" ``` **Important Notes:** - You can only unlock an amount equal to or less than your active stake. - You can only withdraw an amount equal to or less than your inactive stake. - Once you unlock your stake, you must wait for the next lockup cycle before you can withdraw the inactive stake. The smallest unit of SUPRA is **Quants**, where 1 SUPRA = 100,000,000 Quants. You can do this by calling `set_beneficiary_for_operator` to set a beneficiary address for your operator commission. ```bash #!/bin/bash BEN_ADDR=0xabcdef # Replace with the address of the beneficiary RPC_URL="https://rpc-mainnet.supra.com" supra move tool run --function-id 0x1::pbo_delegation_pool::set_beneficiary_for_operator --args address:$BEN_ADDR --url $RPC_URL ``` Replace `$BEN_ADDR` with the address of the beneficiary in the command above. After executing the command above, while the `operator` would still be the address connected to the network as a validator, `$BEN_ADDR` would receive the stake commensurate with the commission earned by the `operator`. Use the steps provided in Q.2 above from the `$BEN_ADDR` profile (with the private key of `$BEN_ADDR`) to unlock/withdraw the stake that was earned as commission. ## Troubleshooting & Issues ```text [2024-10-17T01:51:50.607720Z+00:00] WARN moonshot::core: Timeout reached for View { epoch_id: EpochId { chain_id: 6, epoch: 195 }, round: 2306 } [2024-10-17T01:51:55.608661Z+00:00] WARN moonshot::core: Timeout reached for View { epoch_id: EpochId { chain_id: 6, epoch: 195 }, round: 2306 } [2024-10-17T01:52:00.610197Z+00:00] WARN moonshot::core: Timeout reached for View { epoch_id: EpochId { chain_id: 6, epoch: 195 }, round: 2306 } ``` If the epoch and round are stuck, you will need to restart the network using a snapshot. Please follow the instructions provided in the 'To Update Your RPC Node' section in this document: [RPC Operator Manual (General)](https://docs.google.com/document/d/1ig7uuIXSbnSNHTc3pb3JFdNYDr5sZ99g5E6htNJTSpQ/edit?tab=t.0#heading=h.ao60n777ejup) ```text thread 'main' panicked at /home/ubuntu/smr-moonshot/consensus/node/src/bftnode.rs:57:14: fail to create rocksdb: DBError(Error { message: "Corruption: Corruption: IO error: No such file or directory: While open a file for random read: configs/smr_storage/000364.ldb: No such file or directory in file configs/smr_storage/MANIFEST-000369" }) note: run with RUST_BACKTRACE=1 environment variable to display a backtrace ``` If you see the "Corruption: IO error," restart the network using the snapshot as mentioned in the previous solution. If the issue persists, ensure your environment is properly set up and your data paths are correct. If your IP is not whitelisted, please provide your IPv4 to the Supra team on Discord to get access to the Grafana script. 1. Export the API key with: ```bash export api_key=AIzaSyD2Byf2_yWYngvHnv6Ib7V6C2EpHY3LL0E ``` 2. Run the installation script for your distribution: ```bash sudo -E ./nodeops-monitoring-telegraf-centos.sh # For CentOS ``` or ```bash sudo -E ./nodeops-monitoring-telegraf.sh # For other distributions ``` ```text [2024-11-06T08:20:47.531043Z+00:00] ERROR sop2p::behaviour: Subscription execution failed: "Closed(..)" [2024-11-06T08:20:47.531922Z+00:00] ERROR sop2p::behaviour: Subscription execution failed: "Closed(..)" [2024-11-06T08:20:47.531961Z+00:00] ERROR sop2p::behaviour: Subscription execution failed: "Closed(..)" ``` This issue can be resolved by increasing the system `ulimit` for the number of open files. Follow the steps below: 1. Increase the shell file descriptor limit: ```bash ulimit -n 65535 ``` 2. Increase the limit for the user by editing `/etc/security/limits.conf`: ```text soft nofile 65535 hard nofile 65535 ``` 3. Update system limits in `/etc/sysctl.conf`: ```bash net.core.somaxconn=65535 sudo sysctl -p ``` No, your tokens were not lost. If you're using an operator account, unlocked tokens may be automatically withdrawn as part of the `synchronize_delegation_pool` function. This internal mechanism triggers `execute_pending_withdrawal` automatically for operator accounts once the next lockup cycle has begun. This means: - You do not need to manually trigger a withdrawal for operator accounts. - The withdrawal may be initiated by any transaction, including from other accounts, that calls `synchronize_delegation_pool`. - The unlocked tokens are sent to the operator's account and should be visible in your wallet balance. If the transaction is not visible in SupraScan, it might be a UI delay or an indexing issue. You can verify the token transfer using the RPC endpoint directly or the following CLI command: ```bash ./supra move tool view --function-id 0x1::coin::balance --type-args 0x1::supra_coin::SupraCoin --args address: ``` Replace `` with your actual wallet address to confirm your SUPRA balance. ## General Information & Frequently Asked Questions The differences in stake values could be due to various factors: - All operators received **55M SUPRA** from the Foundation at Genesis. - Additional rewards generated since then are added directly into each operator's delegation pool. - If an operator has withdrawn some of their rewards, their stake may be lower. - If another entity besides the Foundation has delegated a stake to an operator, that could also account for the differences. The Foundation keeps 55M SUPRA locked to ensure that validators continue to function properly. The rest of the stake, which is earned as a reward, can be unlocked or unstaked. However, you cannot unlock the 55M SUPRA delegated by the Foundation. After unstaking, you must wait for the next lockup cycle, which is set to 48 hours, before you can withdraw your inactive stake. Earnings per node are based on performance. However, since we do not currently record failed proposals, the reward calculations are based on the number of successful proposals. We plan to track performance metrics in the future, which will affect rewards. You can find your delegator address private key by running the following command: ```bash ./supra profile list --reveal-secrets ``` The output `ed25519_secret_key` is the key to your operator's Move account. The function `0x1::pbo_delegation_pool::get_stake` returns a tuple with three values: active, inactive, and pending inactive stakes. - **Active stake:** This is your current active stake. - **Inactive stake:** This is the stake that has been unlocked but is not withdrawn yet. - **Pending inactive stake:** This is the stake that has been unlocked and is awaiting the end of the lockup period before it becomes inactive. The lockup duration is **48 hours**, which is configurable via governance. No, you can only unlock an amount equal to or less than your active stake. Please report any issues if you find you can unlock more than your active stake. Important: Please make sure you read and understand [Terms of Use](https://supra.com/terms-of-use/) before start using Supra products and services. ### Source: https://docs.supra.com/network/node/node-upgrade-guide-mainnet # Node Upgrade Guide - Mainnet You can follow the step-by-step process for upgrading your Supra Validator Node to version v9.1.10 with minimal downtime. Keeping your Supra Validator Node updated makes your system secure, stable, and compatible with the latest features and improvements. ### Source: https://docs.supra.com/network/node/node-upgrade-guide-mainnet/upgrade-checklist-pre-upgrade-verification # Upgrade Checklist (Pre-Upgrade Verification) Before upgrading, please complete the following steps. ### Backup Verification - Backup your CLI profiles, validator keys. - Store your backups securely using a cold storage solution. ### System Resource Check Please make sure your system meets the following minimum hardware requirements: | Component | Minimum Requirements | | ---------------- | --------------------------------- | | CPU | Intel Xeon or AMD EPYC @ 3.2 GHz+ | | RAM | 64 GB | | Disk Type | SSD | | Disk Space | Minimum 500 GB | | Network Speed | 2 Gbps or more | | Architecture | x86/64 | | Operating System | Linux(Ubuntu 22.04 recommended) | ### Network & Connectivity Check The node requires open ports to communicate with the blockchain network. | Network | Required Port | | ------- | ------------- | | Mainnet | 30000 | ### Source: https://docs.supra.com/network/node/node-upgrade-guide-mainnet/download-the-node-management-scripts # Download the Node Management Scripts Before proceeding with the upgrade, download the latest node management scripts. To download the script, run the following command: ``` wget -O install_management_scripts.sh https://raw.githubusercontent.com/Entropy-Foundation/supra-nodeops-data/refs/heads/master/node_management/install_management_scripts.sh ``` Then make it executable by running the following command: ``` chmod +x ./install_management_scripts.sh ``` Now run the script using the following command: ``` ./install_management_scripts.sh ``` This installs the following scripts: | `manage_supra_nodes.sh` | This handles node updates, syncing, and restarts. | | ----------------------- | ---------------------------------------------------------------------- | | `migrate_to_vX.X.X.sh` | This is a migration script for upgrading the database and CLI profile. | ### Source: https://docs.supra.com/network/node/node-upgrade-guide-mainnet/update-the-supra-node-docker-image # Update the Supra Node Docker Image The following commands will enable you to update the Docker image for your Validator Node and RPC node. For Validator Node use the command below: ``` ./manage_supra_nodes.sh update validator v9.1.10 ``` For RPC Nodes use the command below: ``` ./manage_supra_nodes.sh update rpc v9.1.13 ``` ### Source: https://docs.supra.com/network/node/node-upgrade-guide-mainnet/download-the-node-management-scripts-for-rpc # Download the Node Management Scripts for RPC Before proceeding with the upgrade, download the latest node management scripts. Note: For successful snapshot downloads, pls ensure your hard disk has at least 2TB of space To download the script, run the following command: ``` wget https://mainnet-data.supra.com/configs/rpc_migration.sh ``` Then make it executable by running the following command: ``` chmod +x rpc_migration.sh ``` Now run the script using the following command: ``` ./rpc_migration.sh ``` ### Source: https://docs.supra.com/network/node/node-upgrade-guide-mainnet/starting-the-supra-nodes # Starting the Supra Nodes After migration, you can restart the node. To restart your Validator Nodes run the following command: ``` ./manage_supra_nodes.sh start validator ``` To restart your RPC Nodes run the following command: ``` ./manage_supra_nodes.sh start rpc ``` ### Source: https://docs.supra.com/network/node/node-upgrade-guide-mainnet/monitor-node-synchronization # Monitor Node Synchronization ## Monitoring Validator Nodes You can follow the steps below to Monitor your Validator Node. ### Monitor the height of the committed blockchain Immediately after starting your node, run the following command to identify the block that your node is resuming from: ``` $ tail -f /supra.log | grep 'Resuming at' ``` After a few seconds (or up to a couple of minutes if the database is very large) a log entry should output that includes information about the last committed block present in the node's database. Take note of the height of this block. After recording this height, run the following command to monitor the synchronization process: ``` $ tail -f /supra.log | grep -i -e "Processing new Commit QC" -e "Successfully finalized" -e "Committing" ``` You should initially see mostly `Successfully finalized` messages as your node syncs missing blocks from its peers. Subsequently, they should mostly see `Processing new Commit QC` messages as your node syncs the corresponding certificates. Once the height of the `Processing new Commit QC` entry reaches the height of the last committed block, you should start to see Committing logs. This sequence may repeat a few times before the node finally catches up to the head of the chain, which you can tell by comparing the height of the Committing logs to the heights reported by SupraScan. We realise that this process is quite complicated and are working on creating a script to automate it. The output of the above log should look similar to the below screenshot when your node is in sync. Note the increasing heights. ![](https://lh7-rt.googleusercontent.com/docsz/AD_4nXfoGU1w6tYhbFwRUTV1L2BaQVEzpyGUALhDpL_AJsXAld11Ld6opK5kWVED9hKl10RHHfnxgetij9Y84RwgfSGiN8UmgirsUNVNMtILrSZ1sx_uZT_C1tn87ia1DNSmpd6VVMpabA?key=77OlmW1ix_9-tCfL7TkgI1Vz) ### Check if your node is proposing new blocks Your node should start proposing as soon as it enters the current consensus epoch. There are two different commands you can use to check if your node is proposing: ``` $ tail -f /supra.log | grep "Proposing" ``` and ``` $ grep "Proposing" /* ``` The first command will pick up new proposal log entries as they are written, so may take some time to produce any output, and will only produce output if your node is currently proposing. This command will need to be restarted each time the log is rotated, so please check the timestamps of the log files included in ``to get an estimate for how frequently you will need to restart the command. The second command will show all proposal records that are contained in your node's logs. Check the timestamps of these entries (if there are any entries), to see if your node has proposed recently. ## Monitoring RPC Nodes For Monitoring RPC Nodes, You can run the following command: ``` tail -f smr_node_logs/rpc_node.log | grep 'Block height' ``` And then ensure that: 1. Output is shown 2. The block heights reported in the log entries are increasing. ### Source: https://docs.supra.com/network/node/node-upgrade-guide-mainnet/cli-improvements # CLI Improvements The following changes have been made in **CLI v0.5.0**: | Legacy Command | New Command / Syntax | | ---------------- | ----------------------------------- | | `key` | `profile` | | `generate-profile` | `profile new -i` | | `import-profile` | `profile new -i` (interactive import) | | `--url` | `--rpc-url` | \ **Note:** * **You should begin using `--rpc-url` in all your CLI commands.** ### RPC API Enhancements * Clients are required to migrate to **Version 3 RPC APIs** as soon as possible. * **Version 1 APIs will be deprecated in a future release.** ### Source: https://docs.supra.com/network/node/node-upgrade-guide-mainnet/recovery-guide # Recovery Guide ### Syncing the Latest Snapshot First, stop your node: ``` docker stop ``` Then sync the latest snapshot from your selected snapshot source.You wish to sync from the default source for your node's type, version, and network. For validators, run: ``` ./manage_supra_nodes.sh sync --exact-timestamps --snapshot-source mainnet-validator-snapshot validator ``` Start the Validator node manually: ``` ./manage_supra_nodes.sh start validator ``` And for RPC nodes, run: ``` ./manage_supra_nodes.sh sync --exact-timestamps --snapshot-source mainnet-archive-snapshot rpc ``` Start RPC node manually: ``` ./manage_supra_nodes.sh start rpc ``` After the command completes, [restart](https://github.com/Supra-Labs/documentation/blob/main/node/node-upgrade-guide-mainnet/broken-reference/README.md) your node and [monitor](/network/node/node-upgrade-guide-mainnet/monitor-node-synchronization) its logs to ensure that it is syncing the latest blocks correctly. If your node produces an error, first refer to the [Troubleshooting](#troubleshooting-guide) section below, then, if your issue cannot be resolved by the instructions provided there, reach out to [Supra Support](/network/node/creating-supradesk-tickets-via-email). ### Source: https://docs.supra.com/network/node/node-upgrade-guide-testnet # Node Upgrade Guide - Testnet You can follow the step-by-step process for upgrading your Supra Validator Node to version 9.0.12 with minimal downtime. Keeping your Supra Validator Node updated makes your system secure, stable, and compatible with the latest features and improvements. ### Source: https://docs.supra.com/network/node/node-upgrade-guide-testnet/upgrade-checklist-pre-upgrade-verification # Upgrade Checklist (Pre-Upgrade Verification) Before upgrading, please complete the following steps. ### Backup Verification - Backup your CLI profiles, validator keys. - Store your backups securely using a cold storage solution. ### System Resource Check Please make sure your system meets the following minimum hardware requirements: | Component | Minimum Requirements | | ---------------- | --------------------------------- | | CPU | Intel Xeon or AMD EPYC @ 3.2 GHz+ | | RAM | 64 GB | | Disk Type | SSD | | Disk Space | Minimum 2 TB | | Network Speed | 2 Gbps or more | | Architecture | x86/64 | | Operating System | Linux(Ubuntu 22.04 recommended) | ### Network & Connectivity Check The node requires open ports to communicate with the blockchain network. | Network | Required Port | | ------- | ------------- | | testnet | 26000 | | Mainnet | 30000 | ### Source: https://docs.supra.com/network/node/node-upgrade-guide-testnet/download-the-node-management-scripts # Download the Node Management Scripts Before proceeding with the upgrade, download the latest node management scripts. To download the script, run the following command: ``` wget -O install_management_scripts.sh https://raw.githubusercontent.com/Entropy-Foundation/supra-nodeops-data/refs/heads/master/node_management/install_management_scripts.sh ``` Then make it executable by running the following command: ``` chmod +x ./install_management_scripts.sh ``` Now run the script using the following command: ``` ./install_management_scripts.sh ``` This installs the following scripts: | `manage_supra_nodes.sh` | This handles node updates, syncing, and restarts. | | ----------------------- | ---------------------------------------------------------------------- | | `migrate_to_v8.0.2.sh` | This is a migration script for upgrading the database and CLI profile. | | `migrate_to_v9.0.x.sh` | This is a migration script for upgrading the database and CLI profile. | **Note:** * **The migrate_to_8.0.2.sh is kept, as mainnet is yet to be upgraded to v8.** ### Source: https://docs.supra.com/network/node/node-upgrade-guide-testnet/update-the-supra-node-docker-image # Update the Supra Node Docker Image The following commands will enable you to update the Docker image for your Validator Node and RPC node. For Validator Node use the command below: ``` ./manage_supra_nodes.sh update validator v9.x.x ``` ### Source: https://docs.supra.com/network/node/node-upgrade-guide-testnet/validator-migration-to-9.x.x # Validator Migration to 9.x.x To migrate your Validator Node, run the following command: ``` ./migrate_to_v9.x.x.sh validator ``` **Note:** - **The migration process for Validator Nodes takes 15-20 minutes.** ### Source: https://docs.supra.com/network/node/node-upgrade-guide-testnet/rpc-migration-to-9.x.x # RPC Migration to 9.x.x Run the following command to migrate the database and configuration files of your RPC node to the latest version. The database migration requires syncing a snapshot that we have already updated and may take several hours, so you may want to consider running the process in the background. ``` ./migrate_to_v9.x.x.sh rpc ``` After the script completes: 1. Transfer your custom settings from `config_v8.0.x.toml` to `config.toml.` 2. Enter the updated Docker container and attempt to start the node interactively: ``` docker exec -it /bin/bash ./rpc_node start ``` Wait for a couple of minutes to see if the process terminates with an error. If it does, then please contact [Supra Support](../creating-supradesk-tickets-via-email) and share a screenshot or text copy of the error. If no error is shown, stop the node again and follow the normal steps to start it again Finally, follow the steps in the[ Monitor Node Synchronization article](../node-upgrade-guide-mainnet/monitor-node-synchronization) to check if your node is in sync. ### Source: https://docs.supra.com/network/node/node-upgrade-guide-testnet/monitor-node-synchronization # Monitor Node Synchronization ## Monitoring Validator Nodes You can follow the steps below to Monitor your Validator Node. ### Monitor the height of the committed blockchain Immediately after starting your node, run the following command to identify the block that your node is resuming from: ``` $ tail -f /supra.log | grep 'Resuming at' ``` After a few seconds (or up to a couple of minutes if the database is very large) a log entry should output that includes information about the last committed block present in the node's database. Take note of the height of this block. After recording this height, run the following command to monitor the synchronization process: ``` $ tail -f /supra.log | grep -i -e "Processing new Commit QC" -e "Successfully finalized" -e "Committing" ``` You should initially see mostly `Successfully finalized` messages as your node syncs missing blocks from its peers. Subsequently, they should mostly see `Processing new Commit QC` messages as your node syncs the corresponding certificates. Once the height of the `Processing new Commit QC` entry reaches the height of the last committed block, you should start to see Committing logs. This sequence may repeat a few times before the node finally catches up to the head of the chain, which you can tell by comparing the height of the Committing logs to the heights reported by SupraScan. We realise that this process is quite complicated and are working on creating a script to automate it. The output of the above log should look similar to the below screenshot when your node is in sync. Note the increasing heights. ![](https://lh7-rt.googleusercontent.com/docsz/AD_4nXfoGU1w6tYhbFwRUTV1L2BaQVEzpyGUALhDpL_AJsXAld11Ld6opK5kWVED9hKl10RHHfnxgetij9Y84RwgfSGiN8UmgirsUNVNMtILrSZ1sx_uZT_C1tn87ia1DNSmpd6VVMpabA?key=77OlmW1ix_9-tCfL7TkgI1Vz) ### Check if your node is proposing new blocks Your node should start proposing as soon as it enters the current consensus epoch. There are two different commands you can use to check if your node is proposing: ``` $ tail -f /supra.log | grep "Proposing" ``` and ``` $ grep "Proposing" /* ``` The first command will pick up new proposal log entries as they are written, so may take some time to produce any output, and will only produce output if your node is currently proposing. This command will need to be restarted each time the log is rotated, so please check the timestamps of the log files included in ``to get an estimate for how frequently you will need to restart the command. The second command will show all proposal records that are contained in your node's logs. Check the timestamps of these entries (if there are any entries), to see if your node has proposed recently. ## Monitoring RPC Nodes For Monitoring RPC Nodes, You can run the following command: ``` tail -f smr_node_logs/rpc_node.log | grep 'Block height' ``` And then ensure that: 1. Output is shown 2. The block heights reported in the log entries are increasing. ### Source: https://docs.supra.com/network/node/node-upgrade-guide-testnet/cli-improvements # CLI Improvements The following changes have been made in **CLI v0.5.0**: | Legacy Command | New Command / Syntax | | ---------------- | ----------------------------------- | | `key` | `profile` | | `generate-profile` | `profile new -i` | | `import-profile` | `profile new -i` (interactive import) | | `--url` | `--rpc-url` | \ **Note:** * **You should begin using `--rpc-url` in all your CLI commands.** ### RPC API Enhancements * Clients are required to migrate to **Version 3 RPC APIs** as soon as possible. * **Version 1 APIs will be deprecated in a future release.** ### Source: https://docs.supra.com/network/node/node-upgrade-guide-testnet/recovery-guide # Recovery Guide If your node falls too far behind the rest of the network or its database becomes corrupted then you will need to recover it from the latest state snapshot. The Supra Foundation maintains the following publicly accessible snapshots for each production network: #### Testnet | **Node Type** | **Scope** | **Version** | **Snapshot Source** | **Default** | | ------------- | --------------------- | ----------- | ----------------------------------------------------------- | ----------- | | RPC | Full Historical State | v8.0 | testnet-snapshot | Y | | | Full Historical State | v9.0 | testnet-archive-snapshot | | | Pruned RPC | Latest 1008 Epochs¹ | Coming Soon | Coming Soon | Y | | Validator | Latest 84 Epochs² | v9.0 | testnet-validator-snapshot (current default for validators) | Y | ¹ ≈ 3 months ² ≈ 1 week #### Mainnet | **Node Type** | **Scope** | **Version** | **Snapshot Source** | **Default** | | ------------- | --------------------- | ----------- | ------------------- | ----------- | | RPC | Full Historical State | v7.1 | mainnet | Y | | Pruned RPC | Latest 1008 Epochs¹ | Coming Soon | Coming Soon | Y | | Validator³ | Latest 84 Epochs² | Coming Soon | Coming Soon | Y | \ ¹ ≈ 3 months ² ≈ 1 week ³ Validators can be synced from RPC snapshots. Use the \`mainnet\` snapshot source until validator-specific snapshots are available. The `manage_supra_nodes.sh sync` command can be used to retrieve the latest snapshot. This command currently defaults to the `testnet-snapshot` bucket for testnet RPC nodes and `testnet-validator-snapshot` for testnet validators, and the `mainnet` bucket for both types of mainnet nodes. A specific bucket can be specified via the `--snapshot-source` optional argument. After selecting the snapshot source that is relevant to your node’s version and the network that it is participating in, follow the steps below to sync your node. ### Syncing the Latest Snapshot First, stop your node: ``` docker stop "$CONTAINER_NAME" ``` Then sync the latest snapshot from your selected snapshot source. You can omit the `--snapshot-source` optional parameter if you wish to sync from the default source for the type, version and network of your node. For validators, run: ``` ./manage_supra_nodes.sh sync --snapshot-source validator ``` And for RPC nodes, run: ``` ./manage_supra_nodes.sh sync --snapshot-source rpc ``` After the command completes, restart your node and [monitor](../node-upgrade-guide-testnet/monitor-node-synchronization) its logs to ensure that it is syncing the latest blocks correctly. If your node produces an error, first refer to the [Troubleshooting](recovery-guide.md#troubleshooting-guide) section below, then, if your issue cannot be resolved by the instructions provided there, reach out to [Supra Support](../creating-supradesk-tickets-via-email). ## Troubleshooting Guide ### Resolving Database Corruption Errors The sync script will occasionally leave the database in an inconsistent state after terminating. You will see an error similar to the below upon starting your node when this happens: ``` RpcNode error: Store error: Database Change error: DBError{Error { message: "Corruption:IO error: No such file or directory: ./configs/rpc_store/453665.sst ./configs/rpc_store/MANIFEST-446443 may be corrupted."}} ``` This can generally be resolved by repeating the sync with the addition of the `--exact-timestamps` optional argument. This argument will cause the script to perform a more thorough sync that will retrieve all files from the remote snapshot that have last-modified timestamps that differ from the timestamps of the corresponding local files. This will generally take longer than a normal sync. It will also continue to sync the same files if run repeatedly due to a limitation in the third-party tools that we rely on for this process. Accordingly, we do not recommend repeatedly syncing with this argument active. ``` ./manage_supra_nodes.sh sync --exact-timestamps --snapshot-source ``` Should the error persist, try a standard sync (i.e. without `--exact-timestamps`) one more time. This should now complete quickly. ``` ./manage_supra_nodes.sh sync --snapshot-source ``` If the error still persists after the final sync, please contact[ Supra Support](../creating-supradesk-tickets-via-email). ### Source: https://docs.supra.com/network/node/node-relocation-guide # Node Relocation Guide 1. You have an existing Supra Validator running in either Testnet or Mainnet. We will refer to the machine that is currently running this Validator as the “old instance”. 2. You have provisioned the machine that you want to transfer your Validator to. We will refer to this machine as the “new instance” ### Source: https://docs.supra.com/network/node/node-relocation-guide/summary # Summary 1. Copy your Supra configuration files from the old instance to the new instance. These files are located in SUPRA_HOME and include: * Your Operator CLI profile and the following: ``` smr_public_key.json smr_secret_key.pem ``` * Your Node Identity files: ``` latest_validator_info.json node_identity.pem validator_public_identity.toml ``` * The TLS files for the connection between your Validator and RPC nodes: ``` ca_certificate.pem server_supra_certificate.pem server_supra_key.pem ``` * The genesis configuration files: ``` enesis.blob genesis_configs.json supra_committees.json ``` * The Validator configuration file: ``` smr_settings.toml ``` * Optionally, copy the recent history of your validator. These files may be very large and are not required for your validator to function correctly. ``` supra_history supra_node_logs ``` * Create a Docker Container from the latest Supra Validator Docker Image for the environment that you are targeting (Testnet or Mainnet), on the new instance. * Sync the latest database snapshot to the new instance. The sync process is diff-based, so performing this sync before updating the network address of your Validator and syncing again, will enable it to rejoin the network much sooner once you update the network address. * If you are using the same DNS name as the network address of your new validator. 1. Update the IP address of the DNS record to that of the new instance. 2. Stop the Validator running on the old instance. * If you are using an IP address or a new DNS name as the network address of your new validator: 1. Rotate the network address of your Validator using the Supra CLI. This update will be applied when the next epoch begins. 2. Wait for the next epoch to begin. 3. Stop the Validator running on the old instance. 4. Wait for the first state snapshot to be taken after the new epoch begins. Snapshots are taken every half hour. 5. Sync the latest database snapshot to the new instance. 6. Start the Validator on the new instance. ### Source: https://docs.supra.com/network/node/node-relocation-guide/step-1 # Step 1 ## Generate and Store the SSH Key Generate an SSH Key Pair on the Old Instance: * Run the following command on the old instance to generate an SSH key pair (if it doesn’t already exist) on the new instance. ``` ssh-keygen -t rsa -b 4096 -f ~/.ssh/id_rsa -C "your_email@example.com" ``` * Copy the SSH Public Key to the New Instance: Use the following command to transfer the public key to the new instance. ``` ssh-copy-id -i ~/.ssh/id_rsa.pub username@new_instance_ip ``` * Remove the Public Key from the New Instance (Post-Termination of Old Node): 1. Once the old instance is terminated, remove its public key from the `authorized_keys` file on the new instance to revoke access. 2. Delete the corresponding key entry and save the file. ### Source: https://docs.supra.com/network/node/node-relocation-guide/step-2 # Step 2 ## Copy Files from the Old Instance ### Define Variables ``` # SSH Private Key Path SSH_KEY_PATH="ssh_private_key_path" # The path to your SSH private key used for secure authentication. # This key allows passwordless login to the remote instance. # Example: `~/.ssh/id_rsa` # Supra Validator Home Directory SUPRA_HOME="path_of_supra_home_folder" # The directory where all Supra Validator configuration, key files, and logs are stored. # Example: `/home/ubuntu/supra` # Remote Server Username REMOTE_USER="username" # The username used for SSH login on the remote instance. # Example: `ubuntu` # Remote Server IP Address REMOTE_IP="your_remote_ip" # The IP address of the remote machine where the validator is being migrated. # Example: `192.168.1.100` ``` ### Transfer Essential Files using rsync ``` # Replace "$SUPRA_HOME/validator_identity.pem" with "$SUPRA_HOME/node_identity.pem" in the below command if your existing node is running v8.0.2 or higher. rsync -varzh -e "ssh -i \"$SSH_KEY_PATH\"" \ "$SUPRA_HOME/smr_public_key.json" \ "$SUPRA_HOME/smr_secret_key.pem" \ "$SUPRA_HOME/latest_validator_info.json" \ "$SUPRA_HOME/validator_identity.pem" \ "$SUPRA_HOME/validator_public_identity.toml" \ "$SUPRA_HOME/ca_certificate.pem" \ "$SUPRA_HOME/server_supra_certificate.pem" \ "$SUPRA_HOME/server_supra_key.pem" \ "$SUPRA_HOME/genesis.blob" \ "$SUPRA_HOME/genesis_configs.json" \ "$SUPRA_HOME/supra_committees.json" \ "$SUPRA_HOME/smr_settings.toml" \ "$REMOTE_USER@$REMOTE_IP:$SUPRA_HOME/" ``` **Note:** - **You can use other tools to transfer the data. Please keep a backup of the files.** - **If you want to keep a recent history of your validator node then you copy the remaining files and folder mentioned below.** **a. `supra_history`** **b. `Supra_node_logs`** ### Optional: Copy Validator History Files ``` rsync -varzh -e "ssh -i \$SSH_KEY_PATH\"" \ "$SUPRA_HOME/supra_history"\ "$SUPRA_HOME/supra_node_logs"\ "$REMOTE_USER@$REMOTE_IP:$SUPRA_HOME/" ``` **Note:** - **You can use other tools to transfer the data from the old to the new Instance. Please keep a backup of the files somewhere.** ### Source: https://docs.supra.com/network/node/node-relocation-guide/step-3 # Step 3 ## Setting Up a Docker Container on the New Instance Execute the following Docker command to initialize the container with the latest Supra Validator Docker image for your target environment on the new instance. ### Latest Validator Docker Images: ``` # Testnet asia-docker.pkg.dev/supra-devnet-misc/supra-testnet/validator-node:v8.0.2 # Mainnet asia-docker.pkg.dev/supra-devnet-misc/supra-mainnet/validator-node:v7.1.7 ``` ### Define Variables ``` # Define Network Type NETWORK="testnet" # Change to "mainnet" if running on mainnet # Specify the IP address. IP_ADDRESS="your_ip_address" # Determine the container name based on network type if [ "$NETWORK" = "mainnet" ]; then CONTAINER_NAME="supra_mainnet_$IP_ADDRESS" else CONTAINER_NAME="supra_$IP_ADDRESS" fi ``` ### Deploy the Container ``` docker run \ --name "$CONTAINER_NAME" \ -v ./supra_configs:/supra/configs \ -e "SUPRA_HOME=/supra/configs" \ -e "SUPRA_LOG_DIR=/supra/configs/supra_node_logs" \ -e "SUPRA_MAX_LOG_FILE_SIZE=4000000" \ -e "SUPRA_MAX_UNCOMPRESSED_LOGS=5" \ -e "SUPRA_MAX_LOG_FILES=20" \ --net=host \ -itd "$LATEST_DOCKER_IMAGE" ``` ### Source: https://docs.supra.com/network/node/node-relocation-guide/step-4 # Step 4 ## Sync the latest snapshot on the new instance before updating the validator address 1. Please sync the latest snapshot before updating your validator's network address. 2. Download the snapshot data from the Supra Validator node in your target environment on the new instance. 3. Include the `smr_storage folder` and ensure the snapshot matches the new epoch data. ### Install rclone ``` curl https://rclone.org/install.sh | sudo bash mkdir -p ~/.config/rclone/ touch ~/.config/rclone/rclone.conf ``` ### Define Variables ``` SUPRA_HOME="path_of_supra_home_folder" ``` #### Testnet Run the following command to configure rclone, which allows secure transfer and synchronization of files between your system and remote storage. ``` cat <> ~/.config/rclone/rclone.conf [cloudflare-r2] type = s3 provider = Cloudflare access_key_id = 229502d7eedd0007640348c057869c90 secret_access_key = 799d15f4fd23c57cd0f182f2ab85a19d885887d745e2391975bb27853e2db949 region = auto endpoint = https://4ecc77f16aaa2e53317a19267e3034a4.r2.cloudflarestorage.com acl = private no_check_bucket = true EOF ``` Execute the following command to download the snapshot for the new instance. #### Sync Testnet Snapshot ``` rclone sync cloudflare-r2:testnet-snapshot/snapshots/store "$SUPRA_HOME/smr_storage/" --progress ``` ### Mainnet ``` cat <> ~/.config/rclone/rclone.conf [cloudflare-r2] type = s3 provider = Cloudflare access_key_id = c64bed98a85ccd3197169bf7363ce94f secret_access_key = 0b7f15dbeef4ebe871ee8ce483e3fc8bab97be0da6a362b2c4d80f020cae9df7 region = auto endpoint = https://4ecc77f16aaa2e53317a19267e3034a4.r2.cloudflarestorage.com acl = private no_check_bucket = true EOF ``` Execute the following command to download the snapshot for the new instance. ### Sync Mainnet Snapshot ``` rclone sync cloudflare-r2:mainnet-snapshot/snapshots/store "$SUPRA_HOME/smr_storage/" --progress ``` **Note:** - **We need to verify if the snapshot data has been fully downloaded into \`smr_storage\` for the `mainnet` or `Testnet`** - **Verification: Run the clone command multiple times until you observe that the downloaded data is zero bytes.** - **This will allow your validator to rejoin the network more quickly once the address update is complete, as the sync process will ensure that it has the latest data before the update.** ### Source: https://docs.supra.com/network/node/node-relocation-guide/step-5 # Step 5 ## Using the same DNS name If you are utilizing the same DNS name for your new instance: 1. Update the DNS record with the IP address of the new instance. 2. Stop the supra validator node on the old instance. ``` pkill supra ``` Note: You can skip Step 6 and proceed directly to Step 7. ### Source: https://docs.supra.com/network/node/node-relocation-guide/step-6 # Step 6 ## Using a different DNS name or an IP address If you are using a different DNS name or IP address, follow the steps outlined below on the new instance: ### Retrieve the account address of your validator’s delegation pool: Find the value of the account_address field in the `latest_validator_info.json` file. This is the address of the delegation pool that is associated with your validator. Use it to set the `DELEGATION_POOL_ADDRESS` variable in the following command. ### Rotate the Network Address. Run the following command on the new instance to rotate the network address of your validator. #### Define Variables ``` # Define Network Type NETWORK="testnet" # Change to "mainnet" if running on mainnet # Specify the IP address. IP_ADDRESS="your_ip_address" # New Validator Node Address (IP or DNS) NEW_ADDRESS="your_ip_or_dns" # The new instance's address where the validator will be migrated. # This can be either an IP address (e.g., 192.168.1.100) or a DNS name (e.g., validator.example.com) # Operator Profile Name PROFILE_NAME="your_profile_name" # The name of the CLI profile that contains the operator's account address. # Retrieve this by running on v8.0.2: `supra profile -l`. # RPC Endpoint RPC_URL="your_rpc_url" # The RPC URL for network communication. # Use the appropriate endpoint for testnet or mainnet. # Delegation Pool Address DELEGATION_POOL_ADDRESS="your_delegation_pool_address" # The delegation pool address associated with your validator. # Determine the container name based on network type if [ "$NETWORK" = "mainnet" ]; then CONTAINER_NAME="supra_mainnet_$IP_ADDRESS" else CONTAINER_NAME="supra_$IP_ADDRESS" fi ``` #### Command to rotate the network address with a new IP address (If changing IP Address) ``` docker exec -it "$CONTAINER_NAME" /supra/supra node rotate-network-address \ --profile "$PROFILE_NAME" --url "$RPC_URL" -s "$NEW_ADDRESS":25000 \ --delegation-pool-address "$DELEGATION_POOL_ADDRESS" ``` **Note:** - For those who have upgraded to the latest version, v8.0.2, please use the below command to rotate the network address with a new IP address (If changing IP Address) ``` docker exec -it "$CONTAINER_NAME" /supra/supra node rotate-network-address \ --profile "$PROFILE_NAME" --rpc-url "$RPC_URL" -s "$NEW_ADDRESS":25000 \ --delegation-pool-address "$DELEGATION_POOL_ADDRESS" ``` #### Command to rotate the network address with a new DNS name (If changing DNS Name) ``` docker exec -it "$CONTAINER_NAME" /supra/supra node rotate-network-address \ --profile "$PROFILE_NAME" --url "$RPC_URL" -d "$NEW_ADDRESS":25000 \ --delegation-pool-address "$DELEGATION_POOL_ADDRESS" ``` **Note:** - For those who have upgraded to the latest version, v8.0.2, please use the command to rotate the network address with a new DNS name (If changing DNS Name). ``` docker exec -it "$CONTAINER_NAME" /supra/supra node rotate-network-address \ --profile "$PROFILE_NAME" --rpc-url "$RPC_URL" -d "$NEW_ADDRESS":25000 \ --delegation-pool-address "$DELEGATION_POOL_ADDRESS" ``` \ The change will take effect at the start of the next epoch, so wait for it to begin. After the new epoch begins, stop the supra validator node running on the old instance. ``` pkill supra ``` **Note:** - **We must wait until the current epoch ends after completing the transaction.** ### Source: https://docs.supra.com/network/node/node-relocation-guide/step-7 # Step 7 ## Restore from the Latest Snapshot and Add in smr_storage * Sync the latest snapshot for your target environment to the new instance using the rclone commands from Step 4. ### Source: https://docs.supra.com/network/node/node-relocation-guide/step-8 # Step 8 ## Start the Supra Validator Node Run the following command to start the Supra Validator Node for your target environment on the new instance. ### Define Variables ``` # Define Network Type NETWORK="testnet" # Change to "mainnet" if running on mainnet # Specify the IP address. IP_ADDRESS="your_ip_address" # Determine the container name based on network type if [ "$NETWORK" = "mainnet" ]; then CONTAINER_NAME="supra_mainnet_$IP_ADDRESS" else CONTAINER_NAME="supra_$IP_ADDRESS" fi ``` ### Command ``` docker exec -it "$CONTAINER_NAME" /supra/supra node smr run -r true ``` ### Source: https://docs.supra.com/network/node/creating-supradesk-tickets-via-email # Creating SupraDesk Tickets via Email This document outlines the steps to create tickets in the application through both Slack and email. You can follow these steps to create a ticket by sending an email: 1. Open your email client. 2. Compose a new email. 3. Enter the designated email address ([techsupport@supraoracles.com](mailto:support@appname.com) or [techsupport@supra.com](mailto:techsupport@supra.com) ) for ticket creation in the "To" field. 4. In the subject line, clearly state the purpose or title of the ticket. **Example Screen:** ![](https://lh7-rt.googleusercontent.com/docsz/AD_4nXdGMoLJ6_SqWDTJ5CjY6uLHKfx4UhDyqJWHaiFrxLQvYWyRqoseTV6kwHAIEC0_YN0XBNk7Q-oP9QNKeJIdK-5TWctVhYH4O76_YcpV79wW5hUbcXbVzaBvzOBDZQRIvQ5VLXrqQw?key=_hWSsBAed5zVfFj_GJv5L9IJ) 5. As mentioned above, In the email body, provide a detailed description of the issue or request. Include any relevant information like to which team it is intended for, (DevOps or QA or Security or Documentation), screenshots, or attachments. 6. Review the email for accuracy and completeness. 7. Send the email. 8. You will receive an automated confirmation email with the ticket number or ID. --- ## Automation ### Source: https://docs.supra.com/automation # Overview ### What is Supra Automation? Supra Automation is a native execution engine that transforms how smart contracts operate. Traditional smart contracts are passive, they require external input to run. Developers and users must manually trigger transactions or rely on third-party bots to monitor conditions and act on their behalf. Supra changes this model. It allows smart contracts to automatically respond to predefined conditions such as time, price feeds, or account balances. These automated tasks are submitted once and executed directly by the blockchain validators. No centralized system or external actor is involved.\ This brings proactive behavior into the blockchain environment. Contracts do not just sit idle waiting for input. They act based on logic and live data, enabling a new class of self-operating applications. ### Why is it important? The Automation Network removes friction from on-chain systems. Developers no longer need to build or maintain scripts, bots, or third-party systems for scheduled or conditional tasks. Automation becomes an embedded capability.\ This shift benefits both users and builders: - Tasks are executed precisely when conditions are met. - Transactions run within the chain without depending on external relayers. - Applications become responsive and intelligent without added complexity. - The entire system becomes more predictable and programmable.\ Supra is building toward a cross-chain future. Although current native automation operates solely within Supra's Layer 1, the upcoming SupraNova protocol is expected to enable automation tasks that can trigger and execute accross different blockchains. This will eventually suppport proper automated flows between ecosystems. ### How the Automation Network Works Supra’s Automation Network works directly within the validator logic. Automation tasks are managed and executed as part of the block-building process. This architecture eliminates the delay between condition checking and execution, which is a common issue in off-chain or keeper-based automation systems. #### Lifecycle of an Automation Task This diagram will give you a brief idea of the Automation processes. ![Automation Overview](/images/automation/4-v2.png) Automation on Supra follows a well-defined flow: #### Step 1: Task Registration A user or developer submits a task to the Automation Registry. The task includes a target function, arguments, and metadata such as gas limits, expiry time, and fee caps. Whether or not the task proceeds is determined by the internal logic of the target function. The function may or may not contain any conditional checks. #### Step 2: Validation and Activation During submission, the task is validated. This includes verifying function references, argument types, user balance, and registration fee limits. Once accepted, the task becomes eligible for activation at the beginning of the next epoch. #### Step 3: Task Execution Trigger Validators process the task's payload at the end of each block. They do not extract or evaluate any separate condition. Instead, they execute the target functions directly. These functions may contain conditional logic, which is based on the current state of the blockchain. This determines whether or not the action should be performed. #### Step 4: Execution Within the Block If a task’s condition evaluates to true, the action is immediately executed inside the current block. The task is treated like an internal transaction and becomes part of the final state update. #### Step 5: State Finalization After all regular and automated transactions are processed, the block output is finalized. The effects of the automation task are included in the finalized block result, and any events or fees are recorded. #### Step 6: Expiry or Cancellation Tasks remain active across blocks until they reach their expiry time or are cancelled. Cancellation can occur manually by the user, or automatically if task fee caps are exceeded or the account balance is insufficient to support execution. All cancellations, both manual and automatic are processed at the start of the next epoch. ### Important Features of Execution - Automation runs directly inside the validator loop. - Conditions are evaluated against actual blockchain state. - No off-chain polling or relaying is involved. - Tasks support custom logic via smart contract function calls. - Execution does not increase sequence numbers or require separate user signatures. - Fees are charged transparently at the time of registration, at each epoch for task retention, and gas fees are charged separately for every task execution at the end of a block. - Supra’s system supports time-based triggers, real-time data from oracles, smart contract states, and custom user-defined logic all directly processed by the blockchain without relying on external infrastructure. --- ## Explore Automation ### Source: https://docs.supra.com/automation/overview # Overview ### What is Supra Automation? Supra Automation is a native execution engine that transforms how smart contracts operate. Traditional smart contracts are passive, they require external input to run. Developers and users must manually trigger transactions or rely on third-party bots to monitor conditions and act on their behalf. Supra changes this model. It allows smart contracts to automatically respond to predefined conditions such as time, price feeds, or account balances. These automated tasks are submitted once and executed directly by the blockchain validators. No centralized system or external actor is involved.\ This brings proactive behavior into the blockchain environment. Contracts do not just sit idle waiting for input. They act based on logic and live data, enabling a new class of self-operating applications. ### Why is it important? The Automation Network removes friction from on-chain systems. Developers no longer need to build or maintain scripts, bots, or third-party systems for scheduled or conditional tasks. Automation becomes an embedded capability.\ This shift benefits both users and builders: - Tasks are executed precisely when conditions are met. - Transactions run within the chain without depending on external relayers. - Applications become responsive and intelligent without added complexity. - The entire system becomes more predictable and programmable.\ Supra is building toward a cross-chain future. Although current native automation operates solely within Supra's Layer 1, the upcoming SupraNova protocol is expected to enable automation tasks that can trigger and execute accross different blockchains. This will eventually suppport proper automated flows between ecosystems. ### How the Automation Network Works Supra’s Automation Network works directly within the validator logic. Automation tasks are managed and executed as part of the block-building process. This architecture eliminates the delay between condition checking and execution, which is a common issue in off-chain or keeper-based automation systems. #### Lifecycle of an Automation Task This diagram will give you a brief idea of the Automation processes. ![Automation Overview](/images/automation/4-v2.png) Automation on Supra follows a well-defined flow: #### Step 1: Task Registration A user or developer submits a task to the Automation Registry. The task includes a target function, arguments, and metadata such as gas limits, expiry time, and fee caps. Whether or not the task proceeds is determined by the internal logic of the target function. The function may or may not contain any conditional checks. #### Step 2: Validation and Activation During submission, the task is validated. This includes verifying function references, argument types, user balance, and registration fee limits. Once accepted, the task becomes eligible for activation at the beginning of the next epoch. #### Step 3: Task Execution Trigger Validators process the task's payload at the end of each block. They do not extract or evaluate any separate condition. Instead, they execute the target functions directly. These functions may contain conditional logic, which is based on the current state of the blockchain. This determines whether or not the action should be performed. #### Step 4: Execution Within the Block If a task’s condition evaluates to true, the action is immediately executed inside the current block. The task is treated like an internal transaction and becomes part of the final state update. #### Step 5: State Finalization After all regular and automated transactions are processed, the block output is finalized. The effects of the automation task are included in the finalized block result, and any events or fees are recorded. #### Step 6: Expiry or Cancellation Tasks remain active across blocks until they reach their expiry time or are cancelled. Cancellation can occur manually by the user, or automatically if task fee caps are exceeded or the account balance is insufficient to support execution. All cancellations, both manual and automatic are processed at the start of the next epoch. ### Important Features of Execution - Automation runs directly inside the validator loop. - Conditions are evaluated against actual blockchain state. - No off-chain polling or relaying is involved. - Tasks support custom logic via smart contract function calls. - Execution does not increase sequence numbers or require separate user signatures. - Fees are charged transparently at the time of registration, at each epoch for task retention, and gas fees are charged separately for every task execution at the end of a block. - Supra’s system supports time-based triggers, real-time data from oracles, smart contract states, and custom user-defined logic all directly processed by the blockchain without relying on external infrastructure. --- ## Explore Automation ### Source: https://docs.supra.com/automation/getting-started # Getting Started ## Getting Started for Developers Supra’s Automation Network is built to be developer-friendly. It provides multiple interfaces for registering tasks, managing them, and observing execution. Developers can integrate automation into their applications with minimal setup using the REST API, Supra CLI, or the SDK.\ \ Here is an overview of a diagram which will give you the idea of the workflow. ![Supra Automation Network](/images/automation/supra-automation-network.png) ## Registering an Automation Task There are two ways to register an automation task: ### Using the Supra CLI The CLI provides a straightforward interface: ```powershell supra move automation register \ --task-max-gas-amount 50000 \ --task-gas-price-cap 200 \ --task-expiry-time-secs \ --task-automation-fee-cap 10000 \ --function-id "0x1::your_module::function_name" \ --args address: U64: ``` This command registers a task that will call the specified function with the given arguments when its condition evaluates to true. #### You can also simulate task creation using: ``` supra move automation register --simulate ... ``` ### Using a REST API You can also register tasks by submitting signed transactions via REST. The payload structure includes: - Target entry function (The entry function includes the conditional logic that determines when to execute the task) - Arguments - Expiry time - Maximum gas amount - Gas price cap - Automation fee cap ```json // Sample Payload { "target_entry_function": "0x1::your_module::function_name", "args": { "recipient": "address_here", "amount": "u64_value" }, "expiry_time": "", "max_gas_amount": 50000, "gas_price_cap": 200, "automation_fee_cap": 10000 } ``` The REST interface accepts `AutomationRegistration` as a transaction payload type. --- ## Monitoring and Managing Tasks #### Once registered, tasks are visible in the registry. You can: - Query active task IDs using view functions. - Fetch task metadata by index. - Cancel a task with the `cancel_task API` or CLI sub-command. - Estimate automation fees using REST view endpoints **Tasks that expire or exceed fee limits are automatically removed at the start of the next epoch.** **Manually cancelled tasks also remain active until the current epoch ends and are removed in the following** ### Source: https://docs.supra.com/automation/api-reference # API Reference Supra provides a rich set of APIs for interacting with automation services, monitoring execution, and retrieving registry data. Below are the key components: ### Automation Registry Move Module The on-chain module `automation_registry` provides the following APIs: #### Registration Users cannot call the `register()` function directly.Instead, tasks are registered by submitting a signed transaction that wraps the target function and its arguments into an internal payload. This is handled automatically via the Supra CLI, REST API, or SDK. The registry validates and activates the task based on submitted parameters and network rules. **Example: Registering a Task Using Supra CLI** ``` bash supra move automation register \ --task-max-gas-amount 50000 \ --task-gas-price-cap 200 \ --task-expiry-time-secs \ --task-automation-fee-cap 10000 \ --function-id "0x1::your_module::"function name" \ --args address: u64: ``` This command prepares a task that invokes the specified fuction with the given arguments. It does not call `register()` directy, it creates a `signed` transaction that interacts with the on-chain registry. To simulate task creation without submission, use the following command: ``` supra move automation register --simulate ... ``` #### Cancellation ``` public entry fun cancel_task(owner: &signer, id: u64) ``` This method cancels the task by index. The task remains scheduled for the current epoch and is removed in the next. #### Read Functions | Function name | Functionality | | ----------------------------------------------------------------------- | ----------------------------------------------------------------------- | | `public fun get_active_task_ids(): vector` | Returns all active tasks IDs for the current epoch. | | `public fun get_task_details(id: u64): TaskMetadata` | Returns the full task metadata for a specific task ID. | | `public fun get_task_count(): u64` | Returns the total number of registered tasks. | | `public fun get_automation_registry_config(): RegistryConfig` | Returns the current automation registry configuration. | | `public fun get_epoch_locked_balance(account: address): u64` | Returns the locked balance for the given account (after current epoch). | | `public fun has_sender_active_task_with_id(sendr:address, id:u64):bool` | Verifies whether the sender has an active task with given ID. | These functions allow visibility into registry state and configuration. ### REST API Endpoints Supra exposes these REST endpoints for tracking automation activity: | Enpoint | Activity | | -------------------------------------------------- | ------------------------------------------------------------------------------------------- | | `/rpc/v3/block/{height}?type=auto` | Returns all successfully executed automation tasks in a given block. | | `/rpc/v3/account/{address}/automated_transactions` | Lists all automated transactions tied to a given account. | | `/rpc/v3/transactions/{hash}` | Looks up a specific transaction by its hash and can be filtered by type (auto, user, meta). | ### Error Codes and Fee Events #### Error Code The registry exposes meaningful error codes for task validation issues, including: | Error Code | Meaning | | ---------------------------- | -------------------------------------------------------------------------- | | `EINVALID_EXPIRY` | Task expiry timestamp is in the past or too soon. | | `EINSUFFICIENT_BALANCE` | Account does not hold enough balance for task registration. | | `EREGISTRY_FULL` | Registry has reached its task capacity for the current epoch. | | `ECONGESTION_LIMIT_EXCEEDED` | Task's congestion fee cap is lower than required for current network load. | These are surfaced via on-chain transaction logs and are useful for debugging or monitoring failed submissions. #### Fee and Registry events These events are emitted by the registry module and are indexed for external observability: | Events | Description | | ------------------------ | -------------------------------------------------------------- | | `AutomationTaskMetadata` | Emitted when a task is accepted into the registry. | | `TaskCancelled` | Triggered when a task is manually cancelled or pruned. | | `AutomationFeeWithdrawn` | Indicates automation fees collected by the system. | | `AutomationRefundIssued` | Sent when an unused task is refunded due to expiry or failure. | The diagram below showx the API architecture map ![API Reference diagram](/images/automation/5-v2.png) ### Registry API Overview The Automation Registry is a native on-chain module that stores all registered tasks. This registry controls task lifecycle, condition validation, execution ordering, and expiry/cancellation management.\ Automation tasks are treated as internal transactions. These are executed directly by the blockchain’s validator layer. This diagram will give you an overview of interaction of Registry System ![API Reference architecture](/images/automation/1.png) #### Core Registry Functions (Move Module) **register(...)** Registers a new automation task with all required metadata. | Metadata | Function | | ------------------------------ | ------------------------------------------------------------------ | | `owner` | Signer address registering the task | | `payload_tx` | Binary-encoded entry function call (contains condition and action) | | `expiry_time` | Epoch timestamp when the task becomes invalid | | `max_gas_amount` | Maximum gas allowed per execution | | `gas_price_cap` | Maximum acceptable gas price | | `automation_fee_cap_for_epoch` | Maximum automation fee for a single epoch | Additional fiels used in registry: - `tx_hash`: Hash of the registration transaction - `aux_data`: Reserved for future use **Cancel Task** `cancel_task(owner, task_id)`: Cancels an existing task. Cancellation becomes effective from the next epoch. **Read Functions (Views)** | Method name | Function | | ----------------------------------------------------------------------- | ---------------------------------------------------------------------------- | | `public fun get_task_ids(): vector` | List all registered task IDs | | `public fun get_active_task_ids(): vector` | List active task IDs for the current epoch | | `public fun get_task_details(id:u64): TaskMetadata` | Returns metadata for a given task index | | `public fun get_task_count(): u64` | Total number of registered tasks | | `public fun get_next_task_index(): u64` | Predicts index for next registered task | | `public fun has_sender_active_task_with_id(address: addresss, id: u64)` | Verifies sender ownership | | `public fun get_gas_committed_for_current_epoch(): u64` | Returns the amount of gas fee set for current epoch. | | `public fun get_epoch_locked_balance(): u64` | Returns the locked balance after the epoch. | | `public fun get_registry_fee_address(): address` | Returns address of the fee. | | `public fun estimate_automation_fee(task_occupancy: u64): u64` | Returns the fee required for task occupancy. | | `public fun estimate_congestion_fee(task_occupancy: u64): u64` | Returns the congestion fee added when registry is above occupancy threshold. | ### Task Metadata Structure Each task includes: - Task index and owner address - Encoded function signature and arguments - Expiry timestamp - Gas limits and caps - Current state: Pending, Active, Cancelled ### Fee Structure #### Flat Registration Fee Paid once during registration. Non-refundable. #### Automation Fee (Per Epoch) Charged at each epoch based on: - Task’s max gas - Registry’s congestion level - Duration of task activity in the epoch. #### Congestion Fee It is applied when task occupancy exceeds a predefined threshold. It grows polynomially with congestion in the registry. #### Refunds Issued if the actual epoch duration is shorter than estimated, proportional to the unused time. ### Error Codes The registry exposes descriptive error codes for: - Invalid or expired time - Invalid gas price or limits - Unauthorized access - Registry full or misconfigured - Fee cap breaches ### Events Emitted on: - Task registration - Task execution - Fee withdrawals - Refunds - Cancellations - Registry configuration changes ### Source: https://docs.supra.com/automation/smart-contract-integration # Smart Contract Integration Supra’s Automation Network is designed to work with any Move-based smart contract that exposes callable entry functions. To make a contract automation-compatible, developers need to ensure that target functions are publicly accessible and well-structured to be invoked automatically under specified conditions. To understand the overview of the function flow, refer to the diagram below. ![Smart Contract Integration flow](/images/automation/2.png) ### Key Requirements #### Entry Function Availability The target contract must expose a public entry function with a fixed function name and argument types. This will maintain consistent reference during task registration. #### Argument Compatibility Arguments passed to the function during registration must exactly match the expected types. The validation engine checks signatures and types during registration.\ The target function may include at most one `signer` parameter, which will always be the same signer that registered the automation task.**Note: Additional `signer` arguments are not supported and may result in validation failure or execution errors.** #### Automation Logic Constraints Since automated tasks are executed within validator logic, their behavior must remain fully deterministic and produce the same results across all the nodes to maintain consensus. #### Gas Limits and Fee Caps Each automation task must define the following parameters: - `max_gas_amount`: Specifies the maximum gas the task is allowed to consume during execution. - `gas_price_cap`: Sets the maximum acceptable gas price per block. If the network gas price exceeds this value during a block,the task is skipped for that block. - `automation_fee_cap`: Defines maximum automationfee a user is willing to pay per epoch.Tasks that exceed this cap are excluded from execution for that epoch. These parameters collectivelyhelp manage cost ceilings, avoid unwanted execution during high gas conditions, and provide predictable automation expense control. #### State Conditions Inside Logic Automation tasks do not include external scripts. Instead, the condition should be wrapped into the logic of the target function. Example: ``` //psuedocode if (balance > 10000) { transfer(user, recipient, balance - 10000); } ``` **Example: Auto Wallet Top-Up** **Use case: Automatically refill a user wallet when the balance drops below a certain threshold.**\ **Pseudocode:** ``` //pseudocode public entry fun auto_top_up(source: &signer, user: address, min_balance: u64, top_up_amount: u64) { let current_balance = balance_of(user); if (current_balance < min_balance) { transfer(source, user, top_up_amount); } } ``` _A task can be registered with a condition like:_\ _“If balance of 0xABC is less than 50 SUPRA, transfer 100 SUPRA from 0xXYZ.”_ **Example: Target Limit Order Execution** **Use case: Execute a swap or trade when a price condition is met.** **Pseudocode:** ``` // pseudocode public entry fun execute_limit_order(user: &signer, token_a: address, token_b: address, price_threshold: u64) { let price = get_price(token_a); if (price <= price_threshold) { swap(user, token_a, token_b); } } ``` _Oracle data is read on-chain using Supra’s oracle feeds. Once the condition is satisfied, the task is executed in the same block._ ### Best Practices - Use clear conditions with safe fallback logic. - Make sure actions are idempotent when needed. - Always add gas caps and expiry time. - Test logic using simulation tools before registering. ### Source: https://docs.supra.com/automation/your-first-automation-task # Your First Automation Task Automation is second nature in Web2 (cron jobs, schedulers, CI/CD), but in Web3, it’s still uncommon. Most on-chain functions still need manual input. **With Supra Automation, you can:** - Run smart contract functions on-chain, automatically - Eliminate reliance on bots or off-chain scripts - Set time-based triggers and periodic logic - Save time managing infrastructure Let’s walk through how to get started. ### Source: https://docs.supra.com/automation/your-first-automation-task/prerequisites-and-epoch-timing # Prerequisites & Epoch Timing ## Prerequisites - Supra CLI setup and profile created - Sufficient funds in your wallet to cover: - Gas fees - Automation execution fees ## Understanding Epoch Timing In Web3, automation tasks are often influenced by time-based intervals. On Supra, an **epoch** is a 2-hour interval (**7200 seconds**) used for internal updates like task registration, cancellation, and fee collection. However, **automation tasks themselves are executed at the end of each block.** ### Key Behavior - Once your task is registered, it can be triggered by block activity — as frequently as every block - Registration timing still matters: if your task is registered too close to its expiry time, it may not have a chance to run Epochs primarily affect **when registrations are picked up**, not when the task is executed. ### Why This Matters - Avoid confusion if a task doesn’t run immediately after registering - Plan automation that reacts quickly to block-level activity - Set `--task-expiry-time-secs` with enough buffer for pickup + execution **Always give your task some buffer time after registration by calculating your expiry like this:**\ expiry = (last_reconfiguration_time / 1,000,000) + 7200 + buffer \ \ **For Example:** expiry = (last_reconfiguration_time / 1,000,000) + 7200 + 300 **While epochs matter for registration, task execution runs block-by-block, so you’ll get more frequent and responsive automation than you might expect.** ### Source: https://docs.supra.com/automation/your-first-automation-task/create-the-move-smart-contract # Create the Move Smart Contract For this guide we'll create an automation contract that will increment a default value with each automated transaction once the automaton task gets started. We can then use the view function and/or SupraScan to see the updated value, old value, timestamp, and total increments. **Best Practice for Gas Optimization:** \ **If you're using AutoFi's trade contracts (limit orders, DCA, etc.) then:** - Initialize storage in init_module (runs once at deployment) - Do NOT initialize storage inside your automation task function (runs repeatedly) - This pattern minimises gas by avoiding storage creation and you can save automation the fee. - Storage creation is required only once hence Performing it in the init module or a dedicated setup function. - Handling storage creation within the automation function would require a high gas limit, which is unnecessary for a one-time operation. **Hence, this approach is more efficient**. **Example:** ```solidity // Storage created once fun init_module(account: &signer) { move_to(account, Counter { value: 0, ... }); } // Task only operates on existing storage public entry fun auto_increment(account: &signer) acquires Counter { let counter = borrow_global_mut(account_addr); counter.value = counter.value + 1; } ``` ## Initialize your move package #### Create a new Move package
execute me!
```powershell supra move tool init --package-dir /supra/move_workspace/autofi --name autofi ```
This will create your project directory automatically, including a `Move.toml` file. This is a manifest file that contains important metadata about your package. This includes the package name, version, dependencies, named addresses, and more. The `SupraFramework` dependency is automatically populated. This framework includes core components that you will interact with during your time on Supra. The framework package includes clearly defined documentation within the `/doc` directory for you to review alongside the Move code within the `/sources` directory. You can view [this package here](https://github.com/Entropy-Foundation/aptos-core/tree/dev/aptos-move/framework/supra-framework).
move.toml
```toml [package] name = "autofi" version = "1.0.0" authors = [] [addresses] [dev-addresses] [dependencies.SupraFramework] git = "https://github.com/Entropy-Foundation/aptos-core.git" rev = "dev" subdir = "aptos-move/framework/supra-framework" [dev-dependencies] ```
#### Update the named addresses Open the `move.toml` file with your code editor. You can find these files on your host machine in the `/supra/move_workspace/autofi` directory. For now, add the below named address to your `Move.toml` file and set the value to your address. You can view the address of your profiles by executing: `supra profile -l` ```toml [addresses] exampleAddress ="YOUR-ADDRESS-HERE" ``` Named addresses allow identifiers such as `@exampleAddress` to be used throughout your package, rather than hard coding an address value. When compiled into bytecode, any occurrence of the identifier such as `@exampleAddress` will be replaced with the value set within the `move.toml` file.
## Write & Publish Your Module #### Create a Module Smart Contract (Module) Open the `move.toml` file with your code editor and set the value to your address to the Profile address of your Supra CLI to Publish the Move Package. Know more about Writing and Publishing your first Move Package at the [**Get Started Page Here.**](/network/move/getting-started/create-a-move-package) And, Within the `sources` directory of your package, create the `autofi.move` file.
autofi.move
```rust module exampleAddress::auto_incr { use supra_framework::timestamp; use supra_framework::event; use supra_framework::account; use std::signer; use std::error; struct Counter has key { value: u64, last_increment_time: u64, total_increments: u64, } /// Event emitted when counter is incremented #[event] struct CounterIncremented has drop, store { old_value: u64, new_value: u64, timestamp: u64, total_increments: u64, } /// Error codes const E_COUNTER_NOT_INITIALIZED: u64 = 1; const E_TOO_EARLY_FOR_INCREMENT: u64 = 2; fun init_module(account: &signer) { let account_addr = signer::address_of(account); assert!(!exists(account_addr), error::already_exists(E_COUNTER_NOT_INITIALIZED)); let current_time = timestamp::now_seconds(); move_to(account, Counter { value: 0, last_increment_time: current_time, total_increments: 0, }); } public entry fun auto_increment(account: &signer) acquires Counter { let account_addr = signer::address_of(account); assert!(exists(account_addr), error::not_found(E_COUNTER_NOT_INITIALIZED)); let counter = borrow_global_mut(account_addr); let current_time = timestamp::now_seconds(); let old_value = counter.value; counter.value = counter.value + 1; counter.last_increment_time = current_time; counter.total_increments = counter.total_increments + 1; event::emit(CounterIncremented { old_value, new_value: counter.value, timestamp: current_time, total_increments: counter.total_increments, }); } /// View function to get current counter value #[view] public fun get_counter_value(account_addr: address): u64 acquires Counter { assert!(exists(account_addr), error::not_found(E_COUNTER_NOT_INITIALIZED)); borrow_global(account_addr).value } /// View function to get detailed counter info #[view] public fun get_counter_info(account_addr: address): (u64, u64, u64) acquires Counter { assert!(exists(account_addr), error::not_found(E_COUNTER_NOT_INITIALIZED)); let counter = borrow_global(account_addr); (counter.value, counter.last_increment_time, counter.total_increments) } /// Manual increment function for testing (optional) public entry fun manual_increment(account: &signer) acquires Counter { auto_increment(account); } /// Reset counter (for testing purposes) public entry fun reset_counter(account: &signer) acquires Counter { let account_addr = signer::address_of(account); assert!(exists(account_addr), error::not_found(E_COUNTER_NOT_INITIALIZED)); let counter = borrow_global_mut(account_addr); counter.value = 0; counter.last_increment_time = timestamp::now_seconds(); counter.total_increments = 0; } // Test functions #[test_only] #[test(account = @0x123)] public entry fun test_counter_initialization(account: signer) acquires Counter { let account_addr = signer::address_of(&account); account::create_account_for_test(account_addr); // Initialize counter init_module(&account); // Check initial value assert!(get_counter_value(account_addr) == 0, 1); // Test increment manual_increment(&account); assert!(get_counter_value(account_addr) == 1, 2); // Test another increment manual_increment(&account); assert!(get_counter_value(account_addr) == 2, 3); } } ```
#### Publish Your Move Package on Supra Network. ```powershell supra move tool publish \ --package-dir /supra/move_workspace/autofi \ --rpc-url https://rpc-testnet.supra.com ``` #### Use SupraScan to confirm it was deployed successfully. You can use [SupraScan](https://suprascan.io/) to confirm your deployment. ![Move Smart Contract deployment](/images/automation/image.png)
### Source: https://docs.supra.com/automation/your-first-automation-task/calculate-task-expiry-time-and-task-automation-fee # Calculate task-expiry-time & task-automation-fee ### View the command ```powershell supra move automation register --help ``` ### Understand parameters ```powershell supra move automation register \ --task-max-gas-amount XXXX \ --task-gas-price-cap XXX \ --task-expiry-time-secs XXXXXXXXXX \ --task-automation-fee-cap XXXXXXXXXX \ --function-id "0xYourAddress::your_module::function_name" \ --rpc-url ``` Check [Network Details](/network/move/network-information) for RPC URL. ## How to Calculate`--task-expiry-time-secs` Supra tasks only run after the next epoch. Here’s how to calculate it. #### Get the last epoch start ```powershell curl -X 'GET' \ 'https://rpc-testnet.supra.com/rpc/v2/accounts/1/resources/0x1%3A%3Areconfiguration%3A%3AConfiguration' \ -H 'accept: application/json' ``` **Look for Something like:** ```powershell "last_reconfiguration_time": "1747163851854115" ``` Above Number is in microseconds, you have to convert it into Seconds before calculating the task expiry time via the formula given.
**Example:** 1747163851854115 Microseconds **->** 1747163851 Seconds
#### Get the epoch interval (epoch duration) ```powershell curl -X 'GET' \ 'https://rpc-testnet.supra.com/rpc/v2/accounts/1/resources/0x1%3A%3Ablock%3A%3ABlockResource' \ -H 'accept: application/json' ``` **Look for Something like:** ```powershell "epoch_interval": "7200000000" ``` #### Final Formula to Calculate Task Expiry Time: (Add a buffer of 300 = 5 mins or 120 = 2 mins) `buffer` is the duration that you wish to set the automation task to run for. Please note that the max duration that your task may be registered for is 7 days from the time of registration. ```powershell task-expiry-time-secs = (last_reconfiguration_time/1000000) + (epoch_interval/1000000) + buffer ``` **Example**: ``` task-expiry-time-secs = 1748027985 + 7200 + 300 = 1748035485 ``` **Use**: `--task-expiry-time-secs 1748035485`
## How to Estimate the`--task-automation-fee-cap` **Input your max gas:** The input argument should be the maximum gas you expect your task to use. Let’s represent this as **\**. ```bash curl --request POST \ --url https://rpc-testnet.supra.com/rpc/v2/view \ --header 'Accept: application/json' \ --header 'Content-Type: application/json' \ --data '{ "function": "0x1::automation_registry::estimate_automation_fee", "type_arguments": [], "arguments": [""] }' ``` This represents the expected **`--task-automation-fee-cap`** based on the currently registered task.
You may set a slightly higher automation fee cap to allow for buffering.
### Example calculation: If your task’s max gas is 100: ```powershell "arguments": ["100"] ``` #### Output: `{"result":["720000000"]}` Your fee cap is 720,000,000 quants - (7.2 supra per epoch) ### Example calculation: If your task’s max gas is 50,000: ```powershell "arguments": ["50000"] ``` #### Output: `{"result":["393872320800"]}` Your fee cap is 393,872,320,800 quant - (393.87 supra per epoch) The value you input (max gas) should reflect how much gas you expect your task to use. It’s not fixed; adjust as needed based on your task complexity. ### Parameter Guide | | | | ---------------------------------------- | --------------------------------------------------------------------------------------------------------------------------------------------------------------------------------------------------------------- | | `--task-max-gas-amount` | Max gas your function can use | | `--task-gas-price-cap` | Max gas price per unit to avoid spikes | | `--task-expiry-time-secs` | Deadline for task (UNIX time) | | `--task-automation-fee-cap` | Max fee (in microSUPRA) for automation | | `--function-id` | Target public entry function to trigger | | `--args` (optional, per target function) | Arguments to pass to the function | | `--task-max-gas-amount` | Run a dry run to check for success | | `task_duration_cap_in_secs` | Maximum allowable duration (in seconds) from the registration time that an automation task can run, If the expiration time exceeds this duration, the task registration will fail. | | `registry_max_gas_cap` | Maximum gas allocation for automation tasks per epoch, exceeding this limit during task registration will cause failure and is used in fee calculation. | | `automation_base_fee_in_quants_per_sec` | Base fee per second for the full capacity of the automation registry, measured in quants/sec. The capacity is considered full if the total committed gas of all registered tasks equals `registry_max_gas_cap`. | | `flat_registration_fee_in_quants` | Flat registration fee charged by default for each task. | | `congestion_threshold_percentage` | Relative to `registry_max_gas_cap`. Beyond this threshold, congestion fees apply. | | `congestion_base_fee_in_quants_per_sec` | Base fee per second for the full capacity of the automation registry when the congestion threshold is exceeded. | | `congestion_exponent` | The congestion fee increases exponentially based on this value, ensuring higher fees as the registry approaches full capacity | | `task_capacity` | Maximum number of tasks that registry can hold | ### Source: https://docs.supra.com/automation/your-first-automation-task/register-your-automation-task # Register your Automation Task Make sure the contract is published before registering automation — otherwise, the system won’t be able to find your function. Before registering for real, test the task using `--simulate:` ```powershell supra move automation register --simulate \ --task-max-gas-amount 5000 \ --task-gas-price-cap 200 \ --task-expiry-time-secs 1748035485 \ --task-automation-fee-cap 1440000000\ --function-id "0x123::auto_incr::auto_increment" \ --rpc-url https://rpc-testnet.supra.com ``` **If you see:** ```powershell "vm_status": "Executed successfully" ``` **You’re good to go, remove `--simulate` and run it for to get Automation Task Registered.** ## Post-Deployment: Sanity Check Once you've registered your automation task, you’ll want to confirm it’s actually working. - **Use SupraScan** - Visit [SupraScan](https://suprascan.io/) - Search your deployer address - Check Tasks Tab. - Confirm your task is executing at the expected intervals ![Register Automation Task](/images/automation/screenshot-2025-05-19-165122.png) Task will not become active until the next epoch.
Users may not be able to confirm the task is executing right away.
- **Run the View Function** To check your counter value, run this CLI command: ```powershell supra move tool view \ --function-id '0x123::auto_incr::get_counter_value' \ --args address:0x123 \ --rpc-url https://rpc-testnet.supra.com ``` Before the automation task starts: ```powershell { "result": [ "0" ] } ``` After the automation task starts: ```powershell { "result": [ "1" ] } ``` Check again after automation runs — if the value increases, your automation task is working perfectly. ### Source: https://docs.supra.com/automation/your-first-automation-task/canceling-your-automation-task # Canceling Your Automation Task #### Why Cancel? Canceling a task prevents it from executing in the future. **Useful when:** - Task logic is no longer needed. - You made a mistake in the task parameters. - You want to avoid draining your wallet from recurring executions. #### Run the Cancel Command ```powershell supra move automation cancel \ --task-index \ --rpc-url ``` **Parameter Guide** `--task-index:` The unique identifier of the task you want to cancel. Each task is assigned an index when registered. **How do you find your `--task-index`?** To find your task index: 1. Go to[ SupraScan](https://suprascan.io) 2. Enter your deployer address 3. Navigate to the “Tasks” tab 4. Locate the active task you want to cancel 5. Find the Task ID value listed with the task details **You’ll use this index in your cancel command.** ![Cancel Automation Task result](/images/automation/image-1.png) #### Understand Parameters ```powershell supra move automation cancel \ --task-index 347 \ --rpc-url https://rpc-testnet.supra.com ``` **If you see this:** `"vm_status": "Executed successfully"` You have successfully cancelled the automation task! ### After Canceling - The task is no longer active - No additional executions will occur - You won’t be charged automation or gas fees for that task anymore ### Post-Cancel: Sanity Check - Visit [SupraScan](https://suprascan.io/) - Search your deployer address - Navigate to the Tasks tab or check your function call history - Confirm that the automated function is no longer executing If you still see executions, double-check that the correct task was cancelled using right `--task-index` ### Source: https://docs.supra.com/automation/using-type-args # Using `--type-args` in Automation When registering automation tasks for functions that use generic types, you must specify the concrete types using the `--type-args` parameter. ## Working Example ### Move Module: Auto Top-up with Generics **Get Step by Step Guide to Setup Your First Automation Module** [**HERE**](your-first-automation-task/)**.**
source.move
``` module exampleaddress::typearg { use supra_framework::coin; use supra_framework::supra_coin; use supra_framework::supra_coin::SupraCoin; public entry fun auto_topup( user: &signer, target: address, threshold: u64, amount: u64, ) { let target_balance = coin::balance(target); if (target_balance < threshold) { coin::transfer(user, target, amount); } } #[test(funder = @0xc1b2, target = @0xd3e4, supra_framework = @supra_framework)] fun test_auto_topup(funder: &signer, target: &signer, supra_framework: &signer) { let threshold = 100_000; let topup_amount = 1_000_000; let funder_addr = aptos_std::signer::address_of(funder); supra_framework::account::create_account_for_test(funder_addr); let (burn, mint) = supra_coin::initialize_for_test(supra_framework); coin::register(funder); supra_coin::mint(supra_framework, funder_addr, 100_000_000); // Mint 100M tokens to the funder let target_addr = aptos_std::signer::address_of(target); supra_framework::account::create_account_for_test(target_addr); coin::register(target); supra_coin::mint(supra_framework, target_addr, 1_000_000); let target_balance = coin::balance(target_addr); assert!(target_balance == 1_000_000, 1); // testcase as in if th target's balance is already above the threshold auto-topup should not trigger auto_topup(funder, target_addr, threshold, topup_amount); let target_balance = coin::balance(target_addr); assert!(target_balance == 1_000_000, 2); // Balance should remain unchanged // simulate transaction for target transfers tokens reducing balance below threshold coin::transfer(target, funder_addr, 950_000); let target_balance = coin::balance(target_addr); assert!(target_balance == 50_000, 3); // Balance drops below threshold // testcase now that the balance is below the threshold auto-topup should trigger auto_topup(funder, target_addr, threshold, topup_amount); let target_balance = coin::balance(target_addr); assert!(target_balance == 1_050_000, 4); // Balance should now include the top-up amount coin::destroy_burn_cap(burn); coin::destroy_mint_cap(mint); } } ````
### Workflow #### 1. Deploy Your Contract ```powershell supra move tool publish \ --package-dir /path/to/your/project \ --rpc-url https://rpc-testnet.supra.com ```` #### 2. Simulate Before Going Live ```powershell supra move automation register --simulate \ --task-max-gas-amount 50000 \ --task-gas-price-cap 200 \ --task-expiry-time-secs [CALCULATED_EXPIRY] \ --task-automation-fee-cap [ESTIMATED_FEE] \ --function-id "YOUR_ADDRESS::typearg::auto_topup" \ --type-args 0x1::supra_coin::SupraCoin \ --args address:TARGET_ADDRESS u64:THRESHOLD u64:AMOUNT \ --rpc-url https://rpc-testnet.supra.com ``` Use the correct Module Path for Specifying the `--type-args`:\ \ ✅ 0x1::supra_coin::SupraCoin ❌ supra_framework::supra_coin::SupraCoin #### 3. Automation Registration Command Remove `--simulate` and run the same command ```powershell supra move automation register \ --task-max-gas-amount 50000 \ --task-gas-price-cap 200 \ --task-expiry-time-secs 1749158860 \ --task-automation-fee-cap 50000000000 \ --function-id "YOUR_ADDRESS::typearg::auto_topup" \ --type-args 0x1::supra_coin::SupraCoin \ --args address:TARGET_ADDRESS u64:600000000 u64:100000000 \ --rpc-url https://rpc-testnet.supra.com ``` ### Parameter Values Based on our working example: | Parameter | Value | Description | | --------------------------- | ---------------------------- | ---------------------------------- | | `--task-max-gas-amount` | 50000 | Maximum gas for function execution | | `--task-gas-price-cap` | 200 | Max gas price per unit | | `--task-automation-fee-cap` | 500000000 | 50M micro-SUPRA (safe high value) | | `--type-args` | `0x1::supra_coin::SupraCoin` | Concrete type for generic | | Target Address | 0xa346... | Address to monitor | | Threshold | 600000000 | 600 SUPRA in micro-SUPRA | | Amount | 100000000 | 100 SUPRA in micro-SUPRA | ### Monitoring Your Automation on SupraScan - Visit [SupraScan](https://testnet.suprascan.io/) - Enter your deployer address - Go to "Tasks" tab - Verify task is active ![Using Type Args in Automation](/images/automation/image-2.png) ### Source: https://docs.supra.com/automation/use-cases # Use Cases of AutoFi AutoFi represents the real-world application layer of Supra’s Automation Network. With native automation built into the chain, developers can create financial systems that are responsive, intelligent, and user-friendly without sacrificing decentralization. Here are some high-impact use cases categorized by function. ### Trading and Investment #### Time-Based Limit Orders _“Buy ETH at $1,900 after 6 PM UTC.”_ The order executes only when both the price and time condition are met. #### Dollar-Cost Averaging (DCA) _“Buy 100 USDC worth of BTC every Monday.”_ A scheduled task executes the buy every week without external bots. #### Cross-Chain Arbitrage Execution _“If price spread between DEX A and DEX B is above 2%, perform arbitrage.”_ The task can compare prices and execute swaps across chains once SupraNova goes live. ### Risk Management and Loans #### Auto Loan Repayment _“Use yield to repay loans when LTV exceeds 70%.”_ Tasks monitor vault metrics and trigger repayments automatically. #### Liquidation Defense _“Repay stablecoins from reserve if vault health drops.”_ Protect users from unexpected liquidations in volatile markets. ### DAOs and Treasury Management #### KPI-Triggered Payroll _“Pay team if 100 GitHub commits are reached.”_ Oracles monitor off-chain metrics. Payment executes on-chain when the KPI is hit. #### DAO Treasury Rebalancing _“Maintain a 60-40 allocation between USDC and ETH.”_ Tasks run block-by-block rebalancing strategies with no human input. ### User Experience Automation #### Auto Wallet Top-Up _“If wallet drops below 10 SUPRA, refill from treasury.”_ Improves UX for games, dApps, and recurring users. #### Scheduled Payments (Subscriptions) _“Send 5 USDC to creator wallet monthly.”_ Subscriptions run without relying on Web2 intermediaries or custodial services. ### DeFi Infrastructure #### On-Chain DEX Order Matching _Orders from users are matched directly on-chain when conditions align._ No need for off-chain bots or liquidity managers. Tasks perform real-time matching. #### Real-Time Yield Optimization _“Move funds to the highest APY protocol every 12 hours.”_ Capital allocation becomes a living process managed on-chain. Below you can find the AutoFi use case map. ![Automation Use Cases](/images/automation/3-v2.png) ### Source: https://docs.supra.com/automation/glossary # Glossary | TERM | DEFINITION | | ----------------------------- | ------------------------------------------------------------------------------------------------------------------------------------------------------------------------------------------------------------------------------------------------------------------------------------------------- | | Automation Task | A transaction registered by a user to be executed automatically when specific conditions are met. | | Automation Registry | The on-chain storage module that tracks all registered tasks, their metadata, and current state. | | Epoch | A fixed period used for validator synchronization and automation task management. Tasks are activated or removed at epoch boundaries. | | Automated Execution | The process by which validators determine whether and when an automation task should trigger execution based on predefined conditions or scheduled criteria. This occurs at the end of each block. | | Gas Price Cap | The highest unit gas price a user is willing to pay for each execution of the automation task. | | Task Max Gas | The maximum amount of gas that can be consumed by the task during execution. If this limit is exceeded, the transaction fails with execution failure. | | Automation Fee Cap | The maximum automation fee a user is willing to pay per epoch. If exceeded, the task is cancelled. | | Pending Task | A task that is registered but not yet active. Tasks are pending until the next epoch begins. | | Active Task | A task that is currently eligible for evaluation and execution in each block. | | Task ID | A unique identifier assigned to every automation task upon registration. It is used to track, manage, and reference tasks across the registry, API calls, and validator execution. | | Cancelled Task | A task that has been cancelled manually by the user or removed automatically due to fee or balance constraints. Manual cancellations take effect at the start of the next epoch. Fee and balance-based removals are processed immediately at the beginning of each epoch during registry cleanup. | | Zero-Block Delay | Execution model in which a task is evaluated and executed within the same block when its condition becomes true. | | Congestion Fee | A dynamically increasing fee applied when task registration surpasses a network-defined congestion threshold. | | Automated Transaction Payload | The encoded data submitted via Supra CLI, REST, or SDK during task registration. It contains the target function call and the call's arguments. The logic for execution, such as conditional checks is defined inside the target function itself, rather than as a separate component. | | Payload Transaction | The packaged Move function call that runs when an automated task is triggered. It includes the function identifier and arguments submitted during task registration, and is executed by the validator if the task conditions are met. | ### Source: https://docs.supra.com/automation/faqs # FAQs ### How is Supra’s automation different from third-party bots or keepers? Supra’s automation is built into the validator layer. There are no off-chain agents, bots, or centralized relayers. All task evaluation and execution happens on-chain, natively, and deterministically. ### Can I automate any smart contract? Yes, as long as the target public entry function specified in the payload transaction during registration is deployed on Supra and matches the argument types of the deployed function. ### What happens if my task exceeds its gas cap or fee cap? The task will not be executed. If the gas price for a particular block is higher than the `gas_price_cap`, it will not be executed for that block. If the automation fee for the epoch exceeds your fee cap, the task is cancelled. ### Can I cancel a task after registration? Yes. You can cancel a task using the CLI or by submitting a transaction to the `cancel_task` function. The task is removed at the start of the next epoch. **NOTE:** * The **registration fee is non-refundable.** * If the task is still pending, it is removed immediately without incurring further cost. * If the task has already become active, the **automation fee for that epoch is still charged** and is **non-refundable**. ### Is there a way to simulate tasks before committing them? Yes. The Supra CLI supports a `--simulate` option that allows you to preview the outcome of a registration without executing it.This is useful for validating arguments and function calls before submitting the transaction. **Example**: ``` bash supra move automation register --simulate \ --task-max-gas-amount 50000 \ --task-gas-price-cap 200 \ --task-expiry-time-secs \ --task-automation-fee-cap 10000 \ --function-id "0x1::your_module::function_name" \ --args address: u64: ``` ### How frequently are tasks evaluated? Tasks are evaluated at the end of every block. If the condition becomes true during block processing, the task is executed in the same block. ### How is pricing determined during high congestion? A congestion threshold is set by governance. If the `max_gas` of all the registered tasks exceed this threshold, additional fees are applied based on how much the threshold is surpassed and `max_gas` for each task. In the current charging model, the fee increases polynomially with congestion. Though the degree of the polynimal can be set to a high value by the governance. ### Can I use automation across chains? At present, automation is scoped to the Supra network. However, cross-chain automation will be supported through SupraNova, allowing source conditions and target actions to occur across different blockchains. ### What happens when a task expires? It is automatically removed during the next epoch cleanup. No additional actions are needed from the user. ### Are refunds given if a task is not fully used during an epoch? Yes. If the actual epoch duration is shorter than expected, partial refunds are processed for unused automation time. --- ## Oracles ### Source: https://docs.supra.com/oracles # Overview Welcome to the Supra Oracles documentation. Supra Oracles delivers a decentralized, high-performance oracle infrastructure that connects real-world data with smart contracts across a wide range of blockchain platforms. Designed for both speed and security, Supra enables developers to integrate highly reliable, low-latency Oracle services. Whether you're building on a DeFi protocol, a prediction market, or a gaming dApp, Supra's robust oracle services make it easy to access and automate critical external data flows.\ \ View any of the Oracle pages to gain a deeper understanding of the protocols along with detailed guides on integration. --- ### Source: https://docs.supra.com/oracles/overview # Overview Welcome to the Supra Oracles documentation. Supra Oracles delivers a decentralized, high-performance oracle infrastructure that connects real-world data with smart contracts across a wide range of blockchain platforms. Designed for both speed and security, Supra enables developers to integrate highly reliable, low-latency Oracle services. Whether you're building on a DeFi protocol, a prediction market, or a gaming dApp, Supra's robust oracle services make it easy to access and automate critical external data flows.\ \ View any of the Oracle pages to gain a deeper understanding of the protocols along with detailed guides on integration. --- ### Source: https://docs.supra.com/oracles/data-feeds # Data Feeds Oracle feeds play a pivotal role in delivering dependable and precise real-world data to blockchain networks, unlocking a multitude of valuable use cases. The Supra team acknowledges the current constraints of conventional oracles, including issues like reliance on trusted intermediaries, higher latency, and slower on-chain finality. That's why Supra took a rigorous, research-based approach to forge a superior oracle solution. This culminated in the creation of DORA, short for Supra's Distributed Oracle Agreement, an advancement in the field grounded in peer-reviewed research. ### **Distributed Oracle Agreement (DORA)** DORA natively employs the most performant consensus algorithm in to the oracle space, and aggregates representative price data (S-value) for a wide array of assets and commodities. To do this, the protocol validates and reports prices derived from up to 21 data sources with Byzantine Fault Tolerant algorithms. Employing a unique Tribe-Clan architecture, DORA is further strengthened and safeguarded by anti-collusion randomness algos (via our decentralised Verifiable Random Function, or dVRF) to ensure the decentralisation qualities of the network persist over time. Likewise, Supra deploys multiple fault-tolerant techniques during the data collection, aggregation, and computation stages to ensure the highest fidelity price feeds and detect abnormal behaviours before they could affect outcomes. ### **Computation of S-Value** Every node obtains data from multiple data sources and computes the median from the set of values obtained from its assigned sources. To begin, nodes are randomly assigned tasks and later reassigned periodically via Supra's decentralised Verifiable Random Function as part of its deliberate, anti-collusion approach. ![Push Oracle Data Flow](/images/oracles/image-1.png)
Figure 1: Node level price data aggregation
Then, Supra’s calculation methodology identifies a _coherent cluster_ formed within the _agreement distance_ parameter. This ensures that different nodes’ median values have not abnormally deviated from each other before computing the arithmetic mean (as a proposed S-value), which is subsequently signed by all nodes in the network. ![Pull Oracle Data Flow](/images/oracles/image-2.png)
Figure 2: Aggregator nodes calculate the mean of median values proposed by nodes of the clan.
Not deep enough? You can check our [lite paper](https://supraoracles.com/news/dora-distributed-oracle-agreement/) for a better understanding and our [white paper](https://supra.com/documents/SupraOracles-DORA-Whitepaper.pdf) for an even deeper dive. Our white paper provides an extremely in-depth explanation of our decentralised Oracle (DORA ) protocol, the industry's leading oracle service, and is ideal for developers who want to use and test our innovative products. Important: Please make sure you read and understand [Terms of Use](https://supra.com/terms-of-use/) before start using Supra products and services. ### Source: https://docs.supra.com/oracles/data-feeds/data-feeds-index # Data Feeds List Welcome to our data feeds catalog, the gateway to seamlessly integrating real-world data on-chain. This will help you empower your smart contracts and applications to interact with external data securely.\ \ **Selecting Data Pairs** At Supra, we uphold stringent standards for data quality and reliability in the pairs we publish. The following table outlines our data standards for each pair, enabling customers to assess their choices when selecting pairs based on their use cases. These standards can vary, however, based on things like the quality and quantity of data sources. Continuous reviews of all price pairs ensure accurate ratings that may be adjusted over time. - **Supra Premium** - Data pairs that adhere to the highest standards in our workflows, derived from a minimum of 8 distinct sources. - **Supra Standard** - Derived from a minimum of 6 distinct sources, these pairs not only fulfill our minimum requirements but also ensure reliability. - **Under Supervision -** These pairs are either relatively new or derived from between 3 and 5 distinct sources. Still, these are closely monitored for progress before achieving higher ratings, contingent upon increases in high-quality data sources.\ These pairs could become relatively unstable due to low number of sources, and low liquidity and users are advised to be extra careful, check timestamps when using these pairs. Please make sure you read and understand "[Terms of Use](https://supra.com/terms-of-use/)" before using any Supra data feed. Specially the data feeds from "_Under Supervision_" category. - **Deprecated -** To be featured on Supra, a data pair must be accessible through a minimum of 3 sources. Should a data pair fail to meet this criterion or fall into non-compliance with our standards, it would be reclassified into this category. Subsequent cessation regarding the publication for these pairs could occur following a comprehensive review. You may access Supra's data feeds by referring to the index of each data pair. Was the data feed you were looking for not available? Please, send over a [request](https://forms.gle/eQQtDChhvGPomya26) and we can discuss the expansion of our catalog.
| Data Pair | Pair ID | Pair Category | | ------------------------------------- | ------- | ------------------------------------- | | BTC_USDT | 0 | Supra Premium | | ETH_USDT | 1 | Supra Premium | | LINK_USDT | 2 | Supra Premium | | DOGE_USDT | 3 | Supra Premium | | BCH_USDT | 4 | Supra Premium | | AVAX_USDT | 5 | Supra Premium | | DOT_USDT | 6 | Supra Premium | | AAVE_USDT | 7 | Supra Premium | | UNI_USDT | 8 | Supra Premium | | LTC_USDT | 9 | Supra Premium | | SOL_USDT | 10 | Supra Premium | | MKR_USDT | 11 | Deprecated | | COMP_USDT | 12 | Supra Premium | | SUSHI_USDT | 13 | Supra Premium | | XRP_USDT | 14 | Supra Premium | | TRX_USDT | 15 | Supra Premium | | ADA_USDT | 16 | Supra Premium | | ATOM_USDT | 17 | Supra Premium | | BTC_USD | 18 | Supra Standard | | ETH_USD | 19 | Supra Standard | | MATIC_USDT | 20 | Deprecated | | BAT_USDT | 21 | Supra Premium | | SNX_USDT | 22 | Supra Premium | | YFI_USDT | 23 | Deprecated | | FIL_USDT | 24 | Supra Premium | | EOS_USDT | 25 | Deprecated | | ETC_USDT | 26 | Supra Premium | | BCH_USD | 27 | Deprecated | | MATIC_USD | 28 | Deprecated | | ALGO_USDT | 29 | Supra Premium | | ONT_USDT | 30 | Supra Standard | | LINK_USD | 31 | Deprecated | | AAVE_USD | 32 | Deprecated | | UNI_USD | 33 | Deprecated | | SUSHI_USD | 34 | Deprecated | | CRV_USDT | 35 | Supra Premium | | ENJ_USDT | 36 | Supra Premium | | MANA_USDT | 37 | Supra Premium | | XTZ_USDT | 38 | Supra Premium | | OMG_USDT | 39 | Supra Premium | | REN_USDT | 40 | Supra Premium | | DAI_USDT | 41 | Supra Standard | | XLM_USDT | 42 | Supra Premium | | RSR_USDT | 43 | Supra Premium | | NEO_USDT | 44 | Supra Premium | | BTC_USDC | 45 | Supra Premium | | ETH_USDC | 46 | Supra Standard | | USDC_USDT | 47 | Under Supervision | | USDT_USD | 48 | Supra Premium | | BNB_USDT | 49 | Supra Premium | | COMP_USD | 50 | Deprecated | | ENJ_USD | 51 | Deprecated | | ZRX_USDT | 52 | Supra Premium | | IRC_USDT | 53 | Supra Premium | | DAI_USD | 54 | Deprecated | | KNC_USDT | 55 | Supra Premium | | FTM_USDT | 56 | Supra Premium | | BAL_USDT | 57 | Supra Premium | | BAND_USDT | 58 | Supra Premium | | DASH_USDT | 59 | Supra Premium | | ZEC_USDT | 60 | Supra Premium | | RUNE_USDT | 61 | Supra Standard | | VET_USDT | 62 | Supra Standard | | AVAX_USD | 63 | Deprecated | | LTC_USD | 64 | Deprecated | | SOL_USD | 65 | Deprecated | | DOT_USD | 66 | Deprecated | | MKR_USD | 67 | Deprecated | | BAT_USD | 68 | Deprecated | | DOGE_USD | 69 | Deprecated | | XRP_USD | 70 | Deprecated | | YFI_USD | 71 | Deprecated | | ZRX_USD | 72 | Deprecated | | OXT_USDT | 73 | Supra Standard | | UMA_USDT | 74 | Supra Premium | | HBAR_USDT | 75 | Supra Premium | | SRM_USDT | 76 | Deprecated | | SXP_USDT | 77 | Supra Standard | | KSM_USDT | 78 | Supra Premium | | C98_USDT | 79 | Supra Premium | | ARB_USDT | 80 | Supra Standard | | ARB_USD | 81 | Deprecated | | FX_ETH | 82 | Deprecated | | FX_USDT | 83 | Deprecated | | FX_BTC | 84 | Deprecated | | PUNDIX_USDT | 85 | Deprecated | | PUNDIX_ETH | 86 | Deprecated | | PUNDIX_BTC | 87 | Deprecated | | FUSE_USDT | 88 | Under Supervision | | USDC_USD | 89 | Supra Premium | | SUI_USDT | 90 | Supra Premium | | STG_USDT | 91 | Supra Standard | | PEPE_USDT | 92 | Supra Premium | | CETUS_USDT | 93 | Supra Premium | | SYS_USDT | 94 | Supra Premium | | WETH_USH | 95 | Deprecated | | svUSD_USDC | 96 | Deprecated | | svBTC_WBTC | 97 | Deprecated | | svETH_WETH | 98 | Deprecated | | unshETH_USH | 99 | Deprecated | | SVY_WETH | 100 | Deprecated | | TURBOS_USDT | 101 | Under Supervision | | SHIB_USDT | 102 | Supra Standard | | APE_USDT | 103 | Supra Premium | | APT_USDT | 104 | Supra Premium | | DYDX_USDT | 105 | Supra Premium | | ICP_USDT | 106 | Supra Premium | | OP_USDT | 107 | Supra Premium | | NEAR_USDT | 108 | Supra Premium | | AXS_USDT | 109 | Supra Standard | | IMX_USDT | 110 | Supra Standard | | SAND_USDT | 111 | Supra Standard | | RNDR_USDT | 112 | Supra Premium | | BTT_USDT | 113 | Supra Standard | | GALA_USDT | 114 | Supra Standard | | ETH_BTC | 115 | Supra Premium | | MINA_USDT | 116 | Supra Standard | | FLOW_USDT | 117 | Supra Premium | | RPL_USD | 118 | Supra Standard | | QNT_USDT | 119 | Supra Standard | | THETA_USDT | 120 | Supra Standard | | INJ_USDT | 121 | Supra Premium | | KAVA_USDT | 122 | Supra Premium | | KLAY_USDT | 123 | Deprecated | | NEXO_USDT | 124 | Supra Standard | | CAKE_USDT | 125 | Supra Premium | | CFX_USDT | 126 | Supra Standard | | CSPR_USDT | 127 | Supra Premium | | FXS_USDT | 128 | Supra Premium | | CHZ_USDT | 129 | Supra Standard | | WLD_USDT | 130 | Supra Premium | | AR_USDT | 131 | Supra Premium | | ZBC_USDT | 132 | Deprecated | | AURORA_USDT | 133 | Supra Standard | | IOTX_USDT | 134 | Supra Standard | | CRO_USDT | 135 | Supra Standard | | MNT_USDT | 136 | Supra Standard | | GLMR_USDT | 137 | Supra Premium | | ASTR_USDT | 138 | Supra Standard | | TOMO_USDT | 139 | Deprecated | | FLR_USDT | 140 | Supra Standard | | KDA_USDT | 141 | Deprecated | | CELO_USDT | 142 | Supra Premium | | 1INCH_USDT | 143 | Supra Premium | | ANKR_USDT | 144 | Supra Premium | | JST_USDT | 145 | Supra Premium | | JOE_USDT | 146 | Supra Premium | | TUSD_USDT | 147 | Supra Standard | | OKB_USDT | 148 | Under Supervision | | stETH_USDT | 149 | Under Supervision | | XDC_USDT | 150 | Supra Standard | | xcvDOT_xcDOT | 151 | Deprecated | | ADA_USD | 152 | Deprecated | | MELD_USDT | 153 | Deprecated | | xcvGLMR_WGLMR | 154 | Deprecated | | CETUS_SUI | 155 | Deprecated | | TURBOS_SUI | 156 | Under Supervision | | afSUI_SUI | 157 | Under Supervision | | haSUI_SUI | 158 | Under Supervision | | vSUI_SUI | 159 | Under Supervision | | SUI_BUCK | 160 | Deprecated | | USDC_BUCK | 161 | Under Supervision | | XEM_USDT | 162 | Supra Premium | | GRT_USDT | 163 | Supra Premium | | TON_USDT | 164 | Supra Standard | | KAS_USDT | 165 | Supra Premium | | wBTC_USDT | 166 | Supra Standard | | STX_USDT | 167 | Supra Premium | | EGLD_USDT | 168 | Supra Premium | | PAXG_USDT | 169 | Supra Standard | | HT_USDT | 170 | Deprecated | | IOTA_USDT | 171 | Supra Standard | | USDY_USDC | 172 | Under Supervision | | TWT_USDT | 173 | Supra Standard | | ALPACA_USDT | 174 | Deprecated | | AKT_USDT | 175 | Supra Premium | | HNT_USDT | 176 | Supra Premium | | BLUR_USDT | 177 | Supra Premium | | BNX_USDT | 178 | Deprecated | | BSV_USDT | 179 | Supra Standard | | BSW_USDT | 180 | Supra Premium | | CELR_USDT | 181 | Supra Premium | | CVX_USDT | 182 | Supra Premium | | PYTH_USDT | 183 | Supra Standard | | KLUB_USDT | 184 | Deprecated | | USDY_USD (Primary Exchange Rate) | 185 | Supra Premium | | CHAPZ_USDT | 186 | Deprecated | | ENS_USDT | 187 | Supra Premium | | GMT_USDT | 188 | Supra Premium | | GMX_USDT | 189 | Supra Premium | | GNO_USDT | 190 | Supra Standard | | FET_USDT | 191 | Supra Premium | | FLOKI_USDT | 192 | Supra Premium | | GAL_USDT | 193 | Deprecated | | PYUSD_USDT | 194 | Under Supervision | | XMR_USDT | 195 | Supra Standard | | ZIL_USDT | 196 | Supra Premium | | POL_USDT | 197 | Under Supervision | | FINC_USDT | 198 | Under Supervision | | BONK_USDT | 199 | Under Supervision | | FUD_SUI | 200 | Deprecated | | DAO_USDT | 201 | Under Supervision | | ELON_USDT | 202 | Supra Standard | | TOSHI_WETH | 203 | Under Supervision | | MOCHI_WETH | 204 | Under Supervision | | TIA_USDT | 205 | Supra Premium | | PENDLE_USDT | 206 | Supra Standard | | NTRN_USDT | 207 | Supra Standard | | SEI_USDT | 208 | Supra Standard | | ORDI_USDT | 209 | Supra Premium | | mevETH_WETH | 210 | Deprecated | | WETH_USDT | 211 | Under Supervision | | JTO_USDT | 212 | Supra Standard | | RIO_USDT | 213 | Under Supervision | | OSMO_USDT | 214 | Supra Premium | | AXL_USDT | 215 | Supra Premium | | AGIX_USDT | 216 | Deprecated | | SC_USDT | 217 | Supra Standard | | QTUM_USDT | 218 | Supra Standard | | USDP_USDT | 219 | Deprecated | | METIS_USDT | 220 | Supra Standard | | ANT_USDT | 221 | Deprecated | | ICX_USDT | 222 | Supra Standard | | GLM_USDT | 223 | Supra Standard | | T_USDT | 224 | Supra Standard | | WAXP_USDT | 225 | Supra Standard | | BICO_USDT | 226 | Supra Standard | | ACE_USDT | 227 | Supra Standard | | FLUX_USDT | 228 | Supra Premium | | SFUND_USDT | 229 | Supra Premium | | DESO_USDT | 230 | Deprecated | | SKL_USDT | 231 | Supra Standard | | ILV_USDT | 232 | Supra Standard | | MOBILE_USDT | 233 | Supra Premium | | WAVES_USDT | 234 | Supra Premium | | SUPER_USDT | 235 | Under Supervision | | TFUEL_USDT | 236 | Supra Standard | | OCEAN_USDT | 237 | Deprecated | | AUDIO_USDT | 238 | Under Supervision | | MASK_USDT | 239 | Supra Premium | | DCR_USDT | 240 | Supra Standard | | RVN_USDT | 241 | Supra Standard | | MAGIC_USDT | 242 | Supra Premium | | STORJ_USDT | 243 | Supra Standard | | MX_USDT | 244 | Under Supervision | | SSV_USDT | 245 | Supra Standard | | ONE_USDT | 246 | Supra Premium | | XCH_USDT | 247 | Supra Standard | | SFP_USDT | 248 | Under Supervision | | RAY_USDT | 249 | Under Supervision | | XAUT_USDT | 250 | Under Supervision | | mevETH_ETH (Primary Exchange Rate) | 251 | Supra Premium | | MINU_WMNT | 252 | Deprecated | | RLB_WETH | 253 | Under Supervision | | FRAX_USDC | 254 | Under Supervision | | CRVUSD_USDT | 255 | Deprecated | | mETH_WETH | 256 | Under Supervision | | WMNT_USDT | 257 | Deprecated | | uniETH_WETH | 258 | Under Supervision | | CORE_USDT | 259 | Supra Standard | | GAS_USDT | 260 | Supra Standard | | HOT_USDT | 261 | Supra Standard | | NFT_USDT | 262 | Supra Standard | | ELF_USDT | 263 | Supra Premium | | WOO_USDT | 264 | Supra Premium | | XEC_USDT | 265 | Supra Standard | | TRB_USDT | 266 | Supra Standard | | USDD_USDT | 267 | Supra Standard | | IDO_USDT | 268 | Supra Premium | | ROSE_USDT | 269 | Supra Standard | | WEMIX_USDT | 270 | Supra Standard | | BEAM_USDT | 271 | Coming soon | | BIFI_USDT | 272 | Under Supervision | | AI_USDT | 273 | Supra Standard | | MAV_USDT | 274 | Supra Standard | | PEOPLE_USDT | 275 | Supra Premium | | XRD_USDT | 276 | Supra Standard | | IDEX_USDT | 277 | Supra Standard | | LEO_USDT | 278 | Under Supervision | | LUNA_USDT | 279 | Supra Premium | | MBOX_USDT | 280 | Supra Standard | | TIFI_WBNB | 281 | Under Supervision | | WBNB_BUSD | 282 | Under Supervision | | RATS_USDT | 283 | Supra Premium | | INTER_USDT | 284 | Under Supervision | | PERP_USDT | 285 | Supra Premium | | LAZIO_USDT | 286 | Supra Standard | | SLP_USDT | 287 | Supra Standard | | XAI_USDT | 288 | Supra Premium | | SMR_USDT | 289 | Deprecated | | wstETH_WETH | 290 | Under Supervision | | rETH_WETH | 291 | Under Supervision | | SANTOS_USDT | 292 | Supra Standard | | RDNT_USDT | 293 | Supra Premium | | TIFI_USDT | 294 | Deprecated | | VLX_USDT | 295 | Under Supervision | | NEON_USDT | 296 | Under Supervision | | SPA_USDT | 297 | Supra Standard | | NRK_USDT | 298 | Deprecated | | mETH_ETH (Primary Exchange Rate) | 299 | Supra Premium | | MANTA_USDT | 300 | Supra Premium | | ONDO_USDT | 301 | Supra Standard | | LQTY_USDT | 302 | Supra Premium | | ACX_USDT | 303 | Under Supervision | | SAVM_USDT | 304 | Deprecated | | USDT_BUSD | 305 | Under Supervision | | JASMY_USDT | 306 | Supra Premium | | PRIME_USDT | 307 | Under Supervision | | SAMO_USDT | 308 | Supra Standard | | MOVR_USDT | 309 | Supra Premium | | LPT_USDT | 310 | Supra Premium | | TAO_USDT | 311 | Supra Standard | | CHEEL_USDT | 312 | Supra Standard | | FTN_USDT | 313 | Deprecated | | POKT_USDT | 314 | Supra Standard | | RBN_USDT | 315 | Deprecated | | AZERO_USDT | 316 | Supra Premium | | LSD_USDT | 317 | Deprecated | | CANTO_USDT | 318 | Deprecated | | MYRO_USDT | 319 | Supra Standard | | API3_USDT | 320 | Supra Premium | | FNSA_USDT | 321 | Deprecated | | OAS_USDT | 322 | Supra Premium | | XVS_USDT | 323 | Supra Standard | | FUD_USDC | 324 | Deprecated | | wstETH_stETH (Primary Exchange Rate) | 325 | Supra Premium | | uniETH_ETH ( Primary Exchange Rate) | 326 | Supra Premium | | STONE_WETH | 327 | Under Supervision | | STONE_USDC | 328 | Under Supervision | | wUSDM_USDC | 329 | Deprecated | | ALT_USDT | 330 | Supra Standard | | KARATE_USDT | 331 | Deprecated | | AERGO_USDT | 332 | Under Supervision | | ORCA_USDT | 333 | Under Supervision | | LYX_USDT | 334 | Under Supervision | | BDX_USDT | 335 | Deprecated | | RLB_USDT | 336 | Under Supervision | | MEME_USDT | 337 | Supra Premium | | RACA_USDT | 338 | Supra Premium | | WOJAK_USDT | 339 | Supra Standard | | LSK_USDT | 340 | Supra Premium | | AMP_USDT | 341 | Supra Standard | | CHR_USDT | 342 | Supra Premium | | DORA_USDT | 343 | Deprecated | | AUCTION_USDT | 344 | Supra Standard | | RLC_USDT | 345 | Supra Premium | | DEXE_USDT | 346 | Supra Standard | | GEL_USDT | 347 | Deprecated | | OMI_USDT | 348 | Under Supervision | | ALEX_USDT | 349 | Supra Standard | | CTSI_USDT | 350 | Supra Standard | | VTHO_USDT | 351 | Supra Premium | | POLYX_USDT | 352 | Supra Premium | | CTC_USDT | 353 | Supra Premium | | IOST_USDT | 354 | Supra Premium | | GNS_USDT | 355 | Supra Standard | | EDU_USDT | 356 | Supra Premium | | ULTIMA_USDT | 357 | Deprecated | | VR_USDT | 358 | Under Supervision | | LOOKS_USDT | 359 | Supra Premium | | VV_USDT | 360 | Deprecated | | JUP_USDT | 361 | Supra Premium | | CDX_USDT | 362 | Deprecated | | DIA_USDT | 363 | Supra Premium | | XNO_USDT | 364 | Supra Premium | | ARBS_USDT | 365 | Supra Premium | | AIOZ_USDT | 366 | Supra Premium | | SYN_USDT | 367 | Supra Premium | | BORA_USDT | 368 | Deprecated | | ALPH_USDT | 369 | Supra Standard | | BNB_USDC | 370 | Supra Premium | | SUI_USDC | 371 | Supra Premium | | DUSK_USDT | 372 | Supra Premium | | TRAC_USDT | 373 | Under Supervision | | POND_USDT | 374 | Supra Standard | | TET_USDT | 375 | Under Supervision | | SGB_USDT | 376 | Under Supervision | | SXP_USDT | 377 | Deprecated | | NMR_USDT | 378 | Supra Premium | | POWR_USDT | 379 | Supra Standard | | BLZ_USDT | 380 | Supra Premium | | PYR_USDT | 381 | Supra Premium | | CQT_USDT | 382 | Deprecated | | NYM_USDT | 383 | Supra Premium | | TRIAS_USDT | 384 | Deprecated | | RIF_USDT | 385 | Supra Standard | | HIVE_USDT | 386 | Supra Standard | | YGG_USDT | 387 | Supra Premium | | OM_USDT | 388 | Deprecate | | ZEN_USDT | 389 | Supra Premium | | DGB_USDT | 390 | Supra Premium | | ID_USDT | 391 | Supra Premium | | PROM_USDT | 392 | Supra Premium | | EVER_USDT | 393 | Deprecated | | CTXC_USDT | 394 | Deprecated | | ONG_USDT | 395 | Supra Premium | | DKA_USDT | 396 | Under Supervision | | MUBI_USDT | 397 | Supra Premium | | DFI_USDT | 398 | Supra Standard | | GOG_USDT | 399 | Deprecated | | HOOK_USDT | 400 | Supra Premium | | LOOM_USDT | 401 | Deprecated | | GAFI_USDT | 402 | Deprecated | | HFT_USDT | 403 | Supra Premium | | PLA_USDT | 404 | Deprecated | | STPT_USDT | 405 | Supra Premium | | ARKM_USDT | 406 | Supra Premium | | SCRT_USDT | 407 | Supra Premium | | NAVX_USDT | 408 | Supra Standard | | svUSD_FRAX | 409 | Deprecated | | DYM_USDT | 410 | Supra Standard | | SOL_USDC | 411 | Supra Premium | | AVAX_USDC | 412 | Supra Standard | | MATIC_USDC | 413 | Deprecated | | OP_USDC | 414 | Deprecated | | COTI_USDT | 415 | Supra Standard | | XAVA_USDT | 416 | Supra Standard | | SHRAP_USDT | 417 | Deprecated | | EWT_USDT | 418 | Supra Standard | | FLIP_USDT | 419 | Supra Standard | | STEEM_USDT | 420 | Supra Premium | | TOMI_USDT | 421 | Supra Premium | | CLY_wAVAX | 422 | Under Supervision | | LOCK_wETH | 423 | Under Supervision | | CLXY_wHBAR | 424 | Under Supervision | | SAUCE_wHBAR | 425 | Under Supervision | | xSAUCE_wHBAR | 426 | Under Supervision | | HBARX_wHBAR | 427 | Under Supervision | | HST_wHBAR | 428 | Under Supervision | | DOVU_wHBAR | 429 | Under Supervision | | HELI_wHBAR | 430 | Deprecated | | JAM_wHBAR | 431 | Under Supervision | | HBAR_USD | 432 | Supra Standard | | wUSDM_USDM (Primary Exchange Rate) | 433 | Supra Premium | | hSUI_SUI | 434 | Deprecated | | LAB.m_WETH | 435 | Deprecated | | wstETH_USDC | 436 | Under Supervision | | VIA_USDT | 437 | Deprecated | | STRK_USDT | 438 | Supra Premium | | PIXEL_USDT | 439 | Supra Standard | | vASTR_WASTR | 440 | Deprecated | | AGI_USDT | 441 | Supra Premium | | WIF_USDT | 442 | Supra Premium | | weETH_WETH | 443 | Under Supervision | | SATS_USDT | 444 | Supra Premium | | TRAC_USDT (BRC20) | 445 | Under Supervision | | DOVI_USDT | 446 | Deprecated | | NALS_USDT | 447 | Deprecated | | MMSS_USDT | 448 | Deprecated | | VMPX_USDT | 449 | Deprecated | | MAPO_USDT | 450 | Supra Standard | | CGO_USDT | 451 | Under Supervision | | DEGEN_WETH | 452 | Under Supervision | | TYBG_WETH | 453 | Under Supervision | | sDAI_USDC | 454 | Deprecated | | vASTR_ASTR (Primary Exchange Rate) | 455 | Supra Premium | | STONE_ETH (Primary Exchange Rate) | 456 | Supra Premium | | sfrxETH_ETH (Primary Exchange Rate) | 457 | Supra Premium | | COPI_USDT | 458 | Deprecated | | WEN_USDT | 459 | Supra Standard | | PUPS_USDT | 460 | Deprecate | | USDE_USDT | 461 | Under Supervision | | DEGEN_USDT | 462 | Under Supervision | | W_USDT | 463 | Supra Premium | | AEVO_USDT | 464 | Supra Standard | | ENA_USDT | 465 | Supra Standard | | ETHFI_USDT | 466 | Supra Standard | | pxETH_WETH | 467 | Under Supervision | | rsETH_WETH | 468 | Under Supervision | | ezETH_WETH | 469 | Under Supervision | | eETH_WETH | 470 | Under Supervision | | rswETH_WETH | 471 | Under Supervision | | KARATE_WHBAR | 472 | Under Supervision | | TAIKO_USDT | 473 | Supra Standard | | FDUSD_USDT | 474 | Supra Premium | | WINR_USDC | 475 | Under Supervision | | SCA_USDT | 476 | Supra premium | | VANRY_USDT | 477 | Supra Premium | | PACK_WHBAR | 478 | Under Supervision | | STEAM_WHBAR | 479 | Under Supervision | | MELD_WETH | 480 | Deprecated | | BOME_USDT | 481 | Supra Premium | | DOD0_USDT | 482 | Supra Premium | | NOT_USDT | 483 | Supra Premium | | TNSR_USDT | 484 | Supra Standard | | ZK_USDT | 485 | Supra Premium | | ZRO_USDT | 486 | Supra Premium | | IO_USDT | 487 | Supra Premium | | HSUITE_WHBAR | 488 | Deprecated | | AEG_USDT | 489 | Deprecated | | AUSD_USDT | 490 | Under Supervision | | DEEP_USDT | 491 | Under Supervision | | SCR_UDT | 492 | Supra Premium | | GOAT_USDT | 493 | Supra Standard | | EIGEN_USDT | 494 | Supra standard | | yUSD_USDT (Primary Exchange Rate) | 495 | Supra Premium | | TURBO_USDT | 496 | Supra Premium | | MOODENG_USDT | 497 | Supra Premium | | CHILLGUY_USDT | 498 | Supra Premium | | NEIRO_USDT | 499 | Supra Standard | | SUPRA_USDT | 500 | Under Supervision | | MOG_USDT | 501 | Supra Premium | | PNUT_USDT | 502 | Supra Premium | | POPCAT_USDT | 503 | Supra Standard | | BRETT_USDT | 504 | Supra Standard | | wHBAR_USDC | 505 | Under Supervision | | MOVE_USDT | 506 | Supra Premium | | pUSD_USDC | 507 | Supra Premium | | BLUE_USDT | 508 | Supra Premium | | nRWA_PUSD | 509 | Supra Premium | | sBTC_BTC | 510 | Supra Premium | | nTBILL_PUSD | 511 | Supra Premium | | nYIELD_PUSD | 512 | Supra Premium | | xPACK_PACK | 513 | Under Supervision | | JOC_USDT | 514 | Under Supervision | | TRUMP_USDT | 515 | Supra Standard | | MELANIA_USDT | 516 | Supra Standard | | HSK_USDT | 517 | Under Supervision | | S_USDT | 518 | Supra Standard | | MPC_USDT | 519 | Under Supervision | | PLUME_USDT | 520 | Supra Premium | | FARTCOIN_USDT | 521 | Supra Premium | | AI16Z_USDT | 522 | Deprecated | | GRIFFAIN_USDT | 523 | Supra Standard | | VIRTUAL_USDT | 524 | Supra Premium | | AIXBT_USDT | 525 | Supra Premium | | KBL_WHBAR | 526 | Under Supervision | | GRELF_WHBAR | 527 | Under Supervision | | BERA_USDT | 528 | Supra Premium | | pETH_USD (Primary Exchange Rate) | 529 | Supra Premium | | nELIXIR_USD (Primary Exchange Rate) | 530 | Supra Premium | | pacARB_NAV (Primary Net asset Value) | 531 | Supra Premium | | BONZO_WHBAR | 532 | Under Supervision | | HTX_USDT | 533 | Supra Standard | | WAL/USDT | 534 | Supra Standard | | stSUI/USDC | 535 | Deprecated | | ALPHA_stSUI | 536 | Under Supervision | | LBTC_SUI | 537 | Under Supervision | | stSUI_SUI (Primary Exchange Rate) | 538 | Supra Premium | | hSUITE_HBAR | 539 | Deprecate | | HAEDAL/USDT | 540 | Supra Premium | | nBasis_USD (Primary Exchange Rate) | 541 | Supra Premium | | UP_SUI | 542 | Under Supervision | | nCREDIT_USD(Primary Exchange Rate) | 543 | Supra Premium | | nPAYFI_USD(Primary Exchange Rate) | 544 | Supra Premium | | nINSTO_USD(Primary Exchange Rate) | 545 | Supra Premium | | nETF_USD(Primary Exchange Rate) | 546 | Supra Premium | | nBTC_USD(Primary Exchange Rate) | 547 | Supra Premium | | A_USDT | 548 | Supra PRemium | | PI_USDT | 549 | Supra Standard | | USD1_USDT | 550 | Supra Standard | | HYPE_USDT | 551 | Supra Standard | | PUMP_USDT | 552 | Supra Standard | | PENGU_USDT | 553 | Supra Premium | | IKA_USDT | 554 | Supra Standard | | TREE_USDT | 555 | Supra Standard | | DOG_USDT | 556 | Supra Premium | | LOBO_USDT | 557 | Under Supervision | | ALKIMI_USDT | 558 | Under Supervision | | stSUPRA_SUPRA ( Primary Exchange Rate | 559 | Supra Premium | | YZY_USDT | 560 | Supra Premium | | RED_USDT | 561 | Supra Premium | | RON_USDT | 562 | Supra Premium | | WLFI_USDT | 563 | Supra Premium | | LINEA_USDT | 564 | Supra Premium | | ASTER_USDT | 565 | Supra Standard | | 2Z_USDT | 566 | Supra Standard | | XPL_USDT | 567 | Supra Premium | | MMT/USDT | 568 | Supra Premium | | MON/USDT | 569 | Supra Standard | | MORPH/USDT | 570 | Supra Premium | | FLUID/USDT | 571 | Supra Premium | | soUSD/USD | 572 | Supra Premium (Primary Exchange Rate) | | | | | | | | | | MANTRA_USDT | 575 | Supra standard | Supra can read data from any blockchain, aggregate and validate it, and subsequently publish that data onto destination chains for their smart contracts. A number of liquid staking protocols employ this functionality to publish, request, and read redemption rates of liquid staking tokens across multiple chains. | Data Pair | Pair ID | Pair Category | | ------------------------------------ | ------- | ------------- | | USDY_USD (Primary Exchange Rate) | 185 | Supra Premium | | mevETH_ETH (Primary Exchange Rate) | 251 | Supra Premium | | mETH_ETH (Primary Exchange Rate) | 299 | Supra Premium | | wstETH_stETH (Primary Exchange Rate) | 325 | Supra Premium | | uniETH_ETH (Primary Exchange Rate) | 326 | Supra Premium | | wUSDM_USDM (Primary Exchange Rate) | 433 | Supra Premium | | vASTR_ASTR(Primary Exchange Rate) | 455 | Coming Soon | | STONE_ETH(Primary Exchange Rate) | 456 | Supra Premium | | sfrxETH_ETH(Primary Exchange Rate) | 457 | Supra Premium | | yUSD_USDT (Primary Exchange Rate) | 495 | Supra premium | | stSUI_SUI (Primary Exchange Rate) | 539 | Supra premium | | nBasis_USD (Primary Exchange Rate) | 541 | Supra Premium | | nCREDIT_USD(Primary Exchange Rate) | 543 | Supra Premium | | nPAYFI_USD(Primary Exchange Rate) | 544 | Supra Premium | | nINSTO_USD(Primary Exchange Rate) | 545 | Supra Premium | | nETF_USD(Primary Exchange Rate) | 546 | Supra Premium | | nBTC_USD(Primary Exchange Rate) | 547 | Supra Premium | | soUSD/USDPrimary Exchange Rate) | 572 | Supra Premium | Live forex feeds available 24\*5 | Data Pair | Pair ID | Pair category | | --------- | ------- | ----------------- | | EUR_USD | 5000 | Under Supervision | | USD_JPY | 5001 | Under Supervision | | GBP_USD | 5002 | Under Supervision | | EUR_GBP | 5003 | Under Supervision | | USD_KRW | 5004 | Under Supervision | | USD_HKD | 5005 | Under Supervision | | USD_INR | 5006 | Under Supervision | | USD_CNY | 5007 | Under Supervision | | USD_SGD | 5008 | Under Supervision | | USD_THB | 5009 | Under Supervision | | AUD_USD | 5010 | Under Supervision | | USD_CAD | 5011 | Under Supervision | | USD_CHF | 5012 | Under Supervision | | NZD_USD | 5013 | Under Supervision | | USD_VND | 5014 | Under Supervision | | USD_PHP | 5015 | Under Supervision | | USD_UAH | 5016 | Under Supervision | | USD_PKR | 5017 | Under Supervision | | USD_BRL | 5018 | Under Supervision | | USD_RUB | 5019 | Under Supervision | | USD_IDR | 5020 | Under Supervision | | USD_TRY | 5021 | Under Supervision | | USD_NGN | 5022 | Under Supervision | | USD_ARS | 5023 | Under Supervision | | EUR_AUD | 5024 | Under Supervision | | GBP_JPY | 5025 | Under Supervision | | CHF_JPY | 5026 | Under Supervision | | EUR_CHF | 5027 | Under Supervision | | AUD_JPY | 5028 | Under Supervision | | GBP_CAD | 5029 | Under Supervision | | NZD_JPY | 5030 | Under Supervision | Supra current reports more than 100 US traded stock prices during standard US trading hours. | Data Pair | Pair ID | Pair Cetagory | | ---------------------------------------------------- | ------- | ----------------- | | TSLA_USD | 6000 | Under Supervision | | MSFT_USD | 6001 | Under Supervision | | NVDA_USD | 6002 | Under Supervision | | GOOG_USD | 6003 | Under Supervision | | AAPL_USD | 6004 | Under Supervision | | AMZN_USD | 6005 | Under Supervision | | META_USD | 6006 | Under Supervision | | NFLX_USD | 6007 | Under Supervision | | PYPL_USD | 6008 | Under Supervision | | INTC_USD | 6009 | Under Supervision | | COIN_USD | 6010 | Under Supervision | | GME_USD | 6011 | Under Supervision | | AMD_USD | 6012 | Under Supervision | | DIS_USD | 6013 | Under Supervision | | BRK.A_USD | 6014 | Under Supervision | | BABA_USD | 6015 | Under Supervision | | XOM_USD | 6016 | Under Supervision | | TMO_USD | 6017 | Under Supervision | | UNH_USD | 6018 | Under Supervision | | LLY_USD | 6019 | Under Supervision | | HD_USD | 6020 | Under Supervision | | TTD_USD | 6021 | Under Supervision | | CRM_USD | 6022 | Under Supervision | | QCOM_USD | 6023 | Under Supervision | | PFE_USD | 6024 | Under Supervision | | ABNB_USD | 6025 | Under Supervision | | SHOP_USD | 6026 | Under Supervision | | JD_USD | 6027 | Under Supervision | | CVX_USD | 6028 | Under Supervision | | JPM_USD | 6029 | Under Supervision | | MU_USD | 6030 | Under Supervision | | SNAP_USD | 6031 | Under Supervision | | UBER_USD | 6032 | Under Supervision | | ZM_USD | 6033 | Under Supervision | | NIKE_USD | 6034 | Under Supervision | | JNJ_USD | 6035 | Under Supervision | | PG_USD | 6036 | Under Supervision | | COST_USD | 6037 | Under Supervision | | ORCLE_USD | 6038 | Under Supervision | | MSTR/USD | 6039 | Under Supervision | | SPY_USD (ETF) | 6040 | Under Supervision | | IBIT_USD (ETF) | 6041 | Under Supervision | | ETHE_USD (ETF) | 6042 | Under Supervision | | ETHA_USD (ETF) | 6043 | Under Supervision | | ETHV_USD (ETF) | 6044 | Under Supervision | | FETH_USD (ETF) | 6045 | Under Supervision | | ETHW_USD (ETF) | 6046 | Under Supervision | | FBTC_USD (ETF) | 6047 | Under Supervision | | GBTC_USD (ETF) | 6048 | Under Supervision | | ARKB_USD (ETF) | 6049 | Under Supervision | | BITB_USD RTF) | 6050 | Under Supervision | | V_USD | 6051 | Under Supervision | | MA_USD | 6052 | Under Supervision | | WMT_USD | 6053 | Under Supervision | | BAC_USD | 6054 | Under Supervision | | ABBV_USD | 6055 | Under Supervision | | WFC_USD | 6056 | Under Supervision | | CSCO_USD | 6057 | Under Supervision | | MRK_USD | 6058 | Under Supervision | | KO_USD | 6059 | Under Supervision | | NOW_USD | 6060 | Under Supervision | | ACN_USD | 6061 | Under Supervision | | ABT_USD | 6062 | Under Supervision | | GE_USD | 6063 | Under Supervision | | LIN_USD | 6064 | Under Supervision | | ISRG_USD | 6065 | Under Supervision | | IBM_USD | 6066 | Under Supervision | | PEP_USD | 6067 | Under Supervision | | MCD_USD | 6068 | Under Supervision | | GS_USD | 6069 | Under Supervision | | PM_USD | 6070 | Under Supervision | | CAT_USD | 6071 | Under Supervision | | ADBE_USD | 6072 | Under Supervision | | AXP_USD | 6073 | Under Supervision | | MS_USD | 6074 | Under Supervision | | TXN_USD | 6075 | Under Supervision | | INTU_USD | 6076 | Under Supervision | | TRTX_USD | 6077 | Under Supervision | | VZ_USD | 6078 | Under Supervision | | SPGI_USD | 6079 | Under Supervision | | PLTR_USD | 6080 | Under Supervision | | DHR_USD | 6081 | Under Supervision | | BKNG_USD | 6082 | Under Supervision | | C_USD | 6083 | Under Supervision | | AMAT_USD | 6084 | Under Supervision | | UNP_USD | 6085 | Under Supervision | | BSX_USD | 6086 | Under Supervision | | NEE_USD | 6087 | Under Supervision | | LOW_USD | 6088 | Under Supervision | | BLK_USD | 6089 | Under Supervision | | AMGN_USD | 6090 | Under Supervision | | ETN_USD | 6091 | Under Supervision | | HON_USD | 6092 | Under Supervision | | CMCSA_USD | 6093 | Under Supervision | | PGR_USD | 6094 | Under Supervision | | TJX_USD | 6095 | Under Supervision | | SYK_USD | 6096 | Under Supervision | | BX_USD | 6097 | Under Supervision | | ANET_USD | 6098 | Under Supervision | | DE_USD | 6099 | Under Supervision | | COP_USD | 6100 | Under Supervision | | BA_USD | 6101 | Under Supervision | | ADP_USD | 6102 | Under Supervision | | BMY_USD | 6103 | Under Supervision | | PANW_USD | 6104 | Under Supervision | | SCHW_USD | 6105 | Under Supervision | | FI_USD | 6106 | Under Supervision | | GILD_USD | 6107 | Under Supervision | | GEV_USD | 6108 | Under Supervision | | MDT_USD | 6109 | Under Supervision | | VRTX_USD | 6110 | Under Supervision | | SBUX_USD | 6111 | Under Supervision | | CRCL_USD | 6112 | Under Supervision | | SPDIA_USD (SPDR S&P 500 ETF) | 6113 | Under Supervision | | QQQM_USD (Nasdaq-100 ETF) | 6114 | Under Supervision | | IWM_USD (TrustSPDR Dow Jones Industrial Average ETF) | 6115 | Under Supervision | Supra reports commodity prices from every week Sunday 21.00.00 UTC to Friday 21.00.00 UTC | Data Pair | Pair ID | Pair Category | | --------- | ------- | ----------------- | | XAU_USD | 5500 | Under Supervision | | XAG_USD | 5501 | Under Supervision | | WTI_USD | 5503 | Under Supervision | | XPD_USD | 5504 | Under Supervision | | XPT_USD | 5505 | Under Supervision | | XG_USD | 5506 | Under Supervision | Supra now publishes US based popular economic indicators enabling vast number of use web3 onchain. | Data Pair | Update frequency | Pair ID | Pair Category | | ----------------------------------- | ---------------- | ----------- | ----------------- | | TBill Yield (3 Months) | daily at EOD | 20000 | Under Supervision | | TBond Yield (2 Years) | daily at EOD | 20001 | Under Supervision | | TBond Yield (5 Years) | daily at EOD | 20002 | Under Supervision | | TBond Yield (7 Years) | daily at EOD | 20003 | Under Supervision | | TBond Yield `(10 Years) | daily at EOD | 20004 | Under Supervision | | TBond Yield `(30 Years) | daily at EOD | 20005 | Under Supervision | | Consumer Price Index (CPI-U) Annual | daily at EOD | 20006 | Under Supervision | | Inflation Rate | Coming Soon | Coming Soon | Coming Soon | | Fed Funds Rate | Daily at SOD | 20009 | Under Supervision | | GDP (Annual) | Coming Soon | Coming Soon | Coming Soon | | Asset | Index | Category | | ----- | ----- | ----------------- | | BTC | 50000 | Under Supervision | | ETH | 50001 | Under Supervision | | SOL | 50002 | Under Supervision | | BNB | 50003 | Under Supervision | | XRP | 50004 | Under Supervision | | DOGE | 50005 | Under Supervision | | TON | 50006 | Under Supervision | | ADA | 50007 | Under Supervision | | TRX | 50008 | Under Supervision |
Important: Please make sure you read and understand [Terms of Use](https://supra.com/terms-of-use/) before start using Supra products and services. ### Source: https://docs.supra.com/oracles/data-feeds/pull-oracle # Pull Oracle DORA V2, our latest version of data feeds protocol, uses a combination of Web2 and Web3 methods to achieve ultra-low latency when sending data from Supra to destination chains. First, Web2 methods are used to retrieve data from Supra, while Web3 smart contracts are utilised for cryptographically verifying and writing it on-chain where it lives on immutable ledgers. Please refer to the following resources for a better understanding of DORA price feeds. - [Data Feeds](/oracles/data-feeds) - This explains how Supra calculates the **S-Value** for data feeds. - [Data Feeds Index](/oracles/data-feeds/data-feeds-index) - This provides a list of data feeds currently offered by Supra. - [Available Networks](/oracles/data-feeds/pull-oracle/networks) - This lists available networks and Supra contract addresses. Important: Please make sure you read and understand [Terms of Use](https://supra.com/terms-of-use/) before start using Supra products and services. The first step of the process would be to set up your web2 code to interact with DORA's pull oracle and sync with Supra's consumer smart contract address.
#### _Javascript Implementation_ A code library is designed to connect to a gRPC/Rest server to retrieve proof data, which it then uses to interact with a smart contracts can be downloaded from links provided below. This document provides instructions on setting up and using the library, along with guidelines for customising its components to suit your specific requirements. - gRPC - [Download here](https://github.com/Entropy-Foundation/oracle-pull-example/tree/master/gRPC/javascript). - REST - [Download here](https://github.com/Entropy-Foundation/oracle-pull-example/tree/master/rest/javascript). **Installation** To use the PullServiceClient library, follow these steps: 1. Clone the repository or download the library's source code. 2. Install the necessary dependencies by running the following command in your project directory: ```bash npm install ``` **Usage** The library's primary function retrieves proof data from the gRPC server using specified parameters and subsequently invokes a smart contract function on a blockchain network. **Configuration** Before using the library, make sure to set up the configuration in the main.js file: - Set the server address: gRPC
Network gRPC Server Address
Mainnets ```bash mainnet-dora-2.supra.com:443 ```
Testnets ```bash testnet-dora-2.supra.com:443 ```
- Set the server address: REST
Network REST Server Address
Mainnets ```bash https://rpc-mainnet-dora-2.supra.com ```
Testnets ```bash https://rpc-testnet-dora-2.supra.com ```
- Set the pair indexes as an array (below given indexes are examples): ```bash const pairIndexes = [0, 21, 61, 49]; ``` - Set the chain type to EVM: ```bash const chainType = 'evm'; ``` - Configure the RPC URL for the desired blockchain network: ```bash const web3 = new Web3(new Web3.providers.HttpProvider('')); ``` #### Customization Users can customize the smart contract interaction under the callContract function. Specifically, you can modify the following components: 1. **Smart Contract ABI**: Update the path to your smart contract's ABI JSON file: ```bash const contractAbi = require("../resources/abi.json"); ```
2. **Smart Contract Address**: Set the address of your smart contract: ```bash const contractAddress = ''; ```
3. **Function Call**: Modify the function call according to your smart contract's methods. For example, if your smart contract has a method named GetPairPrice: ```bash const txData = contract.methods.GetPairPrice(hex, 0).encodeABI(); ```
4. **Gas Estimate**: Adjust the gas estimation by calling the desired contract method: ```bash const gasEstimate = await contract.methods.GetPairPrice(hex, 0).estimateGas({ from: "" }); ```
5. **Transaction Object**: Customize the transaction object as needed: ```bash const transactionObject = { from: "", to: contractAddress, data: txData, gas: gasEstimate, gasPrice: await web3.eth.getGasPrice() // Set your desired gas price here, e.g: web3.utils.toWei('1000', 'gwei') }; ```
6. **Private Key Signing**: Sign the transaction with the appropriate private key: ```bash const signedTransaction = await web3.eth.accounts.signTransaction(transactionObject, ""); ``` #### Running the Application To run the application, execute the following command: ```bash node main.js ``` This will initiate the fetching of proof data and allow for interaction with the smart contract based on the provided configuration and customisation. ---------------------------------------------------- #### *Rust Implementation* **Prerequisites** * [Rust](https://www.rust-lang.org/) and[ Cargo](https://doc.rust-lang.org/cargo/getting-started/installation.html) needs to be installed on your computer. * The code library being discussed in the section can be downloaded below * gRPC: [Download Here](https://github.com/Entropy-Foundation/oracle-pull-example/tree/feat/DoraV2/gRPC/rust-sdks) * REST: [Download Here](https://github.com/Entropy-Foundation/oracle-pull-example/tree/feat/DoraV2/rest/rust-sdks) **Installation** To use the Rust library for EVM please follow these steps: 1. Clone the repository or download the library's source code. 2. Navigate to the project directory in your terminal. **Usage** The Rust library for Sui, Aptos and EVM provides a complete example that retrieves proof data from a gRPC/Rest server and then calls a contract function on a blockchain network. - Set the gRPC server address:
Network gRPC Server Address
Mainnets ```bash const address = 'mainnet-dora-2.supra.com'; ```
Testnets ```bash const address = 'testnet-dora-2.supra.com'; ```
- Set the REST server address:
Network REST Server Address
Mainnets ```bash let address = "https:://rpc-mainnet-dora-2.supra.com".to_string(); ```
Testnets ```bash let address = "https:://rpc-testnet-dora-2.supra.com".to_string(); ```
* Set the pair indexes as an array: ( below mentioned indexes are for an example) * Set the pair indexes as an array: ( below mentioned indexes are for an example) ```rust let pair_indexes = vec![0, 21, 61, 49]; ``` * Set the chain type to Sui: ```rust let chain_type = "sui".to_string(); ``` * Set the RPC URL for the desired blockchain network: ```rust let rpc_url = ""; ``` Before using the library, configure the file in example folder: #### Customization Users can customize the smart contract interaction under the call\_contract function. Specifically, you can modify the following components: 1. **Private Key**: Set your private key: ```rust let secret_key = ""; ``` 2. **Contract Address**: Set the address of your smart contract: ```rust let contract_address = ""; ``` 3. **Contract Function Call**: Customize the function call based on your contract module and methods:: ```rust const MODULE: &str = ""; const ENTRY: &str = ""; ``` 4. Transaction Object: Customize the transaction object as needed: ```rust let sui_arg = vec![ SuiJsonValue::from_str(&payload.dkg_object).unwrap(), SuiJsonValue::from_str(&payload.oracle_holder_object).unwrap(), SuiJsonValue::from_str(&payload.merkle_root_object).unwrap(), SuiJsonValue::from_str(CLOCK).unwrap(), SuiJsonValue::from_bcs_bytes(None, &payload.proof_bytes).unwrap(), ]; ``` #### Running the Application Open your terminal and navigate to the project directory. Run the example using the following command: ```rust cargo run --example sui_client ```
#### _Javascript Implementation_ A code library is designed to connect to a gRPC/Rest server to retrieve proof data, which it then uses to interact with a smart contracts can be downloaded from links provided below. This document provides instructions on setting up and using the library, along with guidelines for customising its components to suit your specific requirements. - gRPC - [Download here](https://github.com/Entropy-Foundation/oracle-pull-example/tree/master/gRPC/javascript). - REST - [Download here](https://github.com/Entropy-Foundation/oracle-pull-example/tree/master/rest/javascript). **Installation** To use the PullServiceClient library, follow these steps: 1. Clone the repository or download the library's source code. 2. Install the necessary dependencies by running the following command in your project directory: ```bash npm install ``` **Usage** The library's primary function retrieves proof data from the gRPC server using specified parameters and subsequently invokes a smart contract function on a blockchain network. **Configuration** Before using the library, make sure to set up the configuration in the main.js file: - Set the server address: gRPC
Network gRPC Server Address
Mainnets ```bash const address = 'mainnet-dora-2.supra.com'; ```
Testnets ```bash const address = 'testnet-dora-2.supra.com'; ```
- Set the server address: REST
Network REST Server Address
Mainnets ```bash const address = 'https://rpc-mainnet-dora-2.supra.com'; ```
Testnets ```bash const address = 'https://rpc-testnet-dora-2.supra.com'; ```
- Set the pair indexes as an array (below given indexes are examples): ```javascript const pairIndexes = [0, 21, 61, 49]; // this is an example ``` - Set the chain type: ```javascript const chainType = 'Aptos'; ``` - Configure the RPC URL for the desired blockchain network: ```javascript const provider = new aptos.Provider({ fullnodeUrl: "" }); ``` Users can customize the smart contract interaction under the callContract function. Specifically, you can modify the following components: 1. **Smart Contract Address**: Set the address of your smart contract: ```javascript const contractAddress = '' ```
2. **Function Call**: Modify the function call according to your smart contract's methods. For example, if your smart contract has module named **_pull_example_** and a method named **_get_pair_price_**: ```javascript const moduleName = 'pull_example' const functionName = 'get_pair_price' ```
3. Retrieve signer Account: ```javascript let account = new aptos.AptosAccount(aptos.HexString.ensure("").toUint8Array(), walletAddress); ```
4. **Transaction Object:** Customize the transaction object as needed: ```javascript const entryFunctionPayload = new aptos.TxnBuilderTypes.TransactionPayloadEntryFunction( aptos.TxnBuilderTypes.EntryFunction.natural( `${contractAddress}::${moduleName}`, functionName, [], [ OracleHolder, aptos.BCS.bcsSerializeBytes(response.bytes_proof), ] )); ``` ##### Running the Application To run the application, execute the following command: ```bash node main.js ``` This will initiate the fetching of proof data and interaction with the smart contract based on the provided configuration and customization. --- #### _Rust Implementation_ The code library being discussed in this section can be downloaded [here](https://github.com/Entropy-Foundation/oracle-pull-example/tree/master/rust-sdks). The Rust PullServiceClient is designed to interact with a gRPC server for fetching proof data and using that data to call a smart contract on a blockchain network. This readme provides instructions on how to use the library and customize certain components for your specific use case. **Prerequisites** - [Rust](https://www.rust-lang.org/) and[ Cargo](https://doc.rust-lang.org/cargo/getting-started/installation.html) needs to be installed on your computer. **Installation** To use the Rust library for Sui, Aptos and EVM and follow these steps: 1. Clone the repository or download the library's source code. 2. Navigate to the project directory in your terminal **Usage** The Rust library for Sui, Aptos and EVM provides a complete example that fetches proof data from a gRPC server and then calls a contract function on a blockchain network. - Set the gRPC server address:
Network gRPC Server Address
Mainnets ```bash let address = "https://mainnet-dora-2.supra.com:443".to_string(); ```
Testnets ```bash let address = "https://testnet-dora-2.supra.com:443".to_string(); ```
Set the REST server address:
Network REST Server Address
Mainnets ```bash let address = "https://rpc-testnet-dora-2.supra.com".to_string(); ```
Testnets ```bash let address = "https://rpc-testnet-dora-2.supra.com".to_string(); ```
- Set the pair indexes as an array: ( below mentioned indexes are for an example) ```rust let pair_indexes = vec![0, 21, 61, 49]; ``` - Set the chain type: ```rust let chain_type = "aptos".to_string(); ``` - Set the RPC URL for the desired blockchain network: ```rust let rpc_url = ""; ``` Before using the library, configure the file in example folder: #### Customization Users can customize the smart contract interaction under the call_contract function. Specifically, you can modify the following components: 1. **Private Key**: Set your private key: ```rust let secret_key = ""; ```
2. **Contract Address**: Set the address of your smart contract: ```rust let contract_address = ""; ```
3. **Contract Function Call**: Customize the function call based on your contract module and methods:: ```rust const MODULE: &str = ""; const ENTRY: &str = ""; ```
4. Transaction Object: Customize the transaction object as needed: ```rust let aptos_arg = TransactionPayload::EntryFunction(EntryFunction::new( ModuleId::new(address, Identifier::new(MODULE).unwrap()), Identifier::new(ENTRY).unwrap(), vec![], vec![ bcs::to_bytes(&AccountAddress::from_hex_literal(&payload.oracle_holder_object).unwrap()).unwrap(), bcs::to_bytes(&payload.bytes_proof).unwrap(), ], )); ``` #### Running the Application Open your terminal and navigate to the project directory. Run the example using the following command: ```rust cargo run --example aptos_client ```
Now, let's move on to set up your Web3 components:
**Step 1: Create The S-Value Pull Interface to verify the price data received.** Add the following code to the solidity smart contract that you wish to retrieve an **S-Value**. ```solidity // SPDX-License-Identifier: MIT pragma solidity 0.8.19; interface ISupraOraclePull { //Below does not have the timestamp or the round. struct PriceData { uint256[] pairs; // prices[i] is the price of pairs[i] uint256[] prices; // decimals[i] is the decimals of pairs[i] uint256[] decimals; } // If timestamp or round is required please use the below struct PriceInfo { uint256[] pairs; // prices[i] is the price of pairs[i] uint256[] prices; // timestamp[i] is the timestamp of pairs[i] uint256[] timestamp; // decimals[i] is the decimals of pairs[i] uint256[] decimal; // round[i] is the round of pairs[i] uint256[] round; } //Below function requests price data with round function verifyOracleProof(bytes calldata _bytesproof) external returns (PriceData memory); //Below function requests price data with round and timestamp function verifyOracleProofV2(bytes calldata _bytesProof) external returns (PriceInfo memory); } ``` This creates the interface that you will later apply in order to verify and fetch **S-Values** from Supra's Pull Contract. **Step 2: Configure The S-Value Feed Address** To verify and fetch the **S-Value** from a Supra Pull smart contract, first find the **S-Value** Pull Contract address for the preferred chain. When you have the address, create an instance of the ISupraOraclePull using the interface we previously defined. Supra contracts for each network can be found in our [network addresses](/oracles/data-feeds/pull-oracle/networks) list. ```solidity // Mock contract which can consume oracle pull data contract MockOracleClient { /// @notice The oracle contract ISupraOraclePull internal oracle; /// @notice Event emitted when a pair price is received event PairPrice(uint256 pair, uint256 price, uint256 decimals); constructor(address oracle_) { oracle = ISupraOraclePull(oracle_); } } ``` **Step 3: Receive and Verify the S-Value** You can refer to: [GitHub Example](https://github.com/Entropy-Foundation/oracle-pull-example) to get the Proof `<_bytesProof>` of S-Values in a Web2 environment. Next, copy the following code to the smart contract to verify the price data received: ```solidity // Get the price of a pair from oracle data received from supra pull model function GetPairPrice(bytes calldata _bytesProof, uint256 pair) external returns(uint256){ ISupraOraclePull.PriceData memory prices = oracle.verifyOracleProof(_bytesProof); uint256 price = 0; uint256 decimals = 0; for (uint256 i = 0; i < prices.pairs.length; i++) { if (prices.pairs[i] == pair) { price = prices.prices[i]; decimals = prices.decimals[i]; break; } } require(price != 0, "Pair not found"); return price; } // Get the price of a pair from oracle data with round and timestamp function GetPairPriceV2(bytes calldata _bytesProof, uint256 pair) external returns(uint256,uint256,uint256){ ISupraOraclePull.PriceInfo memory prices = oracle.verifyOracleProofV2(_bytesProof); uint256 price = 0; uint256 decimals = 0; uint256 timestamp = 0; uint256 round = 0; for (uint256 i = 0; i < prices.pairs.length; i++) { if (prices.pairs[i] == pair) { price = prices.prices[i]; timestamp = prices.timestamp[i]; round = prices.round[i]; decimals = prices.decimal[i]; break; } } require(price != 0, "Pair not found"); return (price,timestamp,round); } ``` Thats it. Done! Now you are ready to consume fast, low latency, and highly accurate data from Supra's Pull oracle. **Recommended Best Practices** Create a function with access control that updates the oracle using the function: `updatePullAddress()` This will allow you to update the address of the Supra Pull contract after deployment, allowing you to future proof your contract. Access control is mandatory to prevent the undesired modification of the address. ```solidity function updatePullAddress(ISupraOraclePull oracle_) external onlyOwner { oracle = oracle_; } ``` **Example Implementation** Here's an example of what your implementation should look like: ```solidity // SPDX-License-Identifier: UNLICENSED pragma solidity 0.8.24; interface ISupraOraclePull { struct PriceData { uint256[] pairs; uint256[] prices; uint256[] decimals; } struct PriceInfo { uint256[] pairs; uint256[] prices; uint256[] timestamp; uint256[] decimal; uint256[] round; } //Below function(DORA1) verify the price and throws error if the proof is invalid. _bytesproof is the oracle proof to extract the pairs from Last Updated PriceData struct that does not contain timestamp and round. function verifyOracleProof(bytes calldata _bytesproof) external returns (PriceData memory); // Below function (DORA2) verify the price and throws error if the proof is invalid. _bytesproof is the oracle proof to extract the pairs from Last Updated PriceData struct that does contain timestamp and round. Stale prices can be determined using unixtimestamp. function verifyOracleProofV2(bytes calldata _bytesproof) external returns (PriceInfo memory); } // Mock contract which can consume oracle pull data contract MockOracleClient is Ownable { ISupraOraclePull public oracle; // Event emitted when a pair price is received event PairPrice(uint256 pair, uint256 price, uint256 decimals); constructor(ISupraOraclePull oracle_) Ownable(msg.sender){ oracle = oracle_; } //Get the price of a pair from oracle data without round and timestamp function GetPairPrice(bytes calldata _bytesProof, uint256 pair) external returns(uint256){ ISupraOraclePull.PriceData memory prices = oracle.verifyOracleProof(_bytesProof); uint256 price = 0; uint256 decimals = 0; for (uint256 i = 0; i < prices.pairs.length; i++) { if (prices.pairs[i] == pair) { price = prices.prices[i]; decimals = prices.decimals[i]; break; } } require(price != 0, "Pair not found"); return price; } //Get the price of a pair from oracle data with round and timestamp function GetPairPriceV2(bytes calldata _bytesProof, uint256 pair) external returns(uint256,uint256,uint256){ ISupraOraclePull.PriceInfo memory prices = oracle.verifyOracleProofV2(_bytesProof); uint256 price = 0; uint256 decimals = 0; uint256 timestamp = 0; uint256 round = 0; for (uint256 i = 0; i < prices.pairs.length; i++) { if (prices.pairs[i] == pair) { price = prices.prices[i]; timestamp = prices.timestamp[i]; round = prices.round[i]; decimals = prices.decimal[i]; break; } } require(price != 0, "Pair not found"); return (price,timestamp,round); } function updatePullAddress(ISupraOraclePull oracle_) external onlyOwner { oracle = oracle_; } } ``` **Step 1: Create The S-Value Interface** Import interface from [https://github.com/Entropy-Foundation/dora-interface](https://github.com/Entropy-Foundation/dora-interface) git repository and add subdirectory mainnet or testnet for integration. **Step 2: Configure The S-Value Feed Dependency** Create your project and add the below dependencies in your Move.toml **Testnet** ```rust [dependencies] SupraOracle = { git = "https://github.com/Entropy-Foundation/dora-interface", subdir = "sui/testnet/supra_holder", rev = "testnet" } ``` **Mainnet** ```rust [dependencies] SupraOracle = { git = "https://github.com/Entropy-Foundation/dora-interface", subdir = "sui/mainnet/supra_holder", rev = "master" } ``` **Step 3: Receive and Verify the S-Value** Import supra_holder contracts dependency in: `client_example/sources/pull_client.move` ```rust use SupraOracle::SupraSValueFeed::OracleHolder; use SupraOracle::price_data_pull_v2; ``` Here's an example of what your implementation should look like. ```rust module client_example::pull_example_v2 { use std::vector; use sui::tx_context::TxContext; use sui::event; use supra_validator::validator_v2::DkgState; use SupraOracle::SupraSValueFeed::OracleHolder; use SupraOracle::price_data_pull_v2; /// Price pair data list struct PricePair has copy, drop, store { pair: u32, price: u128, decimal: u16, round: u64, } struct EmitPrice has copy, drop { price_pairs: vector } /// Get pair price data with verify signature entry fun get_pair_price_v2( dkg_state: &DkgState, oracle_holder: &mut OracleHolder, bytes: vector _ctx: &mut TxContext, ) { let price_datas = price_data_pull_v2::verify_oracle_proof(dkg_state, oracle_holder, bytes, _ctx); let price_pairs = vector::empty(); while (!vector::is_empty(&price_datas)) { let price_data = vector::pop_back(&mut price_datas); let (cc_pair_index, cc_price, cc_decimal, cc_round) = price_data_pull_v2::price_data_split(&price_data); vector::push_back(&mut price_pairs, PricePair { pair: cc_pair_index, price: cc_price, decimal: cc_decimal, round: cc_round }); }; event::emit(EmitPrice { price_pairs }); } ``` Thats it. Done! Now you are ready to consume fast, and low latency data from Supra pull oracle. **Step 1: Create The S-Value Interface** Import interface from [https://github.com/Entropy-Foundation/dora-interface](https://github.com/Entropy-Foundation/dora-interface) git repository and add subdirectory mainnet or testnet for integration. **Step 2: Configure The S-Value Feed Dependency** Create your project and add the below dependencies in your Move.toml **Testnet** ```rust [dependencies] supra_holder = { git = "https://github.com/Entropy-Foundation/dora-interface", subdir = "aptos/testnet/supra_holder", rev = "51c1875d86f20abe2a22e8d2ae7a3a2a2a56d5a1"} ``` **Mainnet** ```rust TBU ``` **Step 3: Receive and Verify the S-Value** Import supra_holder contracts dependency in: `client_example/sources/pull_client.move` ```rust use supra_holder::price_data_pull; ``` Here's an example of what your implementation should look like. ```rust module client_example::pull_example { use std::vector; use aptos_framework::account; use aptos_framework::event; use supra_holder::price_data_pull; /// Price pair data list struct PricePair has copy, drop, store { pair: u32, price: u128, decimal: u16, round: u64, } /// Emit price pair struct struct EmitPrice has key { price_pairs: event::EventHandle> } /// Its Initial function which will be executed automatically while deployed packages fun init_module(owner_signer: &signer) { move_to(owner_signer, EmitPrice { price_pairs: account::new_event_handle>(owner_signer) }); } /// Get pair price data with verify signature entry fun get_pair_price( account: &signer, dkg_state_addr: address, oracle_holder_addr: address, vote_smr_block_round: vector>, vote_smr_block_timestamp: vector>, vote_smr_block_author: vector>, vote_smr_block_qc_hash: vector>, vote_smr_block_batch_hashes: vector>>, vote_round: vector, min_batch_protocol: vector>, min_batch_txn_hashes: vector>>, min_txn_cluster_hashes: vector>>, min_txn_sender: vector>, min_txn_protocol: vector>, min_txn_tx_sub_type: vector, scc_data_hash: vector>, scc_pair: vector>, scc_prices: vector>, scc_timestamp: vector>, scc_decimals: vector>, scc_qc: vector>, scc_round: vector, scc_id: vector>, scc_member_index: vector, scc_committee_index: vector, batch_idx: vector, txn_idx: vector, cluster_idx: vector, sig: vector>, pair_mask: vector>, ) acquires EmitPrice { let price_datas = price_data_pull::verify_oracle_proof(account,dkg_state_addr,oracle_holder_addr, vote_smr_block_round, vote_smr_block_timestamp, vote_smr_block_author, vote_smr_block_qc_hash, vote_smr_block_batch_hashes, vote_round, min_batch_protocol, min_batch_txn_hashes, min_txn_cluster_hashes, min_txn_sender, min_txn_protocol, min_txn_tx_sub_type, scc_data_hash, scc_pair, scc_prices, scc_timestamp, scc_decimals, scc_qc, scc_round, scc_id, scc_member_index, scc_committee_index, batch_idx, txn_idx, cluster_idx, sig, pair_mask ); let price_pairs = vector::empty(); while (!vector::is_empty(&price_datas)) { let price_data = vector::pop_back(&mut price_datas); let (cc_pair_index, cc_price, cc_decimal, cc_round) = price_data_pull::price_data_split(&price_data); vector::push_back(&mut price_pairs, PricePair { pair: cc_pair_index, price: cc_price, decimal: cc_decimal, round: cc_round }); }; let event_handler = borrow_global_mut(@client_example); event::emit_event>(&mut event_handler.price_pairs, price_pairs); } } ``` Thats it. Done! Now you are ready to consume fast, and low latency data from Supra pull oracle.
### Source: https://docs.supra.com/oracles/data-feeds/pull-oracle/data-pair-conversion # Data Pair Conversion The list of data pairs offered by Supra is getting longer every day, but sometimes you might not find the exact pair that you have been looking for. In such instances, the data pair conversion functionality will come in handy.\ \ The data pair conversion process requires just two simple steps: \ **Step 1:** Request for the bytes proof of two input pairs you would be using to derive a new pair via Web2 and verify the prices with the Supra Pull contract.\ **Step 2**: Request for a data pair conversion by interacting with the Supra Storage Contract. So, let's demonstrate how it works with an example case.
**Step 1 : Inherit or copy these interfaces into the contract** ```solidity interface ISupraSValueFeed { struct derivedData{ int256 roundDifference; uint256 derivedPrice; uint256 decimals; } function getDerivedSvalue(uint256 pair_id_1,uint256 pair_id_2,uint256 operation) external view returns (derivedData memory); } ``` **Step 2 :: Interface with the Supra Pull Contract and Storage Contract** ```solidity contract MockOracleClient is Ownable { // The oracle pull contract address ISupraOraclePull public supra_pull; // The oracle storage contract address ISupraSValueFeed public supra_storage; // Event emitted when a pair price is received event PairPrice(uint256 pair, uint256 price, uint256 decimals); constructor(ISupraOraclePull pull_, ISupraSValueFeed storage_) { supra_pull = pull_; supra_storage = storage_; // Supra storage contract address } } ``` **Step 3 :: Add this function to fetch the derived price pair** ```solidity function GetDerivedPairPrice(bytes calldata _bytesProof, uint256 pair_id_1,uint256 pair_id_2,uint256 operation) external { supra_pull.verifyOracleProof(_bytesProof); // derivedData is the structure for derived price and dp stores the derived price data ISupraSValueFeed.derivedData memory dp = ISupraSValueFeed(supra_storage).getDerivedSvalue(pair_id_1,pair_id_2,operation); } ``` **Step 4 :: (Recommended) Update the Supra Pull and Storage Contracts** ```solidity function updatePullAddress(ISupraOraclePull oracle_) external onlyOwner { supra_pull = oracle_; } function updateStorageAddress(ISupraSValueFeed storage_) external onlyOwner { supra_storage = storage_; } ``` \ Below is an example implementation on how your contract would look like: ```solidity // SPDX-License-Identifier: UNLICENSED pragma solidity 0.8.19; interface ISupraOraclePull { // Verified price data struct PriceData { // List of pairs uint256[] pairs; // List of prices // prices[i] is the price of pairs[i] uint256[] prices; // List of decimals // decimals[i] is the decimals of pairs[i] uint256[] decimals; } function verifyOracleProof(bytes calldata _bytesProof) external returns (PriceData memory); } interface ISupraSValueFeed { struct derivedData{ int256 roundDifference; uint256 derivedPrice; uint256 decimals; } function getDerivedSvalue(uint256 pair_id_1,uint256 pair_id_2,uint256 operation) external view returns (derivedData memory); } // Mock contract which can consume oracle pull data contract MockOracleClient is Ownable { /// @notice The oracle contract ISupraOraclePull public supra_pull; ISupraSValueFeed public supra_storage; uint256 public dPrice; uint256 public dDecimal; int256 public dRound; // Event emitted when a pair price is received event PairPrice(uint256 pair, uint256 price, uint256 decimals); constructor(ISupraOraclePull oracle_, ISupraSValueFeed storage_) { supra_pull = oracle_; supra_storage = storage_; } // Verify price updates recieved with Supra pull contract function GetPairPrice(bytes calldata _bytesProof, uint256 pair) external returns(uint256){ ISupraOraclePull.PriceData memory prices = supra_pull.verifyOracleProof(_bytesProof); uint256 price = 0; uint256 decimals = 0; for (uint256 i = 0; i < prices.pairs.length; i++) { if (prices.pairs[i] == pair) { price = prices.prices[i]; decimals = prices.decimals[i]; break; } } require(price != 0, "Pair not found"); return price; } // Get the Derived Pair Price using two pair from oracle data // Input parameter for "Operation" would be, Multiplication=0 and Division=1 function GetDerivedPairPrice(bytes calldata _bytesProof, uint256 pair_id_1,uint256 pair_id_2,uint256 operation) external { supra_pull.verifyOracleProof(_bytesProof); ISupraSValueFeed.derivedData memory dp = ISupraSValueFeed(supra_storage).getDerivedSvalue(pair_id_1,pair_id_2,operation); dPrice=dp.derivedPrice; dDecimal=dp.decimals; dRound=dp.roundDifference; } function updatePullAddress(ISupraOraclePull oracle_) external onlyOwner { supra_pull = oracle_; } function updateStorageAddress(ISupraSValueFeed storage_) external onlyOwner { supra_storage = storage_; } } ```
### Source: https://docs.supra.com/oracles/data-feeds/pull-oracle/networks # Available Networks Default contract for pull oracle is "Pull contract". Storage contract would be required for data pair conversion (derived pairs). Important: Please make sure you read and understand [Terms of Use](https://supra.com/terms-of-use/) before start using Supra products and services. **Mainnet Addresses** | No | Mainnet | Pull Contract | Storage Contract | Version | Language | | --- | ------------------------ | ------------------------------------------------------------------------------------------------------------------------------------------------------------------------------------------- | ------------------------------------------ | ------- | -------- | | 1 | Aptos Mainnet | **Contract Address:** 0x4463d20beee3387cd17389efd6d779de69ec4959b6bc794eca2a217d93189533

**Oracle Holder:**
0x3d28f3142854ce60f387df9762886d27d2b58c0a5bd237f596f5bf6d5c9fad31 | N/A | 0.2.1 | Move | | 2 | Aurora Mainnet | 0x2FA6DbFe4291136Cf272E1A3294362b6651e8517 | 0xD02cc7a670047b6b012556A88e275c685d25e0c9 | 0.2.1 | Solidity | | 3 | Arbitrum one Mainnet | 0x41AB2059bAA4b73E9A3f55D30Dff27179e0eA181 | 0x6562fB484C57d1Cba9E89A59C9Ad3F1b6fc79a65 | 0.2.1 | Solidity | | 4 | Arbitrum Nova Mainnet | 0x2FA6DbFe4291136Cf272E1A3294362b6651e8517 | 0xD02cc7a670047b6b012556A88e275c685d25e0c9 | 0.2.1 | Solidity | | 5 | Avalanche Mainnet | 0x2FA6DbFe4291136Cf272E1A3294362b6651e8517 | 0xD02cc7a670047b6b012556A88e275c685d25e0c9 | 0.2.1 | Solidity | | 6 | Base Mainnet | 0x2FA6DbFe4291136Cf272E1A3294362b6651e8517 | 0xD02cc7a670047b6b012556A88e275c685d25e0c9 | 0.2.1 | Solidity | | 7 | Beam Avax Subnet | 0x08c56fa8eDb36642894fFE372aAC0cF33A06AaC2 | 0x658408aA8aD72c4b553eba82ea74D99C651ea16b | 0.2.1 | Solidity | | 8 | Boba BNB Mainnet | 0x41AB2059bAA4b73E9A3f55D30Dff27179e0eA181 | 0xa0743BfB163b628842E4d25e60AeFE78DFBb845B | 0.2.1 | Solidity | | 9 | Boba ETH Mainnet | 0x2FA6DbFe4291136Cf272E1A3294362b6651e8517 | 0xD02cc7a670047b6b012556A88e275c685d25e0c9 | 0.2.1 | Solidity | | 10 | BNB Mainnet | 0x2FA6DbFe4291136Cf272E1A3294362b6651e8517 | 0xD02cc7a670047b6b012556A88e275c685d25e0c9 | 0.2.1 | Solidity | | 11 | Canto Mainnet | 0x2FA6DbFe4291136Cf272E1A3294362b6651e8517 | 0xD02cc7a670047b6b012556A88e275c685d25e0c9 | 0.2.1 | Solidity | | 12 | Celo Mainnet | 0x2FA6DbFe4291136Cf272E1A3294362b6651e8517 | 0xD02cc7a670047b6b012556A88e275c685d25e0c9 | 0.2.1 | Solidity | | 13 | Core DAO Mainnet | 0x2FA6DbFe4291136Cf272E1A3294362b6651e8517 | 0xD02cc7a670047b6b012556A88e275c685d25e0c9 | 0.2.1 | Solidity | | 14 | Cronos Mainnet | 0x2FA6DbFe4291136Cf272E1A3294362b6651e8517 | 0xD02cc7a670047b6b012556A88e275c685d25e0c9 | 0.2.1 | Solidity | | 15 | Hashkey Chain Mainnet | 0x16f70cAD28dd621b0072B5A8a8c392970E87C3dD | 0x58e158c74DF7Ad6396C0dcbadc4878faC9e93d57 | 0.2.1 | Solidity | | 16 | DFK Chain Mainnet | 0x1957d08c8CAdf0cf5ed085860c8919e737C4f629 | 0xFe7a500B7302C8f1208bf7382f9a91f6a0b12E33 | 0.2.1 | Solidity | | 17 | Dogechain Mainnet | 0x2FA6DbFe4291136Cf272E1A3294362b6651e8517 | 0xD02cc7a670047b6b012556A88e275c685d25e0c9 | 0.2.1 | Solidity | | 18 | Evmos Mainnet | 0x2FA6DbFe4291136Cf272E1A3294362b6651e8517 | 0xD02cc7a670047b6b012556A88e275c685d25e0c9 | 0.2.1 | Solidity | | 19 | Ethereum Mainnet | 0x2FA6DbFe4291136Cf272E1A3294362b6651e8517 | 0xD02cc7a670047b6b012556A88e275c685d25e0c9 | 0.2.1 | Solidity | | 20 | Fantom Mainnet | 0xe41444462709484272F54371F3f53bBF900Ec49E | 0x3E5E89d14576cE9f20a8347aA682517fe65B4ACB | 0.2.1 | Solidity | | 21 | FunctionX Mainnet | 0x2FA6DbFe4291136Cf272E1A3294362b6651e8517 | 0xD02cc7a670047b6b012556A88e275c685d25e0c9 | 0.2.1 | Solidity | | 22 | Fuse Mainnet | 0x41AB2059bAA4b73E9A3f55D30Dff27179e0eA181 | 0x79E94008986d1635A2471e6d538967EBFE70A296 | 0.2.1 | Solidity | | 23 | Hedera Mainnet | 0x41AB2059bAA4b73E9A3f55D30Dff27179e0eA181 | 0xD02cc7a670047b6b012556A88e275c685d25e0c9 | 0.2.1 | Solidity | | 24 | ShimmerEVM Mainnet | 0x08c56fa8eDb36642894fFE372aAC0cF33A06AaC2 | 0x658408aA8aD72c4b553eba82ea74D99C651ea16b | 0.2.1 | Solidity | | 25 | IoTex Mainnet | 0x7Bf7646CfA1a1EBEd4436E53ab2cB95C7d16824D | 0x1a83f5937979CdF9E60Af4C064Da367af2289eD3 | 0.2.1 | Solidity | | 26 | JIB Mainnet (JBC) | 0x2FA6DbFe4291136Cf272E1A3294362b6651e8517 | 0xD02cc7a670047b6b012556A88e275c685d25e0c9 | 0.2.1 | Solidity | | 27 | Kava Mainnet | 0x41AB2059bAA4b73E9A3f55D30Dff27179e0eA181 | 0x1B9CB8D53931155f9170deEbbE531A804e04A27C | 0.2.1 | Solidity | | 28 | Kaia Mainnet (Klayton) | 0x7Bf7646CfA1a1EBEd4436E53ab2cB95C7d16824D | 0x059d018C8b3b256E5E121A4a131fbf58d58D46Cb | 0.2.1 | Solidity | | 29 | Bera chain mainnet | 0x16f70cAD28dd621b0072B5A8a8c392970E87C3dD | 0x58e158c74DF7Ad6396C0dcbadc4878faC9e93d57 | 0.2.1 | Solidity | | 30 | Linea Mainnet | 0x2FA6DbFe4291136Cf272E1A3294362b6651e8517 | 0xD02cc7a670047b6b012556A88e275c685d25e0c9 | 0.2.1 | Solidity | | 31 | Mantle Mainnet | 0x2FA6DbFe4291136Cf272E1A3294362b6651e8517 | 0xD02cc7a670047b6b012556A88e275c685d25e0c9 | 0.2.1 | Solidity | | 32 | Japan Open Chain Mainnet | 0x16f70cAD28dd621b0072B5A8a8c392970E87C3dD | 0x58e158c74DF7Ad6396C0dcbadc4878faC9e93d57 | 0.2.1 | Solidity | | 33 | Metis Mainnet | 0x2FA6DbFe4291136Cf272E1A3294362b6651e8517 | 0xD02cc7a670047b6b012556A88e275c685d25e0c9 | 0.2.1 | Solidity | | 34 | Milkomeda C1 Mainnet | 0x2FA6DbFe4291136Cf272E1A3294362b6651e8517 | 0xD02cc7a670047b6b012556A88e275c685d25e0c9 | 0.2.1 | Solidity | | 35 | Mode Mainnet | 0x2FA6DbFe4291136Cf272E1A3294362b6651e8517 | 0xD02cc7a670047b6b012556A88e275c685d25e0c9 | 0.2.1 | Solidity | | 36 | Moonbeam Mainnet | 0x2FA6DbFe4291136Cf272E1A3294362b6651e8517 | 0xD02cc7a670047b6b012556A88e275c685d25e0c9 | 0.2.1 | Solidity | | 37 | OP BNB Mainnet | 0x375344FcE386Ecd587348Cc27AfA1B3F24913f6E | 0xa64E1313B6e104f2A3A14D0962CEB32acAA72012 | 0.2.1 | Solidity | | 38 | Optimism Mainnet | 0x2FA6DbFe4291136Cf272E1A3294362b6651e8517 | 0xD02cc7a670047b6b012556A88e275c685d25e0c9 | 0.2.1 | Solidity | | 39 | Polygon Mainnet | 0x2FA6DbFe4291136Cf272E1A3294362b6651e8517 | 0xD02cc7a670047b6b012556A88e275c685d25e0c9 | 0.2.1 | Solidity | | 40 | Sui Mainnet | **Package ID:** 0x4979543452f609ff272d504755966ff5e70122256101c17adbe8bd27d35116c3

**Oracle Holder:**
0xaa0315f0748c1f24ddb2b45f7939cff40f7a8104af5ccbc4a1d32f870c0b4105 | N/A | 0.2.1 | Move | | 41 | Syscoin L1 Mainnet | 0x7Bf7646CfA1a1EBEd4436E53ab2cB95C7d16824D | 0x933fA8303C3C8d2676fdDa40ca0492AF46058580 | 0.2.1 | Solidity | | 42 | Telos Mainnet | 0xe41444462709484272F54371F3f53bBF900Ec49E | 0x3E5E89d14576cE9f20a8347aA682517fe65B4ACB | 0.2.1 | Solidity | | 43 | Tron Mainnet | TW79YnUUijVmdN8wKtsvb31scrMoxjqbDA | TAfTddPBu61H1utjSpaNepcETD7WnF41xw | 0.2.1 | Solidity | | 44 | Manta Pacific Mainnet | 0x2FA6DbFe4291136Cf272E1A3294362b6651e8517 | 0xD02cc7a670047b6b012556A88e275c685d25e0c9 | 0.2.1 | Solidity | | 45 | Blast Mainnet | 0x2FA6DbFe4291136Cf272E1A3294362b6651e8517 | 0xD02cc7a670047b6b012556A88e275c685d25e0c9 | | | | 46 | Meter Mainnet | 0xf21F95E37E2df2e8CcFd768dB1d223a43E82d6f5 | 0x5277475d7A234A20138f821Ef55d9eFDDa483662 | | | | 47 | Frax Mainnet | 0xe41444462709484272F54371F3f53bBF900Ec49E | 0x3E5E89d14576cE9f20a8347aA682517fe65B4ACB | | | | 48 | XDC Mainnet | 0x2FA6DbFe4291136Cf272E1A3294362b6651e8517 | 0xD02cc7a670047b6b012556A88e275c685d25e0c9 | | | | 49 | Map Protocol Mainnet | 0x2FA6DbFe4291136Cf272E1A3294362b6651e8517 | 0xD02cc7a670047b6b012556A88e275c685d25e0c9 | | | | 50 | OKX Layer Mainnet | 0xe41444462709484272F54371F3f53bBF900Ec49E | 0x3E5E89d14576cE9f20a8347aA682517fe65B4ACB | | | | 51 | IOTA EVM Mainnet | 0x2FA6DbFe4291136Cf272E1A3294362b6651e8517 | 0xD02cc7a670047b6b012556A88e275c685d25e0c9 | | | | 52 | BSquared Mainnet | 0x2FA6DbFe4291136Cf272E1A3294362b6651e8517 | 0xD02cc7a670047b6b012556A88e275c685d25e0c9 | | | | 53 | Nibiru Mainnet | 0xbCD5391A146Bacc6d5cE170C1EB1eE52C3d46Ff2 | 0x2693Aa16Fe576b9cF5F05BF1F4513d51552Cec04 | | | | 54 | BEVM Mainnet | 0x8B506d2616671b6742b968C18bEFdA1e665A9025 | 0x58e158c74DF7Ad6396C0dcbadc4878faC9e93d57 | | | | 55 | Vanar Chain Mainnet | 0x8B506d2616671b6742b968C18bEFdA1e665A9025 | 0x58e158c74DF7Ad6396C0dcbadc4878faC9e93d57 | | | | 56 | Humanode Mainnet | 0x8B506d2616671b6742b968C18bEFdA1e665A9025 | 0x58e158c74DF7Ad6396C0dcbadc4878faC9e93d57 | | | | 57 | NeoX Mainnet | 0x8B506d2616671b6742b968C18bEFdA1e665A9025 | 0x58e158c74DF7Ad6396C0dcbadc4878faC9e93d57 | | | | 58 | Bitlayer Mainnet | 0x16f70cAD28dd621b0072B5A8a8c392970E87C3dD | 0x58e158c74DF7Ad6396C0dcbadc4878faC9e93d57 | | | | 59 | Ape Chain Mainnet | 0x16f70cAD28dd621b0072B5A8a8c392970E87C3dD | 0x58e158c74DF7Ad6396C0dcbadc4878faC9e93d57 | | | | 60 | Mint Mainnet | 0x2FA6DbFe4291136Cf272E1A3294362b6651e8517 | 0xD02cc7a670047b6b012556A88e275c685d25e0c9 | | | | 61 | Taiko Mainnet | 0x2FA6DbFe4291136Cf272E1A3294362b6651e8517 | 0xD02cc7a670047b6b012556A88e275c685d25e0c9 | | | | 62 | Lumia Mainnet | 0x16f70cAD28dd621b0072B5A8a8c392970E87C3dD | 0x58e158c74DF7Ad6396C0dcbadc4878faC9e93d57 | | | | 63 | Syscoin Rollux Mainnet | 0xa64E1313B6e104f2A3A14D0962CEB32acAA72012 | 0xbc0453F6FAC74FB46223EA5CC55Bd82852f0C670 | | | | 64 | Plume Mainnet | 0x16f70cAD28dd621b0072B5A8a8c392970E87C3dD | 0x58e158c74DF7Ad6396C0dcbadc4878faC9e93d57 | | | | 65 | Artela Mainnet | 0x925abc210c5fda44dBD2a5215b445e7d140249f7 | 0x16f70cAD28dd621b0072B5A8a8c392970E87C3dD | | | | 66 | Sonic Mainnet | 0x16f70cAD28dd621b0072B5A8a8c392970E87C3dD | 0x58e158c74DF7Ad6396C0dcbadc4878faC9e93d57 | | | | 67 | Pharos Mainnet | 0x16f70cAD28dd621b0072B5A8a8c392970E87C3dD | 0x58e158c74DF7Ad6396C0dcbadc4878faC9e93d57 | | | \ \ **Testnet Addresses** | No | Testnet | Pull Contract | Storage Contract | Language | Version | | --- | ----------------------------- | ----------------------------------------------------------------------------------------------------------------------------------------------------------------------------------------- | ------------------------------------------ | -------- | ------- | | 1 | Supra Testnet | **Package ID:**
0x5615001f63d3223f194498787647bb6f8d37b8d1e6773c00dcdd894079e56190

**Oracle Holder:**
0x5615001f63d3223f194498787647bb6f8d37b8d1e6773c00dcdd894079e56190 | N/A | | | | 2 | Aptos Testnet | **Package ID:**
0x5156d144fabd00d6b84141159cd82bc1e33a78f616af8cd9754890a9e26d7b97

**Oracle Holder:**
0x63ce485ca5b0f74f24bb59fd11b6327ddeacdfbb0f4371601dc5aef3a6b3c02 | N/A | Move | 0.2.1 | | 3 | Arbitrum Sepolia Testnet | 0xBf07a08042Bf7a61680527D06aC5F54278e0c8E5 | 0x6Cd59830AAD978446e6cc7f6cc173aF7656Fb917 | Solidity | 0.2.1 | | 4 | Aurora Testnet | 0x6Cd59830AAD978446e6cc7f6cc173aF7656Fb917 | 0x8E80d0EE9eA210cBF6F1b69Ff5BFBD43bE4D78e2 | Solidity | 0.2.1 | | 5 | Avalanche Fuji C Testnet | 0x6Cd59830AAD978446e6cc7f6cc173aF7656Fb917 | 0xfA84fCE7aCa79c50216aac58b0669d48743a17a2 | Solidity | 0.2.1 | | 6 | Base Sepolia testnet | 0x391Ab9ad5C4BFee04eA508b0a0Cf499198D015e3 | 0x6Cd59830AAD978446e6cc7f6cc173aF7656Fb917 | Solidity | 0.2.1 | | 7 | Beam Avax Subnet | 0x6bf7b21145Cbd7BB0b9916E6eB24EDA8A675D7C0 | 0x6Cd59830AAD978446e6cc7f6cc173aF7656Fb917 | Solidity | 0.2.1 | | 8 | Botanix Testnet | 0x6bf7b21145Cbd7BB0b9916E6eB24EDA8A675D7C0 | 0x6Cd59830AAD978446e6cc7f6cc173aF7656Fb917 | Solidity | 0.2.1 | | 9 | Bera chain Testnet | 0xBf07a08042Bf7a61680527D06aC5F54278e0c8E5 | 0x33Ac5E3C266AF17C25921e0A26DCb816d00a3657 | Solidity | 0.2.1 | | 10 | BNB Testnet | 0x6Cd59830AAD978446e6cc7f6cc173aF7656Fb917 | 0x004d42225631F6bec6503a281Ed4c233810CBC29 | Solidity | 0.2.1 | | 11 | Boba ETH Testnet | 0xCAC990ea7DF81D29A0036f32A3126035Edd1AfA4 | 0xaDbB1563E7a3A6c17C078E05c7016429ebEea43b | Solidity | 0.2.1 | | 12 | Canto Testnet | 0x6Cd59830AAD978446e6cc7f6cc173aF7656Fb917 | 0xbbB8485dD8030524Bc34c4e2d206332bB3Cb1D58 | Solidity | 0.2.1 | | 13 | Celo Testnet | 0xDcf9eAF25fDC79c7aD37b4fdE81b0DB315637fa0 | 0xf0e852BC3F940447862D6b67e5B9807E64B433F6 | Solidity | 0.2.1 | | 14 | Core DAO Testnet | 0xDcf9eAF25fDC79c7aD37b4fdE81b0DB315637fa0 | 0xf0e852BC3F940447862D6b67e5B9807E64B433F6 | Solidity | 0.2.1 | | 15 | Cosmos-Evmos Testnet | 0x07a4D0c18D9EcB6f1a05624EDf4759D69840efA3 | 0x9F28e1E5308E206A43cCe3Dc564AdF0AC55511c1 | Solidity | 0.2.1 | | 16 | Cronos Testnet | 0x33Ac5E3C266AF17C25921e0A26DCb816d00a3657 | 0x6e68cF6ecbC88F84f9c8E4F2F7191cD9Bc03ee68 | Solidity | 0.2.1 | | 17 | IOTA EVM Testnet | 0xBf07a08042Bf7a61680527D06aC5F54278e0c8E5 | 0x33Ac5E3C266AF17C25921e0A26DCb816d00a3657 | Solidity | 0.2.1 | | 18 | DFK Chain Testnet | 0x6Cd59830AAD978446e6cc7f6cc173aF7656Fb917 | 0x57C13B53f7d7A16f13d7d5b334fFF835C5400eeb | Solidity | 0.2.1 | | 19 | Etherum Sepolia Testnet | 0x6Cd59830AAD978446e6cc7f6cc173aF7656Fb917 | 0x131918bC49Bb7de74aC7e19d61A01544242dAA80 | Solidity | 0.2.1 | | 20 | Ethereum Holesky Testnet | 0x6bf7b21145Cbd7BB0b9916E6eB24EDA8A675D7C0 | 0x6Cd59830AAD978446e6cc7f6cc173aF7656Fb917 | | | | 21 | Fantom Testnet | 0x6Cd59830AAD978446e6cc7f6cc173aF7656Fb917 | 0xf43F34eD033595D0AE0Dfc68c2F9425847B2b40b | Solidity | 0.2.1 | | 22 | FunctionX Testnet | 0x6Cd59830AAD978446e6cc7f6cc173aF7656Fb917 | 0xF737D54Ce642F3E57f3FB8083d53e683ED4978A1 | Solidity | 0.2.1 | | 23 | Fuse SparkNet | 0x5E6DC067003a72483ef29421c7E8e261D2E5888D | 0x391Ab9ad5C4BFee04eA508b0a0Cf499198D015e3 | Solidity | 0.2.1 | | 24 | Hedera Testnet | 0x6bf7b21145Cbd7BB0b9916E6eB24EDA8A675D7C0 | 0x6Cd59830AAD978446e6cc7f6cc173aF7656Fb917 | Solidity | 0.2.1 | | 25 | IoTeX Testnet | 0x5df499C9DB456154F81121282c0cB16b59e74C4b | 0x59f433fa29Fb2227b6E860956C654AfF7673Af10 | Solidity | 0.2.1 | | 26 | Kava EVM Testnet | 0x6Cd59830AAD978446e6cc7f6cc173aF7656Fb917 | 0xeA760d203Be41700C4bc7C0749315DBBdF84ffDD | Solidity | 0.2.1 | | 27 | Klaytn Testnet | 0x5df499C9DB456154F81121282c0cB16b59e74C4b | 0x35906b7FD6F4e77c0489b2f6b0B89C7d3469a7B3 | Solidity | 0.2.1 | | 28 | Linea Sepolia Testnet | 0x6bf7b21145Cbd7BB0b9916E6eB24EDA8A675D7C0 | 0x6Cd59830AAD978446e6cc7f6cc173aF7656Fb917 | Solidity | 0.2.1 | | 29 | Mantle Sepolia Testnet | 0xa57883C9F9Ba922D06dEAC44edE0584249cB1d3D | 0x391Ab9ad5C4BFee04eA508b0a0Cf499198D015e3 | Solidity | 0.2.1 | | 30 | Metis Sepolia Testnet | 0x94d5Cb2dFDd0F2bBf8d07fE673f5334d09F0c901 | 0x2C138Ece1De189E04ffC089b6140aA3EC3B967C1 | Solidity | 0.2.1 | | 31 | Milkomeda C1 Testnet | 0x6Cd59830AAD978446e6cc7f6cc173aF7656Fb917 | 0x123cE8e6bB7faCcC97946A2011817470cDCba9a2 | Solidity | 0.2.1 | | 32 | Mode Sepolia Testnet | 0x30484f27c5191A34587007aD380049d54DbCfAE7 | 0x33Ac5E3C266AF17C25921e0A26DCb816d00a3657 | Solidity | 0.2.1 | | 33 | Moonbase Alpha Testnet | 0xaa2f56843Cec7840F0C106F0202313d8d8CB13d6 | 0x4591d1B110ad451d8220d82252F829E8b2a91B17 | Solidity | 0.2.1 | | 34 | Optimism Sepolia Testnet | 0xBf07a08042Bf7a61680527D06aC5F54278e0c8E5 | 0x6Cd59830AAD978446e6cc7f6cc173aF7656Fb917 | Soliduty | 0.2.1 | | 35 | Polygon Amoy Testnet | 0x6bf7b21145Cbd7BB0b9916E6eB24EDA8A675D7C0 | 0x6Cd59830AAD978446e6cc7f6cc173aF7656Fb917 | | | | 36 | Sui Testnet | **Package ID:**
0x3fd25bdfab06b7e29a606fa2516655b48556ae8f1efda047a70ba929b2494919

**Oracle Holder:**
0x87ef65b543ecb192e89d1e6afeaf38feeb13c3a20c20ce413b29a9cbfbebd570 | N/A | Move | 0.2.1 | | 37 | Syscoin Rollux Testnet | 0x6Cd59830AAD978446e6cc7f6cc173aF7656Fb917 | 0x14Dbb98a8e9A77cE5B946145bb0194aDE5dA7611 | Solidity | 0.2.1 | | 38 | Syscoin L1 Testnet | 0x6Cd59830AAD978446e6cc7f6cc173aF7656Fb917 | 0x8Ba43C9D8eF6d372582b851B4BE8d8975BA4D9f8 | Solidity | 0.2.1 | | 39 | Telos EVM Testnet | 0x6Cd59830AAD978446e6cc7f6cc173aF7656Fb917 | 0x1a33d1c35a7720b0708e8406f7d6d4418d6536f8 | Solidity | 0.2.1 | | 40 | Tron Testnet | TSR7FegbcdSYC2NvStVMByaisZVwcMY4de | TRotEWcMaPtsPjymCheWRXQ2EHLpC75Zx8 | Solidity | 0.2.1 | | 41 | Zeta Chain Testnet | 0x8d9820A03Fae95580fed3F1b51b0D2439c8EF1eE | 0x402744e78a69C5A8128cBdc6840dc5b32Eb33dF2 | Solidity | 0.2.1 | | 42 | Midl Testnet | 0xDcf9eAF25fDC79c7aD37b4fdE81b0DB315637fa0 | 0xf0e852BC3F940447862D6b67e5B9807E64B433F6 | Solidity | 0.2.1 | | 43 | Blast Sepolia Testnet | 0x6bf7b21145Cbd7BB0b9916E6eB24EDA8A675D7C0 | 0x6Cd59830AAD978446e6cc7f6cc173aF7656Fb917 | Solidity | 0.2.1 | | 44 | OKX Layer testnet | 0x3a2943c5651e5a2b481Ac7779f5db80cDee36a9d | 0xb59563E3a4F0AA5c8aC1880E03a3e50bE19e71A9 | Solidity | 0.2.1 | | 45 | Fantom Sonic Testnet | 0x6bf7b21145Cbd7BB0b9916E6eB24EDA8A675D7C0 | 0x6Cd59830AAD978446e6cc7f6cc173aF7656Fb917 | Solidity | 0.2.1 | | 46 | Manta Pacific Sepolia Testnet | 0x6bf7b21145Cbd7BB0b9916E6eB24EDA8A675D7C0 | 0x6Cd59830AAD978446e6cc7f6cc173aF7656Fb917 | Solidity | 0.2.1 | | 47 | Artela Testnet | 0x6bf7b21145Cbd7BB0b9916E6eB24EDA8A675D7C0 | 0x6Cd59830AAD978446e6cc7f6cc173aF7656Fb917 | | | | 48 | Doge chain Testnet | 0x391Ab9ad5C4BFee04eA508b0a0Cf499198D015e3 | 0x6bf7b21145Cbd7BB0b9916E6eB24EDA8A675D7C0 | | | | 49 | XDC Apothem Testnet | 0x6Cd59830AAD978446e6cc7f6cc173aF7656Fb917 | 0xe52FD0AD5F8B37cb641672b70d0B516797D6682f | | | | 50 | OP BNB Testnet | 0x6bf7b21145Cbd7BB0b9916E6eB24EDA8A675D7C0 | 0x6Cd59830AAD978446e6cc7f6cc173aF7656Fb917 | | | | 51 | Immutable zkEVM Testnet | 0x4Edaf2ab0b230249e574ba10886E5271d8a1A90C | 0x443A0f4Da5d2fdC47de3eeD45Af41d399F0E5702 | | | | 52 | Japan Open Chain Testnet | 0xF439Cea7B2ec0338Ee7EC16ceAd78C9e1f47bc4c | 0xf08A9C60bbF1E285BF61744b17039c69BcD6287d | | | | 53 | Plume Testnet | 0xBf07a08042Bf7a61680527D06aC5F54278e0c8E5 | 0x33Ac5E3C266AF17C25921e0A26DCb816d00a3657 | | | | 54 | Vanguard Testnet (vanar) | 0x30484f27c5191A34587007aD380049d54DbCfAE7 | 0x33Ac5E3C266AF17C25921e0A26DCb816d00a3657 | | | | 55 | BSquared Habitat Testnet | 0x443A0f4Da5d2fdC47de3eeD45Af41d399F0E5702 | 0x6Cd59830AAD978446e6cc7f6cc173aF7656Fb917 | | | | 56 | Frax Testnet | 0x30484f27c5191A34587007aD380049d54DbCfAE7 | 0x33Ac5E3C266AF17C25921e0A26DCb816d00a3657 | | | | 57 | Meter Testnet | 0x49f0B04fb704227cA26482F9C19ef114DB157407 | 0xF9780b16AA0aa1d072C50b36AA53baAAC471de08 | | | | 58 | Map protocol Testnet | 0x30484f27c5191A34587007aD380049d54DbCfAE7 | 0x33Ac5E3C266AF17C25921e0A26DCb816d00a3657 | | | | 59 | SatoshiVM Testnet | 0xC9DA2B1c5ea1a7207Bf5829416d5Bc6c082f87CF | 0xCAC990ea7DF81D29A0036f32A3126035Edd1AfA4 | | | | 60 | BEVM Testnet | 0x443A0f4Da5d2fdC47de3eeD45Af41d399F0E5702 | 0x5df499C9DB456154F81121282c0cB16b59e74C4b | | | | 61 | Bitlayer Testnet | 0xfFcd7bDbA07126D7222878fD415559d558e1CEFb | 0xb632262b880842b6ab490d53fc4f907b717a4a87 | | | | 62 | Taiko Hekla Testnet | 0x30484f27c5191A34587007aD380049d54DbCfAE7 | 0x33Ac5E3C266AF17C25921e0A26DCb816d00a3657 | | | | 63 | BVM Bitcoin L2 Testnet | 0x2C138Ece1De189E04ffC089b6140aA3EC3B967C1 | 0xF439Cea7B2ec0338Ee7EC16ceAd78C9e1f47bc4c | | | | 64 | Hyperliquid Testnet | 0xaDbB1563E7a3A6c17C078E05c7016429ebEea43b | 0x5df499C9DB456154F81121282c0cB16b59e74C4b | | | | 65 | Rari Chain Testnet | 0xBf07a08042Bf7a61680527D06aC5F54278e0c8E5 | 0x5df499C9DB456154F81121282c0cB16b59e74C4b | | | | 66 | Zircuit Chain Testnet | 0x2C138Ece1De189E04ffC089b6140aA3EC3B967C1 | 0xF439Cea7B2ec0338Ee7EC16ceAd78C9e1f47bc4c | | | | 67 | Mint Sepolia Testnet | 0x6bf7b21145Cbd7BB0b9916E6eB24EDA8A675D7C0 | 0x6Cd59830AAD978446e6cc7f6cc173aF7656Fb917 | | | | 68 | Merlin Testnet | 0x6bf7b21145Cbd7BB0b9916E6eB24EDA8A675D7C0 | 0x6Cd59830AAD978446e6cc7f6cc173aF7656Fb917 | | | | 69 | ZKSync Era Sepolia Testnet | 0x091019974aAcD68Df890A2BEB9eBa3c0b7883099 | 0x7907EF8270d5fFB5C149cE841801F343AFd0Ec4D | | | | 70 | WINR Testnet | 0xBf07a08042Bf7a61680527D06aC5F54278e0c8E5 | 0x33Ac5E3C266AF17C25921e0A26DCb816d00a3657 | | | | 71 | Humanode Testnet | 0x30484f27c5191A34587007aD380049d54DbCfAE7 | 0x5df499C9DB456154F81121282c0cB16b59e74C4b | | | | 72 | NeoX Testnet | 0xc99c8510D9FF355CD664F9412bdD645c5e25a7f1 | 0x5df499C9DB456154F81121282c0cB16b59e74C4b | | | | 73 | Dione protocol Testnet | 0xc99c8510D9FF355CD664F9412bdD645c5e25a7f1 | 0x5df499C9DB456154F81121282c0cB16b59e74C4b | | | | 74 | Radix Testnet | **Package:** package_tdx_2_1p5xdecq37xav7yc3g4npdg8ckhwpfgyvpq4rmyj87vfkh702dnrw5v

**Address:**
component_tdx_2_1cq3htqxa4m7rd3fw8y4hzc5gw5207y236f3x40dlywntm7uhjaug29 | | | | | 75 | CosmWasm (Osmosis) | osmo1f3wa6aagy5sefl6s0dyxucvalzczdlsftwx00tnhtc9k8sxwpnkq86mrh9 | | | | | 76 | StratoVM Testnet | 0xBf07a08042Bf7a61680527D06aC5F54278e0c8E5 | 0x33Ac5E3C266AF17C25921e0A26DCb816d00a3657 | | | | 77 | Lumia Testnet | 0x19ccC99200A109cD0bEfA803b67622D513c6bC0B | 0xa57883C9F9Ba922D06dEAC44edE0584249cB1d3D | | | | 78 | Ape ChainCurtis Testnet | 0xF439Cea7B2ec0338Ee7EC16ceAd78C9e1f47bc4c | 0xf08A9C60bbF1E285BF61744b17039c69BcD6287d | | | | 79 | Scroll Sepolia Testnet | 0xBf07a08042Bf7a61680527D06aC5F54278e0c8E5 | 0x33Ac5E3C266AF17C25921e0A26DCb816d00a3657 | | | | 80 | BOBA BNB Testnet | 0x33Ac5E3C266AF17C25921e0A26DCb816d00a3657 | 0x784EC91f28EdF7b332400aDC01a1ACd9B0eB7D30 | | | | 81 | Game7 Testnet | 0x391Ab9ad5C4BFee04eA508b0a0Cf499198D015e3 | 0xaa2f56843Cec7840F0C106F0202313d8d8CB13d6 | | | | 82 | Sonic Testnet | 0x391Ab9ad5C4BFee04eA508b0a0Cf499198D015e3 | 0xaa2f56843Cec7840F0C106F0202313d8d8CB13d6 | | | | 83 | Mezo Testnet | 0x443A0f4Da5d2fdC47de3eeD45Af41d399F0E5702 | 0x6Cd59830AAD978446e6cc7f6cc173aF7656Fb917 | | | | 84 | Hashkey Chain Testnet | 0x443A0f4Da5d2fdC47de3eeD45Af41d399F0E5702 | 0x6Cd59830AAD978446e6cc7f6cc173aF7656Fb917 | | | | 85 | Nibiru Testnet | 0x4Edaf2ab0b230249e574ba10886E5271d8a1A90C | 0x443A0f4Da5d2fdC47de3eeD45Af41d399F0E5702 | | | | 86 | Rise Sepolia Testnet | 0x391Ab9ad5C4BFee04eA508b0a0Cf499198D015e3 | 0xaa2f56843Cec7840F0C106F0202313d8d8CB13d6 | | | | 87 | Monad Testnet | 0x443A0f4Da5d2fdC47de3eeD45Af41d399F0E5702 | 0x6Cd59830AAD978446e6cc7f6cc173aF7656Fb917 | | | | 88 | Pharos Atlantic Testnet | 0x443A0f4Da5d2fdC47de3eeD45Af41d399F0E5702 | 0xaa2f56843Cec7840F0C106F0202313d8d8CB13d6 | | | ### Source: https://docs.supra.com/oracles/data-feeds/push-oracle # Push Oracle ## Quick Start: Supra Price Feeds Supra's Push oracle publishes price pairs on-chain regularly and at high frequencies, enabling consumers to get near real-time prices for their smart contracts. The Push oracle functions via partnerships Supra has with respective chains to share, ensuring that frequent feed updates are available for these destination chains without interruption. Both the Push model and Pull model (on demand) have the same number of data pairs offered by Supra. Integrating with Supra price feeds is quick and easy. The price feed value published by Supra is known as an **S-Value** (aka Supra Value). In the following sections, we will demonstrate how to retrieve an **S-Value** using Supra's Push model. Please refer to the below resources for a better understanding of our price feeds. - [Data Feeds](/oracles/data-feeds) - This explains how Supra calculates the **S-value** for an asset. - [Data Feeds Index](/oracles/data-feeds/data-feeds-index) - This provides a list of data pairs currently offered by Supra. - [Available Networks](/oracles/data-feeds/push-oracle/networks) - This is a list of available networks and Supra contract addresses. Important: Please make sure you read and understand [Terms of Use](https://supra.com/terms-of-use/) before start using Supra products and services. \ Let's begin!
**Step 1: Create the S-value interface** Import the interface from the DORA Interface ([https://github.com/Entropy-Foundation/dora-interface](https://github.com/Entropy-Foundation/dora-interface)) Git repository, and add the subdirectory Testnet you to use for integration. **Step 2: Configure the S-value feed dependency** Create your project and add the below dependencies in your Move.toml Testnet ```solidity [dependencies] core = { git = "https://github.com/Entropy-Foundation/dora-interface", subdir = "supra/testnet/core", rev = "master" } ``` Mainnet ```solidity [dependencies] core = { git = "https://github.com/Entropy-Foundation/dora-interface", subdir = "supra/mainnet/core", rev = "master" } ``` **Step 3: Request S-values for data feeds** Now you can easily request S-values of any supported data pairs. - Import : `supra_oracle::supra_oracle_storage` ```rust use aptos_std::table::{Self, Table}; use supra_oracle::supra_oracle_storage; ``` - Add the following structs ```rust struct PriceConfiguration has key { feeds: Table, } struct PriceStrategy has store, copy, drop { high: u128, low: u128, start_time: u64, end_time: u64, } ``` _**PriceConfiguration**_ is the main resource structure for this module. It has a \`feeds\` map that stores the price strategy feeds.\ \ _**PriceStrategy**_ represents a strategy feed entry with high, low, start time, and end time. - Next, add the \`init_module function below: ```rust fun init_module(owner: &signer) { move_to(owner, PriceConfiguration{ feeds:table::new()}); } ``` This initializes the PriceConfiguration with an empty feeds vector map. Then, it shares this resource. - Add the `set_high_low` function. This function sets the high and low price of a specific pair in the PriceConfiguration. If the pair already exists, it updates the existing PriceStrategy; if not, it inserts a new PriceStrategy. ```rust public entry fun set_high_low(supra_pair_id: u32) acquires PriceConfiguration { assert!(supra_oracle_storage::does_pair_exist(supra_pair_id), 0); let (current_price, _, _, current_round) = supra_oracle_storage::get_price(supra_pair_id); let price_configuration = borrow_global_mut(@supra_client); let price_strategy = table::borrow_mut_with_default( &mut price_configuration.feeds, supra_pair_id, PriceStrategy { high: 0, low: 0, start_time: 0, end_time: 0 } ); if ((price_strategy.high + price_strategy.low) == 0) { price_strategy.high = current_price; price_strategy.low = current_price; price_strategy.start_time = current_round; price_strategy.end_time = current_round; } else { if (current_price > price_strategy.high) { price_strategy.high = current_price; } else if (current_price < price_strategy.low) { price_strategy.low = current_price; }; price_strategy.end_time = current_round; } } ``` - Add the following `check_price_strategy` function to retrieve Strategic Price of one pair between an interval. This public view function fetches the strategic price for a single pair thats been updated by the above function `set_high_low` . ```rust #[view] public fun check_price_strategy(supra_pair_id:u32):PriceStrategy acquires PriceConfiguration { *table::borrow(& borrow_global(@supra_client).feeds,supra_pair_id) } ``` - To retrieve a S-value for multiple pairs you can design a public view function `get_pair_price_sum` that fetches prices for multiple pairs from the oracle, adds them and returns the sum. ```rust #[view] public fun get_pair_price_sum(pairs: vector):u256 { let prices:vector = supra_oracle_storage::get_prices(pairs); let sum:u256 = 0; vector::for_each_reverse(prices,|price| { let (_,value,_,_,_) = supra_oracle_storage::extract_price(&price); sum = sum + (value as u256); }); return sum } ``` **Derived Pairs - Convert a data pair to any currency with ease** There have been many requests to provide functionality convert the prices to USD. While we take data directly from exchange quoted pairs mostly in stable coins (USDT/USDC), conversion at our end adds more latency and extra layer of margin for error. (\*The oracle services who provide USD prices are already converting the USDT prices at their backend with previously mentioned disadvantages of that method). Still, for those who are in need we provide that as a custom function to convert and derive any pair using operators of _**Multiplication(parameter=0)**_ or _**Division(Parameter=1)**_. 1. Import supra_oracle::supra_oracle_storage dependency: ```rust use supra_oracle::supra_oracle_storage ; ``` 2. Next, add the \`init_module function below: ```rust fun init_module(owner_signer: &signer) { move_to(owner_signer, EmitDerivePair { derived_pair: account::new_event_handle(owner_signer) }); } ``` Add the following _`get_update_derived_price`_ function to retrieve S-value for the derived pair. This public entry function fetches the price for a derived pair from the _**supra_oracle_storage**_ module and emits an event for the Derived Pair Feed. ```rust public entry fun get_derived_pair_price( _signer: &signer, pair_id1: u32, pair_id2: u32, operation: u8 ) acquires EmitDerivePair { let (value, decimal, round_difference, round_compare) = supra_oracle_storage::get_derived_price(pair_id1, pair_id2, operation); let event_handler = borrow_global_mut(@client_example); let derived_pair = DerivedPair { pair_id1, pair_id2, operation, value, decimal, round_difference, round_compare }; event::emit_event(&mut event_handler.derived_pair, derived_pair); } ``` From the above code: - **pair**: a pair index number from which you want to retrieve the price value - **pairs**: Index numbers of multiple pairs from which you want to retrieve the price value Tada! You now have a method in your Smart Contract that you can call at any time to retrieve the price of the selected pair. **Step 1: Create The S-Value Interface** In the first step, you need to build data structures to receive the data feeds and functions required to fetch data into configured data structures. You may add the following code to the Solidity smart contract that you wish to retrieve the **S-Value**. ```solidity pragma solidity 0.8.19; // depending on the requirement, you may build one or more data structures given below. interface ISupraSValueFeed { // Data structure to hold the pair data struct priceFeed { uint256 round; uint256 decimals; uint256 time; uint256 price; } // Data structure to hold the derived/connverted data pairs. This depends on your requirements. struct derivedData{ int256 roundDifference; uint256 derivedPrice; uint256 decimals; } // Below functions enable you to retrieve different flavours of S-Value // Term "pair ID" and "Pair index" both refer to the same, pair index mentioned in our data pairs list. // Function to retrieve the data for a single data pair function getSvalue(uint256 _pairIndex) external view returns (priceFeed memory); //Function to fetch the data for a multiple data pairs function getSvalues(uint256[] memory _pairIndexes) external view returns (priceFeed[] memory); // Function to convert and derive new data pairs using two pair IDs and a mathematical operator multiplication(*) or division(/). //** Curreently only available in testnets function getDerivedSvalue(uint256 pair_id_1,uint256 pair_id_2, uint256 operation) external view returns (derivedData memory); // Function to check the latest Timestamp on which a data pair is updated. This will help you check the staleness of a data pair before performing an action. function getTimestamp(uint256 _tradingPair) external view returns (uint256); } ``` The above code creates the interface that you will later apply in order to fetch a price from SupraOracles. **Step 2: Configure The S-Value Feed Address** Next, in order to retrieve the S-Value, configure the S-Value feed using the Supra Smart Contract address as demonstrated below.\ The Supra contract for each network can be found in our [network addresses](https://github.com/nolan-supra/docs-test/blob/oracles/data-feeds/push-oracle/broken-reference/README.md) list, and the address used in the example below needs to be replaced. ```solidity contract ISupraSValueFeedExample { ISupraSValueFeed internal sValueFeed; constructor() { sValueFeed = ISupraSValueFeed(0xE92D276bBE234869Ecc9b85101F423c6bD26654A); } } // used above is a sample address and you should use the correct address of your preffered network ``` **Step 3: Get The S-Value Crypto Price** Now you can access the S-Values for any of the [trading pairs](../data-feeds-index/) Supra publishes. THe below sample code retrieves S-value for single as well as multiple data pairs for demonstration purposes. You may use it as appropriate. ```solidity // requesting s-value for a single pair function getPrice(uint256 _priceIndex) external view returns (ISupraSValueFeed.priceFeed memory) { return sValueFeed.getSvalue(_priceIndex); } // requesting s-values for multiple pairs function getPriceForMultiplePair(uint256[] memory _pairIndexes) external view returns (ISupraSValueFeed.priceFeed[] memory) { return sValueFeed.getSvalues(_pairIndexes); } // Function to convert and derive a new data pair using two existing pair ids, and a mathematical operator division(1), or multiplication(0). function getDerivedValueOfPair (uint256 pair_id_1,uint256 pair_id_2,uint256 operation) external view returns(ISupraSValueFeed.derivedData memory){ return sValueFeed.getDerivedSvalue(pair_id_1,pair_id_2,operation); } ``` \ **Recommended Best Practices:**\ \ **Create a function with access control that updates the sValueFeed using the function \_updateSupraSvalueFeed()**\_**.** This will allow you to update the address of the Supra storage contract after deployment to future-proof your contract. Access control is mandatory to prevent the undesired modification of the address. ```solidity function updateSupraSvalueFeed(ISupraSValueFeed _newSValueFeed) external onlyOwner { sValueFeed = _newSValueFeed; } ``` **Example Implementation:** Here's an example of what your implementation should look like: ```solidity pragma solidity 0.8.19; contract ConsumerContract is Ownable { ISupraSValueFeed internal sValueFeed; constructor(ISupraSValueFeed _sValueFeed) { sValueFeed=_sValueFeed; } function updateSupraSvalueFeed(ISupraSValueFeed _newSValueFeed) external onlyOwner { sValueFeed = _newSValueFeed; } function getSupraSvalueFeed() external view returns(ISupraSValueFeed){ return sValueFeed; } function getPrice(uint256 _priceIndex) external view returns (ISupraSValueFeed.priceFeed memory) { return sValueFeed.getSvalue(_priceIndex); } function getPriceForMultiplePair(uint256[] memory _pairIndexes) external view returns (ISupraSValueFeed.priceFeed[] memory) { return sValueFeed.getSvalues(_pairIndexes); } function getDerivedValueOfPair(uint256 pair_id_1,uint256 pair_id_2,uint256 operation) external view returns(ISupraSValueFeed.derivedData memory){ return sValueFeed.getDerivedSvalue(pair_id_1,pair_id_2,operation); } } ``` **Step 1: Create the S-value interface** Import the interface from the DORA Interface ([https://github.com/Entropy-Foundation/dora-interface](https://github.com/Entropy-Foundation/dora-interface)) Git repository, and add the subdirectory Mainnet or Testnet you would like to use for integration. **Step 2: Configure the S-value feed dependency** Create your project and add the below dependencies in your Move.toml Testnet ```solidity [dependencies] SupraOracle = { git = "https://github.com/Entropy-Foundation/dora-interface", subdir = "sui/testnet/supra_holder", rev = "51c1875d86f20abe2a22e8d2ae7a3a2a2a56d5a1" } ``` Mainnet ```solidity [dependencies] SupraOracle = { git = "https://github.com/Entropy-Foundation/dora-interface", subdir = "sui/mainnet/supra_holder", rev = "51c1875d86f20abe2a22e8d2ae7a3a2a2a56d5a1" } ``` **Step 3: Request S-values for data feeds** Now you can easily request S-values of any supported data pairs. - Import Sui dependency in: `client_example/sources/push_client.move` ```rust use SupraOracle::SupraSValueFeed::{Self, OracleHolder}; ``` - Add the following structs to: `client_example/sources/push_client.move` ```rust struct ExampleHolder has key, store { id: UID, feeds: VecMap, } struct ExampleEntry has store, copy, drop { value: u128, decimal: u16, timestamp: u128, round: u64, } ``` ExampleHolder is the main resource struct for this module. It has a unique identifier \`id\` and a \`feeds\` map that stores the price feeds. ExampleEntry represents a price feed entry with a value, decimal, timestamp, and round. - Next, add the \`init function below: ```rust fun init(ctx: &mut TxContext) { let resource = ExampleHolder { id: object::new(ctx), feeds: vec_map::empty(), }; transfer::share_object(resource); } ``` This initializes the ExampleHolder with a new ID and an empty feeds vector map. Then, it shares this resource. - Add the \`update_price\` function. This Updates the price of a specific pair in the ExampleHolder. If the pair already exists, it updates the existing ExampleEntry; if not, it inserts a new ExampleEntry. ```rust fun update_price(resource: &mut ExampleHolder, pair: u32, value: u128, decimal: u16, timestamp: u128, round: u64) { let feeds = resource.feeds; if (vec_map::contains(&feeds, &pair)) { let feed = vec_map::get_mut(&mut resource.feeds, &pair); feed.value = value; feed.decimal = decimal; feed.timestamp = timestamp; feed.round = round; } else { let entry = ExampleEntry { value, decimal, timestamp, round }; vec_map::insert(&mut resource.feeds, pair, entry); }; } ``` - Add the following \`get_update_price\` function to retrieve S-value for one pair. This is a public entry function that fetches the price for a single pair from the oracle and updates the corresponding entry in the ExampleHolder. ```rust public entry fun get_update_price( oracle_holder: &OracleHolder, resource: &mut ExampleHolder, pair: u32, _ctx: &mut TxContext ) { let (value, decimal, price, round) = SupraSValueFeed::get_price(oracle_holder, pair); update_price(resource, pair, value, decimal, price, round); } ``` - If you want to retrieve a S-value for multiple pairs you need to add \`get_update_prices\` which is a public entry function that fetches prices for multiple pairs from the oracle and updates the corresponding entries in the ExampleHolder. ```solidity public entry fun get_update_prices( oracle_holder: &OracleHolder, resource: &mut ExampleHolder, pairs: vector, _ctx: &mut TxContext ) { let prices = SupraSValueFeed::get_prices(oracle_holder, pairs); let n = vector::length(&prices); let i = 0; while (i < n) { let price = vector::borrow(&prices, i); let (pair, value, decimal, timestamp, round) = svalue_feed_holder::extract_price(price); update_price(resource, pair, value, decimal, timestamp, round); i = i + 1; } } ``` The typical usage of this module starts with initializing an ExampleHolder using the init function. The ExampleHolder is then updated with price information using the update_price function, which can be manually called or called through get_update_prices or get_update_price, which also fetch the price data from the oracle. Please note that you need an instance of OracleHolder to use get_update_prices and get_update_price. These are public entry functions that can be called from external modules or scripts. **Derived Pairs - Convert a data pair to any currency with ease** There have been many requests to provide functionality convert the prices to USD. While we take data directly from exchange quoted pairs mostly in stable coins (USDT/USDC), conversion at our end adds more latency and extra layer of margin for error. (\*The oracle services who provide USD prices are already converting the USDT prices at their backend with previously mentioned disadvantages of that method). Still, for those who are in need we provide that as a custom function to convert and derive any pair using operators of _**Multiplication(parameter=0)**_ or _**Division(Parameter=1)**_. 1. Import supra_holder::derived_pair dependency in:\ `client_example/sources/derived_pair_client.move` ```rust use supra_holder::svalue_feed_holder; ``` 2. Add the following \`get_update_derived_price\` function to retrieve S-value for derived pair. This is a public entry function that fetches the price for a single derived pair from the oracle and updates the corresponding entry in the ExampleHolder. ```solidity public entry fun get_derived_pair_price( pair_id1: u32, pair_id2: u32, operation: u8 _ctx: &mut TxContext ) { let (value, decimal, round_difference, round_compare) = SupraSValueFeed::get_derived_price(oracle_holder, pair_id1, pair_id2, operation); event::emit(DerivedPair { pair_id1, pair_id2, operation, value, decimal, round_difference, round_compare }); } ``` Note: You might need to use `--skip-dependency-verification` flag to publish your smart contract From the above code: - `OracleHolder`: a resource that contains oracle price - `pair`: a pair number which you want to retrieve the price value Tada! You now have a method in your smart contract that you can call at any time to retrieve the prices of selected asset pairs.
### Source: https://docs.supra.com/oracles/data-feeds/push-oracle/networks # Available Networks Push oracles usually require network foundation support for gas for sustainable maintenance of the feeds. The frequencies and deviation thresholds mentioned below can be changed at request. Important: Please make sure you read and understand [Terms of Use](https://supra.com/terms-of-use/) before start using Supra products and services. **Mainnet Addresses** | No | Mainnet | Contract Address | Details | | --- | --------------------- | ----------------------------------------------------------------------------------------------------------------------------------------------------------------------------------------- | ------------------------------------------------- | | 1 | Supra Mainnet | 0xe3948c9e3a24c51c4006ef2acc44606055117d021158f320062df099c4a94150 | Update Frequency: 3 Sec Deviation Threshold: 5% | | 2 | Fuse Mainnet | 0x79E94008986d1635A2471e6d538967EBFE70A296 | Update Frequency: 10 Mins | | 3 | Sui Mainnet | **Package ID:**
0xc7abe17a209fcab08e2d7d939cf3df11f5b80cf03d10b50893f38df12fdebb07

**Oracle Holder:**
0xaa0315f0748c1f24ddb2b45f7939cff40f7a8104af5ccbc4a1d32f870c0b4105 | Update Frequency: 10 Sec | | 4 | Hedera Mainnet | 0xD02cc7a670047b6b012556A88e275c685d25e0c9 | Update Frequency: 1 hr Deviation Threshold: 0.5% | | 5 | Meter Mainnet | 0x5277475d7A234A20138f821Ef55d9eFDDa483662 | Update Frequency: 1 hr Deviation Threshold: 5% | | 6 | XDC mainnet | 0xD02cc7a670047b6b012556A88e275c685d25e0c9 | Update Frequency: 1 hr Deviation Threshold: 5% | | 7 | Map protocol mainnet | 0xD02cc7a670047b6b012556A88e275c685d25e0c9 | Update Frequency: 1 hr Deviation Threshold: 5% | | 8 | B Squared Mainnet | 0xD02cc7a670047b6b012556A88e275c685d25e0c9 | Update Frequency: 6 hr Deviation Threshold: 10% | | 9 | IOTA EVM Mainnet | 0xD02cc7a670047b6b012556A88e275c685d25e0c9 | Update Frequency: 1 Min Deviation Threshold: 10% | | 10 | Mint Mainnet | 0xD02cc7a670047b6b012556A88e275c685d25e0c9 | Update Frequency: 6 hr Deviation Threshold: 5% | | 11 | NeoX Mainnet | 0x58e158c74DF7Ad6396C0dcbadc4878faC9e93d57 | Update Frequency: 1 hr Deviation Threshold: 5% | | 12 | Plume Mainnet | 0x58e158c74DF7Ad6396C0dcbadc4878faC9e93d57 | Update Frequency: 1 hr Deviation Threshold: 0.5% | | 13 | Hashkey Chain mainnet | 0x58e158c74DF7Ad6396C0dcbadc4878faC9e93d57 | Update Frequency: 6 hrs Deviation Threshold: 0.5% | | 14 | Monad Mainnet | 0x58e158c74DF7Ad6396C0dcbadc4878faC9e93d57 | Update Frequency: 1 hrs Deviation Threshold: 0.5% | **Testnet Addresses** | No | Testnet | Contract Address | Details | | --- | ------------------------ | ----------------------------------------------------------------------------------------------------------------------------------------------------------------------------------------- | ------------------------------------------------- | | 1 | Supra Testnet | **Package ID:**
0x5615001f63d3223f194498787647bb6f8d37b8d1e6773c00dcdd894079e56190 | Update Frequency: 3 Sec Deviation Threshold: 10% | | 2 | Arbitrum Sepolia | 0x6Cd59830AAD978446e6cc7f6cc173aF7656Fb917 | Update Frequency: 2 hrs Deviation Threshold: 10% | | 3 | Avalanche Fuji | 0xfA84fCE7aCa79c50216aac58b0669d48743a17a2 | Update Frequency: 24 hrs Deviation Threshold: 10% | | 4 | BNB Testnet | 0x004d42225631F6bec6503a281Ed4c233810CBC29 | Update Frequency: 1 hour Deviation Threshold: 10% | | 5 | Linea Sepolia Testnet | 0x6Cd59830AAD978446e6cc7f6cc173aF7656Fb917 | Update Frequency: 6 hr Deviation Threshold: 10% | | 6 | Fuse SparkNet | 0x391Ab9ad5C4BFee04eA508b0a0Cf499198D015e3 | Update Frequency: 10 MinsDeviation Threshold: 10% | | 7 | Sui Testnet | **Package ID:**
0x3fd25bdfab06b7e29a606fa2516655b48556ae8f1efda047a70ba929b2494919

**Oracle Holder:**
0x87ef65b543ecb192e89d1e6afeaf38feeb13c3a20c20ce413b29a9cbfbebd570 | Update Frequency: 1 Min Deviation Threshold: 5% | | 8 | Hedera Testnet | 0x6Cd59830AAD978446e6cc7f6cc173aF7656Fb917 | Update Frequency: 1 hr Deviation Threshold: 5% | | 9 | Manta Pacific Testnet | 0x6Cd59830AAD978446e6cc7f6cc173aF7656Fb917 | Update Frequency: 3 hr Deviation Threshold: 1% | | 10 | Plume Testnet | 0x33Ac5E3C266AF17C25921e0A26DCb816d00a3657 | Update Frequency: 1 hr Deviation Threshold: 10% | | 11 | Blast sepolia Testnet | 0x6Cd59830AAD978446e6cc7f6cc173aF7656Fb917 | Update Frequency: 6 hr Deviation Threshold: 10% | | 12 | Meter Testnet | 0xF9780b16AA0aa1d072C50b36AA53baAAC471de08 | Update Frequency: 1 hr Deviation Threshold: 5% | | 13 | Frax Testnet | 0x33Ac5E3C266AF17C25921e0A26DCb816d00a3657 | Update Frequency: 1 hr Deviation Threshold: 5% | | 14 | BSquared Habitat Testnet | 0x6Cd59830AAD978446e6cc7f6cc173aF7656Fb917 | Update Frequency: 2 hr Deviation Threshold: 3% | | 15 | Map Protocol Testnet | 0x33Ac5E3C266AF17C25921e0A26DCb816d00a3657 | Update Frequency: 1 hr Deviation Threshold: 5% | | 16 | XDC Apothem Testnet | 0xe52FD0AD5F8B37cb641672b70d0B516797D6682f | Update Frequency: 1 hr Deviation Threshold: 5% | | 17 | Mode Sepolia Testnet | 0x33Ac5E3C266AF17C25921e0A26DCb816d00a3657 | Update Frequency: 6 hr Deviation Threshold: 5% | | 18 | Taiko Hekla Testnet | 0x33Ac5E3C266AF17C25921e0A26DCb816d00a3657 | Update Frequency: 1 hr Deviation Threshold: 1% | | 19 | Base Sepolia Testnet | 0x6Cd59830AAD978446e6cc7f6cc173aF7656Fb917 | Update Frequency: 6 hr Deviation Threshold: 10% | | 20 | Telos Testnet | 0x1a33d1c35a7720b0708e8406f7d6d4418d6536f8 | Update Frequency: 2 hr Deviation Threshold: 10% | | 21 | Immutable ZKEVM Testnet | 0x443A0f4Da5d2fdC47de3eeD45Af41d399F0E5702 | Update Frequency: 2 hr Deviation Threshold: 10% | | 22 | Zeta Chain Testnet | 0x402744e78a69C5A8128cBdc6840dc5b32Eb33dF2 | Update Frequency: 1 hr Deviation Threshold: 10% | | 23 | NeoX Testnet | 0x5df499C9DB456154F81121282c0cB16b59e74C4b | Update Frequency: 1 hr Deviation Threshold: 5% | | 24 | Ape ChainCurtis testnet | 0xf08A9C60bbF1E285BF61744b17039c69BcD6287d | Update Frequency: 10 Min Deviation Threshold: 10% | | 25 | Form Testnet | 0x6Cd59830AAD978446e6cc7f6cc173aF7656Fb917 | Update Frequency: 1 hr Deviation Threshold: 10% | | 26 | Mint Sepolia Testnet | 0x6Cd59830AAD978446e6cc7f6cc173aF7656Fb917 | Update Frequency: 6 hr Deviation Threshold: 10% | | 27 | Merlin Testnet | 0x6Cd59830AAD978446e6cc7f6cc173aF7656Fb917 | Update Frequency: 6 hr Deviation Threshold: 10% | | 28 | Botanix Testnet | 0x33Ac5E3C266AF17C25921e0A26DCb816d00a3657 | Update Frequency: 2 hrs Deviation Threshold: 3% | | 29 | Monad Testnet | 0x6Cd59830AAD978446e6cc7f6cc173aF7656Fb917 | Update Frequency: 1 hr Deviation Threshold: 0.05% | | 30 | IOTA EVM Testnet | 0x33Ac5E3C266AF17C25921e0A26DCb816d00a3657 | Update Frequency: 6 hrs Deviation Threshold: 10% | | 31 | Hashkey Chain testnet | 0x6Cd59830AAD978446e6cc7f6cc173aF7656Fb917 | Update Frequency: 6 hrs Deviation Threshold: 0.5% | ### Source: https://docs.supra.com/oracles/apis-real-time-and-historical-data # APIs - Real time and Historical data Welcome to the Supra Price Feeds API! This guide provides all the resources you need to integrate Supra’s REST and WebSocket APIs into your applications. Our APIs deliver reliable, real-time, and historical crypto price feeds for a wide range of assets, enabling you to build dynamic charts, track trends, and enable users to make informed decisions with better accuracy.\ Designed for seamless integration, the APIs cater to developers aiming to create high-performance applications with accurate market data from Supra. Supra APIs are currently available in Early Access mode.
Please submit this [form](https://docs.google.com/forms/d/e/1FAIpQLSfHZr8BHLTY8q_MjbuKZPpdgQS0oGmRIrsn9H-HrieH9eQjFw/viewform) and contact us via the Supra Builders Telegram [channel](https://t.me/+gJxSM8Cy1AsxNmJh) for support.
--- ### Source: https://docs.supra.com/oracles/apis-real-time-and-historical-data/rest-api # Rest API Rest API enables users to request the latest price update for multiple data pairs or historical prices up to 1 month for a single data pair. We will enable historical data going back up to 6 months in the near future.\ History data response will contain OHLC data (Open price, High price, Low price, Close price) for the requested time resolution which will facilitate building candlestick charts. Important: Please make sure you read and understand [Terms of Use](https://supra.com/terms-of-use/) before start using Supra products and services. \ Base URL ``` https://prod-kline-rest.supra.com/history ``` ### Endpoint: Get Historical Price Data for Trading Pair #### Request URL ``` GET/history ``` \ **Headers** | Header | Value | | --------- | ----------------------------------------------------------------------------------------------------------------------------------------------- | | x-api-key | Your Key ( Please request your key [here](https://docs.google.com/forms/d/e/1FAIpQLSfHZr8BHLTY8q_MjbuKZPpdgQS0oGmRIrsn9H-HrieH9eQjFw/viewform)) | ### Query Parameters | Parameter | Type | Description | Example | | ------------ | ------- | ---------------------------------------------------------------------------------------------------------------------- | --------------------------- | | trading_pair | String | The trading pair for which to retrieve historical data. Example: btc_usd, eth_usd, etc. | btc_usd | | startDate | Integer | The starting timestamp for the data range in Unix milliseconds (UTC). This determines the beginning of the data range. | 1732014893723 | | endDate | Integer | The ending timestamp for the data range in Unix milliseconds (UTC). This determines the end of the data range. | 1732014910000 | | Resolution | Integer | The time interval between data points in seconds. Typical intervals could be 15, 30, 60, 3600(1 hour) | 86400 ( for 24H resolution) | #### Example Request ```javascript GET https://prod-kline-rest.supra.com/history? trading_pair=btc_usd&startDate=1732014893723&endDate=1732014910000&int erval=5 ``` #### Response The response contains historical price data for the given trading pair in the specified time range and interval. The response is typically in JSON format. ```json { "status": "success", "data": [ { "timestamp": 1732014893723, "open": 20000.5, "high": 20100.0, "low": 19950.0, "close": 20050.0, "volume": 15.2 }, { "timestamp": 1732014898723, "open": 20050.0, "high": 20150.0, "low": 20000.0, "close": 20100.0, "volume": 18.1 }, ... ] } ``` ### Endpoint: Get Latest Price Data for Trading Pair Request URL ``` GET /latest ``` \ Parameters | Parameter | Type | Description | Example | | ------------ | ------ | -------------------------------------------------------- | -------- | | trading_pair | String | The trading pair for which to retrieve latest price data | btc_usdt | \ \ Example Request ```javascript GET https://prod-kline-rest.supra.com/latest?trading_pair=btc_usdt ``` Response ```json { "currentPage": 1, "totalPages": 1, "totalRecords": 1, "pageSize": 10, "instruments": [ { "time": "1732175999048", "timestamp": "2024-11-21 07:59:59", "currentPrice": "96913.07250000001", "24h_high": "97849.9", "24h_low": "92720", "24h_change": "5.5326790336496980", "tradingPairs": "btc_usdt" } ] } ``` \ Status Codes - 200 OK: The request was successful, and data is returned. - 400 Bad Request: The request was invalid or improperly formatted. - 404 Not Found: The requested trading pair or data could not be found. - 500 Internal Server Error: A server error occurred while processing the request. ### Source: https://docs.supra.com/oracles/apis-real-time-and-historical-data/websocket-api # WebSocket API WebSocket API streams price feeds data real time. Users can configure the query based on the preferred resolution to receive OHLC( Open price, High Price, Low Price, Close price). data required to build candlestick charts. Important: Please make sure you read and understand [Terms of Use](https://supra.com/terms-of-use/) before start using Supra products and services. ### WebSocket Connection URL WebSocket connection should be established to the above URL to start receiving real-time data.\ \ **Endpoint URL** ``` wss://prod-kline-ws.supra.com ``` **Header** | Header | Value | | --------- | ----------------------------------------------------------------------------------------------------------------------------------------------- | | x-api-key | Your Key ( Please request your key [here](https://docs.google.com/forms/d/e/1FAIpQLSfHZr8BHLTY8q_MjbuKZPpdgQS0oGmRIrsn9H-HrieH9eQjFw/viewform)) | ### Message Payload Structure To initiate a subscription to the data feed, a message is sent to the WebSocket server. The message must be in the following JSON format: ```json { "action": "subscribe", "channels": [ { "name": "ohlc_datafeed", "resolution": 5, "tradingPairs": ["btc_usd"] } ] } ``` #### Parameters - **action**: "subscribe" : This field tells the server that the client is subscribing to a data channel. - **channels**: This is an array of channel configurations to which the client wishes to subscribe. Each channel has the following parameters: - **name**: "ohlc_datafeed" This refers to the data feed channel for receiving historical open/close/low data updates. - **resolution**: 5\ This is the resolution (in minutes) at which data updates will be delivered. A value of 5 means the server will send ohlc (Open price, High price, Low price, close price) updates every 5 minutes. Changing this value will adjust the resolution of updates.\ Example: 1 =1 minute resolution(bar), 5=5 minutes resolution(bar) - **tradingPairs**: A list of data pairs to subscribe to. This can include single or multiple pairs:  **Single pair:** \["btc_usd"] – Subscribes to the Bitcoin to USD data feed.  **Multiple pairs:** \["btc_usdt", "eth_usdt"] – Subscribes to multiple data pairs. Example:  Single pair subscription: "tradingPairs": \["btc_usd"]  Multiple pairs subscription: "tradingPairs”: \["btc_usd", "eth_usd", "btc_usdt"] ### Response Data structure Once the subscription is successful, the server will respond with data at the specified frequency. The format of the response for each update is as follows:\ \ Example Response ```json { "event": "ohlc_datafeed", "payload": [ { "time": "1732081150000", "timestamp": "2024-11-20 05:39:10", "open": "92420.15", "high": "92420.15", "low": "92412.3", "close": "92412.3", "tradingPair": "btc_usd", "currentPrice": 92412.3 } ] } ``` #### Response Parameters - **event**: "ohlc_datafeed"\ This indicates the type of event for which data is being sent, which is the historical open/high/low/close data feed. - **payload**:\ This is an array of data objects representing updates for the subscribed data pair(s). Each object contains: - **time**: 1732081150000\ The time in Unix timestamp format (milliseconds). It represents when the data was recorded. - **timestamp**: "2024-11-20 05:39:10"\ The human-readable timestamp for the data point. - **open**: "92420.15"\ The opening price for the given time period. - **high**: "92420.15"\ The highest price during the time period. - **low**: "92412.3"\ The lowest price during the time period. - **close**: "92412.3"\ The closing price for the given time period - **tradingPair**: "btc_usd"\ The data pair for which this data is provided. - **currentPrice**: 92412.3\ The most recent price of the data pair at the time of data transmission. Time resolution of updates Time resolution parameter in the subscription message determines how often data will be sent. For instance: - If resolution is set to 5:\ The server will send a data update every 5 seconds. - If resolution is set to 10:\ The server will send a data update every 10 seconds. Example:\ \ 1\. Client Subscription\ Client and sends the following subscription message to receive real-time ohlc (open price, high price, low price, close price) data updates every 5 minutes for the "btc_usdt" data pair: ```json { "action": "subscribe", "channels": [ { "name": "hocl_datafeed", "resolution": 5, "tradingPairs": ["btc_usdt"] } ] } ``` 2. Server Response\ After subscribing, the client will start receiving data every 5 minutes (based on the requested resolution for the "btc_usdt" data pair in the following format: ```json { "event": "ohlc_datafeed", "payload": [ { "time": "1732081150000", "timestamp": "2024-11-20 05:39:10", "open": "92420.15", "high": "92420.15", "low": "92412.3", "close": "92412.3", "tradingPair": "btc_usdt", "currentPrice": 92412.3 } ] } ``` ### Source: https://docs.supra.com/oracles/apis-real-time-and-historical-data/price-widgets # Price Widgets Supra provides embeddable widgets for displaying cryptocurrency data on websites. These widgets can be customised and be integrated using HTML iframes. ### Pre requisites Users who plans to display these widgets need to have access to a SUPRA API key. Please feel free to request your key [here](https://docs.google.com/forms/d/e/1FAIpQLSfHZr8BHLTY8q_MjbuKZPpdgQS0oGmRIrsn9H-HrieH9eQjFw/viewform). ### Customisation options - Number of price feeds - Widget size - Text colour - Background colour ### **Horizontal Moving Price Ticker** This ticker can be customised to add any number of asset prices, and prices are updated real time. All price tickers are moving left side. ![Horizontal Price Ticker Widget](/images/oracles/horizontal-ticker.png) Simply copy paste the code snippet below. ```html ``` ### Vertical Price Widget Vertical ticker real time prices and the tickers are static, scrollable and can customise for any number of asset prices. ![Price Ticker Widget variant](/images/oracles/vertical-price-widget.png) \ Copy and paste following snippet. ```html ``` ### Customisation Options 1. textColor : Sets the colour of the text.\ Example:\ `Hex: textColor=black`\ `RGB: textColor=rgb(0, 0, 0)` 2. subTextColor : Sets the colour of the sub-text.\ Example:\ `Hex: subTextColor=%23444 (This sets the color to #444)`\ `RGB: subTextColor=rgb(68, 68, 68)` 3. gridBg : Sets the background colour of the grid.\ Example:\ `Hex: gridBg=yellow`\ `RGB: gridBg=rgb(255, 255, 0)` 4. gridBgHover : Sets the background colour of the grid on hover.\ Example:\ `Hex: gridBgHover=green`\ `RGB: gridBgHover=rgb(0, 255, 0)` 5. mainBG : Sets the main background colour.\ Example:\ `Hex: mainBG=red`\ `RGB: mainBG=rgb(255, 0, 0)` 6. chartBgColor : Sets the background color of the chart.\ Example:\ `Hex: chartBgColor=white`\ `RGB: chartBgColor=rgb(255, 255, 255)` ### Hex Color Codes and URL Encoding When using Hex values in the URL, ensure that you encode the hash (#) as %23. For example: - Hex color #444 becomes %23444. - Hex color #ffffff becomes %23ffffff. #### Example with Encoded Colors If you are using Hex values, here’s how the URL would look with the parameters applied: ```html ``` #### Example with RGB Colors ```html ``` ### Source: https://docs.supra.com/oracles/indices # Indices ### Overview Supra Indices serve as a powerful tool for creating fully transparent cryptocurrency indices on the Supra blockchain, similar to traditional equity indices like the S\&P 500 or FTSE 100, using on-chain [price feeds](/oracles/data-feeds/data-feeds-index) from Supra’s low- latency oracle.\ Indices on Supra are permissionless, fully transparent, self-owned, and user-manageable. Anyone can create an index on the Supra L1 network, and leverage it to develop new decentralized applications (dApps) or enhance the functionality of existing ones. By utilizing any data feed provided by Supra Oracles, users can create their own indices. Additionally, there is an opportunity to collaborate with Supra to have these indices visualised on the Supra Indices [dashboard](https://supra.com/data/indices), further enhancing visibility and usability.\ \ \ Below is alist of indices published by Supra on Supra L1. | Index | Description | Object Address | | ----------------- | ------------------------------------------------------------------------------------------------------------------------------------------------------------------------------------------------------------------------------------------------------------------------ | ---------------------------------------------------------------------------------------------------------------------------------------------------------------------- | | Supra10 Index | The equal-weighted Supra10 Index features the top 10 cryptocurrencies by market capitalisation, excluding stable coins and liquid staking tokens. | _**Testnet**_ 0x6c39da27528adf9730c6a94131756da0aa37ca32fb3556795961b2431b273ff3
_**Mainnet**_ 0x78b9637375bc19bfe7db6bf1496f13b67e81263787a714d870c196d2765293f7 | | Supra Move Index | The equal-weighted Supra Move Index monitors the performance of key assets within the Move ecosystem. | _**Testnet**_ 0x147cf107d949d1c1d40f63fe60ac95d30e7f5b38a34a3709be783081e9fbabdb
_**Mainnet**_ 0xf2ae7ceb3746760e9b49563cb2a2ecc552d8807803dfd8001f85801ec4815637 | | Supra Meme. Index | The equal-weighted Supra Move Index monitors the performance of key assets within the Move ecosystem. | _**Testnet**_ 0x52d26fa1b7dca693d427d83b15f297800c576115cb97e0329d319c7a34abca6e
_**Mainnet**_ 0xdbbea855fa0030c2e7737e76b8edf8f93d7cbc0182d07a018cf713f6e7dcab70 | | Made In USA Index | Made in USA Index showcases cryptocurrencies with strong ties to the United States, either through their founding teams or company headquarters. This index highlights American innovation in blockchain, offering a curated selection of U.S. connected digital assets. | _**Testnet**_ 0xc7dda79f04eff223c4726135dd31844a05e3532112ec6d50e7c65dc89a3335f4
_**Mainnet**_ 0xbaf5949fab5563942f40dcf09c7aeea597182431c03a65549afb32eb3041f687 | Important: Please make sure you read and understand [Terms of Use](https://supra.com/terms-of-use/) before start using Supra products and services. If you are interested in creating your own index or build derivative products, please feel free to contact the Supra team. ### Source: https://docs.supra.com/oracles/indices/creating-a-new-on-chain-index # Creating a new on-chain index Important: Please make sure you read and understand [Terms of Use](https://supra.com/terms-of-use/) before start using Supra products and services. ### Supra Index Contracts Below contracts facilitate index creation and modification on Supra L1. | Supra Network | Module/ Contract | | ------------- | ------------------------------------------------------------------ | | Testnet | 0x5615001f63d3223f194498787647bb6f8d37b8d1e6773c00dcdd894079e56190 | | Mainnet | 0xe3948c9e3a24c51c4006ef2acc44606055117d021158f320062df099c4a94150 | ### Creating an Index on Supra L1 The first step of the process is to decide the assets you want to be included in the index, these can be selected from Supra Data feeds catalog. Next, you can decide on the index related variables given below: - **Asset Weight** : This defines how each asset contributes to the calculation of index value. Currently Supra facilitates static weights only. - **Initial Value**:= This is optional. This is the value your index would start on at the time of creation. Now, let's move to create your first on-chain index. #### Indices with no initial Value The simplest form of creating an index would be without an initial value.\ In this case you need to call the following function, ```solidity public entry fun create_index( owner_signer: &signer, pair_ids: vector,weights: vector) ``` - _**pair_ids**_ is the list of pair indexes from the data sheet provided above. - _**weights**_ is the list of integers that denotes the corresponding weights of the pair from the list provided in the params pair_ids. If we are creating an index with an equally weighted set of 10 data feeds from Supra (denoted by Supra Data feed index number), it would be as follows. ```solidity supra move tool run --function-id "0xe3948c9e3a24c51c4006ef2acc44606055117d021158f320062df099c4a94150::supra_oracle_indices::create_index" --args 'u32:[0, 1, 49, 10, 14, 3, 164, 16, 15, 5]' 'u32:[10, 10, 10, 10, 10, 10, 10, 10, 10, 10]' --profile profile_name --url network_url ``` #### Indices with initial value In this case you need to call the following function ```solidity public entry fun create_index_with_init_value( owner_signer: &signer, pair_ids: vector,weights: vector,init_value: u32) ``` - _**pair_ids**_ is the list of pair indexes from the data sheet provided above. - _**weights**_ is the list of integers that denotes the corresponding weights of the pair from the list provided in the params pair_ids. - _**init_value**_ is the initial value of the index thats the creator wants to start with. If we are to try the same example above with an initial value of 100, it would be as follows:. ```solidity supra move tool run --function-id "0xe3948c9e3a24c51c4006ef2acc44606055117d021158f320062df099c4a94150::supra_oracle_indices::create_index_with_init_value" --args 'u32:[0, 1, 49, 10, 14, 3, 164, 16, 15, 5]' 'u32:[10, 10, 10, 10, 10, 10, 10, 10, 10, 10]' u32:100 --profile profile_name --url network_url ``` In this case the actual weights are converted to scaled weight according to a scaling factor mentioned below. `Scaling Factor = init_value / dot_product(init_weights,price_pair_values);`\ \ This conversion is done so that the index_value can be adjusted with the init_value.\ \ Upon successful execution of creating an index function you will get this kind of [receipt](https://rpc-testnet.supra.com/rpc/v1/transactions/8d18aefd2c5fff9858f4b2685743802eadde739e4fdccfbfa8b040b8a185c74c) and in the data section you can find the fields like: ```solidity "creator": Address Of The Creator Of This Index , "id": Index Identification Number, "index_decimal": Index Decimals, "index_obj_addr": Index Object Address, "init_index_time": Index Initialization Time, "init_value": Index Initialization Value, "pair_ids": List Of Pairs Present In The Index, "scaled_weights": Scaled Weight Of The Corresponding Pairs, "scaling_factor": Scaling Factor For This Index, "weights": Actual Weights Provided By The Creator ``` NOTE : 1. All the weights and intermediary values are converted to _MAX_INDEX_DECIMAL_ decimals before doing any operations on them. This is done to make sure there are very low precision errors. 2. Index values have _MAX_INDEX_DECIMAL_ decimal places, so make sure to convert to desired decimals before doing any operations on them. ### Modifying an Index To update the constituents pairs or or its weight or to modify the pair list the index creator need to call this function: ```solidity public entry fun update_index( owner_signer: &signer, index_object: Object, pair_ids: vector, weights: vector ) ``` - _**index_object**_ is the address of the object in which the index details is stored. - _**pair_ids**_ is the list of pair indexes from the data sheet provided above. - _**weights**_ is the list of integers that denotes the corresponding weights of the pair from the list provided in the params pair_ids. Example; ```solidity supra move tool run --function-id "0xe3948c9e3a24c51c4006ef2acc44606055117d021158f320062df099c4a94150::supra_oracle_indices::update_index" --args address: 0xccb0aaeccff18711969426eb1d422357ca95d46ffce18c376d5a7b521839c93d 'u32:[0, 1, 49, 10, 14, 3, 164, 16, 15, 5]' 'u32:[10, 15, 5, 10, 15, 5, 10, 15, 5, 10]' --profile profile_name --url network_url ``` Note:\ The Scaling Factor will remain the same and the new weights will be adjusted to the scaled weights according to the scaling factor calculated at the time of creation ### Deleting an Index To delete an index, the index creator needs to call this function. Once deleted, the index cannot be restored back. ```solidity public entry fun delete_index( owner_signer: &signer, index_object: Object ) ``` Note: index_object is the address of the object in which the index details is stored.\ \ Example; ```solidity supra move tool run --function-id "0xe3948c9e3a24c51c4006ef2acc44606055117d021158f320062df099c4a94150::supra_oracle_indices::delete_index" --args address: 0xccb0aaeccff18711969426eb1d422357ca95d46ffce18c376d5a7b521839c93d --profile profile_name --url network_url ``` ### Source: https://docs.supra.com/oracles/indices/read-on-chain-indices # Read on-chain Indices Reading index values is permissionless in Supra L1. Any user or dApp can calculate and read the latest values of any index available in Supra. While calculations would require gas, reading is free. Important: Please make sure you read and understand [Terms of Use](https://supra.com/terms-of-use/) before start using Supra products and services. ### Step 1: Create The Supra Indices Framework. Import interface from [https://github.com/Entropy-Foundation/dora-interface](https://github.com/Entropy-Foundation/dora-interface) git repository and add subdirectory mainnet or testnet whatever you would like to use for integration. ### Step 2: Configure The S-Value Feed Dependency Create your project and add the below dependencies in your Move.toml Testnet ```solidity [dependencies] core = { git = "https://github.com/Entropy-Foundation/dora-interface", subdir = "supra/testnet/core", rev = "master" } ``` ### Step 3: Example to access and use the S-Value Crypto Price #### **3.1 Supported Indices** Now you can simply access the Index-Value of our supported indices. * Import supra_oracle::supra_oracle_indices ```solidity use aptos_std::table::{Self, Table}; use supra_oracle::supra_oracle_indices; ``` * Add the following structs\ _IndicesList_ is the main resource structure for this module. It has a \`list\` map that lists object addresses of all indices. ```solidity struct IndicesList has key { list: Table, } ``` * Next, add the \`init_module function below:\ This initializes the IndicesList with an empty list map. ```solidity fun init_module(owner: &signer) { move_to(owner, IndicesList{ feeds:table::new()}); } ``` * Add the `store_index_object_address` function. This function stores the index object address that corresponds to the index id. ```solidity public entry fun store_index_object_address(supra_index_id: u64) acquires IndicesList { let indices_list = borrow_global_mut(@supra_client); let index_object_address = get_index_address(supra_index_id); table::add(&mut indices_list.list,supra_index_id,index_object_address); } ``` ### Calculating the latest value of the index To calculate and retrieve the value of multiple indices on Supra L1 , the client smart contract module can trigger following function: ```solidity public fun calculate_index_value( index_objects: vector> ): vector ``` * **index_objects** : List of index object addresses for which you need to calculate the index values. * _**Return**_: Vector of Index Values corresponding to the index_objects \ NOTE: When this function is triggered the storage is going to get updated\* with the latest calculated index values. _\*if the most recent timestamp from the constituent pair timestamps is greater than the current index timestamp._ ### Reading the index value #### Method 1 : Without considering the timestamp of the last index update Returns the Index details with the value that's present in the storage: ```solidity public fun get_index_details(index_object: Object): Index ``` * _**index_object**_ : Index object address for which you need to fetch the index details ```solidity supra move tool view --function-id "0x1c9decaaa7c8aa1d5cbb7dd009764dfe145891d35586956bdb4ddb888d03a1b3::supra_oracle_indices::get_index_details" --args address: 0xccb0aaeccff18711969426eb1d422357ca95d46ffce18c376d5a7b521839c93d --profile profile_name --url network_url ``` * _**Return**_: Vector of Index details for corresponding to the index_object ```solidity struct Index has key, copy, drop { // Index Identification Number id: u64, // List Of Pairs Present In The Index pair_ids: vector, // Index Initialization Value init_value: u256, // Index Initialization Time init_index_time: u64, // Last Updated Time Of The Index last_update_time: u64, // Scaling Factor For This Index scaling_factor: u256, // Scaled Weight Of The Corresponding Pairs scaled_weights: vector, // Index Decimals index_decimal: u16, // Current Index Value index_value: u256 } ``` #### Method 2 : Fetch the index value that can only sustain/tolerate a specific stateless period Check if the index last calculated time falls into the staleness duration then it will simply return the value from the storage else It recalculates the index value, and if the index still falls into the staleness duration it returns either true or false: ```solidity public fun get_indices_with_staleness_tolerance( index_objects: vector>, staleness_tolerances: vector): (vector, vector) ``` Example: ```solidity supra move tool run --function-id "0x1c9decaaa7c8aa1d5cbb7dd009764dfe145891d35586956bdb4ddb888d03a1b3::supra_oracle_indices::get_index_details" --args address: 0xccb0aaeccff18711969426eb1d422357ca95d46ffce18c376d5a7b521839c93d --profile profile_name --url network_url ``` * _**Return**_: Vector of Index Values corresponding to the index_objects, Vector of bool that tells whether the index calculated time falls under the statelessness tolerance or not corresponding to the index_objects \ NOTE:\ When this function is triggered the storage is going to get updated\* with the latest calculated index values.\ _\*if the most recent timestamp from the constituent pair timestamps is greater than the current index timestamp._ ### Source: https://docs.supra.com/oracles/technical-indicators # Technical Indicators ### Introduction Technical indicators are mathematical calculations based on historical price data that help traders and automated systems analyze market trends, momentum, and potential price reversals. Traditionally used in off-chain trading platforms, Supra L1 now brings these powerful analytical tools directly on-chain, enabling smart contracts to make data-driven decisions in real-time.
### Why Technical Indicators On-Chain? Bringing technical indicators on-chain unlocks entirely new possibilities for decentralized applications: **Trustless Automation**: Smart contracts can execute trading strategies based on verified, tamper-proof technical signals without relying on external services or centralized platforms. **Composability**: Any protocol on Supra L1 can integrate these indicators into their logic, creating sophisticated DeFi products that react to market conditions autonomously. **Transparency**: All calculations and historical data are verifiable on-chain, eliminating the "black box" problem of traditional trading algorithms. **Real-Time Decision Making**: dApps can access fresh technical indicators calculated directly from Supra's oracle price feeds, with data freshness in sub-second ranges.
### Supported Assets and Timeframes **Phase 1 Coverage:** - **Assets**: BTC_USDT, SUPRA_USDT , ETH_USDT, SOL_USDT, BNB_USDT - **Indicators**: SMA, EMA, RSI - **Timeframes**: 5m, 15m, 1h, 4h, 1d - **Supported Periods**: - SMA/EMA: 9, 20, 50, 200 - RSI: 7, 14, 21 **Data Source**: All calculations use the closing price of each timeframe. The closing price is determined as the last verified price available before the period closes, sourced directly from Supra's DORA oracle feeds. ### Looking Ahead Phase 1 establishes the foundation with SMA, EMA, and RSI. Future phases may include: - **Bollinger Bands**: Volatility-based bands around moving averages - **MACD**: Moving Average Convergence Divergence for trend momentum - **Stochastic Oscillator**: Momentum indicator comparing closing price to price range The vision is to create a comprehensive technical analysis layer on Supra L1, empowering developers to build sophisticated, autonomous trading systems and DeFi protocols that react intelligently to market conditions—all without leaving the blockchain. ### Source: https://docs.supra.com/oracles/technical-indicators/developer-guide # Developer Guide This guide shows you how to integrate on-chain technical indicators (SMA, EMA, RSI) into your Supra L1 smart contracts. All indicators are calculated from Supra's DORA oracle price feeds and stored on-chain for immediate access. **Supported in Phase 1:** - **Assets**: BTC_USDT, SUPRA_USDT , ETH_USDT, SOL_USDT, BNB_USDT - **Indicators**: SMA, EMA, RSI - **Timeframes**: 5m, 15m, 1h, 4h, 1d - **Supported Periods**: - SMA/EMA: 9, 20, 50, 200 - RSI: 7, 14, 21 ### Querying Candle Data #### Method 1: Get Latest Candles Get the most recent "n" closed candles. ```move #[view] public fun get_latest_candles( num_of_candles: u64, // Number of recent candles to return pair_id: u32, // Unique identifier for the trading pair candle_duration: u64 // Candle duration in milliseconds ): vector ``` **Returns**: Vector of CandleInfo, ordered from newest to oldest. #### Method 2: Get Latest Candles from Specific Time Get candles generated after a specific timestamp. ```move #[view] public fun get_latest_candles_from_specific_time( num_of_candles: u64, // Number of candles requested pair_id: u32, // Unique trading pair identifier candle_duration: u64, // Candle duration in milliseconds start_timestamp: u64 // Lower bound (inclusive), in milliseconds ): vector ``` **Returns**: Vector of CandleInfo whose close times are >= start_timestamp. **Example**: ```move // Get candles for ETH on 15-min timeframe after a specific time let start_time = 1704067200000; // Jan 1, 2024 00:00:00 UTC let candles = supra_oracle_ti::get_latest_candles_from_specific_time( 50, // num_of_candles 3, // pair_id (ETH) 900_000, // candle_duration (15 min) start_time ); ``` --- ### Reading Technical Indicators Please refer below links or specific Indicator subpage for detailed examples. - [Simple Moving Average(SMA) ](relative-strength-index-rsi) - [Exponential Moving Average(EMA)](exponential-moving-average-ema) - [Relative Strength Index(RSI)](relative-strength-index-rsi) --- ### Asset Pair IDs Map asset names to Supra oracle pair IDs in your contract: | Price Pair | Pair ID | | ---------- | ------- | | BTC_USDT | 0 | | SUPRA_USDT | 500 | | ETH_USDT | 1 | | SOL_USDT | 10 | | BNB_USDT | 49 | ### Candle Durations Use these values for `candle_duration` parameter (in milliseconds): | Timeframe | Duration ( in milliseconds) | | --------- | --------------------------- | | 5 mins | 300_000 | | 15 mins | 900_000 | | 1 hour | 3_600_000 | | 4 hours | 14_400_000 | | 1 day | 86_400_000 | --- ### Edge Cases and Best Practices #### Missing Candles Candles may be missing for several reasons: 1. Oracle feeds down 2. Supra network not producing blocks 3. No active trades during the period **Supra's Approach**: Contract logic will strictly adhere to the users time parameters and will check with the missing candles tolerance percentage user has specified. If the requested calculation period has more than the specified percentage of missing candles query returns `none` . Please Set tolerance based on your strategy's sensitivity to data gaps. Always check if the returned option has data before using it. The `missing_candles_tolerance_percentage` parameter controls how the system handles gaps and uses two-decimal fixed-point precision. **Example**: `1000` means 10.00% and `5000` means 50% tolerance for missing candles. ```move let sma = supra_oracle_ti::compute_sma(pair_id, 20, ONE_HOUR, 1000); if (option::is_none(&sma)) { // Handle missing data case - insufficient history or too many missing candles return default_value }; ``` #### Understanding Return Values **SMA**: Returns a single `Option` with the latest SMA value. **EMA**: Returns a tuple `(Option, Option, Option)`: - First value: Latest EMA - Second value: Number of missing candles since last update - Third value: Total candles from first to latest **RSI**: Returns a tuple `(Option, Option)`: - First value: RSI value (0-100 range, scaled) - Second value: Number of missing candles in the window **Example**: ```move let (ema_value, missing_candles, total_candles) = supra_oracle_ti::compute_ema( 1, 20, ONE_HOUR, 1000 ); if (option::is_some(&missing_candles)) { let missing = option::extract(&mut missing_candles); if (missing > 5) { // Handle case with significant data gaps } } ``` #### Indicator Lag All indicators are calculated **after** the candle closes. For real-time decision making, your contract executes based on the most recent closed candle, not the current forming candle. **Example**: At 10:07 AM on a 5-minute timeframe, you can access indicators up to the 10:05 AM candle. The 10:05-10:10 candle is still forming. #### Period Validation Only specific periods are supported: - **SMA/EMA**: 9, 20, 50, 200 - **RSI**: 7, 14, 21 Requesting unsupported periods will return `none`. ```move // ✅ Valid let sma = supra_oracle_ti::compute_sma(1, 20, ONE_HOUR, 1000); // ❌ Invalid - period 25 not supported let sma = supra_oracle_ti::compute_sma(1, 25, ONE_HOUR, 1000); // Returns none ``` #### Gas Optimization Querying large amounts of historical data costs gas. Optimize by: - Only querying the data you need - Caching frequently accessed values - Using pre-calculated indicators instead of raw candles when possible ```move // ❌ Inefficient: Querying 200 candles every transaction let all_candles = supra_oracle_ti::get_latest_candles(200, pair_id, ONE_HOUR); // ✅ Efficient: Use pre-calculated indicators let sma_200 = supra_oracle_ti::compute_sma(pair_id, 200, ONE_HOUR, 1000); ``` #### Decimal Handling All returned values (SMA, EMA, RSI) are scaled by `DECIMAL_BUFFER` for precision. Make sure to handle the scaling factor in your calculations. **Example**: If `DECIMAL_BUFFER = 10^8`: - Returned SMA value: `4250000000000` - Actual SMA: `42,500.00000000` Check the specific scaling used in your deployment and adjust calculations accordingly. --- ### Testing Your Integration 1\. Start with Recent Data : Test with `get_recent_candles()` to verify data access. 2\. Test Each Indicator: Independently verify SMA, EMA, and RSI calculations. 3\. Handle Edge Cases: Test behavior when indicators return `None`. 4\. Simulate Market Conditions :Test your logic across different market scenarios (trending, ranging, volatile). 5\. Gas Profiling: Measure gas costs of your queries and optimize as needed. ### Source: https://docs.supra.com/oracles/technical-indicators/developer-guide/simple-moving-average-sma # Simple Moving Average (SMA) **What It Is**\ SMA calculates the arithmetic mean of closing prices over a specified number of periods. It smooths out price volatility to reveal underlying trends. **Formula** ``` SMA = (P₁ + P₂ + ... + Pₙ) / n ``` Where: * `n` = number of periods (e.g., 9, 20, 50, 200) * `P` = closing price of each period
**How It Works**\ SMA gives equal weight to all prices in the calculation window. As new prices come in, the oldest price drops out of the calculation, creating a "rolling" average. **Example Calculation** Given this price data: | Period | Closing Price | | --- | --- | | 1 | 20 | | 2 | 22 | | 3 | 21 | | 4 | 23 | | 5 | 24 | | 6 | 26 | **5-Period SMA on Period 5:** ``` SMA₅ = (20 + 22 + 21 + 23 + 24) / 5 = 110 / 5 = 22.0 ``` _Note: This can only be calculated after Period 5 closes, meaning the result is available on Period 6_ **5-Period SMA on Period 6:** ``` SMA₅ = (22 + 21 + 23 + 24 + 26) / 5 = 116 / 5 = 23.2 ``` **Key Characteristics** * **Lag**: SMA reacts slowly to sudden price changes because it averages all periods equally * **Smoothness**: Provides clean trend lines with minimal noise * **Minimum Data**: Requires n periods of data before calculation is possible
### Reading Simple Moving Average (SMA) on Supra L1 ```move #[view] public fun compute_sma( pair_id: u32, // Unique identifier of the trading pair period: u64, // Number of candles to average [9, 20, 50, 200] candle_duration: u64, // Duration in milliseconds missing_candles_tolerance_percentage: u64 // Max missing candles (two-decimal fixed-point) ): Option ``` **Returns**: * `some(sma)` if the indicator can be computed (scaled by DECIMAL_BUFFER) * `none` if insufficient history, invalid period, or tolerance exceeded **Parameters**: * `missing_candles_tolerance_percentage`: Expressed with two-decimal precision (e.g., 5000 = 50.00%, 1000 = 10.00%) **Example**: ```move use supra_oracle::supra_oracle_ti; use std::option; // Get 20-period SMA for BTC on 1-hour timeframe with 10% tolerance let sma = supra_oracle_ti::compute_sma( 1, // pair_id (BTC) 20, // period 3_600_000, // candle_duration (1 hour) 1000 // 10.00% missing candles tolerance ); if (option::is_some(&sma)) { let sma_value = option::extract(&mut sma); // Use sma_value in your logic ``` ### Source: https://docs.supra.com/oracles/technical-indicators/developer-guide/exponential-moving-average-ema # Exponential Moving Average (EMA) EMA is a weighted moving average that gives more importance to recent prices. It responds faster to price changes than SMA, making it useful for capturing emerging trends earlier. **Formula** ``` Initial EMA = SMA for the first calculation For subsequent periods: EMA(t) = α × ClosePrice(t) + (1 - α) × EMA(t-1) ``` Where: - `α` (alpha) = smoothing factor = 2 / (n + 1) - `n` = number of periods - `t` = current time period **How It Works**\ EMA applies a multiplier (alpha) that gives more weight to recent prices. The smoothing factor decreases as the period length increases, meaning a 200-period EMA responds much slower than a 9-period EMA.
**Example Calculation** Using the same example price data from SMA: **Step 1: Calculate Initial EMA (Period 5)**\ The first EMA equals the SMA: ``` EMA₅ = SMA₅ = 22.0 ``` _Available after Period 5 closes (on Period 6)_ **Step 2: Calculate Smoothing Factor** ``` α = 2 / (n + 1) = 2 / (5 + 1) = 0.333 ``` **Step 3: Calculate EMA for Period 6** ``` EMA₅(Period 6) = α × ClosePrice(Period 6) + (1 - α) × EMA₅(Period 5) = 0.333 × 26 + (1 - 0.333) × 22.0 = 8.658 + 14.674 = 23.33 ``` _Available after Period 6 closes (on Period 7)_ **Step 4: Calculate EMA for Period 7 (ClosePrice = 27)** ``` EMA₅(Period 7) = α × ClosePrice(Period 7) + (1 - α) × EMA₅(Period 6) = 0.333 × 27 + (1 - 0.333) × 23.33 = 8.991 + 15.56 = 24.55 ``` **Key Characteristics** - **Responsiveness**: Reacts faster to price changes than SMA - **Trend Sensitivity**: Better at identifying trend changes early - **Complexity**: Carries forward historical data through the exponential calculation - **Memory**: Each new EMA depends on the previous EMA value
### Reading Exponential Moving Average (EMA) on Supra L1 ```move #[view] public fun compute_ema( pair_id: u32, // Unique identifier of the trading pair period: u64, // EMA period [9, 20, 50, 200] candle_duration: u64, // Duration in milliseconds missing_candles_tolerance_percentage: u64 // Max missing candles (two-decimal fixed-point) ): (Option, Option, Option) ``` **Returns**: A tuple with: - `Option`: Latest EMA value (scaled), or `none` if unavailable - `Option`: Number of missing candles since last EMA update - `Option`: Total candles formed from first candle to latest update **Example**: ```move // Get 9-period and 50-period EMA for ETH on 15-minute timeframe let (fast_ema, missing1, total1) = supra_oracle_ti::compute_ema( 3, // pair_id (ETH) 9, // period 900_000, // candle_duration (15 min) 1000 // 10% tolerance ); let (slow_ema, missing2, total2) = supra_oracle_ti::compute_ema( 3, // pair_id (ETH) 50, // period 900_000, // candle_duration (15 min) 1000 // 10% tolerance ); // Check for golden cross (fast EMA crosses above slow EMA) if (option::is_some(&fast_ema) && option::is_some(&slow_ema)) { let fast = option::extract(&mut fast_ema); let slow = option::extract(&mut slow_ema); if (fast > slow) { // Bullish signal } } ``` ### Source: https://docs.supra.com/oracles/technical-indicators/developer-guide/relative-strength-index-rsi # Relative Strength Index (RSI) **What It Is**\ RSI is a momentum oscillator that measures the speed and magnitude of price changes. It oscillates between 0 and 100, helping identify overbought (>70) or oversold (\<30) conditions. Supra's implementation uses Wilder's smoothing method, which applies exponential smoothing to average gains and losses for more stable readings. **Formula** ``` Step 1: Calculate price changes for each period Step 2: Separate gains and losses Step 3: Initial Average Gain = Sum of first n Gains / n Initial Average Loss = Sum of first n Losses / n Step 4: For subsequent periods, apply Wilder's smoothing: Current Avg Gain = ((Previous Avg Gain × (n-1)) + Current Gain) / n Current Avg Loss = ((Previous Avg Loss × (n-1)) + Current Loss) / n Step 5: RS = Average Gain / Average Loss Step 6: RSI = 100 - (100 / (1 + RS)) ``` Where: - `n` = number of periods (typically 7, 14, or 21) **How It Works**\ RSI compares the magnitude of recent gains to recent losses using Wilder's smoothing method. This approach gives more weight to recent data while maintaining a memory of historical movements, creating smoother RSI values that are less susceptible to erratic price swings. When prices are rising strongly, RSI approaches 100. When prices are falling sharply, RSI approaches 0. **Example Calculation** Let's use an extended price dataset to demonstrate Wilder's smoothing: **Step 1: Compute Price Changes**
| Period | Price | Change | Gain | Loss | | ------ | ----- | ------ | ---- | ---- | | 1 | 20 | - | - | - | | 2 | 22 | +2 | 2 | 0 | | 3 | 21 | -1 | 0 | 1 | | 4 | 23 | +2 | 2 | 0 | | 5 | 24 | +1 | 1 | 0 | | 6 | 26 | +2 | 2 | 0 | | 7 | 25 | -1 | 0 | 1 | | 8 | 27 | +2 | 2 | 0 | **Step 2: Calculate Initial Averages (5-period, using periods 2-6)** ``` Initial calculation uses simple average of first n periods: Total Gains = 2 + 0 + 2 + 1 + 2 = 7 Total Losses = 0 + 1 + 0 + 0 + 0 = 1 Initial Average Gain = 7 / 5 = 1.4 Initial Average Loss = 1 / 5 = 0.2 ``` **Step 3: Calculate First RSI (Period 6)** ``` RS = Average Gain / Average Loss = 1.4 / 0.2 = 7.0 RSI = 100 - (100 / (1 + RS)) = 100 - (100 / (1 + 7.0)) = 100 - (100 / 8) = 100 - 12.5 = 87.5 ``` _This first RSI value is available after Period 6 closes_ **Step 4: Apply Wilder's Smoothing for Period 7** ``` Period 7 shows a loss of 1 (price went from 26 to 25) Current Gain = 0 Current Loss = 1 Using Wilder's smoothing formula: Current Avg Gain = ((Previous Avg Gain × (n-1)) + Current Gain) / n = ((1.4 × 4) + 0) / 5 = 5.6 / 5 = 1.12 Current Avg Loss = ((Previous Avg Loss × (n-1)) + Current Loss) / n = ((0.2 × 4) + 1) / 5 = 1.8 / 5 = 0.36 RS = 1.12 / 0.36 = 3.11 RSI = 100 - (100 / (1 + 3.11)) = 100 - (100 / 4.11) = 100 - 24.33 = 75.67 ``` _Notice how the RSI decreased from 87.5 to 75.67 as the loss was incorporated_ **Step 5: Apply Wilder's Smoothing for Period 8** ``` Period 8 shows a gain of 2 (price went from 25 to 27) Current Gain = 2 Current Loss = 0 Current Avg Gain = ((1.12 × 4) + 2) / 5 = 6.48 / 5 = 1.296 Current Avg Loss = ((0.36 × 4) + 0) / 5 = 1.44 / 5 = 0.288 RS = 1.296 / 0.288 = 4.5 RSI = 100 - (100 / (1 + 4.5)) = 100 - (100 / 5.5) = 100 - 18.18 = 81.82 ``` ### **Why Wilder's Smoothing?** Wilder's smoothing provides several advantages: 1. **Reduced Volatility**: Smoothed averages prevent RSI from jumping erratically on single price moves 2. **Historical Memory**: Each new calculation incorporates the entire price history through the smoothed average 3. **Consistency**: This is the standard method used in traditional technical analysis, making on-chain RSI comparable to off-chain indicators **On-Chain Storage**: The smart contract stores the previous smoothed average gain and average loss for each asset/timeframe combination. These values are retrieved and updated with each new candle close, maintaining continuity across the entire price history. **Interpreting RSI Values:** - **RSI > 70**: Potentially overbought (price may be due for a correction) - **RSI < 30**: Potentially oversold (price may be due for a bounce) - **RSI = 50**: Neutral momentum **Key Characteristics** - **Bounded**: Always between 0 and 100 - **Momentum Indicator**: Measures the velocity of price changes with smoothing - **Mean Reversion**: Useful for identifying extreme conditions - **Divergence**: Can signal trend reversals when RSI direction differs from price direction - **Smoothed Values**: Less reactive to noise, more reliable signals ### Reading Relative Strength Index (RSI) on Supra L1 ```move #[view] public fun compute_rsi( pair_id: u32, // Unique identifier of the trading pair period: u64, // RSI lookback period [7, 14, 21] candle_duration: u64, // Duration in milliseconds missing_candles_tolerance_percentage: u64 // Max missing candles (two-decimal fixed-point) ): (Option, Option) ``` **Returns**: A tuple with: - `Option`: RSI value (scaled, 0-100 range), or `none` if unavailable - `Option`: Number of missing candles inside the RSI window **Requirements**: - At least `period + 1` candles must exist - Missing-candle percentage must be within tolerance - Necessary historical RSI state must exist **Example**: ```move // Get 14-period RSI for SUPRA on 4-hour timeframe let (rsi, missing) = supra_oracle_ti::compute_rsi( 2, // pair_id (SUPRA) 14, // period 14_400_000, // candle_duration (4 hours) 500 // 5% tolerance ); if (option::is_some(&rsi)) { let rsi_value = option::extract(&mut rsi); if (rsi_value < 30) { // Oversold condition } else if (rsi_value > 70) { // Overbought condition } } ``` ### Source: https://docs.supra.com/oracles/technical-indicators/example1-market-analysis # Example 1 : Market Analysis with TI Below examples have been added just to showcase what could be potentially done with this new form of information on chain. Possibilities are endless. This is just a start.
#### Example 1: Trend Signaling ```move const ONE_HOUR: u64 = 3_600_000; const TOLERANCE_10_PCT: u64 = 1000; public fun check_trend_signal(pair_id: u32): bool { let (fast_ema, _, _) = supra_oracle_ti::compute_ema( pair_id, 9, // 9-period EMA ONE_HOUR, TOLERANCE_10_PCT ); let (slow_ema, _, _) = supra_oracle_ti::compute_ema( pair_id, 50, // 50-period EMA ONE_HOUR, TOLERANCE_10_PCT ); if (option::is_some(&fast_ema) && option::is_some(&slow_ema)) { let fast = option::extract(&mut fast_ema); let slow = option::extract(&mut slow_ema); return fast > slow // Bullish when fast > slow }; false } ``` #### Example 2: Overbought/Oversold Detection ```move const FOUR_HOURS: u64 = 14_400_000; const TOLERANCE_5_PCT: u64 = 500; public fun check_rsi_extreme(pair_id: u32): u8 { let (rsi, _) = supra_oracle_ti::compute_rsi( pair_id, 14, // 14-period RSI FOUR_HOURS, TOLERANCE_5_PCT ); if (option::is_some(&rsi)) { let rsi_value = option::extract(&mut rsi); if (rsi_value < 30) return 1 // Oversold else if (rsi_value > 70) return 2 // Overbought }; 0 // Neutral } ``` #### Example 3: Multi-Timeframe Confirmation ```move const ONE_HOUR: u64 = 3_600_000; const FOUR_HOURS: u64 = 14_400_000; const TOLERANCE: u64 = 1000; public fun check_multi_timeframe_trend(pair_id: u32): bool { // Check 1-hour and 4-hour trends align let (ema_1h, _, _) = supra_oracle_ti::compute_ema( pair_id, 20, ONE_HOUR, TOLERANCE ); let (ema_4h, _, _) = supra_oracle_ti::compute_ema( pair_id, 20, FOUR_HOURS, TOLERANCE ); let sma_1h = supra_oracle_ti::compute_sma( pair_id, 20, ONE_HOUR, TOLERANCE ); let sma_4h = supra_oracle_ti::compute_sma( pair_id, 20, FOUR_HOURS, TOLERANCE ); // Both timeframes showing uptrend (EMA > SMA) if (option::is_some(&ema_1h) && option::is_some(&sma_1h) && option::is_some(&ema_4h) && option::is_some(&sma_4h)) { let e1 = option::extract(&mut ema_1h); let s1 = option::extract(&mut sma_1h); let e4 = option::extract(&mut ema_4h); let s4 = option::extract(&mut sma_4h); return (e1 > s1) && (e4 > s4) }; false } ``` #### Example 4: Historical Analysis ```move const ONE_HOUR: u64 = 3_600_000; public fun analyze_recent_volatility(pair_id: u32): bool { // Get last 20 candles from 1-hour timeframe let candles = supra_oracle_ti::get_latest_candles( 20, // num_of_candles pair_id, ONE_HOUR ); let len = vector::length(&candles); if (len < 20) return false; // Calculate price range let mut highest = 0u128; let mut lowest = 340282366920938463463374607431768211455u128; // max u128 let mut i = 0; while (i < len) { let candle_info = vector::borrow(&candles, i); let candle = &candle_info.candle; if (candle.high.value > highest) highest = candle.high.value; if (candle.low.value < lowest) lowest = candle.low.value; i = i + 1; }; let range = highest - lowest; let avg_price = (highest + lowest) / 2; let volatility_pct = (range * 100) / avg_price; volatility_pct > 10 // Return true if >10% volatility } ``` ### Source: https://docs.supra.com/oracles/technical-indicators/example2-trading-bot # Example2: Complete Trading Bot with TI This is a sample trading bot made with technical indicators ```move module my_address::trading_bot { use supra_oracle::supra_oracle_ti; use std::option; const ONE_HOUR: u64 = 3_600_000; const TOLERANCE: u64 = 1000; // 10% missing candles tolerance public entry fun execute_strategy(pair_id: u32) { // Get multiple indicators let (rsi, _) = supra_oracle_ti::compute_rsi( pair_id, 14, // 14-period RSI ONE_HOUR, TOLERANCE ); let (fast_ema, _, _) = supra_oracle_ti::compute_ema( pair_id, 9, // 9-period fast EMA ONE_HOUR, TOLERANCE ); let (slow_ema, _, _) = supra_oracle_ti::compute_ema( pair_id, 21, // 21-period slow EMA ONE_HOUR, TOLERANCE ); // Check all indicators are available if (option::is_none(&rsi) || option::is_none(&fast_ema) || option::is_none(&slow_ema)) { return // Not enough data yet }; // Extract values let rsi_val = option::extract(&mut rsi); let fast = option::extract(&mut fast_ema); let slow = option::extract(&mut slow_ema); // Trading logic if (fast > slow && rsi_val < 70) { // Bullish signal + not overbought execute_long_position(pair_id); } else if (fast < slow && rsi_val > 30) { // Bearish signal + not oversold execute_short_position(pair_id); } } fun execute_long_position(pair_id: u32) { // Your position logic here } fun execute_short_position(pair_id: u32) { // Your position logic here } } ``` ### Source: https://docs.supra.com/oracles/oracle-value-capture-ovc # Oracle Value Capture (OVC) ### Convert Oracle-Triggered Liquidations into Guaranteed Revenue Oracle Value Capture (OVC) is Supra's mechanism for enabling DeFi protocols to reclaim liquidation fees that are currently captured by external MEV bots. By combining Supra's real-time oracle infrastructure with coordinated execution via OpenBlocks.ai, OVC transforms passive price feeds into active revenue engines. OVC addresses a core inefficiency in DeFi: oracles trigger liquidations, yet the protocols relying on those oracles rarely capture the resulting value. Liquidation fees, typically 5 to 15% of liquidated collateral, flow instead to third-party MEV bots that frontrun the opportunity. With OVC, that value is reclaimed, shared equitably with the protocol, and channeled through a system designed to be atomic, front run resistant, and operationally zero-lift for partner teams. #### What OVC Delivers **Reclaim Liquidation Fees** — Capture the revenue that MEV bots currently siphon from your protocol's liquidation events. **Stop MEV Leakage** — Supra's signed price updates and bundled execution provide a structural advantage over passive liquidation approaches. **Unlock New Revenue** — Liquidation fees represent a recurring, previously untapped income stream proportional to your protocol's TVL. #### Who Is OVC For? OVC is designed for any protocol that relies on oracle price feeds to trigger liquidations. Ideal partners include: - Lending markets with collateralized positions - Leveraged trading and perpetuals platforms - Any protocol currently integrating Supra Oracles #### How It Works (Summary) OVC operates through a five-step pipeline: identify compatible protocols, index positions in real time, trigger liquidations cryptographically using signed oracle data, execute via atomic bundled transactions, and share the resulting revenue with the protocol. For a detailed technical walkthrough, see How OVC Works. #### Supra x OpenBlocks.ai OVC is a joint initiative between Supra and OpenBlocks.ai. Supra provides the oracle infrastructure and cryptographic price feeds. OpenBlocks.ai handles the execution layer, including atomic transaction bundling, optimized routing, and mempool-free delivery. ### Source: https://docs.supra.com/oracles/oracle-value-capture-ovc/the-problem # The Problem ### Protocols Leave Money on the Table Every Day In the current DeFi landscape, oracles provide the price data that triggers liquidations, but the protocols consuming that data rarely capture any of the resulting value. Instead, that value leaks to external actors. #### Liquidation Fees Are Captured by MEV Bots When a position becomes undercollateralized and eligible for liquidation, external MEV bots race to execute the liquidation call and claim the associated fee. These bots monitor mempools, frontrun transactions, and extract value that rightfully belongs in the protocol's revenue stack. #### Oracles Trigger Liquidations, but Protocols Don't Benefit The oracle is the entity that determines whether a position is underwater. It provides the signed price update that moves a health factor below the liquidation threshold. Despite being the catalyst for the liquidation event, neither the oracle provider nor the protocol captures the fee. The value flows entirely to third-party bots. #### No In-House MEV Execution Building an in-house liquidation system is a significant engineering lift. It requires deep expertise in off-chain indexing, transaction bundling, oracle integration, and MEV-aware execution. Most DeFi teams are focused on core product development and lack the resources or specialization to compete with dedicated MEV operations. #### The Result: Revenue Leakage Every Day For protocols with meaningful TVL, liquidation events happen regularly. Annual liquidation volume typically ranges from 3 to 7% of TVL, with liquidation fees in the 5 to 15% range per event. That adds up to a substantial recurring revenue stream that protocols are currently forfeiting entirely. #### The Opportunity OVC flips this dynamic. By combining Supra's oracle infrastructure with coordinated execution, protocols can convert liquidation events from a cost center into a revenue line: * **Liquidation fees become recurring revenue** rather than value extracted by bots * **3 to 7% annual liquidation volume** across protocol TVL represents a significant addressable pool * **5 to 15% liquidation fees** on each event create meaningful per-event revenue * **3 to 5x potential revenue increase** for protocols that adopt OVC, based on conservative modeling ### Source: https://docs.supra.com/oracles/oracle-value-capture-ovc/how-ovc-works # How OVC Works ### From Oracle Data to Captured Revenue in Five Steps OVC bridges oracle data with on-chain actions, turning price feeds into monetizable execution pathways. The system operates through a structured pipeline that moves from partner identification through to revenue distribution. *** ### Step 1: Target Compatible Protocols OVC begins by identifying dApps that already integrate Supra's oracle data feeds (e.g., ETH/USDC, BTC/ETH). Ideal partners are protocols with collateralized positions that require liquidations to remain solvent. This includes: * **Lending markets** where borrowers post collateral against loans * **Leveraged trading and perpetuals platforms** where positions are maintained against margin * **Any protocol using Supra Oracles** that has liquidation mechanics Supra currently provides these price feeds. OVC positions Supra not just as a data provider but as a value-generating partner with the protocols that consume its oracle infrastructure. Integration requirements are minimal. Protocols need only grant index permissioning and agree to a revenue-sharing arrangement. *** ### Step 2: Real-Time Position Indexing Once a protocol is onboarded, OVC deploys indexing infrastructure to continuously scan the partner's smart contracts. The system tracks: * **Collateral ratios** across all active positions * **Borrow amounts** relative to posted collateral * **Health factors** indicating proximity to liquidation thresholds * **Liquidation thresholds** as defined by the protocol's parameters Liquidations are triggered when an oracle price update pushes a position below its required collateralization level. OVC monitors these conditions in real time, performing the heavy computational work off-chain before submitting results on-chain. This off-chain computation, on-chain execution model ensures that the system operates efficiently without congesting the target chain. *** ### Step 3: Cryptographic Triggering When a signed oracle price update flags a liquidation event, OVC initiates execution. The process follows three steps: 1. **Verify the price** — The oracle-signed price feed is cryptographically verified to ensure authenticity and freshness. 2. **Execute the liquidation** — The liquidation call is submitted to the protocol's smart contract. 3. **Capture the fee** — The liquidation fee (typically 5 to 15% of the liquidated collateral) is captured as part of the transaction. This process is designed to be **frontrun-resistant**. Because Supra's decentralized oracle is the entity that dictates the current price and subsequently determines whether a position is underwater, OVC has a structural execution advantage over external MEV bots that must rely on observing the same data with additional latency. *** ### Step 4: Compound Execution Execution is handled through OpenBlocks.ai, which provides the transaction infrastructure for OVC. Key capabilities include: * **Atomic bundles** — The price verification, liquidation call, and fee capture are composed into a single bundled transaction. Either the entire sequence succeeds or it reverts. * **No mempool exposure** — Transactions are submitted through private channels, eliminating the frontrunning vector that MEV bots exploit. * **Optimized routing** — OpenBlocks.ai selects the most efficient execution path for each liquidation event. The target capture rate is **90% of eligible liquidations**, which is multiple times higher than passive approaches run by third-party liquidation bots. This is achievable because Supra's oracle is the source of truth for the price data that determines liquidation eligibility. *** ### Step 5: Revenue Distribution All captured liquidation fee revenue is aggregated into a shared pool and distributed according to a straightforward split: | Recipient | Share | | --------------------- | --------- | | Protocol | 66% (2/3) | | Supra + OpenBlocks.ai | 33% (1/3) | The expected outcome is a **3 to 5x increase in protocol revenue**, since liquidation fees are often an unrealized portion of TVL turnover that protocols are not currently capturing at all. *** ### Zero Developer Lift A key design principle of OVC is that partner protocols do not need to build or maintain any MEV infrastructure. By adopting OVC, protocols avoid the cost and complexity of: * **Running MEV bots** to compete for liquidation opportunities * **Operating server infrastructure** for off-chain monitoring and execution * **Conducting ongoing research** into MEV strategies and transaction ordering * **Maintaining custom code** for liquidation systems across protocol upgrades OVC is a plug-in monetization layer. Protocols focus on their product; Supra and OpenBlocks.ai handle execution and value capture. ### Source: https://docs.supra.com/oracles/oracle-value-capture-ovc/revenue-model # Revenue Model ### How OVC Generates Protocol Revenue OVC converts liquidation events into a recurring revenue stream for partner protocols. The economics are straightforward: liquidation fees that previously leaked to MEV bots are captured and shared between the protocol and the OVC infrastructure providers. *** ### Revenue Split | Recipient | Share | Role | | --------------------- | --------- | ------------------------------------------------------------ | | Protocol | 66% (2/3) | Receives the majority share of all captured liquidation fees | | Supra + OpenBlocks.ai | 33% (1/3) | Provides oracle infrastructure, indexing, and execution | This split applies to all liquidation fee revenue captured through OVC. The protocol receives its share without needing to build, operate, or maintain any of the underlying infrastructure. *** ### Worked Example Consider a lending protocol with the following parameters: | Parameter | Value | | ------------------------- | ---------------------------- | | Total Value Locked (TVL) | $100M | | Annual liquidation volume | 5% of TVL | | Average liquidation fee | 10% of liquidated collateral | **Calculation:** $100M TVL x 5% liquidation volume x 10% fee = **$500K in total annual liquidation fees** With OVC's 66/33 revenue split, the protocol receives approximately **$330K per year** in previously uncaptured revenue. This is a conservative estimate. During periods of high volatility, liquidation volume increases significantly, and the captured fees scale accordingly. *** ### Why This Revenue Matters Most DeFi protocols generate revenue through borrowing spreads, trading fees, or protocol-owned liquidity. Liquidation fees represent an entirely separate revenue category that is proportional to TVL but typically flows to external actors. For a protocol that currently earns modest fee revenue, adding OVC-captured liquidation fees can produce a **3 to 5x increase in total protocol revenue**. This revenue is recurring, scales with TVL, and requires no additional product development from the protocol team. *** ### On SupraEVM: 100% Fee Retention For protocols that migrate to SupraEVM, the economics improve further. On SupraEVM, AutoLiquidations are a native system-level feature. Protocols on SupraEVM retain **100% of liquidation fees** with no revenue share required, since OVC operates as built-in infrastructure rather than an external service. See The SupraEVM Advantage for details. ### Source: https://docs.supra.com/oracles/oracle-value-capture-ovc/the-supraevm-advantage # The SupraEVM Advantage ### From Off-Chain Add-On to Native Infrastructure OVC works today as an off-chain execution layer on any chain where Supra Oracles are integrated. But for protocols seeking the best possible economics and the deepest integration, SupraEVM offers a fundamentally better architecture. SupraEVM is Supra's high-performance, EVM-compatible execution environment designed specifically for DeFi scalability. On SupraEVM, OVC is not an external service. It is a system-level feature built into the chain itself. *** ### Native AutoLiquidations On SupraEVM, liquidations are triggered automatically at the protocol layer. There is no need for off-chain monitoring, no external bots, and no bundled transaction coordination. When a position crosses its liquidation threshold, the system handles it natively. This eliminates the entire class of MEV extraction that exists on other chains, where bots compete to execute liquidation calls through mempool observation and frontrunning. *** ### 100% Fee Retention Because AutoLiquidations are native to SupraEVM, there is no external execution layer taking a cut. Protocols on SupraEVM retain **100% of all liquidation fees**. There is no revenue share with Supra or OpenBlocks.ai for liquidation execution on SupraEVM. Compare this to the OVC model on external chains, where the split is 66% protocol / 33% Supra + OpenBlocks. On SupraEVM, the protocol keeps everything. *** ### No Off-Chain Infrastructure On other chains, OVC requires off-chain indexing, monitoring, and execution infrastructure operated by Supra and OpenBlocks.ai. On SupraEVM, this entire layer is unnecessary. The chain's native oracle integration means that price updates and liquidation triggers are part of the consensus process itself. This reduces operational complexity, eliminates potential points of failure, and removes latency between price updates and liquidation execution. *** ### Additional SupraEVM Benefits Beyond the OVC-specific advantages, SupraEVM provides: **Low Gas Costs** — Transaction fees are minimized through Supra's high-throughput architecture, making frequent liquidation execution economically viable even for smaller positions. **High Throughput** — SupraEVM's parallel execution model handles high transaction volumes without congestion, critical during market volatility when liquidation events spike. **Oracle-Native Security** — Price data is integrated at the chain level rather than delivered through external contracts. This eliminates oracle manipulation vectors that exist when price feeds are consumed through intermediary smart contracts. **Simple Maintenance** — With no off-chain infrastructure to manage, protocol teams face a significantly reduced operational burden compared to running OVC on external chains. *** ### OVC as an On-Ramp OVC on external chains serves as a practical introduction to the Supra ecosystem. Protocols can begin capturing liquidation revenue immediately on their current chain, experience the value of Supra's oracle infrastructure firsthand, and then evaluate SupraEVM migration when the timing is right. The adoption path from OVC to SupraEVM is designed to be incremental, not disruptive. Migration to SupraEVM is always optional, and OVC continues to deliver value on any supported chain. ### Source: https://docs.supra.com/oracles/oracle-value-capture-ovc/risks-and-mitigations # Risks & Mitigations ### Addressing Key Considerations Like any system operating at the intersection of oracle infrastructure, MEV, and DeFi protocol economics, OVC faces real-world risks. Below is an honest assessment of the primary concerns and how OVC is designed to handle them. *** ### Competition **Risk:** MEV bots and competing liquidation services may evolve their strategies to compete with OVC for liquidation opportunities. **Mitigation: Oracle Primacy.** OVC's structural advantage is that Supra is the oracle provider. Supra's signed price updates are the source of truth that determines whether a position is eligible for liquidation. This gives OVC first-mover access to liquidation triggers before external actors can observe and react to the same data. Competing bots must wait for the price update to land on-chain before they can act; OVC can compose its execution at the moment of signing. *** ### Regulation **Risk:** Regulatory scrutiny around MEV practices and value extraction in DeFi could impact how OVC operates or how revenue sharing is structured. **Mitigation: Transparent Data.** All OVC actions are executed using cryptographically verifiable, publicly auditable data. Supra's oracle feeds are signed and timestamped. Every liquidation executed through OVC can be independently verified against the oracle data that triggered it. This transparency positions OVC favorably in any regulatory environment that values auditability and fair execution. *** ### Scalability **Risk:** As the number of partner protocols and supported chains grows, the indexing and execution infrastructure must scale to maintain capture rates and reliability. **Mitigation: Cross-Chain Architecture.** OVC is designed to operate across any chain where Supra Oracles are deployed. The indexing and execution layer, powered by OpenBlocks.ai, is chain-agnostic and built to handle multi-chain workloads. The same core pipeline (index, trigger, execute, distribute) applies regardless of the target chain, allowing OVC to scale horizontally as new protocols and chains are onboarded. *** ### Protocol Dependency **Risk:** Protocols may change their liquidation mechanics, smart contract interfaces, or oracle integrations in ways that break OVC's indexing or execution. **Mitigation:** OVC integration requires minimal surface area on the protocol side (index permissioning and a revenue-sharing agreement). The indexing layer is designed to adapt to contract changes with configuration updates rather than full re-engineering. Ongoing monitoring ensures that any protocol-side changes are detected and addressed promptly. ### Source: https://docs.supra.com/oracles/oracle-value-capture-ovc/getting-started # Getting Started ### Adoption Path for Protocols OVC is designed for fast onboarding with minimal integration effort. The adoption path moves from initial conversation through to live revenue capture in a structured sequence. *** ### Step-by-Step Onboarding #### Step 1: Intro Call An introductory conversation to understand your protocol's architecture, oracle usage, and liquidation mechanics. This helps us assess fit and estimate the revenue potential specific to your TVL and market exposure. #### Step 2: Free Exposure Audit We conduct a no-cost audit of your protocol's current liquidation exposure. This analysis quantifies how much value is currently being captured by external MEV bots and estimates the revenue OVC would recover. The audit uses real on-chain data from your protocol's smart contracts. #### Step 3: Approvals Internal review and sign-off on the OVC partnership. This covers the revenue-sharing terms, data access scope, and operational responsibilities. #### Step 4: Index Permissions Your protocol grants OVC read access to the relevant smart contract state (collateral ratios, borrow amounts, health factors, liquidation thresholds). This is the primary technical integration point, and it is lightweight by design. #### Step 5: Revenue Share Agreement Formalize the revenue-sharing terms. The standard split is 66% to the protocol and 33% to Supra + OpenBlocks.ai. Custom arrangements may be available depending on the partnership scope. #### Step 6: Deploy OVC's indexing and execution infrastructure goes live against your protocol's contracts. From this point, eligible liquidations are captured and fees are accumulated. #### Step 7: Dashboard Access to real-time monitoring and analytics via OpenBlocks.ai. The dashboard provides visibility into captured liquidations, fee revenue, capture rates, and historical performance. #### Step 8: Optional SupraEVM Migration For protocols interested in maximizing their economics, SupraEVM migration is available as an optional next step. On SupraEVM, AutoLiquidations are native and protocols retain 100% of fees with no revenue share. See The SupraEVM Advantage for details. *** ### What You Need to Provide * Read access to relevant smart contract state (index permissioning) * Agreement on revenue-sharing terms * A technical contact for onboarding coordination That is the full scope of integration effort on the protocol side. OVC handles everything else: indexing infrastructure, execution logic, MEV protection, and revenue distribution. *** ### Get Started If you are interested in an OVC partnership or want to see your protocol's liquidation exposure audit, reach out to the Supra team to schedule an intro call. --- ## dVRF (Verifiable Randomness) ### Source: https://docs.supra.com/dvrf # Overview On-chain and off-chain applications connected to gaming, lottery, and sampling rely heavily on entropy. It could be a dynamic NFT mint, loot boxes, random opponent pairing, randomized spawn environments, an in-game item upgrade, a lottery, or a selection of contributors for an IDO. Randomness in applications is supposed to ensure fair and equal possibilities for participants. Random Number Generation (RNG) has to be unbiased and tamper-proof to be deemed fair. In other words, the process can't be manipulated by any participant, and the randomness that was generated is immutably and publicly verifiable thereafter. Blockchain-based verifiable random functions (VRFs) enable the generation of numbers that are as good as random (pseudorandom) and can be (publicly) verified on-chain. Pseudorandomness guarantees both unpredictability and fairness in RNG, whereas tamper-proofness is demonstrated by via transparency inherent to their immutable on-chain records and verifiability. ### Supra dVRF Supra’s dVRF can provide the exact properties required for a random number generator (RNG) to be fair with tamper-proof, unbiased, and cryptographically verifiable random numbers to be employed by smart contracts. **Unbiased and Unpredictable** - The threshold signature of the nonce, client-provided input, and blockhash of the transaction that requests the randomness (which is unknown at the time of request) is used as the seed for the RNG function**.** **Tamper Proof and Verifiable** - Cryptographic proof will be provided to verify that random numbers were generated and communicated with the highest fidelity. **Supra VRF Architecture** ![Supra dVRF Architecture](/images/dvrf/supradvrf.png)
Supra decentralised VRF (dVRF) architecture overview
Available Networks Please refer to the [_Available Networks_](/dvrf/networks) _page_ for the networks supported. ### Accessing Supra dVRF Supra dVRF operates on a customer-controlled wallet subscription model where your registered wallet address serves as the main reference for access permissions and callback transaction gas fee payments. Please refer to the [VRF Developer Guide](build-supra-l1/v2-guide) for a step-by-step explanation of how to consume Supra’s dVRF services. Important: Please make sure you read and understand [Terms of Use](https://supra.com/terms-of-use/) before start using Supra products and services. ### Source: https://docs.supra.com/dvrf/overview # Overview On-chain and off-chain applications connected to gaming, lottery, and sampling rely heavily on entropy. It could be a dynamic NFT mint, loot boxes, random opponent pairing, randomized spawn environments, an in-game item upgrade, a lottery, or a selection of contributors for an IDO. Randomness in applications is supposed to ensure fair and equal possibilities for participants. Random Number Generation (RNG) has to be unbiased and tamper-proof to be deemed fair. In other words, the process can't be manipulated by any participant, and the randomness that was generated is immutably and publicly verifiable thereafter. Blockchain-based verifiable random functions (VRFs) enable the generation of numbers that are as good as random (pseudorandom) and can be (publicly) verified on-chain. Pseudorandomness guarantees both unpredictability and fairness in RNG, whereas tamper-proofness is demonstrated by via transparency inherent to their immutable on-chain records and verifiability. ### Supra dVRF Supra’s dVRF can provide the exact properties required for a random number generator (RNG) to be fair with tamper-proof, unbiased, and cryptographically verifiable random numbers to be employed by smart contracts. **Unbiased and Unpredictable** - The threshold signature of the nonce, client-provided input, and blockhash of the transaction that requests the randomness (which is unknown at the time of request) is used as the seed for the RNG function**.** **Tamper Proof and Verifiable** - Cryptographic proof will be provided to verify that random numbers were generated and communicated with the highest fidelity. **Supra VRF Architecture** ![Supra dVRF Architecture](/images/dvrf/supradvrf.png)
Supra decentralised VRF (dVRF) architecture overview
Available Networks Please refer to the [_Available Networks_](/dvrf/networks) _page_ for the networks supported. ### Accessing Supra dVRF Supra dVRF operates on a customer-controlled wallet subscription model where your registered wallet address serves as the main reference for access permissions and callback transaction gas fee payments. Please refer to the [VRF Developer Guide](build-supra-l1/v2-guide) for a step-by-step explanation of how to consume Supra’s dVRF services. Important: Please make sure you read and understand [Terms of Use](https://supra.com/terms-of-use/) before start using Supra products and services. ### Source: https://docs.supra.com/dvrf/learn-supra-dvrf # Learn Supra dVRF ### Source: https://docs.supra.com/dvrf/learn-supra-dvrf/networks # Available Versions and Networks Please refer below for the Supra Contract addresses of each network. Important: Please make sure you read and understand [Terms of Use](https://supra.com/terms-of-use/) before start using Supra products and services. | No | Mainnet | Version | Contract Name | Contract Address | | --- | --- | --- | --- | --- | | 1 | Supra Mainnet | V3 | Supra VRF | 0x9672d46410f540b47d7e1f732640c776fa91ea1b909f871b9b2b7527b0ea90ae | | 2 | Arbitrum One Mainnet | V3 | Supra Router Contract | 0x7d86fbfc0701d0bf273fd550eb65be1002ed304e | | | | V3 | Supra Deposit Contract | 0x96c12b50DDC7236dAFaBf7736bAeD7BD92B5CD86 | | 3 | Arbitrum Nova Mainnet | V3 | Supra Router Contract | 0x2990D16634dE6dC80343eAE3080006AB5a971055 | | | | V3 | Supra Deposit Contract | 0xb7aBbD970dC157607f18baFfb48D4c20D5624025 | | 4 | Avalanche Mainnet | V3 | Supra Router Contract | 0x04064A3abe03fE485E3f2Fdc97cB0BCD07170112 | | | | V3 | Supra Deposit Contract | 0xBe2A99D4F18F0C682afe8FD55A5a04e22868E9D3 | | 5 | Base Mainnet | V3 | Supra Router Contract | 0x73970504Df8290E9A508676a0fbd1B7f4Bcb7f5a | | | | V3 | Supra Deposit Contract | 0x52Ad5Ba5c041D6cF952c476c595844c647a692Eb | | 6 | Blast Mainnet | V3 | Supra Router Contract | 0x82A515c2BEC5C4be8aBBbF0D2F59C19A4547709c | | | | V3 | Supra Deposit Contract | 0x3cD3CfF2D93Fd5E296EEfaA46a27862716FC2298 | | 7 | BNB Mainnet | V3 | Supra Router Contract | 0x49572e73D4001A922d3A574B3BcDf666a1167743 | | | | V3 | Supra Deposit Contract | 0x87628Af98b746242227fb3D8468324dCdcFb85cB | | 8 | DFK Chain Mainnet | V2 | Supra Router Contract | 0x7DD42E14337C2CbEC13fa91A7f0aB36dc2e4A371 | | | | V2 | Supra Deposit Contract | 0x862A4819BD933D09c13094878f397e4685D9eEd4 | | 9 | Ethereum Mainnet | V3 | Supra Router Contract | 0x23726e27Ec79d421cf58C815D37748AfCaFeC9e4 | | | | V3 | Supra Deposit Contract | 0xb63b8391e666d21958b8b3459840594A12055D2d | | 10 | Dogechain Mainnet | V2 | Supra Router Contract | 0x7A0b1031c8e9b37704d0591b46740e10d70c6Ebc | | | | V2 | Supra Deposit Contract | 0x26e99E88D20BfB38f6cF3785b0cAf68A9F19292f | | 11 | Klaytn Mainnet | V3 | Supra Router Contract | 0xec5Ad2091b972583Db77D986567be41d58dF5a3E | | | | V3 | Supra Deposit Contract | 0x4E0fcedB33c151C12D2F0856C6Dd79121F2c4EC2 | | 12 | Linea Mainnet | V3 | Supra Router Contract | 0x678cf2ce5beab9884d8cc49dc022f1ccd997474c | | | | V3 | Supra Deposit Contract | 0x8664Dc0819e5d9e1d5B01f7Fa88636F79098C98D | | 13 | Mantle Mainnet | V3 | Supra Router Contract | 0xa7C632CdDe44B5B859B385A04A5BcCdeB1582f94 | | | | V3 | Supra Deposit Contract | 0x56d78Bf9bD9E5E2e9EC2FbEc45cA8dE93b299Cbe | | 14 | Optimism Mainnet | V3 | Supra Router Contract | 0x745d8beC4b46553629FF277Aad62F579CAB96DE4 | | | | V3 | Supra Deposit Contract | 0xE46bd3D2315DF8DDFfbe89e295D1912E75a69757 | | 15 | Polygon Mainnet | V3 | Supra Router Contract | 0x76606cD35d3De51d2c2e44D6eb7AF593D8dfD983 | | | | V3 | Supra Deposit Contract | 0x631d236c415BC21245048419042f0701CA63aFe9 | | 16 | Syscoin Rollux Mainnet | V2 | Supra Router Contract | 0xc489aE6CEeBF5e17676a3B2A8A81e45B4Ba01a78 | | | | V2 | Supra Deposit Contract | 0xD8a459e3B7dB86Dc210031F38BaBc730b72BAbcD | | 17 | XDC Mainnet | V3 | Supra Router Contract | 0xF8284e70bB01cc85757113d9Ba02325Ba605842E | | | | V3 | Supra Deposit Contract | 0xCAB1A1C8467f655f60A74B3026D126369A723397 | | 18 | XAI Mainnet | V3 | Supra Router Contract | 0x01C4EC0bEae7bc469AF2A6a6940Abb0e209b9f34 | | | | V3 | Supra Deposit Contract | 0x31741e5C13bB4D85b10E54A0702e48b555c8E1f1 | | 19 | Gold Fever Mainnet | V3 | Supra Router Contract | 0x630ECe5B97C12B9786A75EC37E8F542e303d2f95 | | | | V3 | Supra Deposit Contract | 0x70C69c8C498A8A653186dC71b6ff1460a0a52cD1 | | 20 | Fuse Mainnet | V2 | Supra Router Contract | 0x1daB558F090029580854FbCF8f83ef3Ad8C223b5 | | | | V2 | Supra Deposit Contract | 0x7a168e3AE8B701648D4f8F89B5fCD278885eBeFA | | 21 | Plume Mainnet | V3 | Supra Router Contract | 0xE1062AC81e76ebd17b1e283CEed7B9E8B2F749A5 | | | | V3 | Supra Deposit Contract | 0x02C36dD414826C0a71e3349a9a0E0BaB7e77Fd99 | | 22 | Ronin Mainnet | V3 | Supra Router Contract | 0x8F9C975F2fbdF6c171Cce21F949342031198ae3f | | | | V3 | Supra Deposit Contract | 0x6Ac1c1Ae47d4f007498141601d1E9ffCfAc14162 | | 23 | Aptos Mainnet | V2 | Supra VRF Contract | 0x6896f544985677e50aa1a6ee172812f26369da6a064d6ed9f3bfd4080c4ba8f1 | | 24 | Monad Mainnet | V3 | Supra Router Contract | 0x8c009E02C1902126bB88901084B3f0714c6d4304 | | | | V3 | Supra Deposit Contract | 0xe0d19f368F273e4f4b30490C804097ec6ec7cd4e | \ [​](https://qa-docs.supraoracles.com/docs/vrf-dev-guide#supra-router-contract-addresses) | No | Testnet | Version | Contract Address | | --- | --- | --- | --- | | 1 | Supra Testnet | V3 | Supra Contract: 0x186ba2ba88f4a14ca51f6ce42702c7ebdf6bfcf738d897cc98b986ded6f1219e | | 2 | Arbitrum Sepolia Testnet | V3 | Router Contract: 0xF8B0eF4e20feD60eB3485a2Dc95C3BBdAa1D24dfDeposit_Contract: 0xcdc10cbc38ad401403edbe26916e3899ffe5cd59 | | 3 | Citrea Testnet | V3 | Router : 0xDF666c76E859D6541FF17E1C6c215e46BfA563B2Deposit : 0xcF99ab8c2AABC04349139484BAFC26f480Ef4cE4 | | 4 | Astar Shibuya Testnet | V3 | Router Contract: 0x1697F96d52DFB51CcC96856680DA885c8AdAe429Deposit Contract: 0x06190C1227CeBB1c09514bf1f9096533fc401E76 | | 5 | Avalanche Fuji Testnet | V3 | Router Contract: 0x7e0EA6e335EDA42f4c256246f62c6c3DCf4d4908Deposit Contract: 0xf8dE4Ff6De679aAE8F29D852f85dE7450Dd84F3c | | 6 | Base Sepolia Testnet | V3 | Router Contract: 0x99a021029EBC90020B193e111Ae2726264a111A2Deposit Contract:0xE71e551535318ecC17eea166f6DF9075b3aAA519 | | 7 | BNB Testnet | V3 | Router Contract: 0xF65754b4988aD9ff25E0f2980f645A02eEB73A5DDeposit Contract:0xE836086e2c5AF0BD3D5128C501590280bC179571 | | 8 | Celo Testnet | V3 | Router Contract:0x5CbC3Dfa33223884E7752a833Fa6aD28Ee015FC4Deposit Contract:0x86b70d189780B163445D747c483C4E0e49B1aBB7 | | 9 | DFK Chain Testnet | V3 | Router Contract:0x2519D5ecE31f02995DF883CE35faDc05D9f12803Deposit Contract:0x78d49c274e528d5f61730845672cd1f8376c3917 | | 10 | Dogechain Testnet | V3 | Router Contract: 0x6D46C098996AD584c9C40D6b4771680f54cE3726Deposit Contract:0x730852018460683fa601ed1896d8576b876a5be1 | | 11 | Ethereum Sepolia Testnet | V3 | Router Contract: 0x7e0EA6e335EDA42f4c256246f62c6c3DCf4d4908Deposit Contract:0x7d63aa8468e8c4c60395ad423271f45bb34df0fd | | 12 | Ethereum Holesky Testnet | V3 | Router Contract:0xa7180E30a93AD77D97922608E1af5751Ec156e8ADeposit Contract:0xBEbAe9F0E228dC13eBF70807e703Fc73cbC05361 | | 13 | Evmos Testnet | V3 | Router Contract:0x99a021029EBC90020B193e111Ae2726264a111A2Deposit Contract: 0x165642e32EBC53cb8Bda878B668b86723E6711F6 | | 14 | Fantom Testnet | V3 | Router Contract:0x6D46C098996AD584c9C40D6b4771680f54cE3726Deposit Contract:0xf6a9Ce373E32B54ded5671243B5638f10817CeEC | | 15 | Fuse Sparknet Testnet | V3 | Router Contract:0x19cbb4fED3a5131418BBc699400E942aB678A7cDDeposit Contract:0x807f296B68564d7d748BD57264DC07365CAF45DB | | 16 | Gnosis Chiado Testnet | V3 | Router Contract:0x6D46C098996AD584c9C40D6b4771680f54cE3726Deposit Contract:0x3d4535575219a31eEFB3e5D997D5158b2edAFd98 | | 17 | Harmony Testnet | V2 | Router Contract:0x6D46C098996AD584c9C40D6b4771680f54cE3726Deposit Contract:0x1697F96d52DFB51CcC96856680DA885c8AdAe429 | | 18 | Immutable ZkEVM Testnet | V3 | Router Contract:0xa7180E30a93AD77D97922608E1af5751Ec156e8ADeposit Contract:0x67E1dC006E575E05C0432e708C35f57fb114416e | | 19 | KCC Testnet | V2 | Router Contract:0x6D46C098996AD584c9C40D6b4771680f54cE3726Deposit Contract:0x1697F96d52DFB51CcC96856680DA885c8AdAe429 | | 20 | Klaytn Baobab Testnet | V3 | Router Contract:0xe01754DEB54c4915D65331Fa31ebf9111CacF9C2Deposit Contract:0x215e147d623930FD5df80327B1A5F532c316d32d | | 21 | Linea Sepolia Testnet | V3 | Router Contract:0x6D46C098996AD584c9C40D6b4771680f54cE3726Deposit Contract:0xB86E600adD83A9C6bA07000113c5Af6fAB976440 | | 22 | Optimism Sepolia Testnet | V3 | Router Contract:0x6D46C098996AD584c9C40D6b4771680f54cE3726Deposit Contract:0x165642e32EBC53cb8Bda878B668b86723E6711F6 | | 23 | X Layer Testnet | V3 | Router Contract:0x99a021029EBC90020B193e111Ae2726264a111A2Deposit Contract:0x8696595f1403309F00825C42e5ef790bac5aB395 | | 24 | Polygon Amoy Testnet | V3 | Router Contract:0x6D46C098996AD584c9C40D6b4771680f54cE3726Deposit Contract:0x7330AEF3f693e36ACD8D5942044701e73C69C413 | | 25 | Syscoin Rollux Testnet | V3 | Router Contract:0x99a021029EBC90020B193e111Ae2726264a111A2Deposit Contract:0x8696595f1403309F00825C42e5ef790bac5aB395 | | 26 | Viction Tomochain Testnet | V2 | Router Contract:0x6D46C098996AD584c9C40D6b4771680f54cE3726Deposit Contract:0x3B5F96986389f6BaCF58d5b69425fab000D3551e | | 27 | Blast Sepolia Testnet | V3 | Router Contract:0x2c9e897Ed7d4B1a917046c0d5B0770FE6094A181Deposit Contract:0x5Bd085A8367E3AAff41a52D12809C22C8115Bc1B | | 28 | Manta Pacific Sepolia Testnet | V3 | Router Contract:0x6D46C098996AD584c9C40D6b4771680f54cE3726Deposit Contract:0xA364b348370B50ef56fC9f5abF2d7E37382411a8 | | 29 | Ronin Testnet | V3 | Router Contract:0x1697F96d52DFB51CcC96856680DA885c8AdAe429Deposit Contract:0xBBba6Cc4675696ee3f683235E229Dbb4A3723a19 | | 30 | Taiko Hekla Testnet | V3 | Router Contract:0x3B5F96986389f6BaCF58d5b69425fab000D3551eDeposit Contract:0x122Ff1F6197Edba77b1A521caD274d4580f626F8 | | 31 | Gold Fever Testnet | V3 | Router Contract:0xe76a099fcdc3c964c151f577801a0e658efd1f94Deposit Contract:0x06190C1227CeBB1c09514bf1f9096533fc401E76 | | 32 | XAI Testnet | V3 | Router Contract:0x14328F2C4D70ED5290f0cd4DC47ecc9C39eeDfE4Deposit Contract:0xf6a9Ce373E32B54ded5671243B5638f10817CeEC | | 33 | XDC Testnet | V3 | Router Contract:0x51a34E727001b97c26e70Bd677fc799490e781d7Deposit Contract:0xeF6C18fd507ce9b4d0631ED9f970fD2F662C8b20 | | 34 | Ape Chain Curtis Testnet | V3 | Router Contract:0x99a021029EBC90020B193e111Ae2726264a111A2Deposit Contract:0xf8dE4Ff6De679aAE8F29D852f85dE7450Dd84F3c | | 35 | Mint Sepolia Testnet | V3 | Router Contract:0x391Ab9ad5C4BFee04eA508b0a0Cf499198D015e3Deposit Contract: 0x4415fB2f97b0291a48fe705b23Da59cE84aa5bc2 | | 36 | Pulse Testnet | V3 | Router Contract:0x99a021029EBC90020B193e111Ae2726264a111A2Deposit Contract:0xc7D568E87ad9D587532a18e2fd17F883182bE91E | | 37 | Mantle Sepolia Testnet | V3 | Router Contract:0x214F9eD5750D2fC87ae084184e999Ff7DFa1EB09Deposit Contract:0xd6675f4fD26119bF729B0fF912c28022a63Ae0a9 | | 38 | BSquared Testnet | V3 | Router Contract:0x6D46C098996AD584c9C40D6b4771680f54cE3726Deposit Contract:0xB4381A8A79Ca387F62f07C4622D171f246063819 | | 39 | Metis Sepolia Testnet | V2 | Router Contract:0x6D46C098996AD584c9C40D6b4771680f54cE3726Deposit Contract:0x3B5F96986389f6BaCF58d5b69425fab000D3551e | | 40 | Core DAO Testnet | V3 | Router Contract:0x6D46C098996AD584c9C40D6b4771680f54cE3726Deposit Contract:0x7E47DfA6adB6b33fd79dF591AACE587249dC7067 | | 41 | Ape chain CurtisTestnet | V3 | Router Contract:0x99a021029EBC90020B193e111Ae2726264a111A2Deposit Contract:0xf8dE4Ff6De679aAE8F29D852f85dE7450Dd84F3c | | 42 | Plume Testnet | V2 | Router Contract:0x6D46C098996AD584c9C40D6b4771680f54cE3726Deposit Contract:0x3B5F96986389f6BaCF58d5b69425fab000D3551e | | 43 | Sonic Blaze Testnet | V3 | Router Contract:0x3B5F96986389f6BaCF58d5b69425fab000D3551eDeposit Contract:0x620F70E0C661cA1Bb2031C979087747c5b9cf21c | | 44 | Hashkey Chain Testnet | V3 | Router Contract:0x6D46C098996AD584c9C40D6b4771680f54cE3726Deposit Contract:0xBa6F79833FFEd6C1Df30271050f9F9f8435f2A4b | | 45 | Rise Sepolia Testnet | V3 | Router Contract:0x6D46C098996AD584c9C40D6b4771680f54cE3726Deposit Contract:0xBC9fEfAC230eBf9EDFA7A33FB46f5598957ad8b6 | | 46 | Nibiru Testnet | V3 | Router Contract:0x6D46C098996AD584c9C40D6b4771680f54cE3726Deposit Contract:0xF077645C53B4CB4F9FA5FDF7980D7FF700112D24 | | 47 | Japan Ocean Chain Testnet | V3 | Router Contract:0x99a021029EBC90020B193e111Ae2726264a111A2Deposit Contract: 0xe3c2c7Af92Aa823ab958E2350F96BC3CAf64058A | | 48 | Monad Testnet | V3 | Router Contract:0x6D46C098996AD584c9C40D6b4771680f54cE3726Depsoit Contract:0x5427Ddf5e255609dc061B1e46f032D337ea3ABAd | | 49 | Aptos Testnet | V2 | Supra VRF Contract:0x186ba2ba88f4a14ca51f6ce42702c7ebdf6bfcf738d897cc98b986ded6f1219e | ### Source: https://docs.supra.com/dvrf/learn-supra-dvrf/supra-dvrf-architecture-guide # Supra dVRF: Architecture Guide Supra's decentralized Verifiable Random Function (dVRF) provides a secure, tamper-proof solution for generating random numbers in Web3 applications. Unlike centralized VRF systems that create single points of failure, dVRF distributes trust across multiple nodes while maintaining cryptographic verifiability. ### The Problem with Traditional Random Number Generation Web3 applications such as online gaming and blockchain lotteries require reliable sources of random numbers that are unpredictable, unbiasable, and tamper-proof. Verifiable random functions enable generating pseudorandom numbers that can be publicly verified cryptographically. Pseudorandomness guarantees both unpredictability and unbiasability, while tamper-proofness is ensured through verifiability. However, maintaining pseudorandomness requires keeping the private key secret. This creates a fundamental problem when implementing VRF generation on-chain, as the private key would be exposed on the blockchain. The solution is to delegate VRF computation off-chain to dedicated nodes. Centralized VRF computation introduces its own problem by relying on a single node to store the private key. This creates a single point of failure and is inherently incompatible with decentralization principles. The centralized approach requires complete trust in one entity, which contradicts the fundamental values of blockchain technology. ### Supra's Decentralized VRF Solution Supra addresses these limitations using decentralized VRF (dVRF), where the private key is cryptographically shared among multiple nodes. In this system, any T+1 out of N nodes collectively hold the complete private key, but any T or fewer nodes have no knowledge of it. ``` dVRF Architecture Flow: Application Request ↓ ┌─────────────────────┐ │ Node Network │ │ │ │ Node 1 → Partial 1 │ │ Node 2 → Partial 2 │ ──→ Public Aggregation ──→ Final VRF Output │ Node 3 → Partial 3 │ │ ... │ │ Node N → Partial N │ └─────────────────────┘ Key Security Properties: • Any T+1 nodes can reconstruct full private key • T or fewer nodes have zero knowledge • Byzantine fault tolerance up to T malicious nodes ``` The VRF computation works through collective participation where at least T+1 nodes each compute a partial evaluation using their respective key shares. Anyone can then publicly aggregate these partial evaluations to compute the final result. The VRF verification procedure remains identical whether the output comes from a dVRF or centralized VRF, making the framework highly flexible. Using dVRF instead of centralized VRF provides significant security benefits as the system remains resilient even when T or fewer nodes behave maliciously in arbitrary ways (Byzantine fault tolerance). This distributed approach eliminates single points of failure while maintaining the cryptographic guarantees required for secure random number generation. ### Security Properties and Guarantees Supra's dVRF implementation ensures four critical security properties that go beyond traditional VRF systems: * **Consistency** - The same result is produced regardless of which specific T+1 nodes participate in the computation. This ensures the verification procedure remains completely agnostic to the VRF generation process and supports architectural flexibility, allowing parameters like T to be adjusted as requirements change. * **Robustness** - The aggregation procedure can detect and discard illegitimate partial evaluations. This guarantees that any honestly aggregated VRF output will be correct, even in the presence of malicious nodes attempting to corrupt the process. * **Availability** - The system continues to function correctly no matter what adversaries do, including remaining silent or unresponsive. As long as the adversary compromises at most T nodes, a correct VRF output can still be computed by requiring that N is at least 2T+1. * **Strong Pseudorandomness** - The VRF output remains truly random even when up to T nodes are compromised and potentially colluding. This property provides the highest level of security guarantee possible in a distributed system. ### Technical Implementation Supra's approach uses the GLOW construction developed by Galindo et al., which builds heavily on BLS threshold signatures. BLS threshold signatures enable signature generation by any T+1 nodes, naturally ensuring the consistency property required for dVRF. The system requires that each partial signature be verified by the aggregator before aggregation to maintain robustness. GLOW uses a special-purpose Zero-Knowledge Proof (ZKP) for this verification step. The ZKP not only enables verification of partial signatures but also ensures strong pseudorandomness guarantees. This approach offers significant advantages over alternatives like Dfinity's distributed randomness beacon, which uses partial BLS verification instead of ZKP. While partial BLS verification guarantees robustness, it cannot be proven strongly pseudorandom and involves pairing computation that is approximately 2.5 times slower than ZKP generation. The final VRF output is computed as a hash of the BLS signature, with the signature itself serving as proof. The VRF output can be verified by checking whether the proof is indeed a valid BLS signature and confirming that the VRF output matches the hash of that signature. ### System Workflow and Operation When an application requests a random number, the request is sent to the dVRF network where T+1 nodes generate partial evaluations using their key shares. Each node creates a Zero-Knowledge Proof to verify their partial signature. An aggregator then verifies each partial signature using the provided ZKPs. Valid partial signatures are aggregated into a complete BLS signature, while invalid signatures are discarded. Even if some signatures are invalid, the system continues operating as long as T+1 valid signatures are available. The final VRF output is computed as the hash of the aggregated BLS signature. The application receives both the VRF output and the BLS signature as proof. Verification involves checking that the proof is a valid BLS signature and that the VRF output equals the hash of that signature. This verification process is identical to centralized VRF verification, enabling seamless integration. ### Performance Considerations and Trade-offs Implementing dVRF compared to centralized VRF involves trade-offs in computational efficiency, communication cost, and system complexity. The distributed nature requires coordination among multiple nodes, increasing communication overhead. The cryptographic operations, while optimized through ZKP usage, still require more computation than a single centralized operation. Despite these incremental costs, the security gains significantly outweigh the performance trade-offs. The elimination of single points of failure, Byzantine fault tolerance, and mathematical guarantees of strong pseudorandomness provide substantially improved security for applications requiring trustworthy randomness. The framework's compatibility with existing VRF verification procedures means applications can upgrade from centralized to decentralized VRF with minimal code changes, making the transition cost-effective for existing systems. ### Applications and Use Cases Supra dVRF serves numerous Web3 applications requiring secure randomness: * **Blockchain Gaming** - Fair random events, loot drops, and matchmaking systems with provable fairness * **Decentralized Lotteries** - Transparent and verifiable winner selection processes that cannot be manipulated * **DeFi Protocols** - Random sampling for governance, fair launch mechanisms, and algorithmic processes * **NFT Collections** - Random trait generation and fair minting processes ensuring equitable distribution * **Consensus Mechanisms** - Secure leader election and committee selection for blockchain networks * **Regulatory Applications** - Transparent and auditable randomness supporting compliance requirements The system's transparency and auditability also support regulatory compliance requirements for applications in regulated jurisdictions, while the framework's compatibility with existing VRF systems enables straightforward adoption across diverse use cases. ### Conclusion Supra's dVRF represents a significant advancement in blockchain randomness generation by eliminating single points of failure while providing mathematical guarantees for security properties. The GLOW construction with Zero-Knowledge Proof verification offers optimal performance among decentralized solutions, and the framework's compatibility with existing VRF systems enables straightforward adoption. The modest increases in computational and communication overhead are substantially outweighed by the security improvements, making Supra dVRF the optimal choice for mission-critical Web3 applications requiring trustworthy, verifiable randomness. As the blockchain ecosystem continues evolving toward greater decentralization, solutions like Supra dVRF provide the foundational infrastructure necessary for secure, scalable applications. ### Source: https://docs.supra.com/dvrf/build-supra-l1 # Getting Started Before diving into the technical details, let's understand how dVRF works and how to subscribe to consume random numbers. ### Subscription Model Think of it like a prepaid phone plan, but for random numbers. You deposit funds upfront, and Supra uses them to pay gas fees for your VRF callbacks. * **Predictable costs**: Set gas limits upfront, no surprises * **Simplified contracts**: Your VRF consumer contracts don't need to handle payments * **Bulk management**: One subscription can serve multiple contracts * **Reliability**: Reserved minimum balance ensures your requests don't fail due to insufficient funds ### How dVRF works? Understanding the complete dVRF process flow will help you integrate more effectively: ![dVRF Integration Flow](/images/dvrf/untitled-diagram-mermaid-chart-2025-08-25-191451.png) **Why use subscriptions?** * You create a subscription with your wallet address as the manager * Deposit funds into your subscription account * Register (whitelist) your smart contracts under this subscription * When your contracts request random numbers, Supra automatically pays the callback gas fees from your subscription balance * No need to handle gas payments in your contract code - it's all automated! ### Source: https://docs.supra.com/dvrf/build-supra-l1/getting-started # Getting Started Before diving into the technical details, let's understand how dVRF works and how to subscribe to consume random numbers. ### Subscription Model Think of it like a prepaid phone plan, but for random numbers. You deposit funds upfront, and Supra uses them to pay gas fees for your VRF callbacks. * **Predictable costs**: Set gas limits upfront, no surprises * **Simplified contracts**: Your VRF consumer contracts don't need to handle payments * **Bulk management**: One subscription can serve multiple contracts * **Reliability**: Reserved minimum balance ensures your requests don't fail due to insufficient funds ### How dVRF works? Understanding the complete dVRF process flow will help you integrate more effectively: ![dVRF Integration Flow](/images/dvrf/untitled-diagram-mermaid-chart-2025-08-25-191451.png) **Why use subscriptions?** * You create a subscription with your wallet address as the manager * Deposit funds into your subscription account * Register (whitelist) your smart contracts under this subscription * When your contracts request random numbers, Supra automatically pays the callback gas fees from your subscription balance * No need to handle gas payments in your contract code - it's all automated! ### Source: https://docs.supra.com/dvrf/build-supra-l1/create-your-subscription # Create your subscription To start using dVRF, you need to create a subscription that will manage your random number requests and handle gas payments for callbacks. You can create a subscription in two ways: using the new web interface or through on-chain functions.
The easiest way to create your dVRF subscription is through subscription manager UI at [supra.com/data/dvrf](https://supra.com/data/dvrf). (Currently testnet only). #### Prerequisites - StarKey wallet installed and configured. - Sufficient funds in your wallet for gas fees. - Connected to the appropriate network (see [Available Networks](/dvrf/networks)) #### Steps 1. **Connect Your Wallet** - Navigate to [supra.com/data/dvrf](https://supra.com/data/dvrf) - Click "Connect Wallet" - Approve the connection request 2. **Access Subscription Management** - Click on "My Subscription" in the interface. - If you don't have a subscription yet, you'll see an option to create one. 3. **Create New Subscription** - Fill in the required details. - **Max Transaction Fee**: Maximum gas fee you're willing to pay for callback transactions. - Click "Create Subscription" 4. **Review and Confirm** - Review your Gas configuration settings. - Confirm the transaction in your wallet. - Wait for transaction confirmation. 5. **Verification** - Once confirmed, your subscription will be active. - You can view your subscription details in the "My Subscription" section. - Your wallet is now registered as the subscription manager. 6. **Whats next?** 1. **Supra Credits**: Supra automatically provides a default grant for every subscriber to cover initial callback transaction fees. This will be displayed as Supra Credits in Subscription Manager UI. \ This can only be used to fund dVRF requests. Once this grant is over, you need to deposit $SUPRA tokens to continue. 2. **Module Whitelisting**: You can now whitelist dVRF requester modules under this wallet address. For developers who prefer programmatic subscription creation (Supra MoveVM), you can interact directly with the smart contracts. ```solidity deposit::whitelist_client_address(client: &signer, max_txn_fee: u64) ``` **Parameters:** - `client` - Your signer/wallet that will be whitelisted - `max_txn_fee` - The maximum transaction fee (in the smallest unit) beyond which callback transactions won't be sent. This helps you control costs. #### Verification **Check subscription status**: Use web interface or `is_client_whitelisted_v2` function. ```solidity deposit::is_client_whitelisted_v2(client_address: address): bool ``` After creating your subscription, verify it's working correctly.
Still not comfortable with Minimum Balance, Max Gas Limit, Max Gas price or Max Gas Fee? In the next section we talk about it. ### Source: https://docs.supra.com/dvrf/build-supra-l1/gas-configurations # Gas Configurations Now that you understand how dVRF works and have created your subscription, it's time to configure gas settings properly. Gas configuration is crucial because it determines both your callback performance and minimum balance requirements. Getting this right ensures reliable random number delivery while managing costs effectively. ### Why Gas Configuration Matters - **Performance**: Higher gas settings = faster callback execution during network congestion - **Cost Control**: Optimized settings prevent overpaying while ensuring reliability - **Minimum Balance**: Your gas settings directly calculate the required minimum balance - **Request Success**: Insufficient gas settings can cause callback failures ### Supra L1 Transaction Fee Configuration Supra dVRF on Supra L1 uses a simplified transaction fee model with configurations at two levels: #### Wallet Level (Required) **Maximum Transaction Fee** (`max_txn_fee`): The highest transaction fee you'll pay for any callback across all your modules. This is set when whitelisting your wallet address. #### Module Level (Optional) **Maximum Callback Transaction Fee** (`max_callback_txn_fee`): Transaction fee limit for a specific requester module (must be ≤ max_txn_fee) ### Setting Transaction Fees You are prompted to set these value at the subscription creation stage in the subscription manager UI. You can also modify them later from the menu. Do you also do the same via onchain functions.\ \ **Wallet level** ```solidity deposit::whitelist_client_address(client: &signer, max_txn_fee: u64) ``` Example (move): ```solidity // Whitelist wallet with max transaction fee of 1,000,000 (in smallest unit) deposit::whitelist_client_address(&signer, 1000000); ``` **Module Level** For granular control, set different fee limits for specific modules: ```solidity deposit::update_max_callback_txn_fee(client: &signer, max_callback_txn_fee: u64) ``` #### Optimising After Testing ```solidity // After testing, lower your max fee if actual usage is less deposit::update_max_txn_fee(&signer, 800000); // Update specific module if needed deposit::update_max_callback_txn_fee(&signer, 400000); ``` ### Minimum Balance Your total fund balance should always be significantly higher than the minimum balance for Supra dVRF to accept dVRF requests. Your gas settings directly affect the minimum balance requirement:. you can check your minimum balance in the UI after subscription creation. ``` Minimum Balance = max_txn_fee × min_request_count ``` **Where:** - `min_request_count` = Minimum number of requests Supra requires you to be able to afford (typically 30) - ### Monitoring Your Funds Supra doesn't send automated email alerts and users are advised to implement their own balance monitoring. #### Recommended Alert Thresholds - **300% of minimum balance**: Plan your next deposit - **200% of minimum balance**: Schedule deposit soon - **100% of minimum balance**: Urgent - new requests will be blocked - **At minimum balance**: Critical - immediate deposit required Here's an example structure for monitoring: ```solidity #[view] public fun get_subscription_health(client_address: address): (u64, u64, u64, bool) { let total = deposit::check_client_fund(client_address); let minimum = deposit::check_min_balance_client_v2(client_address); let effective = deposit::check_effective_balance_v2(client_address); let at_minimum = deposit::has_minimum_balance_reached_v2(client_address); (total, minimum, effective, at_minimum) } ``` ### Dev tips for better experience - **Start Conservative**: Begin with higher limits, optimize down over time - **Test Thoroughly**: Always test your callback gas usage before production - **Monitor Actively**: Set up alerts for deposit balance warnings at matching threshold levels via UI - **Update Regularly**: Adjust settings based on network conditions and usage patterns - **Plan for Peaks**: Account for network congestion during high-demand periods ### Source: https://docs.supra.com/dvrf/build-supra-l1/add-contracts-to-subscription # Add Contracts to Subscription After creating your subscription and configuring gas settings, you need to whitelist your consumer contracts. Only whitelisted contracts can request random numbers from your subscription. **Important**: Make sure you've read the Gas Configuration page first. Understanding gas settings is crucial before adding contracts and funds, as your contract-level gas configuration directly impacts performance, costs, and minimum balance requirements
Via Onchain Contracts
**Whitelisting Your Module** After deploying your requester module, whitelist it with Supra to enable VRF requests: ```solidity deposit::init_vrf_module(client: &signer): SupraVRFPermit ``` **Parameters:** - `client` - Your signer (must be the whitelisted wallet address) - `T` - Your module's type/struct (e.g., `YourModule`) **Returns:** - `SupraVRFPermit` - A capability that authorizes your module to interact with Supra VRF **Important**: Store the returned `SupraVRFPermit` capability in your module. This permit is required for all VRF requests.
#### **Disabling a Contract** Temporarily stop a module from making requests without removing it: ```solidity deposit::disable_module(client: &signer) ``` **Example:** ```solidity // Temporarily disable the module deposit::disable_module(&signer); ``` #### **Re-enabling a Contract** Reactivate a previously disabled module: ```solidity deposit::enable_module(client: &signer) ``` ### Best Practices **Store the Permit Safely**: The `SupraVRFPermit` capability is essential for making VRF requests. Store it in a resource with `key` ability. **One Permit Per Module**: Each module type can only have one permit. Don't try to create multiple permits for the same module. **Module-Specific Limits**: Use per-module fee limits to isolate costs, especially for experimental features. ### Troubleshooting **"Module disabled" error**: - Check that you're using the correct signer (whitelisted wallet) - Verify the `SupraVRFPermit` is properly stored **"Insufficient permissions" error**: - Ensure you called `init_vrf_module()` after deploying your module - Verify your wallet was whitelisted first **"Module not whitelisted" error**: - Ensure you called `init_vrf_module()` after deploying your module - Verify your wallet was whitelisted first ### Source: https://docs.supra.com/dvrf/build-supra-l1/deposit-and-withdraw-funds # Deposit and Withdraw Funds After adding contracts, you need to ensure your subscription has sufficient funds to pay for callback gas fees. You can deposit funds through the web interface or using on-chain functions. ### **Understanding Your Grant** Remember, you have a grant from Supra that's used before your deposited funds: This is displayed in UI. **How Grants Work:** 1. Callback fees are deducted from your grant first 2. Once grant is exhausted, fees come from your deposited funds 3. Grants cannot be withdrawn - they're only for callback fees 4. Your deposited funds remain untouched until grant is fully used
### Deposit Funds 1. **Navigate to Subscription Management** - Go to [supra.com/data/dvrf](https://supra.com/data/dvrf) - Connect your wallet (subscription owner) - Click on "My Subscription" 2. **Add Funds** - Click "Deposit Funds" from the menu - Enter the amount to deposit - Review current balance and minimum balance requirement. - Confirm the transaction in your wallet 3. **Verify Deposit** - Check updated balance in the interface - Ensure balance is above minimum threshold - Monitor deposit balance alerts. #### Managing Grants ```solidity // Check remaining grant let remaining_grant = deposit::get_client_remaining_grant(client_address); // Check total grant received let total_grant = deposit::get_client_total_grant(client_address); ``` #### Deposit funds ```solidity movedeposit::deposit_fund_v2( sender: &signer, client_address: address, deposit_amount: u64 ) ``` **Parameters:** - `sender` - The signer depositing the funds (can be any address) - `client_address` - The whitelisted wallet address receiving the deposit - `deposit_amount` - Amount to deposit (in the smallest unit of the native token) **Key Features:** - ✅ Anyone can deposit on behalf of a client - ✅ Useful for team members or automated top-up services. **Checking Your Balance** Before depositing, check your current balance and minimum balance requirements: ```solidity // Check total deposited funds let total_balance = deposit::check_client_fund(client_address); // Check minimum balance requirement let min_balance = deposit::check_min_balance_client_v2(client_address);000000000000000000 ```
### **Best Practices** #### **Deposit Strategy** **Maintain Buffer**: Keep 3-5x your minimum balance for uninterrupted service. - 5x minimum = Comfortable buffer for high-volume applications - 3x minimum = Acceptable for moderate usage - Below 2x minimum = Risky, may block requests soon **Regular Monitoring**: Check your balance periodically, especially during high-usage periods **Automated Top-ups**: Consider implementing an automated deposit script that monitors your balance **Multiple Depositors**: Designate team members or services that can deposit on your behalf for redundancy #### ### Withdraw Funds You can withdraw excess funds from your subscription when needed via UI or via onchain functions. **Important**: You cannot withdraw funds while you have pending random number requests
1. Navigate to "My Subscription". 2. Click "Withdraw Funds" from the Menu. 3. Enter withdrawal amount. 4. Confirm transaction in your wallet. ```move deposit::withdraw_fund( sender: &signer, withdraw_amount: u64 ) ``` **Parameters:** - `sender` - Your signer (must be the whitelisted wallet owner) - `withdraw_amount` - Amount to withdraw (in smallest unit)
**Important Restrictions:** - ❌ Only the whitelisted wallet owner can withdraw their own funds. - ❌ Grants cannot be withdrawn - only deposited funds. ### Source: https://docs.supra.com/dvrf/build-supra-l1/request-random-numbers # Request Random Numbers Ready to get random? Follow these four simple steps to integrate Supra dVRF into your Move module and start requesting verifiable random numbers. ### Prerequisites * ✅ Whitelisted wallet address with configured gas parameters * ✅ Deposited sufficient funds in the Deposit Contract * ✅ Whitelisted your consumer contract address Before requesting random numbers, ensure you have: ### **Step 1: Import the Supra dVRF Interface** Add the Supra dVRF framework dependency to your module's `Move.toml` file. #### **For Testnet:** ```toml [dependencies] supra_vrf = { git = "https://github.com/Entropy-Foundation/vrf-interface", subdir = "supra/testnet", rev = "testnet" } ``` #### **For Mainnet:** ```toml [dependencies] supra_vrf = { git = "https://github.com/Entropy-Foundation/vrf-interface", subdir = "supra/mainnet", rev = "master" } ``` #### **Import in Your Module:** ```solidity module example::example_module { use std::string; use supra_addr::deposit::{Self, SupraVRFPermit}; use supra_addr::supra_vrf; // Your module code } ``` ### **Step 2: Define Your Module Structure** Create the necessary structs to store your VRF permit and manage random numbers. ```solidity // Your module's identifier (used as capability type) struct ClientExample has store {} // Resource to store the VRF permit struct PermitCap has key { permit: SupraVRFPermit } // Resource to store received random numbers struct RandomNumberList has key { random_numbers: table::Table> } ``` #### **Initialize Module:** The `init_module` function is called automatically when your module is published. Use it to set up VRF access: ```solidity fun init_module(sender: &signer) { // Whitelist this module and get VRF permit let permit = deposit::init_vrf_module(sender); // Store the permit for making VRF requests move_to(sender, PermitCap { permit }); // Initialize storage for random numbers move_to(sender, RandomNumberList { random_numbers: table::new() }); } ``` ### **Step 3: Request Random Numbers** Use the `rng_request_v2` function to request random numbers. This function returns a nonce that you can use to track your request. ```solidity supra_vrf::rng_request_v2( permit_cap: &SupraVRFPermit, callback_function: String, rng_count: u8, client_seed: u64, num_confirmations: u64 ): u64 ``` #### **Parameters:** * **`permit_cap`**: Reference to your VRF permit capability (proves authorization) * **`callback_function`**: Name of your callback function that will receive the random numbers (e.g., `"distribute"`) * **`rng_count`**: Number of random numbers to generate (maximum 255) * **`client_seed`**: Your custom seed for additional entropy (can be 0 for default) * **`num_confirmations`**: Number of block confirmations to wait before generating random numbers (minimum 1) #### **Returns:** * **`u64 nonce`**: A unique identifier to track your request and link the callback #### **Example Request Function:** ```solidity public entry fun rng_request_v2( rng_count: u8, client_seed: u64, num_confirmations: u64 ) acquires RandomNumberList, PermitCap { // Define callback function name let callback_function = string::utf8(b"distribute"); // Get the VRF permit let permit = &borrow_global(@example).permit; // Request random numbers let nonce = supra_vrf::rng_request_v2( permit, callback_function, rng_count, client_seed, num_confirmations ); // Initialize storage for this nonce's random numbers let random_num_list = &mut borrow_global_mut(@example).random_numbers; table::add(random_num_list, nonce, vector[]); } ``` #### **Request with a Custom Seed:** ```solidity public entry fun request_random_with_seed(count: u8) acquires RandomNumberList, PermitCap { let callback_function = string::utf8(b"distribute"); // Use timestamp or other entropy source as seed let custom_seed = 12345; // Could be from external source let num_confirmations = 1; let nonce = supra_vrf::rng_request_v2( &borrow_global(@example).permit, callback_function, count, custom_seed, num_confirmations ); // Store nonce for tracking let random_num_list = &mut borrow_global_mut(@example).random_numbers; table::add(random_num_list, nonce, vector[]); } ``` ### **Step 4: Implement Callback Function** Create a callback function to receive and verify the random numbers. The callback must be a `public entry` function with a specific signature. ```solidity public entry fun callback_name( nonce: u64, message: vector, signature: vector, caller_address: address, rng_count: u8, client_seed: u64, ) ``` #### **Callback Validation:** **CRITICAL**: Always call `supra_vrf::verify_callback` to ensure the random numbers are legitimate and from Supra's VRF service. This prevents malicious actors from calling your callback with fake data. ```solidity let verified_num: vector = supra_vrf::verify_callback( nonce, message, signature, caller_address, rng_count, client_seed ); ``` #### **Complete Callback Example:** ```solidity public entry fun distribute( nonce: u64, message: vector, signature: vector, caller_address: address, rng_count: u8, client_seed: u64, ) acquires RandomNumberList { // SECURITY: Verify the callback is legitimate let verified_num: vector = supra_vrf::verify_callback( nonce, message, signature, caller_address, rng_count, client_seed ); // Store the verified random numbers let random_num_list = &mut borrow_global_mut(@example).random_numbers; let random_numbers = table::borrow_mut(random_num_list, nonce); *random_numbers = verified_num; // Your application logic here // Example: Use random numbers for lottery, NFT traits, etc. } ``` ### **Complete Working Example** Here's a full implementation showing all components together: ```solidity module example::example_module { use aptos_std::table; use std::string; use std::signer; use supra_addr::deposit::{Self, SupraVRFPermit}; use supra_addr::supra_vrf; // Module identifier struct ClientExample has store {} // Storage for random numbers struct RandomNumberList has key { random_numbers: table::Table> } // Storage for VRF permit struct PermitCap has key { permit: SupraVRFPermit } // Error codes const E_NOT_INITIALIZED: u64 = 1; const E_INVALID_COUNT: u64 = 2; // Initialize module (called automatically on publish) fun init_module(sender: &signer) { // Whitelist module and get permit let permit = deposit::init_vrf_module(sender); // Initialize storage move_to(sender, RandomNumberList { random_numbers: table::new() }); move_to(sender, PermitCap { permit }); } // Request random numbers public entry fun rng_request_v2( rng_count: u8, client_seed: u64, num_confirmations: u64 ) acquires RandomNumberList, PermitCap { // Validate input assert!(rng_count > 0 && rng_count <= 255, E_INVALID_COUNT); // Define callback function let callback_function = string::utf8(b"distribute"); // Request random numbers let nonce = supra_vrf::rng_request_v2( &borrow_global(@example).permit, callback_function, rng_count, client_seed, num_confirmations ); // Prepare storage for callback let random_num_list = &mut borrow_global_mut(@example).random_numbers; table::add(random_num_list, nonce, vector[]); } // Callback function - receives random numbers public entry fun distribute( nonce: u64, message: vector, signature: vector, caller_address: address, rng_count: u8, client_seed: u64, ) acquires RandomNumberList { // Verify callback authenticity let verified_num: vector = supra_vrf::verify_callback( nonce, message, signature, caller_address, rng_count, client_seed ); // Store verified random numbers let random_num_list = &mut borrow_global_mut(@example).random_numbers; let random_numbers = table::borrow_mut(random_num_list, nonce); *random_numbers = verified_num; } // View function to retrieve random numbers by nonce #[view] public fun get_rng_number_from_nonce(nonce: u64): vector acquires RandomNumberList { let random_num_list = borrow_global(@example); *table::borrow(&random_num_list.random_numbers, nonce) } // Check if random numbers are ready for a nonce #[view] public fun has_random_numbers(nonce: u64): bool acquires RandomNumberList { let random_num_list = borrow_global(@example); table::contains(&random_num_list.random_numbers, nonce) } } ``` ### **Best Practices** ✅ **Always Verify Callbacks**: Never skip `verify_callback()` - it's your security layer ✅ **Handle Nonce Collisions**: Use unique storage per nonce to avoid overwriting ✅ **Set Appropriate Confirmations**: Higher confirmations = more security but slower delivery ✅ **Store Request Context**: Link nonces to requesters or application state for proper handling ✅ **Use Client Seeds Wisely**: Add entropy from user input, timestamps, or external data ✅ **Monitor Your Balance**: Ensure sufficient funds for callback transaction fees ✅ **Error Handling**: Implement proper error codes and assertions. ### **Troubleshooting** **Request fails with "module not whitelisted":** * Ensure you called `init_vrf_module()` in `init_module()` * Verify your wallet is whitelisted first. **Callback never arrives:** * Check your balance is above minimum. * Verify callback function name matches exactly. * Ensure module is enabled: `deposit::is_module_enabled()` **Verification fails:** * Don't modify the callback parameters. * Pass all parameters exactly as received. * Ensure you're using correct module type. `` **"Nonce already exists" error:** * Don't reuse nonces - each request gets a unique nonce. * Clear old nonce data before making new requests. The random numbers generated are cryptographically secure and verifiable, making them suitable for gaming, NFT minting, and other blockchain applications requiring true randomness. ### Source: https://docs.supra.com/dvrf/build-supra-l1/v2-guide # Legacy VRF - V2 Developer Guide Supra dVRF requires a whitelisted subscription to the service with a customer-controlled wallet address to act as the main reference. Once your wallet is whitelisted, you can use it to whitelist any number of consumer contracts and top up the deposit balance maintained with Supra in order to pay for the gas fees of callback (response) transactions. - Please refer to the [VRF subscription FAQ](/dvrf/build-third-party-evm-networks/vrf-subscription-model) page for a better understanding of how it works. - Please refer to the [Network Addresses](/dvrf/networks) page for Supra dVRF version and contract addresses. The following guide explains the steps a user has to follow in order to request random numbers. Important: Please make sure you read and understand [Terms of Use](https://supra.com/terms-of-use/) before start using Supra products and services.
In Supra network, You will interact with a single Supra Smart contract to connect and consume Supra VRF. **Whitelisting on SUPRA L1 is still required for VRF 2.0** Send us a request via this [form](https://forms.gle/WFvpBXg67GmDrokv5) to get your wallet registered with Supra ## Supra Move ### Step 1: Create the Supra dVRF Interface Import interface from [https://github.com/Entropy-Foundation/vrf-interface](https://github.com/Entropy-Foundation/vrf-interface) git repository and add subdirectory mainnet or testnet whatever you would like to use for integration. ### Step 2: Configure Supra dVRF Testnet ```toml [dependencies.SupraVrf] git = "https://github.com/Entropy-Foundation/vrf-interface" subdir = "supra/testnet" rev = "master" ``` Mainnet ```toml [dependencies.SupraVrf] git = "https://github.com/Entropy-Foundation/vrf-interface" subdir = "supra/mainnet" rev = "master" ``` ### Step 3: Use the VRF service and request a Random Number In this step, we will use the "rng_request" function of the SupraContract to create a request for random numbers. - **\_sender** - as an signer parameter, here the requester contract will have to pass his own signature. - **\_callback_address** - an address parameter, here the requester contract will have to pass the callback contract address which will receive the callback. - **\_callback_module** - a string parameter, here the requester contract will have to pass the module name which will receive the callback. - **\_callback_function** - a string parameter, here the requester contract will have to pass the function name which will receive the callback. We will see an example later in the document. - **\_rng_count** - an integer u8 parameter, it is for the number of random numbers a particular requester wants to generate. Currently, we can generate a maximum of 255 random numbers per request. - **\_client_seed** - an integer u64 parameter that could be provided by the client (defaults to 0). This is for additional unpredictability. The source of the seed can be a UUID of 64 bits. This can also be from a centralized source. - **\_num_confirmations** - an integer u64 parameter that specifies the number of block confirmations needed before supra VRF can generate the random number. ```move public entry fun rng_request(sender: &signer, rng_count: u8, client_seed: u64, num_confirmations: u64) { create_empty_struct(sender); let callback_address = @example; let callback_module = string::utf8(b"example_module"); let callback_function = string::utf8(b"distribute"); let _rng = supra_vrf::rng_request(sender, callback_address, callback_module, callback_function, rng_count, client_seed, num_confirmations); } ``` ### Step 4 - Define requester contract callback function Requester contract callback functions should be defined as public entry functions and will mainly take 7 parameters. Below are the list of parameters. In the request contract callback function they need to call `supra_vrf::verify_callback` function to verify that the callback signature which they received is valid and then the requester contract gets the random number list. ```move public entry fun distribute( nonce: u64, message: vector, signature: vector, caller_address: address, rng_count: u8, client_seed: u64, ) acquires RandomNumberList { let verified_num: vector = supra_vrf::verify_callback(nonce, message, signature, caller_address, rng_count, client_seed); let random_num_list = &mut borrow_global_mut(@example).random_numbers; let random_numbers = table::borrow_mut(random_num_list, nonce); *random_numbers = verified_num } ``` ### Step 5 - Whitelist your requester contract with Supra Deposit Module and deposit funds It is important to note that your wallet address must be registered with Supra before this step. If that is completed, then you need to whitelist your requester smart contract under your wallet address and deposit funds to be paid for your call back transactions gas fees. - The simplest way to interact with the deposit contract is to use the Supra CLI directly. - Following functions will facilitate whitelisting your requester smart contracts and fund deposits. - **add_contract_to_whitelist(contract_address: address):** The whitelisted users will have to whitelist their contract which they will be using to request for random numbers. The parameter this function takes is the User's contract address. This function will be called after the user deploys the requester contract post development and makes it eligible to consume random numbers. - **deposit_fund(deposit_amount: u64):** This function will deposit funds in the deposit module from the users for the response/callback transaction. The funds for a specific user should remain higher than the minimum amount set by the Supra( 10 Supra for Supra testnet) for the new request transactions to be accepted. There will be a script from Supra which will be monitoring the funds and will alert the user if a refill is required. **Additional functions of the Deposit Module and its usage** 1. **deposit::add_contract_to_whitelist(contract_address: address):** This function is for the users to whitelist their requester contract address, given that the user's wallet address which interacts with the function is already whitelisted by the supra team. 2. **deposit::deposit_fund(deposit_amount: u64):** This function is for the users to add their funds, which will be used to pay the transaction fees for the response transaction of their request. 3. **remove_contract_from_whitelist(contract_address: address):** The function helps user's to remove their contract addresses from the whitelist if that is no longer required. 4. **client_setting_minimum_balance(min_balance_limit_client: u64):** This function is for the user to set the minimum limit of the fund they will add in the deposit contract. The higher of the user's value or, the default value (10 Supra) will be saved as the minimum balance for the subscription. Total fund balance should be higher than the minimum balance in order to receive random numbers from Supra. Please read more on Supra subscription model [here](/dvrf/build-third-party-evm-networks/vrf-subscription-model) for a better understanding. 5. **withdraw_fund(withdraw_amount: u64):** The function helps users to withdraw funds. 6. **check_client_fund(client_address: address):** The function helps the users to check their total available balance in the deposit contract. 7. **check_effective_balance(client_address: address):** The function helps the user to check the effective balance, that is the balance that is left after subtracting the minimum balance from the total fund that has been deposited by the user. 8. **check_min_balance_supra():** This function checks the minimum balance set by the supra team. As mentioned earlier, the minimum balance is already set by the supra team and the function helps the user to check its value. 9. **check_min_balance(client_address: address):** The function checks the minimum balance for a particular user. As mentioned earlier, the minimum balance can be set by the supra team as well as the user. If the minimum balance is set by both, the minimum balance for a particular user will be the higher value among the two. 10. **get_subscription_by_client(client_address: address):** The function returns the information like when the subscription for a particular user started, when it will end and if the user is a participant of the SNAP programme or not. 11. **has_minimum_balance_reached(client_address: address):** The function returns the list of addresses, the contract addresses which are whitelisted by a particular user. ### Example Implementation Please find an example implementation of VRF on Supra network. ([link here](https://github.com/Entropy-Foundation/supra-vrf-examples/tree/master/supra_l1_vrf/example)) In the example below, - The function rng_request is using the VRF service by calling the rng_request function of the SupraContract. - Then the callback function returns the signature and all other required parameters. - Then call verify_callback function of the SupraContract and get the random number list. ```move module example::example_module { use aptos_std::table; use supra_addr::supra_vrf; use std::string; struct RandomNumberList has key { random_numbers: table::Table> } fun init_module(sender: &signer) { move_to(sender, RandomNumberList { random_numbers: table::new() }); } public entry fun rng_request(sender: &signer, rng_count: u8, client_seed: u64, num_confirmations: u64) acquires RandomNumberList { let callback_address = @example; let callback_module = string::utf8(b"example_module"); let callback_function = string::utf8(b"distribute"); let nonce = supra_vrf::rng_request(sender, callback_address, callback_module, callback_function, rng_count, client_seed, num_confirmations); let random_num_list = &mut borrow_global_mut(@example).random_numbers; table::add(random_num_list, nonce, vector[]); } public entry fun distribute( nonce: u64, message: vector, signature: vector, caller_address: address, rng_count: u8, client_seed: u64, ) acquires RandomNumberList { let verified_num: vector = supra_vrf::verify_callback(nonce, message, signature, caller_address, rng_count, client_seed); let random_num_list = &mut borrow_global_mut(@example).random_numbers; let random_numbers = table::borrow_mut(random_num_list, nonce); *random_numbers = verified_num } #[view] public fun get_rng_number_from_nonce(nonce: u64): vector acquires RandomNumberList { let random_num_list = &mut borrow_global_mut(@example).random_numbers; *table::borrow(random_num_list, nonce) } } ``` To call rng_request function as below format: ``` supra move tool run --function-id default::example_module::rng_request --args u8:{rng_count} u64:{client_seed} u64:{num_confirm} ``` Retrieve random number ``` supra move tool view --function-id default::example_module::get_rng_number_from_nonce --args u64:{nonce} ``` Before you dive in.. In Aptos network, You will interact with a single Supra Smart contract to connect and consume Supra VRF. #### Step 1: Create the Supra dVRF Interface Import interface from [https://github.com/Entropy-Foundation/vrf-interface](https://github.com/Entropy-Foundation/vrf-interface) git repository and add subdirectory mainnet or testnet whatever you would like to use for integration. #### Step 2: Configure the Supra dVRF Import Below supra vrf-framework dependency in your requester contract Move.toml file based on the network you are connected. Testnet ```solidity [dependencies] supra_vrf = { git = "https://github.com/Entropy-Foundation/vrf-interface", subdir = "aptos/testnet", rev = "0806fc554fe0235f4f16a99827e99bdffb4d0c94" } ``` Mainnet ``` [dependencies] supra_vrf = { git = "https://github.com/Entropy-Foundation/vrf-interface", subdir = "aptos/mainnet", rev = "0806fc554fe0235f4f16a99827e99bdffb4d0c94" } soon ``` #### Step 3: Use the VRF service and request a Random Number[​](https://qa-docs.supraoracles.com/docs/vrf-dev-guide#step-3-use-the-vrf-service-and-request-for-a-random-number) In this step, we will use the “**rng_request**” function of the SupraContract to create a request for random numbers. - **\_sender.** - as an signer parameter, here the requester contract will have to pass his own signature. - **\_callback_address** - an address parameter, here the requester contract will have to pass the callback contrat address which will receive the callback. - **\_callback_module** - a string parameter, here the requester contract will have to pass the module name which will receive the callback. - **\_callback_function** - a string parameter, here the requester contract will have to pass the function name which will receive the callback. We will see an example later in the document. - **\_rng_count** - an integer u8 parameter, it is for the number of random numbers a particular requester wants to generate. Currently, we can generate a maximum of 255 random numbers per request. - **\_client_seed** - an integer u64 parameter that could be provided by the client (defaults to 0). This is for additional unpredictability. The source of the seed can be a UUID of 64 bits. This can also be from a centralized source. - **\_num_confirmations** - an integer u64 parameter that specifies the number of block confirmations needed before supra VRF can generate the random number. ```solidity public entry fun rng_request(sender: &signer, rng_count: u8, client_seed: u64, num_confirmations: u64) { create_empty_struct(sender); let callback_address = @example; let callback_module = string::utf8(b"example_module"); let callback_function = string::utf8(b"distribute"); let _rng = supra_vrf::rng_request(sender, callback_address, callback_module, callback_function, rng_count, client_seed, num_confirmations); } ``` #### Step 4 - Define requester contract callback function Requester contract callback functions should be defined as public entry functions and will have 7 parameters. Below are the list of parameters. In the request contract callback function they need to call `supra_vrf::verify_callback` function to verify that the callback signature which they received is valid and then the requester contract gets the random number list. ```solidity public entry fun distribute( nonce: u64, message: vector, signature: vector, caller_address: address, rng_count: u8, client_seed: u64, ) acquires RandomNumberList { let verified_num: vector = supra_vrf::verify_callback(nonce, message, signature, caller_address, rng_count, client_seed); let random_num_list = &mut borrow_global_mut(@example).random_numbers; let random_numbers = table::borrow_mut(random_num_list, nonce); *random_numbers = verified_num } ``` #### Step 5 - Whitelist your requester contract with Supra Deposit Module and deposit funds​ It is important to note that your wallet address must be registered with Supra before this step. If that is completed, then you need to whitelist your requester smart contract under your wallet address and deposit funds to be paid for your call back transactions gas fees. - The simplest way to interact with the deposit contract will be through Aptos Explorer or you can directly use Aptos CLI. - Following functions will facilitate whitelisting your requester smart contracts and fund deposits. - **deposit::add_contract_to_whitelist(contract_address: address)**\ The whitelisted users will have to whitelist their contract which they will be using to request for random numbers. The parameter this function takes is the User’s contract address. This function will be called after the user deploys the requester contract post development and makes it eligible to consume random numbers. - **deposit::deposit_fund(deposit_amount: u64)**\ This function will deposit funds in the deposit module from the users for the response/callback transaction. The funds for a specific user should remain higher than the minimum amount set by the Supra( 10 Aptos for Aptos testnet) for the new request transactions to be accepted. There will be a script from Supra which will be monitoring the funds and will alert the user if a refill is required. - **add_contract_to_whitelist(contract_address: address)**\ This function is for the users to whitelist their requester contract address, given that the user’s wallet address which interacts with the function is already whitelisted by the supra team. - **deposit_fund(deposit_amount: u64)**\ This function is for the users to add their funds, which will be used to pay the transaction fees for the response transaction of their request. - **remove_contract_from_whitelist(contract_address: address)**\ The function helps user’s to remove their contract addresses from the whitelist if that is no longer required. - **client_setting_minimum_balance(min_balance_limit_client: u64)**\ This function is for the user to set the minimum limit of the fund they will add in the deposit contract. The higher of the user’s value or, the default value (10 Aptos) will be saved as the minimum balance for the subscription. Total fund balance should be higher than the minimum balance in order to receive random numbers from Supra. Please read ore on Supra subscription model [here](../build-third-party-evm-networks/vrf-subscription-model) for a better understanding. - **withdraw_fund(withdraw_amount: u64)**\ The function helps users to withdraw funds. - **check_client_fund(client_address: address)**\ The function helps the users to check their total available balance in the deposit contract. - **check_effective_balance(client_address: address)**\ The function helps the user to check the effective balance, that is the balance that is left after subtracting the minimum balance from the total fund that has been deposited by the user. - **check_min_balance_supra()**\ This function checks the minimum balance set by the supra team. As mentioned earlier, the minimum balance is already set by the supra team and the function helps the user to check its value. - **check_min_balance(client_address: address)**\ The function checks the minimum balance for a particular user. As mentioned earlier, the minimum balance can be set by the supra team as well as the user. If the minimum balance is set by both, the minimum balance for a particular user will be the higher value among the two. - **get_subscription_by_client(client_address: address)**\ The function returns the information like when the subscription for a particular user started, when it will end and if the user is a participant of the SNAP programme or not. - **has_minimum_balance_reached(client_address: address)**\ The function returns the list of addresses, the contract addresses which are whitelisted by a particular user. ### Example Implementation Please find below an example implementation of Supra Aptos VRF ([link here](https://github.com/Entropy-Foundation/supra-vrf-examples/tree/master/supra_aptos_vrf/example2)). In the example below, - The function rng_request is using the VRF service by calling the rng_request function of the SupraContract. - Then the callback function returns the signature and all other required parameters. - Then call verify_callback function of the SupraContract and receive the random number. ```solidity module example::example_module { use aptos_std::table; use supra_addr::supra_vrf; use std::string; struct RandomNumberList has key { random_numbers: table::Table> } fun init_module(sender: &signer) { move_to(sender, RandomNumberList { random_numbers: table::new() }); } public entry fun rng_request(sender: &signer, rng_count: u8, client_seed: u64, num_confirmations: u64) acquires RandomNumberList { let callback_address = @example; let callback_module = string::utf8(b"example_module"); let callback_function = string::utf8(b"distribute"); let nonce = supra_vrf::rng_request(sender, callback_address, callback_module, callback_function, rng_count, client_seed, num_confirmations); let random_num_list = &mut borrow_global_mut(@example).random_numbers; table::add(random_num_list, nonce, vector[]); } public entry fun distribute( nonce: u64, message: vector, signature: vector, caller_address: address, rng_count: u8, client_seed: u64, ) acquires RandomNumberList { let verified_num: vector = supra_vrf::verify_callback(nonce, message, signature, caller_address, rng_count, client_seed); let random_num_list = &mut borrow_global_mut(@example).random_numbers; let random_numbers = table::borrow_mut(random_num_list, nonce); *random_numbers = verified_num } #[view] public fun get_rng_number_from_nonce(nonce: u64): vector acquires RandomNumberList { let random_num_list = &mut borrow_global_mut(@example).random_numbers; *table::borrow(random_num_list, nonce) } } ``` To call rng_request function as below format, ```solidity aptos move run --function-id default::example_module::rng_request --args u8:{rng_count} u64:{client_seed} u64:{num_confirm} ``` Retrieve random number ```solidity aptos move view -–function-id default::example_module::get_rng_number_from_nonce --args u64:{nonce} ```
### Source: https://docs.supra.com/dvrf/build-third-party-evm-networks # Getting Started Before diving into the technical details, let's understand how dVRF works and how to subscribe to consume random numbers. ### Subscription Model Think of it like a prepaid phone plan, but for random numbers. You deposit funds upfront, and Supra uses them to pay gas fees for your VRF callbacks. - **Predictable costs**: Set gas limits upfront, no surprises - **Simplified contracts**: Your VRF consumer contracts don't need to handle payments - **Bulk management**: One subscription can serve multiple contracts - **Reliability**: Reserved minimum balance ensures your requests don't fail due to insufficient funds ### How dVRF works? Understanding the complete dVRF process flow will help you integrate more effectively: ![dVRF Integration Flow](/images/dvrf/untitled-diagram-mermaid-chart-2025-08-25-191451.png) **Why use subscriptions?** - You create a subscription with your wallet address as the manager - Deposit funds into your subscription account - Register (whitelist) your smart contracts under this subscription - When your contracts request random numbers, Supra automatically pays the callback gas fees from your subscription balance - No need to handle gas payments in your contract code - it's all automated! ### Source: https://docs.supra.com/dvrf/build-third-party-evm-networks/getting-started # Getting Started Before diving into the technical details, let's understand how dVRF works and how to subscribe to consume random numbers. ### Subscription Model Think of it like a prepaid phone plan, but for random numbers. You deposit funds upfront, and Supra uses them to pay gas fees for your VRF callbacks. * **Predictable costs**: Set gas limits upfront, no surprises * **Simplified contracts**: Your VRF consumer contracts don't need to handle payments * **Bulk management**: One subscription can serve multiple contracts * **Reliability**: Reserved minimum balance ensures your requests don't fail due to insufficient funds ### How dVRF works? Understanding the complete dVRF process flow will help you integrate more effectively: ![dVRF Integration Flow](/images/dvrf/untitled-diagram-mermaid-chart-2025-08-25-191451.png) **Why use subscriptions?** * You create a subscription with your wallet address as the manager * Deposit funds into your subscription account * Register (whitelist) your smart contracts under this subscription * When your contracts request random numbers, Supra automatically pays the callback gas fees from your subscription balance * No need to handle gas payments in your contract code - it's all automated! ### Source: https://docs.supra.com/dvrf/build-third-party-evm-networks/create-your-subscription # Create your subscription To start using dVRF, you need to create a subscription that will manage your random number requests and handle gas payments for callbacks. You can create a subscription in two ways: using the new web interface or through on-chain functions.
The easiest way to create your dVRF subscription is through subscription manager UI at [supra.com/data/dvrf](https://supra.com/data/dvrf). #### Prerequisites - MetaMask wallet installed and configured. - Sufficient funds in your wallet for gas fees. - Connected to the appropriate network (see [Available Networks](/dvrf/networks)) #### Steps 1. **Connect Your Wallet** - Navigate to [supra.com/data/dvrf](https://supra.com/data/dvrf) - Click "Connect Wallet" - Approve the connection request 2. **Access Subscription Management** - Click on "My Subscription" in the interface - If you don't have a subscription yet, you'll see an option to create one 3. **Create New Subscription** - Fill in the required details. - **Max Gas Price**: Maximum gas price you're willing to pay for callback transactions. - **Max Gas Limit**: Maximum gas limit allocated for callback transactions. - Click "Create Subscription" 4. **Review and Confirm** - Review your Gas configuration settings. - Confirm the transaction in your wallet. - Wait for transaction confirmation. 5. **Verification** - Once confirmed, your subscription will be active. - You can view your subscription details in the "My Subscription" section. - Your wallet address is now registered as the subscription manager. For developers who prefer programmatic subscription creation, you can interact directly with the smart contracts. ```solidity // Interface for dVRF 3.0 Deposit Contract interface IDeposit { function addClientToWhitelist( uint128 maxGasPrice, uint128 maxGasLimit ) external payable; } ``` #### Verification **Check subscription status**: Use web interface or `getSubscriptionByClient()` function After creating your subscription, verify it's working correctly.
Still not comfortable with Minimum Balance, Max Gas Limit, Max Gas price or Max Gas Fee? In the next section we talk about it. ### Source: https://docs.supra.com/dvrf/build-third-party-evm-networks/vrf-subscription-model # VRF Subscription FAQ Supra dVRF is a prepaid subscription model that provides enhanced controls for consumers. This document will walk you through the key features and functionalities of the Supra VRF prepaid subscription. ## Whitelisting for dVRF The subscription model requires users to be registered with a wallet address that can be used as the subscription manager and once it is whitelisted, it can be used to register any number of requester smart contracts to consume random numbers from Supra dVRF. Currently under VRF 2.1, the whitelisting process is manual and requires users to request whitelisting via this [form](https://forms.gle/WFvpBXg67GmDrokv5) which is then carried out by the Supra team. We are now rolling out VRF 3.0 with self a whitelisting feature. Please refer to the [network list](/dvrf/networks) to see the version of the dVRF protocol for your chosen network. ## How to determine Max gas limit and Max gas price in VRF 3.0? Supra VRF subscription operates as a prepaid model, where users can add funds to their subscription account to cover the gas fee for call back (response) transactions. Setting up the right value depends on. your requirement. If speed of the response is a priority over cost, setting high values will help and vice versa.\ These two parameters will also impact the minimum balance that you have to maintain in your subscription account as described later in this page. ### **Max Gas Limit** “**maxGasLimit**” is the maximum gas limit with which the callback transaction can be executed. This will be the default and maximum call back gas limit applied to all requester smart contracts registered under your subscription. If you need a different call back gas limit for each requester contract you can set "**callbackGasLimit"** parameter at requester contract level, which should be less than or equal to **"maxGasLimit".** ### **Max Gas Price** Maximum gas price is the gas price you are willing to spend for call back transactions of all your requester contracts. If you need a different call back gas price for each requester contract you can set "**callbackGasPrice"** parameter at requester contract level, which should be less than or equal to the **"maxGasPrice".** ## What is the callback gas price? The callback gas price is set per contract basis which determines the maximum gas price with which the callback transaction gets executed for that particular contract. The callback gas price of a contract is `<= maxGasPrice` of the client. ## What is the callback gas limit? The callback gas limit is set per contract basis which determines the maximum gas limit with which the callback transaction gets executed for that particular contract. The callback gas limit of a contract is `<= maxGasLimit` of the client. callbackGasLimit of a contract \<= maxGasLimit of the subscription\ callbackGasPrice of a contract \<= maxGasprice of the subscription\ \ If you need to increase the callbackGasLimit and callbackGasPrice of a contract, please make sure maxGasLimit and maxGasprice of the subscription are always higher than the values you plan to have for your contract. ### Total Balance The total balance represents the amount of tokens held by a consumer in their prepaid subscription account. ### **Minimum Balance** The minimum fund balance is the threshold that consumers must maintain in order to submit new VRF requests and have them accepted for processing. If the total balance falls below the minimum balance, Supra will stop processing new VRF requests. However, it will continue to process already in-progress requests. The minimum Balance for a subscription account is dynamically calculated as follows: ``` minBalanceLimit = minRequests * _maxGasPrice * (_maxGasLimit + verificationGasValue); ``` where, - **MinRequests** = Maximum number of requests (already in progress) to be processed after reaching the minimum balance. This is currently set to 30. If any user had more than 30 at the time, additional requests will be on hold for and retried every 6 hours, and, after 48 hours will be dropped. - **verificationGasValue** = Gas consumed by BLS verification and random number generation. - Clients can fetch their “**minBalanceLimit**” by calling “**getMinBalanceLimit(uint128 \_maxGasPrice, uint128 \_maxGasLimit)”**. ### **Effective Balance** When the effective balance falls below certain thresholds, email reminders will be sent to prompt users to top up their subscription balance. ``` Effective Balance = Total Balance - Minimum Balance ``` | Reminder | Logic | | --------------- | ------------------------------------------------ | | First Reminder | Effective balance <= 50% of minimum balance | | Second Reminder | Effective balance <=25% of minimum balance | | Third Reminder | Effective Balance <=10% of minimum balance | | Fourth Reminder | Effective balance <=5% of minimum balance | | Final Reminder | Effective balance <=minimum balance | If you have further questions or need assistance, please feel free to reach out to our support team. ### Source: https://docs.supra.com/dvrf/build-third-party-evm-networks/gas-configurations # Gas Configurations Now that you understand how dVRF works and have created your subscription, it's time to configure gas settings properly. Gas configuration is crucial because it determines both your callback performance and minimum balance requirements. Getting this right ensures reliable random number delivery while managing costs effectively. ### Why Gas Configuration Matters - **Performance**: Higher gas settings = faster callback execution during network congestion - **Cost Control**: Optimized settings prevent overpaying while ensuring reliability - **Minimum Balance**: Your gas settings directly calculate the required minimum balance - **Request Success**: Insufficient gas settings can cause callback failures ### Chain Specific Gas Configuration
Supra dVRF in EVM chains has four gas parameters configured at two levels. If per contract configurations not set, it will inherit values from subscription level limits. **Subscription Level (Required)** - **Max Gas Price**: Highest gas price you'll pay for any callback - **Max Gas Limit**: Maximum gas limit for any callback execution **Per-Contract Level (Optional )** - **Callback Gas Price**: Gas price for specific contract (≤ maxGasPrice) - **Callback Gas Limit**: Gas limit for specific contract (≤ maxGasLimit) #### Change via UI You are prompted to set these value at the subscription creation stage. You can also modify them later from the menu. #### Change via On chain functions ```solidity // Setting subscription-level at the time of subscription creation addClientToWhitelist(maxGasPrice, maxGasLimit); // Setting per-contract customization at contract addition addContractToWhitelist(contractAddress, callbackGasPrice, callbackGasLimit); // Update maximum gas price updateMaxGasPrice(newMaxGasPrice); // Update maximum gas limit updateMaxGasLimit(newMaxGasLimit); // Update specific contract's gas price updateCallbackGasPrice(contractAddress, newGasPrice); // Update specific contract's gas limit updateCallbackGasLimit(contractAddress, newGasLimit); ```
### Minimum Balance Your total fund balance should always be higher than the minimum balance for Supra dVRF to accept dVRF requests. Your gas settings directly affect the minimum balance requirement:. you can check your minimum balance in the UI after subscription creation. ``` Minimum Balance = 30 requests × maxGasPrice × (maxGasLimit + verificationGas) ``` **Verification Gas**: Additional gas consumed by BLS signature verification and random number generation on-chain. This is automatically added to your callback gas limit during minimum balance calculation ### Deposit Balance Alerts The system automatically sends email notifications when your deposit balance drops to critical levels: - **300% of minimum balance**: Early warning - good time to plan your next deposit - **100% of minimum balance**: Critical alert - new requests will be blocked soon - **25% of minimum balance**: Final warning - immediate action required 💡 **Good news**: These alert thresholds can be changed via UI to match your operational needs. ### Dev tips for better experience - **Start Conservative**: Begin with higher limits, optimize down over time - **Test Thoroughly**: Always test your callback gas usage before production - **Monitor Actively**: Set up alerts for deposit balance warnings at matching threshold levels via UI - **Update Regularly**: Adjust settings based on network conditions and usage patterns - **Plan for Peaks**: Account for network congestion during high-demand periods ### Source: https://docs.supra.com/dvrf/build-third-party-evm-networks/add-contracts-to-subscription # Add Contracts to subscription After creating your subscription and configuring gas settings, you need to whitelist your consumer contracts. Only whitelisted contracts can request random numbers from your subscription. **Important**: Make sure you've read the Gas Configuration page first. Understanding gas settings is crucial before adding contracts and funds, as your contract-level gas configuration directly impacts performance, costs, and minimum balance requirements
The easiest way to manage your contracts is through the web interface at [supra.com/data/dvrf](https://supra.com/data/dvrf). #### Steps - **Navigate to Contract Management** - Go to [supra.com/data/dvrf](https://supra.com/data/dvrf) - Connect your wallet (subscription owner) - Click on "My Subscription" - **Add New Contract** - Click "Add Contract" - Enter your contract address - Configure gas settings for this specific contract - **Configure Contract Gas Settings** **For EVM Chains:** - **Callback Gas Price**: Must be ≤ your subscription's maxGasPrice - **Callback Gas Limit**: Must be ≤ your subscription's maxGasLimit - **Submit and Confirm** For EVM Chains ```solidity solidity// Interface for adding contracts interface IDeposit { function addContractToWhitelist( address contractAddress, uint128 callbackGasPrice, uint128 callbackGasLimit ) external; } ```
### Remove Contracts from subscription You can remove already whitelisted contracts via subscription manager UI or via onchain function. ```solidity // Remove contract from whitelist removeContractFromWhitelist(contractAddress); ``` ### Source: https://docs.supra.com/dvrf/build-third-party-evm-networks/deposit-and-withdraw-funds # Deposit and Withdraw Funds After adding contracts, you need to ensure your subscription has sufficient funds to pay for callback gas fees. You can deposit funds through the web interface or using on-chain functions.
1. **Navigate to Subscription Management** * Go to [supra.com/data/dvrf](https://supra.com/data/dvrf) (for third party EVM networks only) * Connect your wallet (subscription owner) * Click on "My Subscription" 2. **Add Funds** * Click "Deposit Funds" from the menu * Enter the amount to deposit * Review current balance and minimum balance requirement. * Confirm the transaction in your wallet 3. **Verify Deposit** * Check updated balance in the interface * Ensure balance is above minimum threshold * Monitor deposit balance alerts. For EVM Chains ```solidity solidity // Deposit funds to susbcription interface IDeposit { function depositFund() external payable; } // Check minimum balance requirement (additional) uint128 minBalance = deposit.getMinBalanceLimit(maxGasPrice, maxGasLimit); ```
### Withdraw Funds You can withdraw excess funds from your subscription when needed via UI or via onchain functions. **Important**: You cannot withdraw funds while you have pending random number requests
1. Navigate to "My Subscription". 2. Click "Withdraw Funds" from the Menu. 3. Enter withdrawal amount. 4. Confirm transaction in your wallet. EVM Chains ```solidity // Withdraw funds deposit.withdrawFund(withdrawAmount); ```
### Source: https://docs.supra.com/dvrf/build-third-party-evm-networks/request-random-numbers # Request Random Numbers ### Supra dVRF Contracts Architecture in EVMs Supra dVRF uses a two-contract system: - **Router Contract**: Handles VRF requests and delivers random numbers to your callback function - **Deposit Contract**: Manages user funds, whitelisting, and gas configurations Ready to get random? Follow these four simple steps to integrate Supra dVRF into your smart contract and start requesting verifiable random numbers. ### Prerequisites Before requesting random numbers, ensure you have: - ✅ Whitelisted wallet address with configured gas parameters - ✅ Deposited sufficient funds in the Deposit Contract - ✅ Whitelisted your consumer contract address ### Step 1: Create the Router Interface Add the Router Contract interface to your smart contract. This interface enables communication with Supra's VRF service.\ The interface provides two versions of `generateRequest` - use the first one if you want to provide your own seed for additional entropy, or the second one for standard random number generation. #### Parameters - **`_functionSig`**: The signature of your callback function that will receive the random numbers (e.g., "myCallback(uint256,uint256\[])") - **`_rngCount`**: Number of random numbers to generate in a single request (maximum 255) - **`_numConfirmations`**: Number of block confirmations after request transaction to wait before generating random numbers (Min:1 , Max: 20) - **`_clientSeed`** _(optional)_: Your custom seed value for additional randomness (can be UUID, timestamp, etc.) - **`_clientWalletAddress`**: Your whitelisted wallet address that will pay for the transaction - **Returns**: `uint256 nonce` - A unique identifier to track your request ```solidity interface ISupraRouterContract { // With custom client seed for additional randomness function generateRequest( string memory _functionSig, uint8 _rngCount, uint256 _numConfirmations, uint256 _clientSeed, address _clientWalletAddress ) external returns(uint256); // Without client seed (uses default seed) function generateRequest( string memory _functionSig, uint8 _rngCount, uint256 _numConfirmations, address _clientWalletAddress ) external returns(uint256); } ``` ### Step 2 : Configure Router Address Initialize the Router Contract connection in your constructor. This binds your contract to Supra's on-chain router. ```solidity contract ExampleContract { ISupraRouter internal supraRouter; constructor(address routerAddress) { supraRouter = ISupraRouterContract(routerAddress); } } ``` ### Step 3 : Request Random Numbers Call the `generateRequest` function to request random numbers. This function returns a nonce that you can use to track your request and link it back to the original requester or context. ```solidity function exampleRequest() external { uint8 rngCount = 10; uint256 numConfirmations = 1; address clientWallet = msg.sender; uint256 nonce = supraRouter.generateRequest( "exampleCallback(uint256,uint256[])", rngCount, numConfirmations, clientWallet ); // Store nonce if necessary (e.g., in a hashmap) // This can be used to track parameters related to the request } ``` ### Step 4 : Implement Callback Function Create a callback function to receive the random numbers. This function must have the exact signature: `(uint256 nonce, uint256[] memory rngList)`. Please refer to below example.\ The callback validation is crucial to prevent malicious contracts from calling your function with fake random data. ```solidity function exampleCallback(uint256 nonce, uint256[] memory rngList) external { // Security: Only allow Router Contract to call this function require(msg.sender == address(supraRouter), "Only Supra Router allowed"); // Process your random numbers for(uint i = 0; i < rngList.length; i++) { uint256 randomNumber = rngList[i]; // Your logic here } } ``` ### Complete Example ```solidity // SPDX-License-Identifier: MIT pragma solidity ^0.8.0; interface ISupraRouter { function generateRequest( string memory _functionSig, uint8 _rngCount, uint256 _numConfirmations, uint256 _clientSeed, address _clientWalletAddress ) external returns(uint256); } contract Interaction { address supraAddr; constructor(address supraSC) { supraAddr = supraSC; } mapping(uint256 => string) result; mapping(string => uint256[]) rngForUser; function exampleRequest(uint8 rngCount, string memory username) external { // You can customize this value to meet your needs. Minimum: 1, Maximum: 20. uint256 numConfirmations = 1; uint256 nonce = ISupraRouter(supraAddr).generateRequest( "exampleCallback(uint256,uint256[])", rngCount, numConfirmations, 123, msg.sender ); // Can pass "msg.sender" when calling from the whitelisted wallet address result[nonce] = username; } function exampleCallback(uint256 nonce, uint256[] calldata rngList) external { require(msg.sender == supraAddr, "only supra router can call this function"); uint256[] memory x = new uint256[](rngList.length); rngForUser[result[nonce]] = x; for(uint8 i = 0; i < rngList.length; i++) { rngForUser[result[nonce]][i] = rngList[i] % 100; } } function viewUserName(string memory username) external view returns (uint256[] memory) { return rngForUser[username]; } } ``` ### Next Steps After implementing the request functionality, you can: - Monitor your balance using Deposit Contract view functions - Update gas parameters for your contracts - Scale your random number requests based on your application needs The random numbers generated are cryptographically secure and verifiable, making them suitable for gaming, NFT minting, and other blockchain applications requiring true randomness. ### Source: https://docs.supra.com/dvrf/build-third-party-evm-networks/other-functions # Other Functions Beyond requesting random numbers, Supra dVRF provides additional functions for managing your account, monitoring balances, and configuring contract settings. These utility functions help you maintain your VRF integration and optimize your random number generation workflow. ### Interact with deposit contract - EVM networks The simplest way to interact with the deposit contract is through Remix IDE. #### Setup in Remix IDE 1. Go to Remix IDE & create a file with name `IDepositContract.sol` 2. Paste the following interface code in the file: ```solidity interface IDepositContract { function depositFundClient() external payable; function addContractToWhitelist(address _contractAddress, uint128 _callbackGasPrice, uint128 _callbackGasLimit) external; function removeContractFromWhitelist(address _contractAddress) external; function withdrawFundClient(uint128 _amount) external; function updateMaxGasPrice(uint128 _maxGasPrice) external; function updateMaxGasLimit(uint128 _maxGasLimit) external; function updateCallbackGasPrice(address _contractAddress, uint128 _callbackGasPrice) external; function updateCallbackGasLimit(address _contractAddress, uint128 _callbackGasLimit) external; function checkClientFund(address _clientAddress) external view returns (uint128); function checkMinBalanceClient(address _clientAddress) external view returns (uint128); function countTotalWhitelistedContractByClient(address _clientAddress) external view returns (uint256); function getSubscriptionInfoByClient(address _clientAddress) external view returns (uint64, bool); function isMinimumBalanceReached(address _clientAddress) external view returns (bool); function listAllWhitelistedContractByClient(address _clientAddress) external view returns (address[] memory); } ``` 3. Navigate to the "Deploy & run Transactions" tab in Remix 4. Paste the Deposit Contract Address into the text box beside the "At Address" button & press the At Address button 5. You will find the instance for the Deposit Contract created, which you can use to interact with the contract features ### Essential Functions | Function | Purpose | Parameters | Returns | Notes | | --------------------------------------- | ------------------------------------------------------ | ------------------------------------------------------------------------------------------------------------------------------------------------------------------ | -------------- | ---------------------------------------------------------------------- | | **Contract Management** | | | | | | `addContractToWhitelist` | Whitelists your contract for requesting random numbers | `_contractAddress`: Contract address (not EOA) `_callbackGasPrice`: Max gas price for callbacks (≤ maxGasPrice) `_callbackGasLimit`: Max gas limit (≤ maxGasLimit) | - | Call after deploying your requester contract | | `removeContractFromWhitelist` | Removes contract from whitelist | `_contractAddress` Whitelisted contract address to remove | - | Use when contract no longer needed | | **Fund Management** | | | | | | `depositFundClient` | Deposits funds for callback transactions | None (payable function) | - | Must call before requesting random numbers. Keep balance above minimum | | `withdrawFundClient` | Withdraws funds from account | `_amount`: Amount to withdraw (≤ deposited balance) | - | Cannot exceed available balance | | **Gas Configuration** | | | | | | `updateMaxGasPrice` | Updates maximum gas price for callbacks | `_maxGasPrice` New max gas price (> 0) | - | Also updates minimum balance requirement | | `updateMaxGasLimit` | Updates maximum gas limit for contracts | `_maxGasLimit` New max gas limit (> 0) | - | Also updates minimum balance requirement | | `updateCallbackGasPrice` | Updates gas price for specific contract | `_contractAddress` Whitelisted contract `_callbackGasPrice`: New gas price (> 0) | - | Contract-specific setting | | `updateCallbackGasLimit` | Updates gas limit for specific contract | `_contractAddress` Whitelisted contract `_callbackGasLimit`: New gas limit (> 0) | - | Contract-specific setting | | **Balance Information** | | | | | | `checkClientFund` | Returns total available balance | `_clientAddress` Whitelisted wallet address (EOA only) | `uint128` | Your deposited funds | | `checkMinBalanceClient` | Returns minimum required balance | `_clientAddress` Whitelisted wallet address | `uint128` | Minimum balance threshold | | `isMinimumBalanceReached` | Checks if balance is at/below minimum | `_clientAddress` Whitelisted wallet address | `bool` | true if balance ≤ minimum, false otherwise | | **Contract Information** | | | | | | `countTotalWhitelistedContractByClient` | Returns number of whitelisted contracts | `_clientAddress` Whitelisted wallet address | `uint256` | Total contract count | | `listAllWhitelistedContractByClient` | Returns all whitelisted contract addresses | `_clientAddress` Whitelisted wallet address | `address[]` | Array of contract addresses | | `getSubscriptionInfoByClient` | Returns subscription details | `_clientAddress` Whitelisted wallet address | `uint64, bool` | Subscription end timestamp, SNAP program status | \ **Important Notes** - Supra runs monitoring scripts that will alert you when a fund refill is required - Your funds are used to pay transaction fees for VRF response callbacks - Always ensure your total balance remains well above the minimum requirement to avoid request failures - Contract addresses and EOA addresses serve different purposes - use the correct type for each function These functions provide comprehensive control over your Supra dVRF integration, allowing you to manage funds, monitor usage, and configure your setup according to your application's needs. ### Source: https://docs.supra.com/dvrf/build-third-party-evm-networks/migration-to-dvrf-3.0 # Migration to dVRF 3.0 on EVM (thirdparty) This page introduces the new features of Supra dVRF 3.0 and provides migration steps. Clients are encouraged to migrate at their convenience before the VRF 2.0 contracts are phased out soon. ## Why Migrate to dVRF 3.0? Moving to VRF 3.0 offers several key advantages over the previous version, especially for users focused on reliability, customization, and future-proofing their integration. dVRF 3.0 introduces major upgrades focused on reliability, configurability, and developer experience. Check all the New Features & Benefits introduced in dVRF 3.0 Below:
#### Request Retry Mechanism Failed callback transactions (due to insufficient gas) are automatically retried every 6 hours, for up to 48 hours. Greatly improves reliability without manual resubmission. #### Custom Callback Gas Settings Clients can now set: `callbackGasPrice` and `callbackGasLimit`. This gives full control over callback execution costs and helps adapt to varying network conditions. #### Request & Response Tracking Every client now has counters to track: Total RNG requests made, and total responses fulfilled. #### Self-whitelisting Clients can whitelist themselves, specifying "maxGasPrice" and "maxGasLimit" which acts as default values for their contracts. #### On-chain Request Validation A hash of request parameters is stored and validated during callbacks for data integrity: Includes nonce, caller, clientSeed, gas details, etc. It prevents tampering and enhances security. #### Upgradeable & Migration-Friendly Deposit Contract The Deposit contract is now upgradeable and backward-compatible with older versions. It supports seamless client migration, dynamic gas balance requirements, auto-whitelisting during migration. #### Dynamic Minimum Balance Enforcement "`minBalanceLimit`" for a client is calculated dynamically as follows: ```solidity uint128 minBalanceLimit = minRequests * _maxGasPrice * (_maxGasLimit + verificationGasValue); ``` #### Introduction of "supraMinimumPerTx" It is the gas used by '`generateRngCallback()`' for transaction initialization and calldata. If a transaction fails due to insufficient funds, "`supraMinimumPerTx`" is deducted from the client. #### Client removal `removeClientFromWhitelist(address _clientAddress, bool _forceRemove)` removes the client and their contracts. It transfers back the client fund if no pending requests exist or transfers the client fund to "`supraFund`" if pending requests exist and "`_forceRemove`" is true. ### Improved Reliability with Retry Mechanism If a random number callback fails due to insufficient gas funds, the RequestRetry mechanism caches it and retries every 6 hours (for up to 48 hours). This significantly reduces the chance of missed callbacks. ### Custom Gas Controls for Callback Transactions Users can now specify both callbackGasPrice and callbackGasLimit, giving more control over costs and ensuring successful delivery during network volatility. ### Enhanced Security & Integrity On-chain calldata hash verification prevents tampering and validates the request origin, seed, and other key parameters before fulfilling a callback. ### Dynamic Minimum Balance Enforcement Prevents underfunded requests by enforcing a minimum balance, calculated dynamically. ### Self-whitelisting Clients can whitelist themselves, specifying "maxGasPrice" and "maxGasLimit" which acts as default values for their contracts.
### Who Needs to Migrate? You need to migrate to VRF 3.0 if you are currently using VRF 2 and want access to VRF 3.0 features and improvements. ## Migration Guide ### Code for existing clients to Migrate Before migrating, the client must withdraw their existing funds from the old Deposit contract. The client must decide the following values: 1. `maxGasPrice` — the maximum callback gas price they are willing to pay 2. `maxGasLimit` — the maximum callback gas limit with which the callback transaction can get executed. The client can call getMinBalanceLimit(maxGasPrice, maxGasLimit) to compute their minimum balance required: ```solidity function getMinBalanceLimit(uint128 _maxGasPrice, uint128 _maxGasLimit) ``` external view returns `(uint128)`; **You can learn more about the `maxGasPrice` & `maxGasLimit` functions from** [Here](/dvrf/build-third-party-evm-networks/vrf-subscription-model#what-is-the-callback-gas-price). #### Interface to interact with the Deposit contract ```solidity interface IDeposit { function getMinBalanceLimit(uint128 maxGasPrice, uint128 maxGasLimit) external view returns (uint128); } contract MigrateToVRF3 { IDeposit public deposit; // The address of the Deposit contract (VRF 3.0) constructor(address _deposit) { deposit = IDeposit(_deposit); } /// @notice Get the minimum balance required. function checkMinRequiredBalance(uint128 maxGasPrice, uint128 maxGasLimit) external view returns (uint128) { return deposit.getMinBalanceLimit(maxGasPrice, maxGasLimit); } } ``` Clients need to call `"migrateClient(uint128 _maxGasPrice, uint128 _maxGasLimit) payable"`, specifying the max gas price, max gas limit for their contracts and sending along the ether to deposit. During the migration process, users must ensure their deposit amount is significantly higher than the minimum balance returned by the function: `deposit.getMinBalanceLimit(maxGasPrice, maxGasLimit)` The `Minimum Balance Limit` is the threshold below which the client can no longer issue new VRF requests. If the client's balance drops to or near this limit, VRF functionality will be blocked, potentially affecting operations or availability. They can only migrate before the end of migration time.\ `function migrateClient(uint128 _maxGasPrice, uint128 _maxGasLimit) external payable;` Please refer to **[THIS REPO](https://github.com/Entropy-Foundation/supra-vrf-examples/tree/master/supra_examples)** for Sample Contract with VRF3 Implementation. ## Self-whitelisting Guide
### Requirements: - You must not already be whitelisted. - `_maxGasPrice` and `_maxGasLimit` must be greater than 0. ### Clients can call the "`addClientToWhitelist`" function to whitelist themselves: ```solidity function addClientToWhitelist(uint128 _maxGasPrice, uint128 _maxGasLimit) external; ``` 1. Visit https://supra.com/data/dvrf 2. Select the network from the network list. 3. Click on “Create new subscription” button. 4. Enter the project name, email address, telegram handle, max gas price (in Gwei) and max gas limit. 5. Click “Create subscription”
### Whitelist Your Consumer Contracts The parameter this function takes is the User's contract address along with `callbackGasPrice` and `callbackGasLimit` for the contract which should be smaller than the `maxGasPrice` and `maxGasLimit` respectively. ```solidity addContractToWhitelist(address _contractAddress, uint128 _callbackGasPrice, uint128 _callbackGasLimit) ``` You can learn more about the `callbackGasPrice` and `callbackGasLimit` functions from [Here](/dvrf/build-third-party-evm-networks/vrf-subscription-model#what-is-the-callback-gas-price). ## Comparing dVRF 2 vs dVRF 3.0 | Feature | dVRF 2 | dVRF 3 | | --------------------------------- | ------------------------------ | --------------------------------------------------------------------------- | | Client Whitelisting | Manual only (admin-controlled) | Self-whitelisting with `maxGasPrice` and `maxGasLimit` | | Min Balance Calculation | Static or fixed value | Dynamically computed | | Upgradeable Contracts | Only Generator | Generator and Deposit | | Custom Gas Config for Callbacks | Not available | Configurable per client & contract (`callbackGasPrice`, `callbackGasLimit`) | | Fund Locking for Pending Requests | Funds always withdrawable | Funds locked if pending RNG requests exist | | Request Retry Mechanism | Not available | Failed callbacks retried for 48 hours | | Backward Compatibility | Not applicable | Supported via Generator and Deposit | | On-chain Calldata Hash Storage | Only validated on-chain | Stored and validated on-chain | ## Functions Introduced in dVRF 3 | Function Name | Contract | Utility | | ---------------------------------------------------------------------- | -------- | ---------------------------------------------------------------------------------------------------------------- | | `addClientToWhitelist(uint128, uint128)` | Deposit | Allows new clients to self-whitelist, specifying their max gas price and gas limit. | | `getMinBalanceLimit(uint128, uint128)` | Deposit | Returns the minimum balance required to maintain based on client’s gas settings. | | `addContractToWhitelist(address, uint128, uint128)` | Deposit | Allows whitelisted clients to add their contract while specifying the callback gas price and callback gas limit. | | `withdrawFundClient(uint128)` | Deposit | Allows whitelisted clients to withdraw their funds if they don’t have any pending requests. | | `getContractDetails(address) external view returns (uint128, uint128)` | Deposit | Returns callback gas price and callback gas limit of a whitelisted contract. | | `checkMinBalanceClient(address) public view returns (uint128)` | Deposit | Returns the minimum balance limit for a given client address. | | `checkMaxGasPriceClient(address) public view returns (uint128)` | Deposit | Returns the 'maxGasPrice' for a given client address. | | `checkMaxGasLimitClient(address) public view returns (uint128)` | Deposit | Returns the 'maxGasLimit' for a given client address. | | `updateMaxGasPrice(uint128)` | Deposit | Allows a whitelisted client to update their maxGasPrice, which impacts the minBalanceLimit. | | `updateMaxGasLimit(uint128)` | Deposit | Allows a whitelisted client to update their maxGasLimit, which affects the minBalanceLimit. | | `updateCallbackGasPrice(address, uint128)` | Deposit | Allows clients to set callbackGasPrice for specific contracts. | | `updateCallbackGasLimit(address, uint128)` | Deposit | Allows clients to set callbackGasLimit for specific contracts. | | `migrateClient(uint128, uint128)` | Deposit | Enables existing clients to migrate their subscription and settings from VRF 2 to VRF 3.0. | --- ## SupraNova (Bridge) ### Source: https://docs.supra.com/supranova # SupraNova Bridge - Bridging ETH to Supra ## Introduction SupraNova is a cross-chain communication framework developed by Supra. It enables the transfer of assets and messages across blockchains by integrating multiple bridging technologies under a unified architecture. #### SupraNova does not represent a single bridge protocol. Instead, it supports two different bridging technologies based on use cases: - [HyperNova](https://supra.com/documents/Supra-HyperNova-Whitepaper.pdf): A trustless bridge protocol that uses the source chain’s consensus layer for event verification using validator signatures. - [Hyperloop](https://supra.com/documents/Supra-Hyperloop-Whitepaper.pdf): A fast, multi-signature based game-theoretically secure bridge designed for source chains for which HyperNova style trustless bridging is not applicable or feasible or results in high latency (Layer 2 chains). By combining these models, SupraNova offers both trust-minimized and high-speed bridging capabilities that can be selected per deployment context. **Our first SupraNova release, focuses on bridging native ETH, wETH and USDC from Ethereum to the Supra blockchain, using HyperNova. Bridged ETH and wETH are minted on Supra as supETH (a wrapped token) using the FA token standard. Bridged USDC is minted on Supra as supUSDC (a wrapped token) using the FA token standard.** ### Source: https://docs.supra.com/supranova/bridging-flow # Bridging Flow This section explains how to use the SupraNova Bridge dApp to bridge ETH from Ethereum to supETH on Supra network, with each technical stage explained clearly. ## Connecting Your Wallets Before initiating a bridge transaction, you must connect two wallets: | Wallet | Purpose | | -------------------------- | ---------------------------------------- | | **MetaMask (Ethereum)** | Send ETH and sign the bridge transaction | | **Supra Wallet (StarKey)** | Receive `supETH` on Supra | **Getting Started:** - Open the SupraNova Bridge dApp. - Click "Connect Wallet" on the top right corner. - Approve the MetaMask pop-up to connect your Ethereum wallet. - Choose your Supra Wallet (StarKey Wallet) or manually enter a recipient address using the "Type Recipient Address" toggle. ![Connect Wallet](/images/supranova/bridge-flow-connect-wallet.png)
The toggle is notated as 1 and the existing wallet is notated as 2.
- The Supra Wallet is where your minted supETH will arrive after successful bridging. - Make sure the address is correct before proceeding. ## Initiating the Bridge Transaction After wallets are connected, follow these steps. Under the Bridge tab, **select:** - Source Chain: Ethereum - Destination Chain: Supra - Token: ETH → supETH - Enter the amount of ETH you wish to bridge. **Review:** 1. Estimated bridge time 2. Bridge fee breakdown (in ETH and $SUPRA) Click **"Confirm"** to proceed. ![Supra Bridge Service](/images/supranova/supra-bridge-service.png) **This action calls the HyperNovaCore smart contract on Ethereum, locking your ETH and emitting a LOGX event signaling a bridge request.** ## MetaMask Transaction Confirmation Upon clicking **"Confirm"**: - MetaMask prompts you to confirm the transaction. - Gas fees are shown (normal Ethereum fees apply). - Approve and confirm the transaction
![Bridge Transaction Request](/images/supranova/bridge-transaction-request.png)
## Event Capture and Proof Generation by Relayer After the bridge event is emitted, The Event Listener captures the bridge event from the ethereum chain and stores it in a message queue. The Relayer Driver then consumes the event, detects the bridge event from the Ethereum chain. It generates the following proofs: - **Sync Committee Proof** – Block signed by the Sync Committee - **Receipt Proof** – Proof that the transaction succeeded - **Ancestry Proof** (if the block lacks enough signatures) If required, Ancestry Proof connects the event's block to a more recent, heavily signed block. ### The Technical flow is as follows: **Ethereum Event → Relayer captures → Builds Proof Bundle → Prepares Submission to Supra** ## Proof Submission and On-Chain Verification Once proofs are generated: - The Relayer submits the proof bundle to Supra's HyperNovaCore verifier smart contract. - The verifier checks: - Validity of the block header signatures - Correctness of transaction existence and execution - Authenticity of the event data (right source, token, amount, recipient) If all checks pass, the verifier marks the bridge request as valid. ## Token Minting and Fund Receipt Upon successful verification: - The Token Bridge Service Contract is triggered. - Supra Wrapped ETH (supETH) is minted on Supra in a 1:1 ratio to the locked ETH. - The minted supETH is sent to your connected (or specified) Supra Wallet address. You can now: - View transaction history under Explorer > My Transactions. ![Bridge Transaction Detail](/images/supranova/bridge-transaction-detail.png)
## Transaction Lifecycle Summary | Stage | System Action | User Action | | ------------------ | --------------------------------------- | --------------------- | | Wallet Connection | Connect MetaMask and Supra Wallet | Click Connect Wallet | | Initiate Bridge | Lock ETH on Ethereum | Enter Amount, Confirm | | Event Emission | Emit bridge request log | Wait | | Relayer Proofs | Generate Sync, Receipt, Ancestry proofs | Wait | | Supra Verification | Validate proofs on-chain | Monitor Explorer | | Token Mint | Mint `supETH` to recipient wallet | Receive tokens | **During Bridging these are the in-built safeguards:** - **Incomplete Proofs: Bridge request remains pending until sufficient proofs arrive.** - **Relayer Failure: Another permissionless relayer can submit the proof.** - **Committee Key Rotation: If Sync Committee public keys expire, Committee Updater submits fresh keys to Supra automatically.** ### Source: https://docs.supra.com/supranova/hypernova-vs-hyperloop # Supra’s Interoperability Model (HyperNova vs HyperLoop) SupraNova integrates two types of bridging models depending on the destination chain and required trust assumptions: | Protocol | Use Case | Validation Model | | --------- | --------------------------------------------------------------- | ------------------------------------------------------------------------- | | HyperNova | Trustless bridging between major L1s (e.g., Ethereum to Supra). | Cryptographic proofs (Sync Committee signatures, Merkle proofs, Ancestry) | | HyperLoop | Fast bridging across Layer2 rollups or high-throughput chains. | Multi-signature validator committee with game-theoretic security | Both models are modular and selected based on use case. HyperNova is used where trust minimization and security are critical and on-chain cryptographic verification of source chain events are possible, while HyperLoop is optimized for speed and cost in environments where a middle network of bridge nodes that are proven to be game theoretically secure needs to be trusted. ### Source: https://docs.supra.com/supranova/standard-two-layer-approach # Standard Two-Layer Approach in SupraNova SupraNova organizes its bridging infrastructure into clearly separated functional layers, each responsible for a distinct part of the cross-chain communication process. - The Message Passing Layer handles only the detection and verification of external blockchain events. It is operated by the HyperNovaCore protocol, which validates Ethereum events using cryptographic proofs like receipt proofs, and ancestry proofs. This layer remains lightweight and strictly focused on trustless message verification. **In case of HyperNova protocol, the message passing layer validates source chain validator signatures and membership proofs.**
**In case of HyperLoop, the message passing layer validates the bridge validator signatures.**
- The Service Layer sits above the Message Layer and consumes validated messages to perform application-specific actions. The Token Bridge, responsible for minting wrapped assets (like supETH) on Supra, is an example of a Service Layer application. Future services could also be built independently at this layer without touching core validation logic. **Future services such as PoEL (Proof of Efficient Liquidity) may operate over the validated event flow but will be covered in their own documentation.** This separation enables innovation at the Service Layer while maintaining strong cryptographic guarantees at the Message Layer. Below you can find the architecture of Two- Layer Approach: ![Standard Two-Layer Approach diagram](/images/supranova/1.png) ### Source: https://docs.supra.com/supranova/workflow-of-hypernova-bridging # Workflow of Hypernova Bridging within SupraNova SupraNova uses the HyperNova trustless bridging protocol for bridging from Ethereum to Supra. For example at a high level, the bridging flow looks like this: **Ethereum Wallet → Lock ETH → Emit Event → Relayer → Proof Bundle → Supra Verifier → Mint supETH** ### The system consists of several coordinated components: #### **Ethereum Source Chain** - Bridge contracts in the Service layer like Token Bridging Component typically locks the asset, and the contracts in the message passing layer emits events containing the user bridge request details. - The Ethereum-side bridge component resides in the message layer, it emits verifiable events that capture user intent, but it does not execute any asset-related logic on its own. #### Off-Chain Relayer - A permissionless relayer listens for bridge events. - It constructs cryptographic proofs: a. Receipt Proof (that the transaction succeeded) b. Sync Committee Signature(that the block was finalized) c. Ancestry Proof #### **Supra Destination Chain** - The message is consumed by a service-layer smart contract (like the Token Bridge) that handles typically minting of wrapped tokens. - The relayer submits the proof bundle along with the bridge request event to the Service Contract (Token Bridge contract) on Supra. - The Token Bridge contract does not perform validation itself. Instead, it submits the request event and the proof bundle to the HyperNovaCore Verifier on Supra. If the proof is verified successfully, the control is returned to the service contract that proceeds with minting of the wrapped token. #### The HyperNovaCore checks: - That the block is correctly signed (using Ethereum’s Sync Committee) - That the event originates from the expected bridge contract - That the transaction receipt is valid Upon successful verification, the wrapped asset (like supETH) is minted for the user. #### Below you can see the bridge life cycle: ![HyperNova Bridging Workflow diagram](/images/supranova/2.png) ### Summary of Components | Component | Role | | -------------------------------- | --------------------------------------------------------------------------------------------------------- | | HyperNovaCore (Ethereum) | Emit event | | Token Bridge Contract (Ethereum) | Lock ETH | | Relayer | Generate proofs, submit to Supra | | HyperNovaCore Verifier (Supra) | Validate proofs on-chain | | Token Bridge Contract | Mint supETH to user | | Committee Updater | Publishes new Sync Committee public keys to HypernovaCore Verifier on Supra every \~27 hours (256 epoch). | ### Source: https://docs.supra.com/supranova/proof-validation-structure # Proof Validation Structure in HyperNova SupraNova uses HyperNova, a trustless bridge protocol that relies on Ethereum’s native secondary consensus layer to verify cross chain messages. This section explains the full proof pipeline, including how bridge events are validated securely and cryptographically before minting wrapped assets (like supETH) on Supra. ### Ethereum’s Consensus: Gasper and Sync Committee Ethereum transitioned to Proof-of-Stake with the Beacon Chain and introduced Gasper which is a combination of: - Casper FFG (Finality Gadget) – makes sure finalized checkpoints. - LMD-GHOST (Fork Choice Rule) – Decides which chain fork is the head. These two mechanisms define block finality and fork choice respectively in Ethereum’s Proof-of Stake [consensus](workflow-of-hypernova-bridging-within-supranova). Each block is signed by: - Participation of hundreds of thousands of validators. - Sync Committee signatures for lightweight validation. **Since, Sync committee is not signing every block, ancestry proofs are used to solve this.** ### Proof Pipeline in SupraNova When you bridge assets like ETH using SupraNova, the following proofs are generated by the Relayer: | Proof Type | Purpose | | ------------------------ | ------------------------------------------------------------------------------------------ | | Sync Committee Signature | Verifies the sync committee attestation of the block | | Receipt Proof | Verifies that the transaction successfully executed | | Ancestry Proof | Links the old block which have bridge event to the recent block with enough sync threshold | These proofs are generated off-chain by relayers and submitted to the Supra Token bridge service contract for on-chain verification. #### Importance of these proofs: - They are required to prove the execution, and authenticity of bridge events without relying on external validators. #### Sync Committee Signatures does the following: - Verifies that a majority of the Sync Committee signed the block header. - The Supra verifier contract aggregates public keys and validates the BLS signature. --- ### Minimum Signature Threshold SupraNova’s configuration can require more than 90% of Sync Committee signatures for extra security. This minimum signature requirement applies to the Sync Committee's aggregated BLS signature during proof validation. #### Receipt Proof - Verifies that the transaction execution resulted in a successful receipt. - Checks that the expected event (LOGX) was emitted by the correct bridge contract. - Check that the receipt contains the bridge event or not #### Ancestry Proof This always operates with two blocks. One is the target block (block with the event), other is the recent block (can be a finalised/safe/optimistic block) and link these blocks with ancestry proof. And then, verify the sync committee signature verification for the recent block It handles two types of ancestry proofs: | Proof Type | Used When | | -------------------------- | ------------------------------------------------------------------------------ | | Block Roots Ancestry Proof | If the Targent block is within 8192 recent slots (\~27 hours) | | Historical Summaries Proof | If the block is older than 8192 slots(archived in historical_summaries vector) | #### Ancestry proofs use: - Ethereum’s `block_roots` array for recent event blocks - Ethereum’s `historical_summaries` for older event blocks --- ### Fallback The relayer generates an Ancestry proof using Ethereum’s state vectors, which is then verified by the HyperNovaCore contract on Supra. #### Handling Edge Cases | Scenario | Handling logic (Component + Action) | | ---------------------------------------------- | -------------------------------------------------- | | Block has < required Sync Committee signatures | We always generate Ancestry Proof | | Sync Committee rotates | Committee Updater refreshes keys on Supra | | Proof is invalid or tampered | Supra on-chain verifier rejects the bridge request | ### Source: https://docs.supra.com/supranova/ethereum-to-supra-security # Ethereum to Supra Security SupraNova is designed not just for operational efficiency, but also for deep, protocol-level security through its modular components like HyperNovaCore, Relayers, and Committee Updates. It actively addresses several major risk factors that traditional bridges often fail to solve. Each component plays a distinct role in minimizing attack surface, validating cryptographic proofs, and to maintain liveness under adversarial conditions. ### Long-Range Attack Risks A potential vulnerability in trustless bridges using the Sync Committee model is the possibility of a long-range attack: - A malicious Sync Committee could collude to forge signatures on a fake block. - If unchecked, this could allow them to fool external chains like Supra into believing invalid transactions are real. #### Protocol Response: - SupraNova requires more than 90% of Sync Committee members to sign a block for it to be considered valid. - Even if signatures are forged, the fork would not be accepted unless justified by Ethereum’s fork choice rule(LMD-Ghost). - The probability of randomly selecting a colluding majority is astronomically low (studied by [Succinct](https://www.gnosis.io/blog/succincts-ethereum-zk-light-client-and-the-road-to-trust-minimzed-bridges-with-hashi), Snowfork, [T3rn](https://www.t3rn.io/blog/exploring-eths-altair-light-client-protocol-t3rns-vision), etc.). - Even if a malicious Sync Committee existed, they could not fork Ethereum itself , only mislead a bridge verifier if the bridge does not validate correctly. - HyperNovaCore on-chain verifier checks proof authenticity and threshold participation before accepting any event. #### Security Insight: - **Ethereum’s primary consensus remains intact even if a Sync Committee misbehaves.** - **SupraNova’s HyperNovaCore piggybacks on Ethereum’s finality guarantees by verifying Sync Committee signatures and ancestry root on-chain.** ### Summary of Security Layers | Threat | Mitigation Mechanism | | ------------------------- | ------------------------------------------------- | | Long-range attacks | High signature threshold (>90% required) | | Missing signatures | Ancestry Proofs fallback | | Malicious relayers | On-chain proof validation rejects bad submissions | | Stale Sync Committee Keys | Permissionless Committee Updater mechanism | ### Source: https://docs.supra.com/supranova/fee-structure # Fee Structure in SupraNova SupraNova’s fee model is designed to sustain a permissionless, decentralized bridging ecosystem while incentivizing critical actors like relayers and committee updaters. ![Fee Structure diagram](/images/supranova/3.png) ## Fee Overview and Responsibilities SupraNova applies two levels of fees internally but simplifies the user experience by exposing only the **Service Layer Fee** during transaction confirmation. ### **Verification Fee** An internal fee that compensates **Committee Updaters** for: - Proof generation - Signature validation - Validator public key updates **Paid by:** Service Layer (not the user directly) -------------- | ----------------------------------------------------------------------- | ------------------------ | | Verification Fee | Covers cryptographic proof verification on Supra | Funded from service fee. | | Service Layer Fee | Specific to the token bridge service, customizable by service providers | Paid by bridging users | --- ### Message Passing Layer Fee This fee is charged for: - Verifying Sync Committee proofs - Verifying ancestry and receipt proofs - Managing public key updates (Committee Updater work) - Safe validators committee handovers through public key updates. #### **Who Charges It?** - The HyperNovaCore verifier contract charges this fee internally. Service-contracts calling the message-passing layer for validation pay this fee as part of the process. --- ### Service Layer Fee (Token Bridge Specific) This fee is charged by service-specific components like the Token Bridge and includes: - Operational Service costs. - Relayer rewards. #### **Who Sets It?** - The Token Bridge smart contract service owner (typically the protocol team). #### **How is it Collected?** - A small cut is deducted from the bridged amount (in bridged assets like supETH or supUSDC) at the time of minting. **The entire bridging fee is borne by the bridging users.** #### **What Does It Fund?** - Relayer incentives - Operational treasury buildup --- ## Fee Breakdown Example During a Bridge Transaction **Suppose you are bridging 1 ETH:** | Fee Component | Example | | --------------------------------- | -------------------------------------- | | Message Passing Verification Fee | 0.001 $SUPRA equivalent | | Service Layer Fee (token bridge) | 0.1% of bridged amount | | Relayer Reward (from service fee) | Paid after periodic treasury disbursal | | Committee Updater Reward | Paid after periodic treasury disbursal | - The net amount minted as supETH will be slightly less than 1 ETH after fees. - All fees are transparent and visible during the bridge confirmation step. --- ## Incentivizing Liveness Both relayers and committee updaters are permissionless roles that ensure network liveness and decentralization. They are incentivized through fee rewards: | Actor | Task | Incentive Source | | ---------------- | --------------------------------- | -------------------------------------- | | Relayer | Submit proof bundles | Treasury payouts via Service Layer Fee | | CommitteeUpdater | Update Sync Committee public keys | Payouts via Verification Fee | Without sufficient rewards: - Relayers may delay proof submissions - Committee updates may lapse, compromising security SupraNova’s modular fee and reward system ensures both roles remain sustainably incentivized. **Testnet Fee Settings** - Some fees (especially the Verification Fee) are reduced or set to zero for testing purposes. - The full fee model will be enforced at Mainnet launch. --- ## Fee Model for our Ethereum to Supra Bridge protocol This protocol involves a **Token Bridge Service** and a **Message Passing Layer**. The model details various fees and rewards, including: - **Service Fee (S)** - **Relayer Rewards (RR)** - **Committee Updater Rewards (CUR)** - **Relayer Expense (RG)** - **Committee Updater Expense (CUG)** - **Verification Fee (V)** ### Key points of the model: - Users pay a **Service Fee (S)** and **gas costs** when initiating a bridge request. - **Relayers** are compensated with **Relayer Rewards (RR)** that cover their expenses (**RG**). - **Committee Updaters (CU)** are rewarded (**CUR**) for updating Ethereum sync committee public keys to Supra, covering their expenses (**CUG**). - **RG** and **CUG** are treated as constants determined by the Admin. ### Fee Derivation Formulas Given traffic estimate `X`, and gross margins `SM`, `VM`, `CUM`, `RM`: - `CUR = CUG / (1 - CUM)` - `V = (CUR / X) / (1 - VM)` - `RR = (V + RG) / (1 - RM)` - `S = RR / (1 - SM)` ### Tiered Service Fee Structure To accommodate varying bridge volumes, SupraNova introduces a **tiered service fee model** based on the **value bridged in USDT**: | Tier | Bridged Value Range | Service Fee Rate | | -------- | ------------------- | ---------------- | | Micro | < $5,000 | 0.5% | | Standard | $5,000 – $100,000 | 0.3% | | Whale | > $100,000 | 0.2% | --- ## SupraNova Address Details | Network Name | Hypernova | Token Bridge | | ---------------- | ------------------------------------------------------------------ | ------------------------------------------------------------------ | | Ethereum Sepolia | 0x50888Fc24e1224E12f5C8a31310A47B98b2A7f75 | 0x71eb89D6D0d6ED44526dd8EAcb956735934eC2d5 | | Supra Testnet | 0x3ab1136a5dbb76b923d2b02f95b042f5d80b70218a0395755eafb63d4eefc340 | 0x76b38ad503118cb7749a835d965b023a2fe4801dba736bfa66e18d1f0339695c | | Ethereum Mainnet | 0xEF7238503Fdd7671d85F3Cc5e4B9d7D90e99bFF1 | 0x7cECd42A15A691EF693512b1D508F1465ec5DA16 | | Supra Mainnet | 0xda20f7d0ec813c751926f06004a10bc6ee1eefc96798f6a1aa31447ee146f932 | 0xda20f7d0ec813c751926f06004a10bc6ee1eefc96798f6a1aa31447ee146f932 | --- ## Asset Details #### Testnet | Asset Name | Ethereum (Lock) | Asset Name | Supra (Mint) | | ---------- | ------------------------------------------ | ---------- | ------------------------------------------------------------------ | | WETH | 0xfFf9976782d46CC05630D1f6eBAb18b2324d6B14 | supETH | 0x1a57888bfcd31ef82a8e3dac93db14335b36f9228d5f050b722151ae2a77153a | | USDC | 0x1c7D4B196Cb0C7B01d743Fbc6116a902379C7238 | supUSDC | 0x3ca17a5b04d826f9be112c319e003b3a79b2682c40613876023758dbb0d03e96 | | USDT | 0xaA8E23Fb1079EA71e0a56F48a2aA51851D8433D0 | supUSDT | 0x2946e0f1a942ab8eb6f763f19da3d7540609aba8b00fb54e680cac5e048f8d0 | | SolvBTC | 0xE33109766662932a26d978123383ff9E7bdeF346 | supSolvBTC | 0x420c8751a043b5b216cf02a011b0d563f3638eb082f91f0d879254e388f2b53a | | WBTC | 0x29f2D40B0605204364af54EC677bD022dA425d03 | supBTC | 0x7ca33bcce4f4bb7904ac7b46e3613b6b62dae55cc89923706aac1ad1c244e3e6 | #### Mainnet | Asset Name | Ethereum (Lock) | Asset Name | Supra (Mint) | | ---------- | ------------------------------------------ | ---------- | ------------------------------------------------------------------ | | WETH | 0xC02aaA39b223FE8D0A0e5C4F27eAD9083C756Cc2 | supETH | 0xe4af154ade9551e7f58a23b8f727ae2dca050f1b74582bb518ba361c889d246d | | USDC | 0xA0b86991c6218b36c1d19D4a2e9Eb0cE3606eB48 | supUSDC | 0xf90b4b9d4a9d87c39fb3140513e52edc3ead5eaddcb9881b02becdeb63c5793d | | USDT | 0xdAC17F958D2ee523a2206206994597C13D831ec7 | supUSDT | 0x7b6463ca7a54ee37e113c8333db9c0af49de39555ee1cb44837db4c085f8964 | | SolvBTC | 0x7A56E1C57C7475CCf742a1832B028F0456652F97 | supSolvBTC | 0x224bee573e0ae84ba7f1eee4f7063a945ad7a268bea7ab9e004f6890177a480b | | WBTC | 0x2260fac5e5542a773aa44fbcfedf7c193bc2c599 | supBTC | 0x348b1a4fa68803cbda3b50326a90e59b21e80c3ced93588b20950b5c0697a67e | --- ## Asset Transaction Limit #### Mainnet | Asset Name | Max Global Limit | Per Transaction Limit | | ---------- | ------------------------------- | -------------------------------- | | ETH | 23000000000000000000 (23 ETH) | 4500000000000000000 (4.5 ETH) | | USDC | 100000000000 (100K USDC) | 20000000000 (20K USDC) | | USDT | 100000000000 (100K USDT) | 20000000000 (20K USDT) | | SolvBTC | 1000000000000000000 (1 solvBTC) | 200000000000000000 (0.2 solvBTC) | | WBTC | 100000000 (1 wBTC) | 20000000 (0.2 wBTC) | ### ### Source: https://docs.supra.com/supranova/modular-relayer-architecture # Modular Relayer Architecture SupraNova’s architecture relies on a relayer framework built using a modular design that separates concerns for better scalability and resilience. ![Modular Relayer Architecture diagram](/images/supranova/4.png) 1. **Event Listener:** - Monitors Ethereum for HyperNovaCore bridge events. - Pushes detected events into a secure message queue. 2. **Relayer Driver:** - Consumes events from the queue, builds full proof bundles, including receipt proofs, ancestry proofs and Sync Committee signatures. - Packages the proof bundle into a transaction and submits it to the Supra HyperNovaCore verifier contract. 3. **Committee Updater:** - Independently monitors Ethereum to update the active Sync Committee public keys on Supra every \~27 hours. This Modular flow allows any actor to permissionlessly run relayers, increasing redundancy and system liveness. ### Relayer Architecture The Relayer is a permissionless component made up of three modular subsystems: | Component | Responsibility | | -------------- | ----------------------------------------------------------------------------------------------------------------------------------------------------- | | Event Listener | Listens to Ethereum for bridge events (LOGX) emitted by HyperNovaCore | | Relayer Driver | Picks up the event from a queue, generates proofs (receipt, ancestry) using Prover module and submits them to Supra’s HyperNovaCore verifier contract | | Prover Module | Generates the Ancestry and Receipt proofs and returns to Relayer | #### Event Listener - Connects to an Ethereum node. - Subscribes to bridge-related event logs (filtered by contract address and event topics). - On event detection, publish it to a message queue. #### Relayer Driver - Consumes events from the message queue. - Uses the Ethereum fullnode RPC APIs to: 1. Fetch block headers 2. Fetch full transaction and receipt data **Then it constructs a proof bundle which includes:** 1. Sync Committee signature aggregate 2. Receipt inclusion proof 3. Ancestry Proof #### Transaction Sender - Builds a bridge request transaction. - Attaches the full proof bundle as calldata. - Submits the transaction to Supra’s HyperNovaCore verifier smart contract. **If verification succeeds, the corresponding service layer (e.g., Token Bridge) is triggered to mint assets.** --- ### Committee Updater Architecture The Committee Updater makes sure that SupraNova can always validate Ethereum blocks based on the latest Sync Committee. #### Every 27 hours (approximately 8192 slots): - Ethereum’s Beacon Chain rotates its Sync Committee members. - Their aggregate public key and 512 public keys set must be updated on Supra. #### **Tasks of the Committee Updater:** - Monitor Ethereum’s finalized epochs. - When a new Sync Committee becomes active: 1. Fetch the new sync committee public keys. 2. Submit an on-chain transaction to update Supra’s trusted keys inside HyperNovaCore. **Make sure that relayer proofs referencing new epochs can be validated correctly.** --- ### Rewards and Incentives | Actor | Incentive Source | Reward Type | | ----------------- | ---------------- | --------------------------------------------- | | Relayer | Service Fee | Paid periodically from treasury | | Committee Updater | Verification Fee | Paid directly during user bridge transactions | **Without these actors:** - No proof would be submitted. - No committee keys would update. - Bridge verification would halt. SupraNova keeps liveness and decentralization by rewarding these permissionless participants --- ### Failure Handling | Failure | System Behavior | | -------------------------------------- | ------------------------------------------------------------------------------------- | | Relayer fails to submit proofs | Another relayer can pick up the event and submit | | Committee Updater fails to update keys | Bridge verification pauses for new blocks; liveness resumes once updater submits keys | **Thus, the system is resilient and non-reliant on any single actor.** ### Source: https://docs.supra.com/supranova/token-bridge-smart-contract-interface # Token Bridge Smart Contract Interface SupraNova’s Token Bridge contract is a service layer contract integrated within Supranova. It exposes key functions that allow users and developers to interact with the bridge directly. The functions are as follows: - `sendNative()`: Locks native ETH on Ethereum and emits a bridge event for Supra to process. - `sendTokens(address tokenAddress, uint256 amount)`: Locks an approved ERC20 token for cross-chain bridging. - `calculateTokenBridgeFee(address token, uint256 amount)`: Returns the service fee applicable for a given asset and amount. - `isRegistered(address tokenAddress)`: Checks if a token is approved for bridging. - `isChainIdRegistered(uint256 chainId)`: Checks if a destination chain is supported. These methods provide a flexible, decentralized interface for both end-users and cross-chain applications interacting with SupraNova. ### Source: https://docs.supra.com/supranova/token-bridging-model-lock-mint # Token Bridging Model - Lock-Mint SupraNova’s initial asset bridging uses the Lock-Mint model, a secure method that preserves the total supply of assets across chains while ensuring collateralization. ## What is the Lock-Mint Bridging Model? **In a Lock-Mint model:** - The asset on the source chain (Ethereum) is locked securely in a vault contract. - A wrapped equivalent token is minted on the destination chain (Supra). There is no destruction, burning, or movement of tokens between chains. **Instead**: - Original tokens remain locked. - Wrapped tokens represent a claim on the locked original. - The minting only occurs after proof verification by HyperNovaCore on Supra. ### How Lock-Mint Works in SupraNova ###### User initiates a bridge request locking ETH into HyperNovaCore (Ethereum) ###### Relayer submits proofs verifying the lock event ###### Supra’s HyperNovaCore verifier validates the proofs ###### The Token Bridge Service Contract mints equivalent wrapped asset, supETH on Supra to the recipient address **Example Flow** - You bridge 5 ETH from Ethereum. - SupraNova locks exactly 5 ETH in the Ethereum bridge vault. - After proof validation, Supra mints the equivalent amount of supETH to your wallet, minus any applicable service fee. **In the current testnet release, fee deductions may be waived or minimal.** #### **Collateral Status:** - ETH remains locked securely in Ethereum contracts. - supETH is fully backed 1:1 by real ETH. #### Security Guarantees - **No Double Spending:** Because ETH remains immobile once locked. - **Full Collateralization:** supETH minted on Supra cannot exceed ETH locked on Ethereum. - **Proof-Driven Minting:** No minting happens without complete proof validation across transaction, receipt, and consensus. ### Why is Lock-Mint chosen? SupraNova chose Lock-Mint because: - It is simple and verifiable. - It aligns perfectly with Supra’s trustless, proof-based validation model. - It avoids complexities like token burns, which are harder to verify without replay attacks or external watchdogs. ### Supported Asset in Initial Release | Source Token | Destination Token | Model | | --------------------------- | --------------------------- | --------- | | ETH (Ethereum native asset) | supETH (Supra FA standard) | Lock-Mint | | USDC | supUSDC (Supra FA standard) | Lock-Mint | **You cannot unlock ETH or USDC back to Ethereum yet in this release.** **Supra → Ethereum (burn-unlock model) will be added in a future HyperNova reverse bridge upgrade.** ### Future Transfer Models SupraNova currently uses a Lock-Mint bridging model where original assets are locked on the source chain and mirrored on Supra through minting. In future versions, the bridge will also support: - **Burn-Release**: Users will burn wrapped tokens on Supra, which will trigger the release of locked assets back to the source chain. - **Burn-Mint**: Burning wrapped assets on Supra to mint another representation on a different destination chain. **These additional modes will allow Supra to offer both one-way and bi-directional bridging based on user needs and liquidity dynamics.** ### Source: https://docs.supra.com/supranova/supranova-bridge-admin-functionalities # SupraNova Bridge Admin Functionalities ## Overview To ensure robust governance, security, and operational control, SupraNova employs a multi-signature (MultiSig) administration model. This model distributes administrative privileges across three distinct MultiSig entities, each with defined membership, thresholds, and scoped functionalities. Administrative actions are executed via on-chain transactions, leveraging MultiSig wallets to enforce consensus-based approvals. This documentation details the composition, thresholds, and capabilities of each admin entity for the SupraNova bridge. #### Key Principles - All MultiSig actions require a quorum threshold to prevent single-points of failure. - MultiSig quorum fall-back features are temporary and will be deprecated via governance over time.. ## Admin Entities #### 1. Supra Foundation MultiSig Admin on Ethereum **Composition:** A 15-member committee comprising core members of the Supra Ecosystem. **Threshold:** 9 out of 15 signatures are required to execute any admin function. **Administrative Capabilities:** - **Delegate Admin Capabilities:** Transfer delegation of these admin privileges to another MultiSig wallet address. This allows for future governance evolution without redeploying contracts. - **Pause Vault Contract:** Temporarily halt the Ethereum Token Bridge Vault contract, effectively pausing all token bridging operations originating from Ethereum users. This serves as a global emergency stop for bridge inflows. - **Set Transfer and Vault Caps:** Configure per-transfer amount limits and total vault capacity limits per token. This mitigates risk from large-scale exploits or imbalances by enforcing economic bounds on bridged assets. - **Emergency Withdrawal (Temporary Feature):** Exclusive to the current unidirectional Ethereum-to-Supra bridge phase. Enables the withdrawal of locked funds from the Ethereum Token Bridge Vault in crisis scenarios. - **Process:** Requires two sequential transactions: 1. **Request Transaction:** Initiates the withdrawal request. 2. **Execution Transaction:** Performs the actual fund withdrawal from the Vault. - **Safeguard:** The execution transaction must be submitted at least 1 hour after the request to allow for community review and intervention. - **Deprecation Note:** This capability will be removed upon activation of the reverse (Supra-to-Ethereum) bridge. #### 2. Operating MultiSig Admin on Ethereum **Composition:** A 5-member committee consisting of core cross-chain team members from Supra. **Threshold:** 3 out of 5 signatures required to execute any admin function. **Administrative Capabilities:** - **Transfer Admin Privileges:** Delegate or transfer these operational admin privileges to another MultiSig wallet address, enabling seamless team transitions or expansions. - **Pause/Resume Bridge Operations:** - Pause or resume the cross-chain message passing (CCM) feature. - Pause or resume the Token Bridge smart contracts on Ethereum. This provides granular control over bridge activity without affecting the entire system. - **Update Configuration Parameters:** Modify bridge-specific settings, such as transaction fees, to adapt to network conditions or economic models. - **Smart Contract Upgrades:** Perform upgrades to the Token Bridge and Cross-Chain Message Passing (CCM) smart contracts on Ethereum. Upgrades follow a proxy pattern for minimal disruption. - **Link to Oracle Price Feeds:** Integrate or update links to oracle-provided price feed contracts on Ethereum, ensuring accurate asset valuations for bridging operations. **Cross-Admin Requirement:** Registration of new tokens on the Ethereum side requires joint approval from both the Supra Foundation MultiSig Admin on Ethereum and the Operating MultiSig Admin on Ethereum. #### 3. Supra Foundation MultiSig Admin on the Supra Blockchain **Composition:** A 16-member committee comprising core members of the Supra team. **Threshold:** 9 out of 16 signatures required to execute any admin function. **Administrative Capabilities:** - **Delegate Admin Capabilities:** Transfer delegation of these admin privileges to another MultiSig wallet address on the Supra blockchain. - **Module Upgrades:** Upgrade Supra modules related to cross-chain message passing (CCM) and token bridging functionalities. This includes governance-approved code updates via the Supra runtime. - **Deploy New Wrapped Tokens:** Deploy smart contracts for new wrapped token representations on Supra, enabling support for additional assets in the bridge ecosystem. - **Minting Authority:** Grant minting capabilities to the Token Bridge Module, allowing controlled issuance of wrapped tokens upon successful bridge transfers from Ethereum. **Cross-Admin Dependencies:** - **Message Passing Verification Fee Modification:** Adjustments to fees for verifying cross-chain messages require concurrent approval from: - Supra Foundation MultiSig Admin on Ethereum. - Supra Foundation MultiSig Admin on Supra. This ensures balanced incentives across chains. #### Security and Best Practices: - **Threshold Design:** MultiSig thresholds (e.g., 9/16, 3/5) balance accessibility with security, requiring supermajority consensus. - **Audit and Monitoring:** All admin transactions are publicly verifiable on-chain. - **Recovery Mechanisms:** Delegation functions allow for key rotations or recoveries without halting operations. - **Temporary Features:** Emergency withdrawal is audited for removal upon reverse bridge deployment, estimated in Q4 2025. In short, SupraNova begins to be run by more decentralized operators, towards full L1 security. ### Source: https://docs.supra.com/supranova/future-roadmap # Future Roadmap SupraNova’s architecture is designed to evolve beyond one-way bridging into a fully decentralized cross-chain communication framework. ### **Upcoming releases:** #### Reverse Bridge (Burn-Release) Users will be able to burn wrapped tokens on Supra (e.g., wETH) to release locked native assets (e.g., ETH) from the source chain. This enables bi-directional bridging. *** #### PoEL (Proof of Efficient Liquidity) - Service Layer Future releases may include service modules such as PoEL, enabling: * Staking across chains * Ownership validation * Governance participation **PoEL will be documented separately and is not part of the current bridge release.** *** #### Multi-Chain Bridging Support The HyperNova protocol will expand to support additional EVM chains. Each will be integrated based on light client feasibility, validator model, and consensus compatibility. *** #### HyperLoop Integration for Fast L2 Transfers For chains where full consensus proofs are unnecessary (e.g., L2 rollups), SupraNova will offer HyperLoop, a fast multisig-based bridging solution with rotating validator sets and game-theoretic safety. --- ## iAssets (Proof of Efficient Liquidity) ### Source: https://docs.supra.com/proof-of-efficient-liquidity-poel # Overview Supra has developed the Multi-Asset Liquid Staking framework, which implements the Proof of Efficient Liquidity (PoEL) protocol. Within the Supra ecosystem, the protocol has three objectives: (a) bootstrap Supra DeFi by attracting assets and liquidity from external ecosystems to Supra; (b) serve as a liquidity-attraction program for Dynamic Function Market Maker (DFMM), and (c) strengthen the economic security of the Supra blockchain. This mechanism is designed to deliver on these objectives. The framework is the first phase of a broader architecture: once DFMM is live, the framework’s liquidity pools will serve as LP pools for DFMM. ## What is PoEL? PoEL solves the circular dependency problem in DeFi: applications need liquidity to attract users, but users need attractive returns to provide liquidity. PoEL addresses LP challenges through: - **Dual Income Streams** for liquidity providers - **Dynamic Risk Management** with automated collateralization - **Network Security Enhances** through diversified staking - **Capital Efficiency optimization** using the same assets for multiple purposes

### Source: https://docs.supra.com/proof-of-efficient-liquidity-poel/overview # Overview Supra has developed the Multi-Asset Liquid Staking framework, which implements the Proof of Efficient Liquidity (PoEL) protocol. Within the Supra ecosystem, the protocol has three objectives: (a) bootstrap Supra DeFi by attracting assets and liquidity from external ecosystems to Supra; (b) serve as a liquidity-attraction program for Dynamic Function Market Maker (DFMM), and (c) strengthen the economic security of the Supra blockchain. This mechanism is designed to deliver on these objectives. The framework is the first phase of a broader architecture: once DFMM is live, the framework’s liquidity pools will serve as LP pools for DFMM. ## What is PoEL? PoEL solves the circular dependency problem in DeFi: applications need liquidity to attract users, but users need attractive returns to provide liquidity. PoEL addresses LP challenges through: - **Dual Income Streams** for liquidity providers - **Dynamic Risk Management** with automated collateralization - **Network Security Enhances** through diversified staking - **Capital Efficiency optimization** using the same assets for multiple purposes

### Source: https://docs.supra.com/proof-of-efficient-liquidity-poel/workflow # Workflow The application logic is built on two main components: - The lending and delegation flow, which handles all token-delegation processes. - The reward distribution logic. ### Lending and Delegation Flow The lending and delegation flow lends assets from the PoEL vault to users based on the collateral they have deposited in the IntraLayer vaults, and directly delegates the borrowed $SUPRA to the system’s delegation pools. Throughout this process, the system maintains accounting to ensure the delegated amount is periodically updated according to changes in the amount and price of assets deposited in the IntraLayer vaults. It also tracks lifecycle updates of the delegated amount and performs other operations to act as an equitable delegating agent on behalf of the user. ### Reward Distribution Logic The reward allocation logic first calculates the total staking rewards earned by the user of PoEL. It then allocates these rewards across iAssets based on the amount of the underlying asset deposited as collateral and asset-specific characteristics (e.g., desirability score, price, collateralization rate). Finally, each iAsset holder’s rewards are determined by the quantity of iAssets they hold and the duration for which they have held them in their account. ### Workflow To provide a high-level understanding of the flow, we provide an illustrative example of an end-to-end process for depositing ETH and minting iETH. ![Workflow Diagram](/images/workflow-diagram.png) ###### Depositing ETH: Users deposit ETH into the Supra’s IntraLayer Vault on Ethereum ###### Cross-chain Relay: The SupraNova cross-chain bridge relays deposit events to PoEL modules on Supra. ###### Minting iETH (IntraLayer ETH): Users can mint iETH (IntraLayer ETH) on the Supra blockchain through a two-step process: 1. First, the system pre-mints iAssets to the user’s account. 2. After two epochs, the user finalises the mint, and the iETH is credited to their account. Minting may also be performed by backend automation, but it is ultimately the user’s responsibility to mint their iAssets to start earning rewards. ###### Collateral Management: In the background, PoEL uses the deposited ETH as collateral to lend $SUPRA and delegate it across multiple delegation pools in Supra’s Proof-of-Stake system, acting as a delegator on behalf of the user. - The delegated amount depends on ETH’s oracle price and collateralization rate. - If ETH’s value rises relative to $SUPRA, PoEL increases delegation; if it falls, PoEL reduces delegation. This ensures PoEL’s total delegated $SUPRA reflects the (nominal) collateral value held in the IntraLayer Vaults. ###### Staking Rewards: By securing the network, PoEL generates staking rewards in $SUPRA, 1. iETH holders can withdraw rewards proportional to their balance and holding duration. 2. Reward claim rights automatically transfer with iETH ownership. 3. Withdrawals follow three steps: - `update_rewards` (allocate accrued rewards), to allocate accrued rewards to the user - `claim_rewards` (submit intent), to submit an intent to withdraw the allocated rewards. - `withdraw_rewards` (available after the lockup cycle), to complete withdrawal after the lockup cycle. ###### iETH Deployment: Once received, iETH can be freely used, including in third-party DeFi liquidity pools. The system incentivises users to deploy their iAssets to Supra's DeFi ecosystem, where active participation such as providing liquidity contributes to overall capital efficiency. ###### (Coming Soon) ETH Redemption: After SupraNova reverse bridge becomes available(that can relay messages from Supra to Ethereum), users will be able to redeem iETH to withdraw the corresponding ETH from the IntraLayer Vault. Overall, redemption is a two-step process: 1. Redemption request: The user submits a request, and the corresponding iETH is burned to signal withdrawal intent. 2. Redemption: After the lockup cycle, PoEL withdraws tokens from delegation pools to maintain collateral alignment. Users can then withdraw: SupraNova relays the redemption order to the IntraLayer Vault, which transfers the underlying asset to the user’s address. Until the reverse bridge is available, the system operates one-way: users can deposit into the IntraLayer Vault and receive iAssets now, redemption back to the underlying asset will be enabled after reverse bridging is supported. ### Source: https://docs.supra.com/proof-of-efficient-liquidity-poel/key-concepts # Key Concepts --- ## iAsset Lifecycle & Delegation ![iAsset Lifecycle & Delegation](/images/proof-of-efficient-liquidity-poel/key-concept/iasset-lifecycle.png) The lifecycle of assets supplied as liquidity to create iAssets is as follows: upon deposit, users are credited with pre-minted iAssets that are not yet transferable. At regular intervals, the supplied assets are locked as collateral to borrow $SUPRA, which is then delegated to Supra delegation pools, at this point, the assets are officially registered as collateral. After delegation, a mandatory holding period applies before users can finalize the mint. Once it ends, users can mint their pre-minted iAssets, fully activating them as live iAssets. The histogram above shows how balances transition across these stages for a representative iAsset. ## Deposit Limits ![Deposit Limits](/images/proof-of-efficient-liquidity-poel/key-concept/deposit-limits.png) The system can enforce per-asset deposit limits in the vault to safeguard fiscal sustainability, diversify available liquidity, and match inflows with operational capacity and policy requirements. Any deposit attempt that breaches these limits will fail, and the vault will not accept the request. ## iAssets iAssets are reward-bearing tokens native to the Supra chain, functioning as vouchers that represent user ownership in IntraLayer vaults. The term “iAsset” is derived from IntraLayer Asset, holding which brings two primary sources of yield. Users earn staking rewards from $SUPRA borrowed against their collateralized deposits and delegated to validator pools. They can then deploy iAssets as liquidity across Supra DeFi to earn additional protocol fees on top of staking rewards. Over time, as DFMM and other initiatives launch, and IntraLayer Vaults evolve into liquidity pools, iAsset holders may also earn AMM trading fees, followed by yield from actively managed strategies. Consequently, iAssets become multi-yield assets, aligning incentives among validators, liquidity participants, and Supra-based DeFi use cases. ## Pre-minted iAssets #### Step 1: Pre-minting - Upon deposit, the asset is pre-minted to the user’s account. - A pre-minted iAsset represents the user’s right to mint at a later time. - Pre-minted iAssets do not accrue rewards. #### Step 2: Final Minting - After a waiting period of two epochs, the user can finalize the mint. - Once fully minted, iAssets begin generating rewards. - Users must complete this step to start earning. ## Delegation Per Pool Analytics ![Delegation per Pool](/images/proof-of-efficient-liquidity-poel/key-concept/delegation-per-pool.png) The PoEL system delegates assets to delegation pools that are whitelisted for use. PoEL effectively acts as the delegator, and the design targets a relatively even stake distribution across pools. Within each pool, delegated tokens move through lifecycle states, the diagram above shows three states per delegation pool for $SUPRA delegated by PoEL. **Active** - Assets are submitted and begin earning rewards in the delegation pool. Rewards generated by the borrowed $SUPRA that is delegated and in the active state are distributed to iAsset holders. **Pending Inactive** - After the borrowed principal is unstaked from the delegation pools, tokens move from Active to Pending Inactive, indicating they are being prepared for withdrawal. Unstaking can occur for several reasons, for example, shifts in the collateral’s value relative to $SUPRA or user withdrawals from liquidity (collateral) pools, both of which may require realigning staked amounts with collateral value. **Inactive** - Staked $SUPRA (by PoEL) that is now withdrawable from the pool. After the lockup cycle, assets in Pending Inactive become withdrawable and enter Inactive state. ## Delegation Metrics ![Delegation Metrics](/images/proof-of-efficient-liquidity-poel/key-concept/delegation-metrics.png) Delegation metrics present the system’s delegation states and their historical values: **Borrowed Amount** — This metric counts all $SUPRA borrowed from PoEL vaults and staked in delegation pools, including tokens in active, pending_inactive, and inactive states. **Borrowable Amount** — Total $SUPRA deposited into the PoEL vault by the protocol governance from ecosystem funds, available to be borrowed as principal and delegated to the delegation pools. **Delegated Assets** — $SUPRA that, per system accounting, is delegated to pools and currently in the Active state. This accounting state is updated after each delegation or unstaking operation. **Staked Assets** — $SUPRA currently staked in delegation pools and in the Active state, as fetched from the pools. This amount includes accrued rewards,since rewards earned on tokens in the Active state are auto-added back into Active. **Available Liquidity** — The total nominal, $SUPRA-denominated value of user-supplied collateral in the liquidity pools. **Vault Balance** — The $SUPRA balance held in the PoEL vault, including available-to-borrow $SUPRA and any earned rewards that have been credited to the vault but not yet claimed by users. In the webpage charts, data can be aggregated by interval (e.g., weekly, monthly). When aggregation is applied, the value shown for each day or week is the period’s end-of-period value (the last entry of that interval). ## Staking Rewards for iAsset Holders ![Staking Rewards for iAsset Holders](/images/proof-of-efficient-liquidity-poel/key-concept/staking-rewards.png) Multiple factors can affect the rewards distributed per asset and, consequently, that asset’s APY. In the diagram above, Total Distributed Rewards shows the cumulative rewards paid to the specific iAsset holders over time. **Key drivers that affect the APY rate include (non-exhaustive):** - **Collateral vs. Borrowable Amount:** The relationship between total collateral supplied and the total borrowable SUPRA available in the system to match collateral with borrowable SUPRA. - **Portfolio Weight Deviation:** How far the asset’s current weight in the collateral portfolio is from its target (influences collateralization-rate dynamics). - **Stimulus Reward Rate:** The applied rate for incentivizing the submission of iAssets to liquidity pools of DeFi applications in the Supra ecosystem. - **Asset Desirability Score:** The priority or weighting assigned to the asset within the system, based on its value as a source of liquidity. - **Capital Efficiency Coefficient:** How efficiently the submitted collateral can be converted into productive yield. **These inputs jointly affect reward distribution and, therefore, realized APY. The displayed APY values are dynamic estimates and may differ from actual results.** ## Base APY Calculation Methodology ![APY Calculation](/images/proof-of-efficient-liquidity-poel/key-concept/calculation-mehodology.png) The displayed APY is a point-in-time estimate computed once per APY calculation window. **Formula** **APY = (SUPRA earned per iAsset unit over the window) \* (epochs per year) / (iAsset unit price in SUPRA \* window length)** Where: - **SUPRA earned per unit of iAsset** is measured over the current window and computed from the change in the global reward index (i.e., the per-unit rewards accrued during that window). - **window length** is a configurable parameter defined in epochs. - **epochs_per_year** is the annualization factor used to scale window returns to a yearly rate. - **iAsset unit price in SUPRA** is derived by: - calculating how much underlying asset is redeemable for a **unit of iAsset**, and - converting that value into **SUPRA** using prevailing price references. ### Why the APY Can Vary Because this APY is estimated over a discrete window and relies on price inputs, it may fluctuate due to several temporary factors, including (but not limited to): - **Price movement during the window:** If the underlying asset price and/or the SUPRA price is volatile, different operations may use price snapshots from different points in time. For example, the amount of SUPRA staked based on liquidity submitted to intralayer vaults (and therefore the staking rewards accrued) may be derived using one price snapshot, while the iAsset-to-SUPRA conversion used for the calculated APY may use a later snapshot. This timing mismatch can cause APY variations driven purely by price movements.- - **New collateral submissions and timing effects:** Newly submitted liquidity may start contributing to staking rewards (and those rewards may be distributed to existing iAsset holders) before that liquidity becomes eligible to mint iAssets, due to a waiting/eligibility period. As a result, rewards can temporarily increase without a corresponding increase in iAsset supply, inflating the measured per-unit rewards until minting catches up. **These and other dynamics can cause the displayed APY to deviate from a longer-term realized rate.** ## Total borrowable amount ![Stimulus Rewards](/images/proof-of-efficient-liquidity-poel/key-concept/stimulus-rewards.png) The total amount of $SUPRA available for borrowing is capped by protocol governance. Each epoch, the system aggregates all user-supplied collateral, converts it into $SUPRA-equivalent terms, and adjusts by the applicable collateralization rates. Based on this adjusted collateral value, the protocol determines how much $SUPRA can be borrowed and delegated to validator pools, generating staking rewards for iAsset holders. - If adjusted collateral < borrowable cap, the system borrows and delegates an equal amount of $SUPRA. - If adjusted collateral > borrowable cap, borrowing and delegation are capped, leaving excess collateral unmatched. This mechanism ensures predictable borrowing capacity, preventing reward dilution and reinforcing economic security. Governance retains flexibility to adjust the borrowable cap, directly influencing the scale of delegation and the APYs earned by iAsset holders. ## Asset Weights: Target vs. Current ![Reward Metrics](/images/proof-of-efficient-liquidity-poel/key-concept/target-vs.-current.png) Each collateral asset in the system has a target portfolio weight, designed to encourage diversification and strengthen Supra’s economic resilience. In practice, the actual composition of collateral may deviate from these targets. To correct imbalances, the system dynamically adjusts an asset’s collateralization rate. Specifically, as the Composition Gap (the difference between target weight and actual share) widens, the system raises that asset’s collateralization rate. A higher rate reduces its effective loan-to-value (LTV) ratio, which lowers the yield for a particular iAsset. This design creates market-driven incentives that nudge collateral supply toward the system’s optimal portfolio mix. Governance can fine-tune these parameters to maintain balance and resilience across the ecosystem. ![Reward Metrics](/images/proof-of-efficient-liquidity-poel/key-concept/target-vs.-current2.png) We calculate the collateralization rate for asset X as follows: ![Reward Metrics](/images/proof-of-efficient-liquidity-poel/key-concept/calculateX.png) Here, `p``min` represents the minimum applicable collateralization rate, while `p``I``max` and `p``II``max` are the maximum collateralization rates for the asset, corresponding to the second and third intervals of the function, respectively. `w``X`\*e represents target weights of asset `X` and `w``X``e` represents the weight of the asset in the collateral portfolio in e-th epoch. ## Asset desirability score An asset’s desirability score influences its APY relative to other admissible assets, which will have particular importance once the DFMM and other Supra native DeFi liquidity‑pool primitives are live. IntraLayer vaults will then function as both DFMM pools and liquidity sources for other protocols. Each asset’s desirability score is based on the aggregate capital efficiency of its pool, favoring higher-efficiency assets. ## Capital efficiency coefficient The protocol’s collateral pools would also act as shared liquidity for the DFMM and for other DeFi protocols that integrate with them as liquidity pools. To align rewards with capital efficiency and efficient utilization of the liquidity, the mechanism adaptively withholds or releases rewards over time: it distributes less when aggregate capital efficiency of whole system is below target and more when it is above target. Governance/admin-set parameters, and, in future, on-chain programmatic mechanisms, can control how deviations from the target efficiency translate into reward distribution. In PoEL, we introduce a governable minimum-payout floor and an efficiency-responsive release factor (capital efficiency coefficient), ensuring both liveness and efficiency alignment.
![Reward Metrics](/images/proof-of-efficient-liquidity-poel/key-concept/capital-efficiency-coefficient.png)
where r’i represents the distributable rewards after accounting for the capital efficiency coefficient in allocation cycle i; ri is the newly distributable rewards accrued in cycle i; pi is the minimum payout, i.e. the smallest portion of the distributable rewards that must be distributed in cycle i, which is governed by governance/admin; ci​ (capital-efficiency coefficient) scales the base amount ri, e.g., ci​=1.5 allows distributing 1.5×ri, limited by the remaining budget; bi is the reward budget carried forward from prior cycles where distributable rewards were withheld due to poor capital efficiency. **The reward budget then updates as:**
![Reward Metrics](/images/proof-of-efficient-liquidity-poel/key-concept/capital-efficiency-coefficient2.png)
## Stimulus Rewards ![Reward Metrics](/images/proof-of-efficient-liquidity-poel/key-concept/stimulus-reward.png) One of the main objectives of the PoEL protocol is to bootstrap Supra’s DeFi ecosystem by attracting a diversified set of collateral and establishing iAssets as a core, yield-bearing asset class. To achieve such adoption PoEL also encourages iAsset utility by incentivizing their use as liquidity across DeFi protocols. To that end, PoEL introduces a complementary lever: Stimulus Rewards, paid at a rate we refer to as - Stimulus Reward Rate. Stimulus Rewards are an earmarked budget of SUPRA distributed to the liquidity pools of DeFi applications, where iAssets have been submitted. These rewards are intended to be passed through to LPs (responsibility of DeFi apps), potentially increasing the effective yield for providing iAsset liquidity (on top of any fees those apps already pay to their LPs). The applicable rate for stimulus rewards, i.e. the Stimulus Reward Rate, is a configurable parameter (0–100%) that withholds a portion of the baseline rewards that would otherwise accrue directly to passive iAsset holders but is instead redirected to eligible liquidity pools in the form of Stimulus Rewards. **Operationally:** - A fraction of baseline rewards equal to the Reward-Reduction Rate is diverted into the Stimulus Rewards budget each epoch. - The budget is distributed to registered pool addresses of DeFi apps operating in Supra’s ecosystem, wherever iAssets are supplied as liquidity or as collateral - Integrated apps are expected to redistribute received rewards to their liquidity providers (pass-through), so that supplying iAssets to liquidity pools potentially is more attractive than simply holding them. - Governance/parameters (e.g., rate, pool eligibility, allocation weights) can be tuned over time to balance between rewarding passive holders and accelerating iAsset liquidity depth where it is most valuable. In short, PoEL channels part of the earned staking rewards toward active iAsset liquidity, amplifying TVL, market depth, and utility while keeping the mechanism transparent, configurable, and aligned with ecosystem growth. ## Stimulus Reward Distribution Mechanism The stimulus reward distribution mechanism may evolve, starting with a Merkle‑tree‑based approach. At regular intervals, the system computes the distributable rewards for each liquidity pool and updates that pool’s cumulative entitlement (i.e., total rewards accrued to date). To make distribution efficient and verifiable, the system encodes the snapshot into a Merkle tree, a cryptographic structure that proves “my entry is included” without storing the full list on‑chain. In this approach, each pool’s entry (address + cumulative amount) becomes a leaf. Leaves are combined layer by layer into a single root hash (a 32‑byte fingerprint of the list), which the system publishes on‑chain. This root commits to the snapshot’s contents. Note, that entitlements are computed off‑chain and may change over time, e.g., rewards could be allocated proportionally to the nominal value of iAssets held per pool or by other evolving criteria. In this approach, pools claim rewards by submitting their leaf hash (address + cumulative amount), a Merkle proof, and the current on‑chain root. The contract verifies the proof and, if valid, releases the allocable amount (new cumulative − previously claimed). This enables repeated claims without double‑counting. Backend automation may also claim on behalf of pools to streamline the process. ![Reward Metrics](/images/proof-of-efficient-liquidity-poel/key-concept/stimulus-reward-distribution-mechanism.png) **The screenshot above highlights two components:** ### Base APY - **Base APY** is a pool-level estimate calculated off-chain: a weighted average of each iAsset’s base APY (what passive holders earn from PoEL), weighted by the pool’s SUPRA-denominated nominal iAsset liquidity per iAsset. This is a point-in-time estimate, calculated based on the base APY of the iAssets(fetched from the PoEL modules) at the point of the root submission(or shortly after).
![Reward Metrics](/images/proof-of-efficient-liquidity-poel/key-concept/base-apy.png)
Where:
Li t\_1 is the nominal SUPRA-denominated liquidity of iAsset i at time t1, in a pool with N-many iAssets, and ai t\_1 is the base APY of the iAsset fetched from the PoEL modules at time t1.
### Stimulus-adjusted APY - **Stimulus-adjusted APY** is a pool-level estimate(calculated off-chain) of the total APY earned from the PoEL program by the pool(calculated for a particular period). It is computed at each Merkle root submission using the pool’s SUPRA-denominated nominal iAsset value(considering only iAssets and excluding any other asset types), the total distributable stimulus rewards, and the base APY of the pool.
![Reward Metrics](/images/proof-of-efficient-liquidity-poel/key-concept/stimulus-adjusted-apy.png)
Where: Rt_0,t_1 is the total stimulus rewards(in SUPRA) allocated to the pool for a particular period (t1-t0), Lit_1 is the nominal SUPRA-denominated liquidity of iAsset i at time t1 in a pool with N-many iAssets, t0 is the time of the previous merkel root submission, t1 is the time of the current merkel root submission, and τ is the annualisation constant(the length of a year). Estimates Only, Not Financial Advice. The APY figures shown are pool-level estimates calculated from the nominal iAsset value at each root submission; they are provided as-is and may be incomplete, delayed, rounded, or contain errors. They do not reflect user-specific (LP-level) outcomes. Nothing here is financial, investment, legal, tax, or accounting advice. No returns are guaranteed and past performance is not indicative of future results. Methods, inputs, annualization factors, and display logic may change without notice, and previously shown figures may be revised or corrected. These calculations exclude non-iAsset legs of LP positions (e.g., in an AMM pair, APY is computed only on the iAsset side because PoEL stimulus applies solely to iAssets). LP rewards, redistribution policies, fees, and timing are determined by the third-party DeFi application where you provided liquidity, so realized APY can differ from these estimates. Outcomes may vary due to market conditions, protocol upgrades, outages (including oracle disruptions),automation backend failures and other factors. For app-specific APY details, including PoEL rewards/APY and any fees received from deploying liquidity, refer to the application’s official documentation/website. By relying on these figures, you accept the associated risks and limitations. ## Reward Metrics ![Reward Metrics](/images/proof-of-efficient-liquidity-poel/key-concept/reward-metrics-aggregrate.png) Reward Metrics aggregate key reward metrics, including - **Allocated Reward Balance** — the total tokens earned by PoEL for users that have not yet been distributed. - **Reward Budget** — the carry-over budget from prior cycles in which distributions were withheld due to low capital efficiency. - **Stimulus Rewards Accumulated** — the total rewards earmarked as stimulus, pending allocation across liquidity pools to incentivize using iAssets as liquidity. - **Total Distributable Rewards** — the cumulative amount already distributed plus currently distributable to users, excluding stimulus rewards. ### Source: https://docs.supra.com/proof-of-efficient-liquidity-poel/iasset-minting-flow # iAsset Minting Flow This section explains how to mint iAsset on the Supra network, with each step of the minting process. Note: iAssets Minting can take up to 4 hours i.e. 2 EPOCHS ## Connect Your Ethereum Network Before initiating the transaction, you must connect your two wallets: | Wallet | Purpose | | ------------------------------------------------------------------ | ----------------------------------------------------------------- | | MetaMask (Ethereum), Starkey Wallet or any supported source wallet | Wallet used to deposit the source asset into the IntraLayer vault | | StarKey Wallet | To receive the minted iAssets on the Supra network | ### Getting Started: - Open the iAsset page. - Click "Connect Wallet" to the right of the From field. - Approve the MetaMask or StarKey pop-up to connect your Ethereum or Supra wallet. - Choose your Supra Wallet (StarKey) in the `To` field. **After successful bridging, your minted iAssets (e.g., iETH) will be credited to your address on the Supra blockchain.** ![Connect Ethereum Network](/images/proof-of-efficient-liquidity-poel/iasset-minting-flow/connect-your-ethereum-network.png) ### Initiating the Premint iAsset Bridge Transaction Once your wallets are connected, follow these steps under the iAsset Factory -> Mint: Step 1: Premint: 1. **Select the following options:** - **Source Chain:** Ethereum - **Destination Chain:** Supra - **Token:** - ETH → iETH - USDC → iUSDC - SolvBTC → iSolvBTC - SUPRA → iSUPRA (**Source Chain:** Supra) 2. **Enter the amount of ETH, USDC, SUPRA, or your chosen token to deposit for iAsset minting** 3. **Review the transaction details:** - Estimated bridge time - Service fee breakdown (displayed in iAsset, along with the source token) 4. **Click "Confirm" to proceed with cross-chain message transmission and asset pre-minting.** ![Premint iAsset Bridge Transaction](/images/proof-of-efficient-liquidity-poel/iasset-minting-flow/initiating-the-premint-iasset-bridge-transaction.png)
Image 1: ETH -> iETH
![Premint iAsset Bridge Transaction Supra](/images/proof-of-efficient-liquidity-poel/iasset-minting-flow/initiating-the-premint-iasset-bridge-transaction-supra.png)
Image 2: SUPRA -> iSUPRA (no cross-chain communication is required, as both assets are within one network)
### Confirm Transaction in Wallet Upon clicking "Confirm": - MetaMask prompts you to confirm the transaction. - Gas fees are shown (normal Ethereum OR Supra fees apply). - Approve and confirm the transaction.
![Confirm transaction](/images/proof-of-efficient-liquidity-poel/iasset-minting-flow/confirm-transaction-in-wallet.png)
### Token Minting and Fund Receipt Upon successful verification: - The iAsset (e.g., iETH) is pre-minted to the user’s Supra wallet address. ![Pre-minted iETH](/images/proof-of-efficient-liquidity-poel/iasset-minting-flow/token-minting-and-fund-receipt.png) ### Minting Pre-minted iAssets After pre-minting, the user must wait 2 epochs (about 4 hours) before minting the pre-minted assets. The UI shows a countdown timer. When it reaches zero, your dashboard will display a non-zero Mintable iAsset balance, and you can mint the pre-minted tokens. 1. **To Mint:** Select the following options: - **Chain:** Supra - **Token:** - iETH - iUSDC - iSolvBTC - iSUPRA 2. **Receive:** - The pre-minted amount based on the selected token will be displayed automatically. - This value is not editable by the user. 3. Click **"Submit"** then select "Confirm" in the Starkey wallet to mint the pre-minted tokens. After minting, both "pre-minted iAsset Balance" and "Mintable iAsset Balance" will be 0, and the minted iAssets will be added to "iAsset Balance." **Rewards accrue only after you mint your pre-minted iAsset. Please mint promptly to start earning!** ![Mint iAsset](/images/proof-of-efficient-liquidity-poel/iasset-minting-flow/minting-pre-minted-iassets.png)
### Source: https://docs.supra.com/proof-of-efficient-liquidity-poel/reward-claiming-flow # Reward Claiming Flow ## Update Rewards Guide Make sure your Starkey Wallet is connected, Rewards will be calculated based on the connected wallet’s iAsset holding history, and any withdrawn rewards will be distributed to that wallet address. All rewards are distributed on the Supra Network in **$SUPRA** ### Getting Started 1. Open the iAsset page. 2. Click "Connect Starkey Wallet". 3. Pick the iAsset for which you want to see rewards. 4. Once connected and asset is selected, your Allocable Rewards will auto-populate. 5. Click the "Submit" button. 6. If you have no Allocable Rewards, the "Next" button is disabled. After the transaction is confirmed, "Next" becomes enabled. 7. Click "Next" to proceed, or directly click the "Claim Rewards" step at the top. #### After Submission - The Next button will initially be disabled when you do not have Allocated Rewards. - Once the transaction is confirmed, the Next button will become enabled. - Click "Next" to proceed, or directly click the "Claim Rewards" step at the top. ### Right-Side Summary Panel You can view the following reward balances: - Allocable Reward Balance - Allocated Reward Balance - Claimed Reward Balance - Withdrawable Reward Balance - Withdrawn Reward Balance Once you complete the Update Rewards steps in the dashboard, the Allocable Reward Balance decreases and the Allocated Reward Balance increases. ![Reward Summary Panel](/images/reward-summary-panel.png) ## Claim Rewards Guide After completing the Update Rewards step: - The Next button will be enabled, or you can directly click the "Claim Rewards" label at the top of the stepper. - This will take you to the Claim Rewards section. - Your Starkey Wallet Address will be displayed. - Based on the connected wallet, your claimable rewards will be calculated and shown. - After reviewing the reward values, click "Submit" to initiate the claim transaction. ![Claim Rewards Section](/images/claim-rewards-section.png) After the Claim Rewards transaction succeeds, you must wait until the lockup cycle ends (see the countdown) before you can withdraw the claimed rewards. When the timer expires: - In the right-hand side, you can see an increase in the Withdrawable Reward Balance. - The "Next" button is enabled to proceed to the "Withdraw Rewards" step. ## Withdraw Rewards Guide: After completing the Claim Rewards step: - Your connected Starkey Wallet Address will be displayed. - Based on the wallet, your **Withdrawable Rewards** will be calculated and shown. - After verifying the reward values, click **"Submit"** to initiate the withdrawal transaction. ![Withdrawable Rewards](/images/withdrawable-rewards.png) ## Transaction Confirmation After clicking "Submit" to initiate the transaction: - Your wallet will prompt you to confirm the transaction. - After the transaction is confirmed, the rewards will be withdrawn and sent to the user's Starkey wallet address. ### Source: https://docs.supra.com/proof-of-efficient-liquidity-poel/add-iassets-to-starkey-wallet # Add iAssets to Starkey Wallet ### Open the Starkey Wallet app. ### Tap the "Manage Token" option (pencil icon). This will open the token management window.
![Manage Token](/images/proof-of-efficient-liquidity-poel/add-iassets-to-starkey-wallet/manage-token.png)
### Click the "+" (plus icon) to add a new custom token. In the new window: - Select the network as Supra. - Paste the contract address for the token you want to add (e.g., iETH, iUSDC, iSolvBTC, iSUPRA, etc.). ![Add Custom Token](/images/proof-of-efficient-liquidity-poel/add-iassets-to-starkey-wallet/add-custom-token.png)
![Add Custom Token 2](/images/proof-of-efficient-liquidity-poel/add-iassets-to-starkey-wallet/add-custom-token-2.png) ### Once the contract address is entered 1. The Token Name, Symbol, and Decimals will populate automatically. 2. Review the details and click Confirm.
![Add Custom Token Prepopulate](/images/proof-of-efficient-liquidity-poel/add-iassets-to-starkey-wallet/add-custom-token-prepopulate.png)
### After confirmation: The token will be added and shown on your wallet dashboard.
## Contract Address Details ### You can find the official contract addresses here: 🔗 [Supra Docs – Token Integration Guide](/proof-of-efficient-liquidity-poel/integration-guide) ### Source: https://docs.supra.com/proof-of-efficient-liquidity-poel/integration-guide # Integration Guide Please find the currently supported iAsset addresses in testnet below: ## Testnet | iAsset | Contract Address | | :----------- | :------------------------------------------------------------------- | | **iETH** | `0xe78614f0dca0a899d0994546a4db6a9372b31d23270a70874396a9d6998adba1` | | **iUSDC** | `0x7762f3583728573ad0e02367ba06d35fdd75bc6bac5985038d24f1fa4b3f661c` | | **iSOLVBTC** | `0x5e551a49289e147661c6c60fd01b12d8a02fe6946d52baeff6d662c0dae00469` | | **iSUPRA** | `0x7bc27446b62b0539e39b185551747b13368c1f26d30eaa62113f0a18de78eb0` | ## Mainnet | iAsset | Contract Address | | :--------- | :------------------------------------------------------------------- | | **iETH** | `0xa0040c97616048b6e0409e048d5f3cb9cfa0caa91dce0505390ac7ec8a132a86` | | **iUSDC** | `0x90a8e901e02ac1539af4a865bbe4a6b96edc27375488803cfbbd6875ec57b281` | | **iSUPRA** | `0x80f0251b74c76f1c477b9209ade65ffb5cfecd9b259875c3865ad645f6c33a3d` | | **iWBTC** | `0xbc8d1fb1ea5f22dd931935cbdcb128bbb205e567a6b5225fe6994f8bafc8702a` | | **iUSDT** | `0xceff14089bde0d4f512dcd3b6f3df6794346c58115b8d97e043f92ff08cd1fca` | **DeFi applications can support these assets in their liquidity pools to facilitate liquidity provision.** **Once liquidity providers deposit these assets, the LP pool contract becomes the asset holder and begins accruing PoEL rewards. DApps that support the asset should implement a mechanism to periodically claim PoEL rewards and redistribute them to their liquidity providers, to prevent liquidity provision from resulting in forgone rewards for LPs.** ### Source: https://docs.supra.com/proof-of-efficient-liquidity-poel/smart-contract-integration # Smart Contract Integration The system is composed of two main modules: **iAsset** and **PoEL**. -------- | ------------------------------------------------------------------ | ---------------------------------------------------------------------------------------------------------------------- | | **Testnet** | 0xc4a734e5b84deb218ab7ba5a46af45da54d5ff4aa8846e842c3ac2e32ce0eebd | https://testnet.suprascan.io/address/0xc4a734e5b84deb218ab7ba5a46af45da54d5ff4aa8846e842c3ac2e32ce0eebd/f?tab=modules` | | **Mainnet** | 0xda20f7d0ec813c751926f06004a10bc6ee1eefc96798f6a1aa31447ee146f932 | https://suprascan.io/address/0xda20f7d0ec813c751926f06004a10bc6ee1eefc96798f6a1aa31447ee146f932/f?tab=modules | ## Ethereum | Mainnet Deployed | Contract Address | | ------------------------- | -------------------------------------------- | | Multisig admin (9/16) | `0xb09eE905aFfb96E4da95D50ed946cDa696C8FF1D` | | FeeOperatorImpl | `0xB69e964cA6cD9D9E02202A636e222469b97D8e32` | | FeeOperatorProxy | `0x6CA8244fF976DCa12d0260662cCE4483b4945BFF` | | TokenBridgeImplementation | `0xE7Bb5770D83f42a96e62B3034643d92139477009` | | TokenBridgeProxy | `0x573330c2F115FB1C1fBa3220f072f2eF9F411eC2` | | VaultImplementation | `0x9C9D5879eB96a7A037eA2b58196e342e93D80004` | | VaultProxy | `0x548957c5b25f6831382D848b9806459cdfBD048E` | | TESTNET Deployed | Contract Address | | ------------------------- | -------------------------------------------- | | FeeOperatorImpl | `0x651b7a3a747CC75B33cEbF5c0740B69954EB5Bc0` | | FeeOperatorProxy | `0xcd06057e8642613C38b938EFbe4FB44734920e2a` | | TokenBridgeImplementation | `0x64ea2A2F3A9adADf42E21C7ed88fff5f87032990` | | TokenBridgeProxy | `0x7a5157c9A2F449f0EDDBa591327Ae1215c63ec75` | | VaultImplementation | `0x4efB9F7C6E1155E315c2dFEecEA0AEa7Bc88FD5F` | | VaultProxy | `0x70FeF9A2fF27Fd834E41D6b281A9e82Afc75305d` | dApps that hold iAssets (e.g., liquidity pools) and need to withdraw rewards periodically can use the following methods from the PoEL and iAsset modules. ## Methods Used During Integration | Method | In / Out | Comment | | ---------------------------------------------------------------------------------------------------------------------- | ---------------------------------------------------------------------------------------------------------------------------------------------------------------------------------------------------------------------------------------------------------------------------------------------------------------------------------------------------------------------------------------------------------------------------------------------------------------------------------------------------------------------------------------------------------------------------------- | ---------------------------------------------------------------------------------------------------------------------------------------- | | `View method`

**`get_user_rewards`**

(user_address: address): UserRewardsInfo | `in`

`user_address`:
address of the iasset holder

`out`
`UserRewardsInfo` object containing:

`Fields`:
• Allocated rewards for a user `allocated_rewards`: u64,
  • • Withdrawable (claimed) rewards for a user `withdrawable_rewards`: u64,
  • • Epoch when rewards were claimed (moved to withdrawable) `withdrawable_rewards_epoch`: u64,
  • • Timestamp when rewards were claimed (moved to withdrawable) `withdrawable_rewards_ts`: u64,
  • • Withdrawn rewards for a user `withdrawn_rewards`: u64
| Method returns total allocated rewards, withdrawable, withdrawn etc | | `View method`

**`get_allocatable_rewards`**

`(user_address: address, asset: Object): u64` | `in`

`user_address`:
address of the iasset holder

`asset`:
iasset object

`out`
amount of SUPRA coins | Return number of rewards could be allocated by calling method update_rewards | | `View method`

**`get_withdraw_timer_for_user`**

(user_address: address): u64 | `in`

`user_address`:
address of the iasset holder | Method is useful for the claim/withdraw scenario. This method indicates the remaining time to wait until withdraw_rewards can be invoked | ## PoEL Module | Method | In / Out | Comment | | ------------------------------------------------------ | ------------------------------------------------------------------------------------------------------------ | --------------------------------------------------------------------------------------------------------------- | | **`update_rewards`** (account: &signer, asset: Object) | `in`
`account`: signer who updates rewards

`asset`: iAsset object for which rewards are updated | Call when `get_allocatable_rewards` returns a non-zero value | | **`claim_rewards`** (account: &signer) | `in`
`account`: signer who claims allocated rewards | Call only when `allocated_rewards > 0` | | **`withdraw_rewards`** (account: &signer) | `in`
`account`: signer who withdraws claimed rewards | Method can be called if `withdrawable_rewards` not 0 (something claimed) and `Get_withdraw_timer_for_user` is 0 | ### Source: https://docs.supra.com/proof-of-efficient-liquidity-poel/roles-with-special-permissions # Roles with special permissions Currently The PoEL system spans two networks: - The Ethereum chain, where the Ethereum-specific IntraLayer Vaults reside. - The Supra network, where the PoEL and iAsset modules handle iAsset creation, SUPRA delegation and reward distribution. The roles with special permissions on both the Ethereum and Supra sides are outlined below. This overview may be incomplete, contain errors, or be outdated. For current information on roles and capabilities, refer to the project's [GitHub repository](https://github.com/Entropy-Foundation/IntraLayer/). ## Roles on Ethereum The primary role on the Ethereum side is the **Admin**. This role has distinct permissions across several contracts, including the IntraLayer Vault, the Token Bridge contract, and the Fee Operator contract responsible for fee calculations. All admin actions are currently executed by a 16-member multisig, and any change requires a 9-of-16 approval. Over time, some of these authorities are expected to be delegated or moved under Supra governance once that governance framework matures. | Role | Address(es) | | :-------- | :------------------------------------------- | | **admin** | `0xb09eE905aFfb96E4da95D50ed946cDa696C8FF1D` | This system also uses the Hypernova Bridge for cross-chain message transmission. You can find more information about it [HERE](/supranova/). ### Vault-Side Multisig Administration Within the vault contract, the Vault Admin functionalities include: 1. **Delegate Admin Capabilities:** Transfer these admin privileges to another address. This allows for future governance evolution without redeploying contracts. 2. **Pause Vault Contract:** Halts the Ethereum Vault (IntraLayer vault) contract, effectively pausing all token bridging operations originating from the system's Ethereum users. 3. **Set Transfer and Vault Caps:** Configure per-transfer amount limits and total vault capacity limits per token. This mitigates risk from large-scale exploits or imbalances by enforcing economic bounds on iAssets. 4. **Set Token Bridge Contract:** Point the Vault to a new Token Bridge Service contract, used to rotate/upgrade the bridge. 5. **Emergency Withdrawal (Temporary Feature):** Conduct withdrawals from the Ethereum Vault (IntraLayer vault) which holds users' deposited underlying assets used only for crisis response or governance-approved migrations (e.g., when a future DFMM release requires replacing the current vault implementation). a. **Process:** Requires two sequential transactions: - **Request Transaction:** Initiates the withdrawal request. - **Execution Transaction:** Executes the withdrawal, transferring funds from the Vault to the specified destination address. b. **Safeguard:** Per the contract, execution is permitted after a minimum 1-week delay from the initial request, providing a window for community review and intervention. 6. **Upgrade Vault Implementation:** Replace the Vault's logic contract behind the proxy, updating functionality without changing the proxy address or stored state. Used to deploy fixes or new features while preserving asset balances and configurations. ### Administrative Operations on the Token-Bridge Side On the token-bridge (and hypernova) side, admin capabilities include: 1. **Transfer Admin Privileges:** Delegate or transfer these Token Bridge admin privileges to another wallet address, enabling seamless transition of governance rights. 2. **Update Configuration Parameters:** Modify bridge-specific settings (specific to PoEL system), such as transaction fees, to adapt to system conditions or economic models. 3. **Set Fee Operator and Vault Address:** Assign/change the fee-logic operator. Controls fee calculation/validation used during transfers. Reconfigure which Vault contract holds locked funds. 4. **Set Native Token:** Update the bridge's canonical native-token address (usually the wrapped native coin, e.g., WETH). 5. **Token Registration:** Adding a new token on Ethereum requires coordinated approvals on both the Vault and the Bridge side. Admins can add or remove a token for bridging to a specific chain (specifying Uniswap V3 pool ID as price reference). Admin can also add or remove a token for bridging to a specific chain with fixed service/relayer fees. 6. **Register/Unregister Destination Chain:** Enable or disable bridging to a specific chain, controlling which chains the system will service. 7. **Set Hypernova Endpoint:** Point the bridge to a new Hypernova messaging/config contract, future operations reference this updated endpoint. 8. **Upgrade Implementation:** Replace the bridge's logic contract while preserving storage/state, enabling feature updates or fixes. 9. **Pause/Unpause Bridge:** Toggle the global operational state, when paused, new bridge actions of the system are halted until re-enabled. ### Admin Functions on the Fee-Operator Side On the fee-operator side, admin capabilities include: 1. **Set Admin:** Replace the Fee Operator's admin address, transferring administrative control as protocol governance and management evolve. 2. **Set Hypernova Endpoint:** Point the Fee Operator to a new Hypernova messaging/config contract. Future fee computations will reference the updated Hypernova config. 3. **Set S-Value Feed (+ Pair Index):** Update the on-chain price feed source and the SUPRA/USDT pair index used in fee calculations. Affects conversion of relayer rewards and service fees into the bridged (applied as liquidity) asset units. 4. **Add or Update Transfer-Bridge Fee Config:** Create or modify the fee configuration for the chains. 5. **Pause/Unpause Fee Operator:** Toggle the global paused state of the contract, halting operational fee computation. ## Roles on the Supra Side PoEL on the Supra side defines three roles: - **Deployer** - While not a formal PoEL role, the deployer can upgrade modules by publishing a new package version to the PoEL package address - **Owner** – The ultimate steward. Grants and revokes administrative powers, and authorizes movement of borrowable amounts into and out of the system. In the long run, once full network governance is live, this authority is expected to transition to (or be determined by) on-chain governance - **Admin** – Enables/disables features, updates configurations, and onboards new assets, etc. This role is expected to be assigned by the owner to the entity responsible for system administration. - **Pool Manager** – Operations role focused on selecting the delegation pools the PoEL system interacts with. In future versions, this authority is envisioned to be granted to a collective governance system, enabling iAsset holders to decide which pools receive delegation and which are replaced based on their expectations of validator performance. Presently, all roles are assumed by multisig addresses with similar membership setup: a 16-member committee where 9 of 16 signatures are required for any administrative action. | Role | Multisig Address | | ------------ | ------------------------------------------------------------------------------------------------------------------------------------------- | | Deployer | 0xda20f7d0ec813c751926f06004a10bc6ee1eefc96798f6a1aa31447ee146f932 | | Owner | 0xda20f7d0ec813c751926f06004a10bc6ee1eefc96798f6a1aa31447ee146f932
0xfcd4f9272b20ddc08bbd0614b3dda632930889ea9ba307574ec12d9273d9a3f2 | | Admin | 0xda20f7d0ec813c751926f06004a10bc6ee1eefc96798f6a1aa31447ee146f932 | | Pool Manager | 0xda20f7d0ec813c751926f06004a10bc6ee1eefc96798f6a1aa31447ee146f932 | **Below, we break down the capabilities of contract-defined roles.** ### Owner Role The Owner role includes: 1. **Emergency Withdrawal (Temporary Feature):** Conduct withdrawals from the Supra vault (IntraLayer vault)—which holds users' deposited underlying assets—used only for crisis response or governance-approved migrations (e.g., when a future DFMM release requires replacing the current vault implementation). **Process: It is a 2-step process:** - **Request Transaction:** Initiates the withdrawal request. - **Execution Transaction:** Executes the withdrawal, transferring funds from the Vault to the specified destination address. **Safeguard:** Per the contract, execution is permitted after a minimum 1-week delay from the initial request, providing a window for community review and intervention. 2. **Appoint and Remove Admins and Owner:** Add multisig addresses to the Admin set so they can perform operational tasks defined by the protocol. Revoke Admin access when it is no longer appropriate. (e.g., key rotation, role changes, or security concerns). The deployer also has the exclusive right to designate other owners. 3. **Appoint and Remove Pool Manager:** Granting or revoking the Delegation Pools role for specified addresses. 4. **Set the Withdrawal Address:** Update the address that receives withdrawn SUPRA (e.g., when decreasing borrowable amounts or withdrawing surplus rewards). 5. **Update Oracle Pair IDs:** Refresh the price-oracle pair IDs for selected iAssets to keep pricing and indexation current. 6. **Increase Borrowable Capacity:** Transfer SUPRA into the PoEL vault to raise the protocol's total borrowable amount. 7. **Decrease Borrowable Capacity:** Reduce the protocol's total borrowable amount, immediately forwarding available principal to the withdrawal address and scheduling any shortfall to be unlocked from delegation pools. 8. **Withdraw Surplus Rewards:** Send excess staking-reward proceeds (not principal or rewards not allocable to users) from the PoEL vault to the withdrawal address. ### Admin Role The functions covered by Admin role include: - **Set Service-Fee Address:** Update the address that receives the protocol's service-fee charged in iAssets. - **Set Stimulus Rewards-Distribution Address:** Update the address that receives withdrawn stimulus reward funds. - **Enable/Disable Reward Allocation:** Turn the rewards-allocation process on or off. - **Update System Parameters:** Modify global settings, including collateralization rate related coefficients, epoch length, lockup-cycle length, APY window (in epochs), reward-reduction rate, per-pool max delegation cap, smallest distributable-rewards portion, minimum rewards threshold to distribute, minimum allocation frequency, and lockup cycle length (in epochs). - **Change verification policy:** Update the method used to verify cross-chain messages and adjust its safety level, applies to future message processing. - **Pause or resume operations:** Temporarily halt or resume processing of incoming bridge messages to manage incidents or maintenance. - **Initialize Delegation Pools:** Register the initial set of validator delegation pools used by PoEL. - **Create New iAsset:** Deploy a new iAsset (name, symbol, pair ID, metadata, and source-bridge details) in the system. - **Update Desired Weights:** Adjust per-iAsset target weights in the liquidity portfolio that inform collateralization-rate calculations. - **Update Desirability Scores:** Tune per-iAsset desirability scores that influence reward distribution proportions. Desirability weights are intended to be tuned algorithmically by a separate module in the future. - **Pause/Unpause an iAsset:** Temporarily halt or resume actions for a specific iAsset. - **Set Redeemable Flag:** Enable or disable redemption for a specific iAsset. - **Freeze/Unfreeze Account:** Block or restore a specific user's ability to interact with a given iAsset. - **Update Capital-Efficiency Coefficient:** Set the coefficient used in reward-allocation math to modulate effective rewards based on capital efficiency. Capital-Efficiency Coefficient is intended to be tuned algorithmically by a separate module in the future. - **Set Service Fees:** Configure global protocol fees for Supra-native assets used as underlying liquidity, deposit, redeem on Supra, and redeem to external chains. - **Register Supported Assets:** Add a fungible asset (FA native to Supra) to the list of collateral iAssets allowed for deposits/withdrawals. - **Deregister Assets:** Remove an FA (native to Supra) from the supported list, preventing new deposits/withdrawals for that asset. - **Set Per-Asset Deposit Limit:** Define or update a deposit cap for a specific FA. Enforced during deposit flow. - **Enable/Disable Deposits:** Toggle whether the system accepts any deposits across Supra native assets submitted as liquidity to intralayer vaults. - **Enable/Disable Withdrawals:** Toggle whether withdrawals are allowed across Supra native assets submitted as liquidity to intralayer vaults. ### Pool Manager Role - **Submit Delegation-Pool Replacement Request:** Propose removing a currently-used delegation pool from the PoEL system. Triggers an unlock of that pool's active stake and records the request for processing after the lockup cycle ends. - **Execute Delegation-Pool Replacement:** After the relevant lockup cycle completes, withdraw the unlocked stake from the old pool and delegate it to the new pool. --- ## AI Agents ### Source: https://docs.supra.com/ai-agents # Your First AI Agent on Supra In this guide, you’ll learn how to build and run your first Supra AI Agent, an interactive agent that communicates with the Supra Network and capable of: - Creating a new account on Supra Network. - Fetching your account balance. - Funding your account via faucet - Retrieving transaction details by transaction hash - Retrieving your transaction history - Fetching on‑chain resource data of your account. ## Why Choose Supra for AI Agents? Supra’s vertically integrated infrastructure, plus tight coupling of OpenBlocks.ai at its core, creates the most complete environment for AI Agents to flourish in a multi-chain DeFi world. With real-time data through Supra’s built-in Oracles, native automation, cross-chain communication, and seamless execution all in one stack, Supra will allow your AI Agent to operate at peak intelligence and speed. Supra is the first platform where strategy becomes execution without friction. In a world of fragmented tools, Supra delivers the one thing AI Agents truly need: a unified infrastructure to execute your intent at the speed of light. --- ### Source: https://docs.supra.com/ai-agents/setting-up-your-agent # Setting up your Agent ## Prerequisites Before getting started, make sure you have the following installed: - Node.js - [NVM installed](https://github.com/coreybutler/nvm-windows/releases) ## Project Setup #### **Clone This Repo** ```bash git clone https://github.com/Supra-Labs/Supra-agents-hub.git ``` #### **Navigate into Agents sub-dir & Open Target Agent Directory.** ```bash cd Supra-agents-hub cd Agents cd SupraOnChainAgent ``` #### **Install Dependencies** ```bash npm install ``` #### **Running Your Agent** ```bash npx tsx agent.ts ``` **You should see a welcome message with your generated account address and list of available commands.** *Sample Output* below: ```bash $ npx tsx agent.ts *** Welcome to SupraOnChainAgent *** Initializing Supra Client... Connected to network with chain ID: _ChainId { value: 6 } Loaded existing account from account.json Your Supra Account Address: 0x26b58df6a3716bc16de96d6aa5fa60c1cf12e0854e8983b4a6d0a4a9548c218d Available commands: - 'what is the balance of my account' : Fetch account info & balance - 'please fund my account' : Fund account via faucet - 'show me transaction details for ': Fetch transaction details - 'what is my transaction history' : Retrieve transaction history - 'show my account resources' : Fetch resource data - 'help' : Show this help message - 'exit' : Quit the agent SupraOnChainAgent> ``` **The agent will carry out the corresponding blockchain operations using the Supra-L1-SDK.** ### Source: https://docs.supra.com/ai-agents/interacting-with-the-agent # Interacting with the Agent #### **Wallet Creation** ```bash $ npx ts-node agent.ts *** Welcome to SupraOnChainAgent *** Initializing Supra Client... Connected to network with chain ID: _ChainId { value: 8 } Loaded existing account from account.json Your Supra Account Address: 0x26b58df6a3716bc16de96d6aa5fa60c1cf12e0854e8983b4a6d0a4a9548c218d ``` #### **Fetching the Wallet Balance** **Make sure you fund your wallet via Faucet else it won't be showing registered on chain.** ```bash Supra OnChain Agent> what is the balance of my account Address : 0x26b58df6a3716bc16de96d6aa5fa60c1cf12e0854e8983b4a6d0a4a9548c218d Sequence Number : 0n Authentication Key: 0x26b58df6a3716bc16de96d6aa5fa60c1cf12e0854e8983b4a6d0a4a9548c218d Balance : 1000000000 --------------------- ``` #### **Funding Wallet.** ```bash Supra OnChain Agent> please fund my account Requesting funds via faucet... Faucet Response: { status: 'Success', transactionHash: '0x866984a1ae3b3225379b0aa77f83f25a169faef6c605d22da8df8c51ab196a0f' } Updated Account Balance: 1500000000 ``` #### **Transaction History of an account.** ```bash Supra OnChain Agent> what is my transaction history --- Transaction History --- // Your History --------------------------- ``` #### **Fetching Transaction details based on its TXN Hash.** ```bash Supra OnChain Agent> show me transaction details for 0x0eddc65189edae437e326908f9039f046801eec8db8a08e5b01b0a75b7dfd46a --- Transaction Details --- { "txHash": "0x0eddc65189edae437e326908f9039f046801eec8db8a08e5b01b0a75b7dfd46a", "sender": "0x6f12b0fe05ba8796c0455981c88c99a11539ef205723a1740fc7dd72cb98520f", "sequenceNumber": 1553378, "maxGasAmount": 500000, "gasUnitPrice": 100, "gasUsed": 35, "transactionCost": 3500, "txExpirationTimestamp": 1747814148000000, "txConfirmationTime": 1747813849978867, "status": "Success", "events": [ { "guid": { "creation_number": "0", "account_address": "0x0" }, "sequence_number": "0", "type": "0x1::coin::CoinWithdraw", "data": { "account": "0x6f12b0fe05ba8796c0455981c88c99a11539ef205723a1740fc7dd72cb98520f", "amount": "518227", "coin_type": "0x8ede5b689d5ac487c3ee48ceabe28ae061be74071c86ffe523b7f42acda2fcb7::test_usdc::TestUSDC" } } ``` #### **Looking for Resources in your account** ```bash Supra OnChain Agent> show my account resources --- Account Resources --- { "resource": [ [ "0x0000000000000000000000000000000000000000000000000000000000000001::account::Account", { "address": "0000000000000000000000000000000000000000000000000000000000000001", "module": "account", "name": "Account", "type_args": [] } ], [ "0x0000000000000000000000000000000000000000000000000000000000000001::coin::CoinStore<0000000000000000000000000000000000000000000000000000000000000001::supra_coin::SupraCoin>", { "address": "0000000000000000000000000000000000000000000000000000000000000001", "module": "coin", "name": "CoinStore", "type_args": [ { "struct": { "address": "0000000000000000000000000000000000000000000000000000000000000001", "module": "supra_coin", "name": "SupraCoin", "type_args": [] } } ] } ] ], "cursor": "0026b58df6a3716bc16de96d6aa5fa60c1cf12e0854e8983b4a6d0a4a9548c218d6801000000000000000000000000000000000000000000000000000000000000000104636f696e09436f696e53746f7265010700000000000000000000000000000000000000000000000000000000000000010a73757072615f636f696e095375707261436f696e0000" } ------------------------- ``` ## Conclusion Congratulations on building your first Supra Agent! This guide serves as a starting point in your journey into the Supra ecosystem. --- ### Want to create more AI Agents on Supra? Our Agents Hub is live with multiple AI Agent templates to help you get started.
} description="https://github.com/Supra-Labs/Supra-agents-hub" href="https://github.com/Supra-Labs/Supra-agents-hub" target="_blank" descriptionClass="underline underline-offset-2 text-supra-red" className="[&>span>img]:w-[204px] [&>span>img]:object-cover [&>span>img]:h-[110px] w-fit" /> --- ## Audit Reports ### Source: https://docs.supra.com/audit-reports # Audit Reports We treat security as a continuous journey of monitoring, testing, and improvement not a destination. We ensure the integrity and safety of our platform through comprehensive security audits conducted at intervals, we evaluate our infrastructure to identify potential vulnerabilities before they can be exploited. When issues are discovered, we take immediate action to remediate them, implementing robust fixes and enhanced protective measures. This proactive approach allows us to stay ahead of emerging threats and maintain the highest standards of protection for our users. Explore our detailed audit reports below for complete transparency into our security practices and findings. ## Supra L1 > In-Progress ## dVRF (Verifiable Randomness) | Product | Codebase | Report Link | | :--------------- | :------------------------- | :--------------------------------------------------------------------------------------------------------- | | **Pull VRF 1.0** | Solidity SC | [Read Audit Report](https://drive.google.com/file/d/1_3vfUYaO1xqtNjnZ7FFozV6sKGQCHRQR/view?usp=drive_link) | | **Pull VRF 1.0** | RUST Code (VRF, Free Node) | [Read Audit Report](https://drive.google.com/file/d/1qRDkHVC1Oz5VUv4zZlMv_4EHuTgGaMt2/view?usp=drive_link) | | **Pull VRF 2.0** | Solidity SC | [Read Audit Report](https://drive.google.com/file/d/19SuwPUo5fviU3eEy2-X0mdGP7x-9dCpn/view?usp=drive_link) | | **Pull VRF 2.0** | Move SC | [Read Audit Report](https://drive.google.com/file/d/1XGnPZiOwK9f6-3jwXagqhMMWptwPeMNQ/view?usp=drive_link) | | **Pull VRF 2.1** | Solidity SC | [Read Audit Report](https://drive.google.com/file/d/1lFSaHWYgtzmMK8Olosw8nqL32-kGIWGW/view?usp=drive_link) | ## Supra Oracles (DORA) | Product | Codebase | Report Link | | -------- | ----------- | -------------------------------------------------------------------------------------------------------------------------------------------------------------------------------------------------------------------------------------------------------------------------------------------------------------------------------------------------------------------------------------------------------------------------------------------------------------------------------------- | | DORA 1.0 | Solidity SC | [Read Audit Report](https://drive.google.com/file/d/1jBfluUwsib-WDlfhUjPHT02JFUKvRm_n/view?usp=drive_link) | | | Move SC |

Aptos:
[Read Audit Report](https://drive.google.com/file/d/1Bza6LiSJp2hFCMFXYEcTRZmkzNN5K90-/view?usp=drive_link)

SUI:
[Read Audit Report](https://drive.google.com/file/d/1F9Ch7GZLT71S61NmJRfz7AlQMJ5cUjuA/view?usp=drive_link)

| | DORA 1.1 | Solidity SC |

HCC:
[Read Audit Report](https://drive.google.com/file/d/1-aPto1BTOOxAQjPhu-vqAd3oZEVdBrPg/view?usp=drive_link)

Derived Pair + HCC:

[Read Audit Report](https://drive.google.com/file/d/1DtIBZk88j8UXcBGY1C8Fd4T5jfgYiEFL/view?usp=drive_link)

Derived Pair + Proxy Improved:
[Read Audit Report](https://drive.google.com/file/d/1SRCiWmKaagMMZZnUSMiszVO-mBjeg2Tn/view?usp=drive_link)

| | | Move SC | [Read Audit Report](https://drive.google.com/file/d/126SsYZbNiz_hIvR85PONw7A7-BlZLlDx/view) | | DORA 2.0 | Solidity SC | [Read Audit Report](https://drive.google.com/file/d/1rYmIqrhiKcimioUN5UpkKSfK_R9Msxr8/view) | | | Move SC | [Read Audit Report](https://drive.google.com/file/d/1pb_i4wdRD2HfzLhlvTYRMqkaVimau6za/view) | | | Radix SC | [Read Audit Report](https://drive.google.com/file/d/1DFhI8iuta1gvbNMS3H9ds-xeU_gnr2Oa/view) | | | CosmWasm SC | [Read Audit Report](https://drive.google.com/file/d/14qKQ5BJECynSZVHeWG1W45tpcE-bsS57/view) | ## iAssets (Proof of Efficient Liquidity) | Product | Audited by | Codebase | Report Link | | :------- | :--------- | :------- | :------------------------------------------------------------------------------------------ | | **PoEL** | RektProof | Scope | [Read Audit Report](https://drive.google.com/file/d/1kv9sZGZHXeVtkU5S5NywUGrK4ijdWMdw/view) | ## SupraNova | Product | Audited by | Scope | Report Link | | :------------ | :---------- | :---------- | :------------------------------------------------------------------------------------------ | | **SupraNova** | RektProof | Move SC | [Read Audit Report](https://drive.google.com/file/d/1Pjtm7e3y6yubJYnNBdrCLUBRyOkIQsZs/view) | | | RektProof | Solidity SC | [Read Audit Report](https://drive.google.com/file/d/1XWJuig6tpk6dqckvhir2abb-jszNPFN1/view) | | | QuillAudits | Solidity SC | [Read Audit Report](https://drive.google.com/file/d/1j6IvaktmknjdjxmxwjLv8VmcsqVDeMsw/view) | ## StarKey Wallet | Product | Codebase | Report Link | | :--------- | :------------ | :--------------------------------------------------------------------------------------------------------- | | **Wallet** | Web Extension | [Read Audit Report](https://drive.google.com/file/d/1OxJFU6LVRd8tb8oJRREZ5WYVwQ4OWq4u/view?usp=drive_link) | | **Wallet** | Mobile App | [Read Audit Report](https://drive.google.com/file/d/1gfFiQVxkbV62puOPu39qci__RN5JAPnz/view?usp=drive_link) |