Bridging Flow
This section explains how to use the SupraNova Bridge dApp to bridge ETH from Ethereum to supETH on Supra network, with each technical stage explained clearly.
Connecting Your Wallets
Before initiating a bridge transaction, you must connect two wallets:
| Wallet | Purpose |
|---|---|
| MetaMask (Ethereum) | Send ETH and sign the bridge transaction |
| Supra Wallet (StarKey) | Receive supETH on Supra |
Getting Started:
- Open the SupraNova Bridge dApp.
- Click “Connect Wallet” on the top right corner.
- Approve the MetaMask pop-up to connect your Ethereum wallet.
- Choose your Supra Wallet (StarKey Wallet) or manually enter a recipient address using the “Type Recipient Address” toggle.
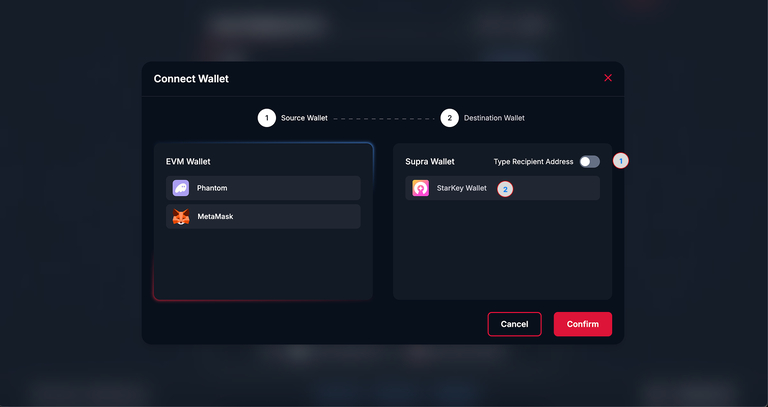
- The Supra Wallet is where your minted supETH will arrive after successful bridging.
- Make sure the address is correct before proceeding.
Initiating the Bridge Transaction
After wallets are connected, follow these steps.
Under the Bridge tab, select:
- Source Chain: Ethereum
- Destination Chain: Supra
- Token: ETH → supETH
- Enter the amount of ETH you wish to bridge.
Review:
- Estimated bridge time
- Bridge fee breakdown (in ETH and $SUPRA)
Click “Confirm” to proceed.
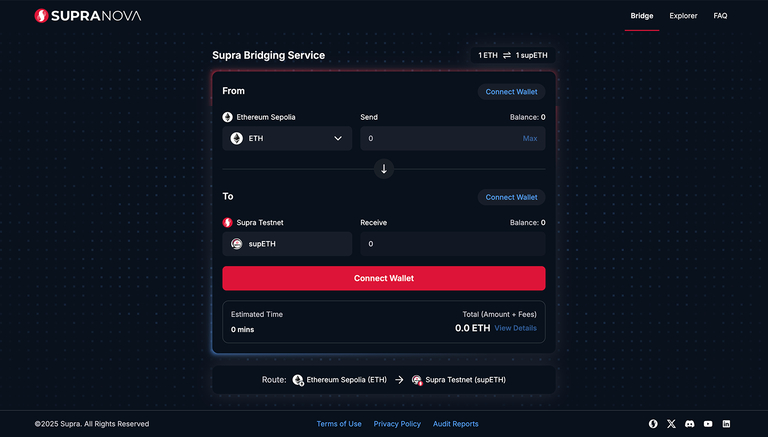
This action calls the HyperNovaCore smart contract on Ethereum, locking your ETH and emitting a LOGX event signaling a bridge request.
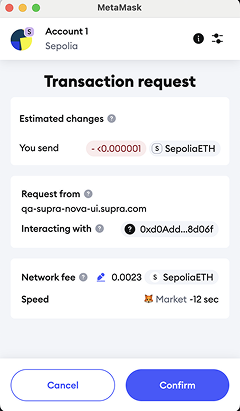
MetaMask Transaction Confirmation
Upon clicking “Confirm”:
- MetaMask prompts you to confirm the transaction.
- Gas fees are shown (normal Ethereum fees apply).
- Approve and confirm the transaction
Event Capture and Proof Generation by Relayer
After the bridge event is emitted, The Event Listener captures the bridge event from the ethereum chain and stores it in a message queue. The Relayer Driver then consumes the event, detects the bridge event from the Ethereum chain.
It generates the following proofs:
- Sync Committee Proof – Block signed by the Sync Committee
- Receipt Proof – Proof that the transaction succeeded
- Ancestry Proof (if the block lacks enough signatures)
If required, Ancestry Proof connects the event’s block to a more recent, heavily signed block.
The Technical flow is as follows:
Ethereum Event → Relayer captures → Builds Proof Bundle → Prepares Submission to Supra
Proof Submission and On-Chain Verification
Once proofs are generated:
- The Relayer submits the proof bundle to Supra’s HyperNovaCore verifier smart contract.
- The verifier checks:
- Validity of the block header signatures
- Correctness of transaction existence and execution
- Authenticity of the event data (right source, token, amount, recipient)
If all checks pass, the verifier marks the bridge request as valid.
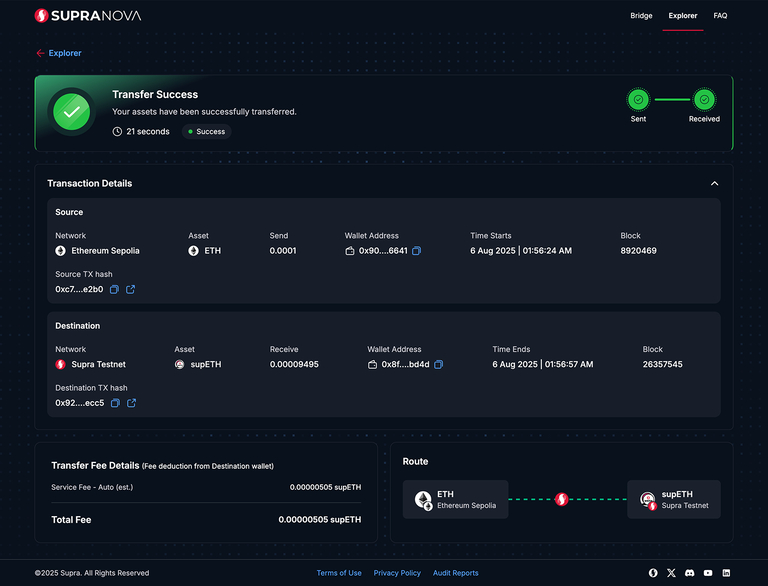
Token Minting and Fund Receipt
Upon successful verification:
- The Token Bridge Service Contract is triggered.
- Supra Wrapped ETH (supETH) is minted on Supra in a 1:1 ratio to the locked ETH.
- The minted supETH is sent to your connected (or specified) Supra Wallet address.
You can now:
- View transaction history under Explorer > My Transactions.
Transaction Lifecycle Summary
| Stage | System Action | User Action |
|---|---|---|
| Wallet Connection | Connect MetaMask and Supra Wallet | Click Connect Wallet |
| Initiate Bridge | Lock ETH on Ethereum | Enter Amount, Confirm |
| Event Emission | Emit bridge request log | Wait |
| Relayer Proofs | Generate Sync, Receipt, Ancestry proofs | Wait |
| Supra Verification | Validate proofs on-chain | Monitor Explorer |
| Token Mint | Mint supETH to recipient wallet | Receive tokens |
During Bridging these are the in-built safeguards:
- Incomplete Proofs: Bridge request remains pending until sufficient proofs arrive.
- Relayer Failure: Another permissionless relayer can submit the proof.
- Committee Key Rotation: If Sync Committee public keys expire, Committee Updater submits fresh keys to Supra automatically.